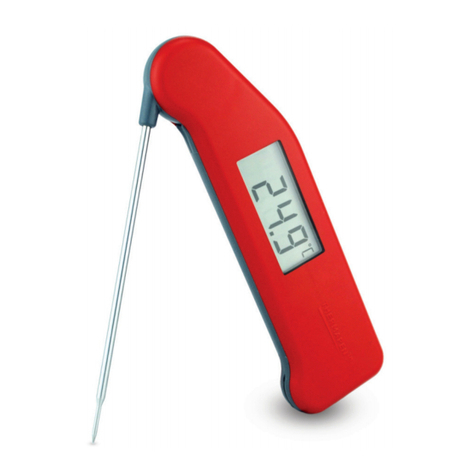
ETI TempTest 1 User manual

INSTRUMENT OPERATION - Switch the instrument on and
apply the tip of the probe to the substance or medium
being measured. The instrument reading may take a
few seconds to stabilise, depending on the nature of the
measurement and sensitivity of the probe.
AUTO-OFF - The unit will automatically turn off after
10 minutes to maximise the battery life. This function
can be disabled. To disable the auto off function, switch
the unit off, then press and hold the HOLD/LOCK and
ON/OFF buttons at the same time - 'auto off disabled'
will scroll across the screen. Once the unit is switched off
it will revert to the auto off function being enabled.
ROTATIONAL DISPLAY - The unit’s display will rotate
through 90° with each turn so that it can be used at
any angle or either hand. This function can be disabled.
Press and hold the LOCK button for 3 seconds to lock
the orientation of the display, 'Loc on' will be displayed.
To enable this function, repeat as before and 'Loc oFF'
will be displayed.
SMART BACKLIGHT - The unit incorporates a smart
backlight which automatically switches on when the unit
is being used in low light conditions. The backlight will
activate for 10 seconds. Please note the light sensor is
incorporated in the 'o' in the smart thermometer label.
MAX/MIN - Press the MAX/MIN button to display the
values. The instrument retains the max/min values when
switched off. To reset, press the MAX/MIN button for
three seconds, 'rst' will be displayed. Please note whilst
in the MAX/MIN mode, the instrument will continue to
measure.
HOLD - Press the HOLD button to retain the last
temperature measured, HOLD will be displayed. To
continue to measure, press the HOLD button again.
°C/°F- With the unit switched off, press and hold the
ON/OFF button for 5 seconds to change between
°C and °F. Once changed, the unit will remain in the
selected value.
BATTERY REPLACEMENT - The low battery symbol
will indicate when the batteries need replacing. The
instrument continues to measure accurately but we
recommend that the batteries are changed as soon as
possible. To replace the batteries, remove the battery
cover on the bottom using a pozi screwdriver. Replace
the AAA batteries ensuring that polarity is correct.
Replace the cover and tighten to ensure the unit remains
waterproof. The cover can only be fitted one way.
Please note: If the batteries are removed, modes set
such as Lock and Max/Min will be reset to the default
setting.
INSTRUMENT CLEANING - Clean the instrument
regularly with an anti-bacterial probe wipe to avoid
potential food-borne bacteria growth.
WARNING: IPA and other solvents may cause damage to
the case and screen of this instrument.
ERROR MESSAGES - 'Lo' will be displayed if you are
measuring below the instrument's range. 'Hi' will be
displayed if you are measuring above the instrument's
range. 'Err' will be displayed if the probe develops a
fault. If the error message remains, contact our service
department for further assistance.
FR - INSTRUMENT OPERATION - Allumez l’instrument et
placez l’extrémité de la sonde à la substance ou au fluide
à mesurer. La lecture de l’instrument peut mettre quelques
secondes à se stabiliser, en fonction de sa nature de la
mesure et de la sensibilité de la sonde.
AUTO-OFF - L’unité va automatiquement se mettre hors
service après 10 minutes pour optimiser la durée de
vie des piles. Cette fonction peut être désactivée. Pour
désactiver la fonction de mise hors service automatique,
éteignez l’unité, puis appuyez et maintenez simultanément
les boutons HOLD/LOCK et ON/OFF - 'auto off disabled'
(mise au service automatique) va défiler à l’écran. Une fois
l’unité éteinte, elle va revenir au réglage par défaut avec la
fonction mise hors service automatique activée.
AFFICHAGE ROTARIF - L’affichage de l’unité va tourner
de 90° à chaque tour afin qu’elle puisse être utilisée sous
n’importe quel angle ou avec n’importe quelle main. Cette
fonction peut être désactivée. Appuyez et maintenez le bouton
LOCK pendant 3 secondes pour verrouiller l’orientation de
l’affichage, 'Loc on' (verrouillage activé) va s’afficher. Pour
active cette fonction, répétez comme précédemment et 'Loc
oFF' (verrouillage désactivé) va s’afficher.
RÉTROÉCLAIRAGE INTELLIGENT - L’unité comporte un
rétroéclairage intelligent qui s’allume automatiquement
lorsque l’unité est utilise dans des conditions de faible
luminosité. Le rétroéclairage va être actif pendant
10 secondes. Notez que le capteur de lumière est incorporé
dans le 'o' de l’étiquette du thermomètre intelligent.
MAX/MIN - Appuyez sur le bouton MAX/MIN pour afficher
les valeurs. L’instrument conserve les valeurs max/min
lorsqu’il est éteint. Pour réinitialiser, appuyez sur le bouton
MAX/MIN pendant 3 secondes, 'rst' va s’afficher. Notez que
l’instrument continue de mesurer tout en se trouvant dans le
mode MAX/MIN.
HOLD - Appuyez sur le bouton HOLD pour conserver la
dernière température mesurée, HOLD va s’afficher. Pour
poursuivre les mesures, appuyez une nouvelle fois sur le
bouton HOLD.
°C/°F - Pressez et maintenez le bouton ON/OFF pendant
5 secondes, l’unité éteinte, pour basculer entre °C et °F. Une
fois modifiée, l’unité conservera la valeur sélectionnée.
BATTERY REPLACEMENT - Le symbole batterie faible indique
la nécessité de remplacer des piles. L’instrument continue
à mesurer avec précision mais nous recommandons
de changer les piles le plus rapidement possible. Pour
remplacer les piles, retirez le couvercle du logement des
piles à la base en utilisant un tournevis cruciforme pozidrive.
Remplacez les piles AAA en s’assurant que la polarité est
bien respectée. Replacez le couvercle et resserrez pour
garantir que l’unité reste parfaitement étanche à l’eau.
Le couvercle peut uniquement être monté dans un sens.
Veuillez noter: Lorsque les piles sont retirées, le
paramétrage des modes comme Lock et Max/Min va être
réinitialisé au paramétrage par défaut.
NETTOYAGE DE L’INSTRUMENT - Nettoyer régulièrement
l’instrument avec une lingette antibactérienne afin d’éviter
la formation potentielle de bactéries d’origine alimentaire.
AVERTISSEMENT: L’alcool isopropylique et d’autres solvants
pourraient endommager le boîtier et l’écran de cet instrument.
MESSAGES D’ERREUR - 'Lo' s’affiche si la mesure que
vous effectuez est inférieure à la plage de température de
l’instrument. 'Hi' s’affiche si la mesure que vous effectuez est
supérieure à la plage de température de l’instrument. 'Err'
s’affiche si la sonde présente une anomalie. Si le message
d’erreur demeure, contacter notre service d’assistance.
TempTest® 1
Smart Thermometer
Operating Instructions
order code: 221-910
545-810/04.02.15
manufactured by
Electronic Temperature Instruments Ltd
Worthing · West Sussex · BN14 8HQ
www.etiltd.com
GUARANTEE - This instrument carries a two-year
guarantee against defects in either components
or workmanship. During this period, products that
prove to be defective will, at the discretion of ETI,
be either repaired or replaced without charge. This
guarantee does not apply to probes, where a six-
month period is offered. The product guarantee
does not cover damage caused by fair wear and
tear, abnormal storage conditions, incorrect use,
accidental misuse, abuse, neglect, misapplication
or modification. Full details of liability are
available within ETI's Terms & Conditions of Sale
at www.etiltd.com/terms. In line with our policy
of continuous development, we reserve the right
to amend our product specification without prior
notice.
Table of contents
Other ETI Thermometer manuals

ETI
ETI ThermoPop User manual

ETI
ETI ThermaData WiFi User manual

ETI
ETI Raytemp 8 User manual

ETI
ETI Super-Fast Mini User manual

ETI
ETI ThermaData Logger User manual

ETI
ETI 810-421 User manual

ETI
ETI HYGRO-THERMO 810-190 User manual

ETI
ETI FoodSafe 803-900 User manual

ETI
ETI THERMAPEN IR BLUE User manual

ETI
ETI Therma 22 Plus User manual

ETI
ETI RAYTEMP HSE User manual

ETI
ETI SuperFast Thermapen 3 User manual

ETI
ETI THERMAQ 2 User manual

ETI
ETI 810-275 User manual

ETI
ETI THERMALITE User manual

ETI
ETI 810-925 User manual

ETI
ETI FLOW CUP User manual

ETI
ETI Saf-T-Log User manual

ETI
ETI MULTI-FUNCTION THERMOMETER User manual

ETI
ETI Precision User manual