INSTRUMENT OPERATION - The instrument is
switched on by unfolding the probe until the
display shows the temperature. The unit is turned
off by folding the probe back into the rubber
probe retainer. The probe should not be rotated
more than 180 degrees as damage will occur.
It is recommended to store the probe, in the
closed position, when not in use.
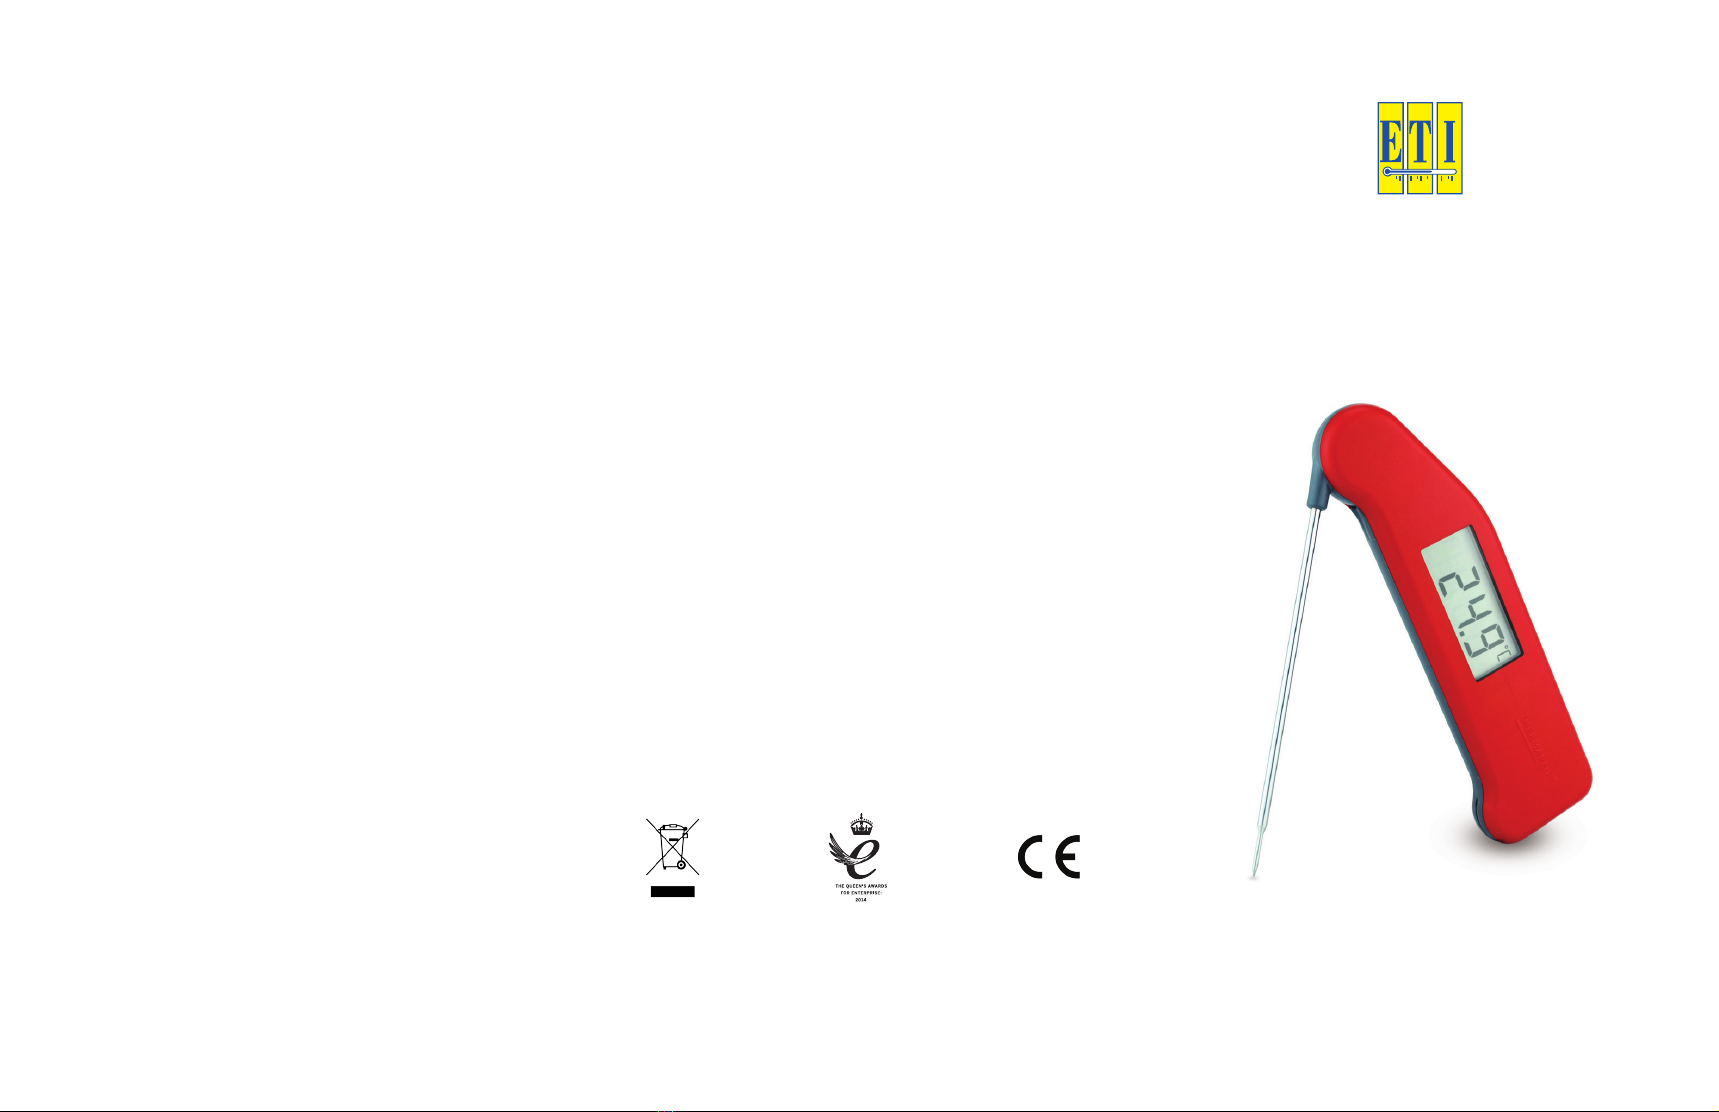
Apply the tip of the probe to the substance,
medium or surface to be measured. The sensor
is located at the tip of the probe, therefore the
minimum depth insertion should be 3 mm. The
probe tip is very sharp and therefore caution
should be taken when using.
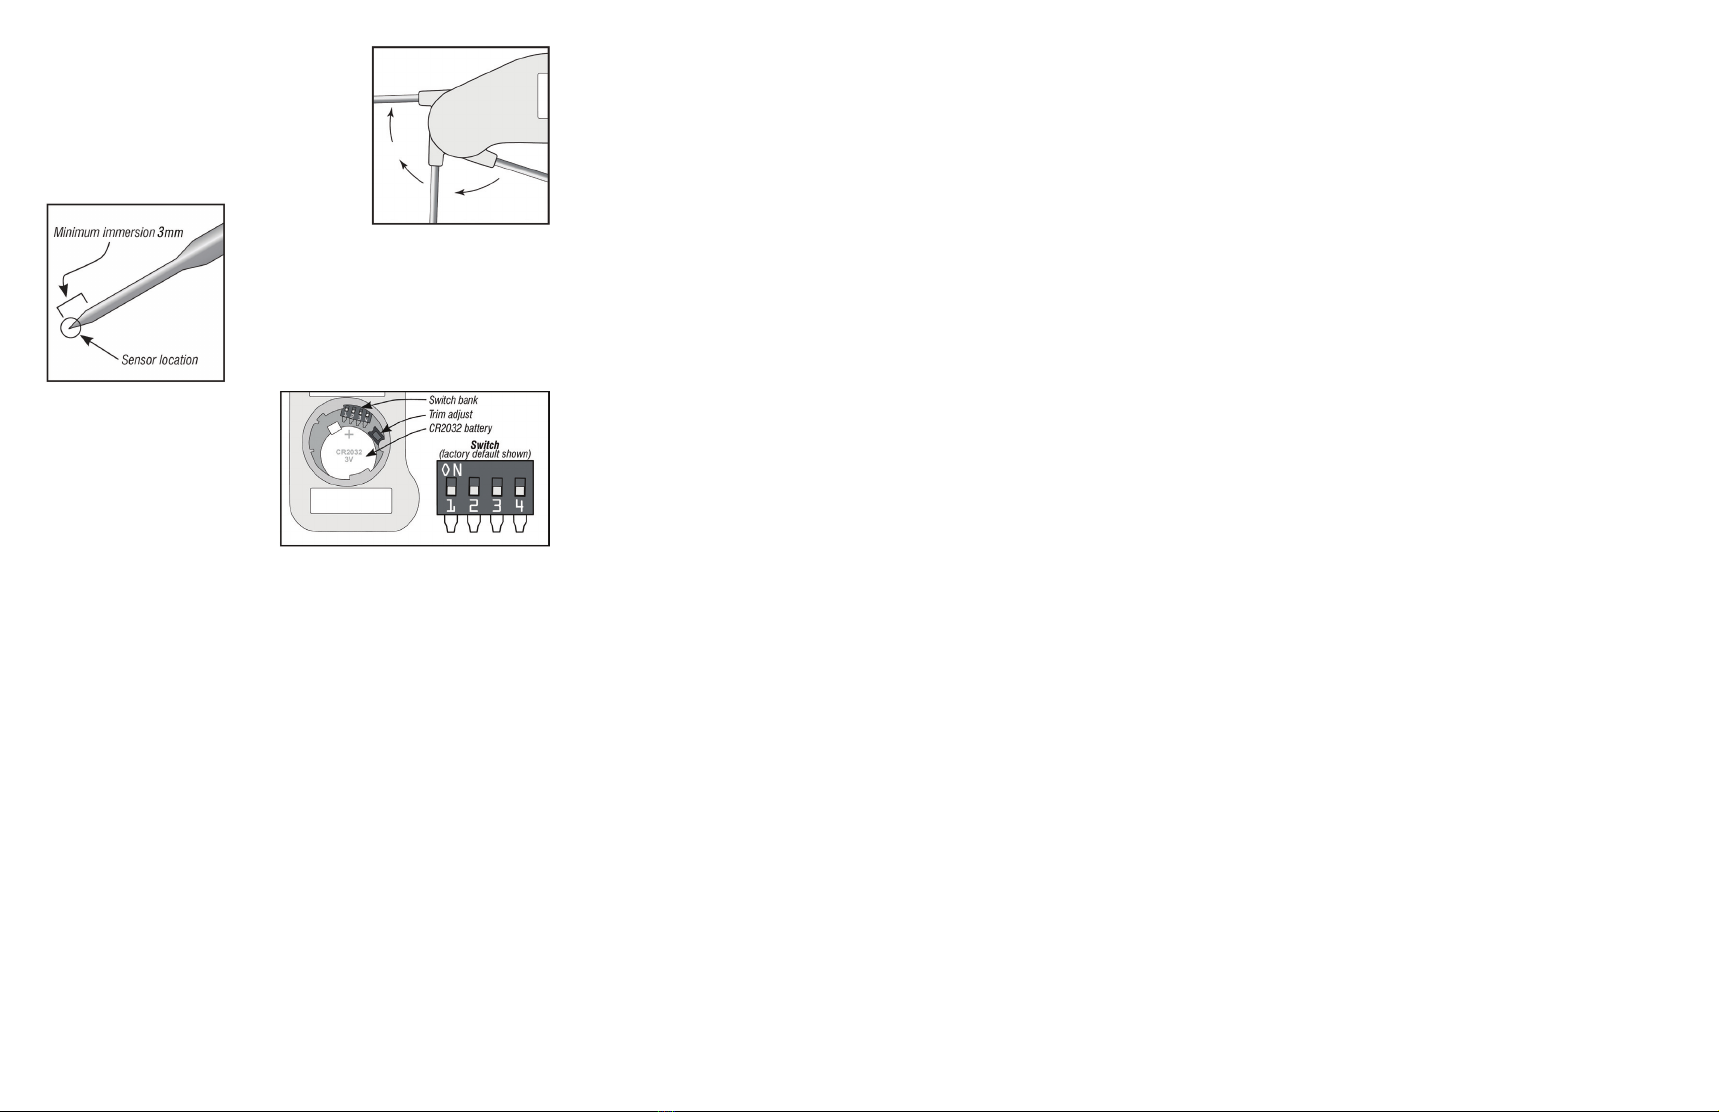
INSTRUMENT CONFIGURATION
- This instrument has four user
selectable slide switches (switch
bank), adjustable with a paperclip,
and a single push button 'Trim
Adjust' which is located under the
battery cover.
Switch 1 - Not used
Switch 2 - Resolution To change the resolution from 0.1 °C (factory
default) to 1°C push the switch away from the
batteries.
Switch 3 - Auto-off To disable the auto-off (factory default - 10
minutes) push the switch away from the
batteries.
Switch 4 - Reading Trim For normal use, we do not recommend
using the 'Trim Adjust'. For further details visit
our website www.etiltd.com.
INSTRUMENT CLEANING -Clean the instrument regularly with an anti-bacterial
probe wipe to avoid potential food-borne bacteria growth.
BATTERY REPLACEMENT - A battery symbol indicates that the batteries will need
replacing. The instrument continues to measure accurately but we recommend
that the batteries be changed as soon as possible. To replace the batteries,
remove the battery cover using a coin. Remove the batteries by pulling the battery
retaining clip back whilst holding the unit upside down. Replace both batteries,
positive side up, replace cover.
ERROR MESSAGES - 'Lo' will be displayed if you are measuring below the
instrument's range. 'Hi' will be displayed if you are measuring above the
instrument's range. 'Err' will be displayed if the probe develops a fault. If the
error message remains, contact our service department for further assistance.
EMC/RFI - Instrument performance may be affected if operated within a high
frequency radio field, such as near a mobile phone, or if subjected to an
electrostatic shock.
GUARANTEE - This instrument carries a two-year guarantee against defects
in either components or workmanship. During this period, products that
prove to be defective will, at the discretion of ETI, be either repaired or
replaced without charge. This guarantee does not apply to probes, where a
six-month period is offered. The product guarantee does not cover damage
caused by fair wear and tear, abnormal storage conditions, incorrect use,
accidental misuse, abuse, neglect, misapplication or modification. Full
details of liability are available within ETI's Terms & Conditions of Sale at
www.etiltd.com/terms. In line with our policy of continuous development, we
reserve the right to amend our product specification without prior notice.
FR - FONCTIONNEMENT DE L’APPAREIL - L’appareil s’allume en dépliant la
sonde jusqu’à ce que l’ecran claire s’affiche. L’appareil sa s’éteint en appliant la
sonde dans le caoutchouc dispositif. La sonde ne doit pas être pivotée à plus de
180 degrés, cela pourrait l’endommager. Il est recommandé d’entreposer la
sonde dans une position fermée l’orsqu’elle n’est pas utilisée. Appliquer la
pointe de la sonde sur la surface ou sur la substance à mesurer. Le capteur
est situé à la pointe de la sonde, c’est pourquoi la profondeur d’insertion de
la sonde est d’au moins 3mm. La pointe de la sonde est très coupante c’est
pourquoi elle est doit être utiliser avec précaution.
DISPOSITION DE L’APPAREIL - L’appareil est dispose de quatre interrupteurs à
glissière sélectionnables (bloc-commutateurs),
réglage
avec un
trombone, et un
seul bouton poussoir '
Trim Adjust
' situe sous le couvercle de la batterie.
Bouton 1 - Ne pas utiliser
Bouton 2 - Résolution Pour modifier la résolution de 0.1°C (par défaut)
à 1°C, appuyer sur le bouton en direction
opposée des piles.
Bouton 3 - Arrêt automatique Pour désactiver la fonction Arrêt automatique
(par défaut, 10 minutes), appuyer sur le
commutateur à l’écart des piles.
Bouton 4 - Lecture Pour une utilisation normale, nous déconseillons
l’utilisation de 'Trim Adjust'. Pour de plus de
l’information rendez-vous sur www.etiltd.com.
NETTOYAGE DE L’INSTRUMENT - Nettoyer régulièrement l’instrument avec
une lingette antibactérienne afin d’éviter la formation potentielle de bactéries
d’origine alimentaire.
REMPLACEMENT DES PILES - Le symbole d’une pile indique que les piles
doivent être changées. L’instrument continue à mesurer avec précision mais
nous recommandons de changer les piles le plus rapidement possible. Pour
remplacer les piles, enlever le couvercle des piles en utilisant une pièce de
monnaie. Retirer les piles en tirant sur le crochet de fixation tout en maintenant
l’appareil à l’envers. Remplacer les deux piles, la partie positive vers le haut et
replacer le couvercle.
MESSAGES D’ERREUR - 'Lo' s’affiche si la mesure que vous effectuez est inférieure
à la gamme la de température de l’instrument. 'Hi' s’affiche si la mesure que
vous effectuez est supérieure à la gamme la de température de l’instrument. 'Err'
s’affiche si la sonde présente une anomalie. Si le message d’erreur demeure,
contacter notre service d’assistance.
DE - BEDIENUNGSANLEITUNG - Das Gerät wird durch Ausklappen des
Messfühlers eingeschaltet, wobei die Anzeigebeleuchtung sich einschaltet. Das
Gerät wird ausgeschaltet, indem der Messfühler wieder in seinen Gummihalter
zurückgeklappt wird. Der Messfühler darf nicht um mehr als 180° gedreht
werden, da er sonst beschädigt wird. Es wird empfohlen, den Messfühler bei
Nichtgebrauch verschlossen zu lagern.
Die Spitze des Messfühlers an die zu messende Substanz, das Medium bzw.
die Oberfläche setzen. Der Temperatursensor befindet sich an der Spitze des
Messfühlers, daher sollte die Spitze mindestens 3 mm tief eingeführt werden.
Die Messfühlerspitze ist sehr spitz, daher muss vorsichtig mit ihr umgegangen
werden.
GERÄTEKONFIGURATION - Dieses Gerät besitzt vier vom Benutzer einstellbare
Schiebeschalter (Schalterreihe), die mit einer Büroklammer verstellt werden
können, und eine Drucktaste mit der Bezeichnung "Trim Adjust" die sich unter
dem Batteriefachdeckel befindet.
Schalter 1 -
Schalter 2 - Auflösung Zum Umschalten von 0,1°C (Werkseinstellung)
auf 1°C den Schalter von den Batterien
wegdrücken.
Schalter 3 -
Automatische
Zum Deaktivieren der utomatischen
Abschaltung (Werkseinstellung: nach
10 Minuten) den Schalter von den Batterien
wegdrücken.
Schalter 4 - Messwertjustierung Für den normalen Einsatz wird von der
Verstellung von 'Trim Adjust' abgeraten.
Für Einzelheiten dazu besuchen Sie bitte
www.etiltd.com.
REINIGUNG DES GERÄTS - Reinigen Sie das Gerät regelmäßig mit
einem antibakteriellen Messfühler-Wischtuch, um das Wachstum von
Nahrungsmittelbakterien zu verhindern.
BATTERIEWECHSEL - Ein Batteriesymbol zeigt an, dass die Batterien ersetzt
werden müssen. Das Gerät ermittelt weiterhin genaue Messwerte, aber wir
empfehlen, die Batterien so bald wie möglich zu wechseln. Zum Wechseln
der Batterien den Batteriefachdeckel mit einer Münze öffnen. Nehmen Sie die
Batterien heraus, indem Sie die Batteriehalteklemme zurückziehen, während Sie
das Gerät umgekehrt halten. Setzen Sie zwei neue Batterien mit der Plus-Seite
nach oben ein und verschließen Sie den Deckel wieder.
FEHLERMELDUNGEN - Wenn der Messwert unterhalb des Messbereichs des
Geräts liegt, wird 'Lo' angezeigt. Wenn der Messwert oberhalb des Messbereichs
des Geräts liegt, wird 'Hi' angezeigt. Bei einem Defekt des Messfühlers wird 'Err'
angezeigt. Wenn die Fehlermeldung bestehen bleibt, wenden Sie sich für weitere
Unterstützung bitte an unsere Kundendienstabteilung.
IT - FUNZIONAMENTO DELLO STRUMENTO - Lo strumento si accende aprendo
la sonda. Il display si illumina. Per spegnere il termometro, richiudere la
sonda e riporla nel suo alloggio in gomma. Non ruotare la sonda per più di
180 gradi. La mancata osservanza di tale indicazione potrebbe danneggiarla.
Si raccomanda di conservare la sonda in posizione di chiusura quando
non utilizzata. Applicare la testina della sonda sulla sostanza, sul mezzo
o sulla superficie da misurare. Considerando che il sensore è situato sulla
sommità, la profondità minima di inserimento deve essere pari a 3mm. La
testina della sonda è molto affilata. Prestare, dunque, particolare attenzione
durante l’utilizzo.
CONFIGURAZIONE DELLO STRUMENTO - Lo strumento è dotato di quattro
interruttori selezionabili a scorrimento, regolabili con una graffetta, e di un
pulsante singolo per la 'Trim Adjust' situato sotto il vano batteria.
Interruttore 1 -
Interruttore 2 - Risoluzione Per scegliere tra le opzioni 0.1°C (impostazione
di default) e 1°C premere l'interruttore lontano
dalle batterie.
Interruttore 3 - Autospegnimento Per disattivare la funzione di autospegnimento
(impostazione di default: 10 minuti), premere
l’interruttore lontano dalle batterie.
Interruttore 4 - Trim di lettura In condizioni di utilizzo normale, si
raccomanda di non agire sulla 'Trim Adjust'.
Per maggiori informazioni, visitare il sito www.
etiltd.com.
Abschaltung