Exaco EOS JUNIOR VICTORIAN User manual

MOUNTING INSTRUCTIONS
EOS JUNIOR VICTORIAN
Version 2021_2
htt s://janssens-alusystems.be/downloads
MANUAL
Manual
Manual
+
www.exaco.com
877-760-8500
Note: This is an all-inclusive manual. It shows optional
accessories and customizations that may not apply to your
greenhouse. Direct any questions to Exaco.
The Junior Victorian assembly is similar to
the Royal Victorian. Please watch our
animated assembly video on our Exaco
Trading Co YouTube Channel.
Find the link at www.exaco.com

Table of Contents
General Product Information…………………………………………………………………….…....1
Foundation Footprint, Planning Consideration and Important Notes……………………………..2
Packing Slip/Parts List………………………………………………………………………………....3
Glass Spec Sheet………………………………………………………………………………………4
Greenhouse profile layout diagram…………………………………………………………………...5
Main Greenhouse Frame Construction…………………………………………………………...6-16
Roof Decorations and Downspout installation..…………………………………………………….17
Glass and Gasket Installation…………………………………………………………………….18-20
Accessories (please call Exaco or your retailer to order optional items)
Sliding Door Assembly and Installation………………………………………………….22-24
OPTIONAL Sliding door lock…………………………………………………………………25
OPTIONAL Sliding door lowered threshold…………………………………………..…26-27
Roof Window Assembly and Installation…………………………………………...……28-29
Ventomax Auto Opener Installation………………………………………………………….30
OPTIONAL Manual Spindle Opener…………………………………………………………31
OPTIONAL Shelves:
2 Slat Shelf Installation………………………………………………………………..32
5 Slat Shelf Installation………………………………………………………………..33
Narrow Top Shelf Installation…………………………………………………………34
Seedtray Shelf Installation……………………………………………………………35
OPTIONAL Shadecloth Installation……………………………………………..………..36-37
Customer Support……………………………………………………………………………..………..38

Product Information
Dear customer,
Thank you for buying a high-quality aluminium greenhouse model JUNIOR.
Remarks
In this manual, you will find the assembly instructions for all basic/standard-model
greenhouses. However, this manual also contains pages which apply to optional accessories
that may not be included with your kit. This greenhouse is designed for cultivation of plants/
flowers. Therefore leakage, water drops and condensation inside the building are allowed. The
building may only be entered by competent persons during cultivation or maintenance.
Aluminium profiles that are not painted may show black stains, these stains are not a
production error: they can be easily removed with an aluminium cleaner available at a home
improvement store. The rubber strips have been treated with oil/silicone on the interior to
facilitate the assembly. The building should be mounted on a solid concrete foundation deep
enough to get a solid and frost-free ground. Anchoring of the foundation should be made by
the owner or operator and should be checked periodically. During winter, the roof will need to
be cleared of snow or supported in a suitable way. The greenhouse should be built in a
location protected from strong winds. Protective gear (such as protective gloves) should be
used during assembly in order to avoid injuries. One should at all times pay attention to the
local building regulations.
The assembly procedure is the same for all our greenhouses.
- Sorting of the profiles/extrusions according to the model/size of greenhouse. The
aluminum profiles (extrusions) are identified by their cross-section and length.
- Assembly of the complete aluminium framework.
- Leveling of the construction using a level
- Anchoring/securing of the greenhouse to the ground
- Glazing installation
Required tools
- Metric or Combination Measuring Tape (highly recommended)
- Socket wrench or spanner 10mm
- Level
- Screwdriver
- Drill + drill bit 4.2 mm
- Scissors (to cut the rubber).
We reserve the right to change the construction without prior notice!
Questions? Need Assembly Support?
Please call Exaco at 877-760-8500, ext. 701 or email
1

JUNIOR VICTORIAN
AB
X
2360mm
or 93"
JVIC23-2360mm/93"
JVIC24-3836mm/151"
JVIC25-4574mm/180"
VERY IMPORTANT!!! Do not set the corners in concrete until the entire
greenhouse frame is complete, level and square. You may need some
play to install the uprights.
Notes:
- It is recommended to build your foundation
down to the frost line in your area and/or
consult a local contractor for recommedations.
- Greenhouse base frame is 2 1/4" wide
- Corner anchor posts are 1.5" x 1.5". They attach
at the interior corners of the base frame. The
anchor posts then extend 12" into the ground/
concrete. There will be bolts inserted at the
bottom of the anchor to "catch" in the concrete.
- Do not embed the corner anchor into the concrete
until the entire greenhouse is assembled, level,
and square. It is recommended to leave a 5 to 6"
hole in the concrete for the anchor.
- Embedding the corner anchor into concrete is the
most secure method, although you may choose to
trim them off, cut in half, and use as L brackets to
attach to the greenhouse and the foundation with
the appropriate screws (i.e. Tap Con screws for
concrete)
2

(Roof window)
(Hardware pack)
(silicone/shims)
(corner anchors)
(12mm long bolts/nuts/caps -inside gutter profiles under shrink wrap)
SEE NEXT PAGE FOR GLASS ILLUSTRATION /COUNT IN INCHES
3
Sapak_EOS contains:
(black PVC gable/ridge covers, long bolts & nuts for corner anchors,
small L brackets for gable assembly (L2G)
(single sliding door)
Main hardware for assembling the greenhouse will be found in the longest
box - INSIDE the gutter profiles. You will need to remove the shrink wrap to
find them, they will not slide out.
28 3/4"
28 3/4"
28 3/4"
28 3/4"
28 3/4" 28 3/4"
28 3/4"
28 3/4"
28 3/4"
28 3/4"
28 3/4"
28 3/4"
28 3/4"
28 3/4"
28 3/4"
Door
Door
Side wall
& Roof
Side wall
& Roof
Side wall
& Roof
Door
Roof window
Roof window
Roof window
Under roof window
Under roof window
Under roof window
14 3/16"
14 3/16"
14 3/16"
14 3/16"
14 3/16"
14 3/16"
Gable End Pieces:
Gable End Pieces:
Gable End Pieces:
72 3/4"
72 3/4" 72 3/4"
57 1/16" 57 1/16" 57 1/16"
32 1/2"
32 1/2"
32 1/2" 24 5/8" 24 5/8"
24 5/8" 26 3/4"
26 3/4" 26 3/4"
35 13/16"
35 13/16" 35 13/16"
3 5/16"
3 5/16"
3 5/16"
2 3/4"
2 3/4"
2 3/4"
2 3/4"
2 3/4"
2 3/4"
27 5/32" 27 5/32"
27 5/32"
20 1/2"
20 1/2" 20 1/2"
11 13/32"
20 1/2"
11 13/32" 11 13/32"
4
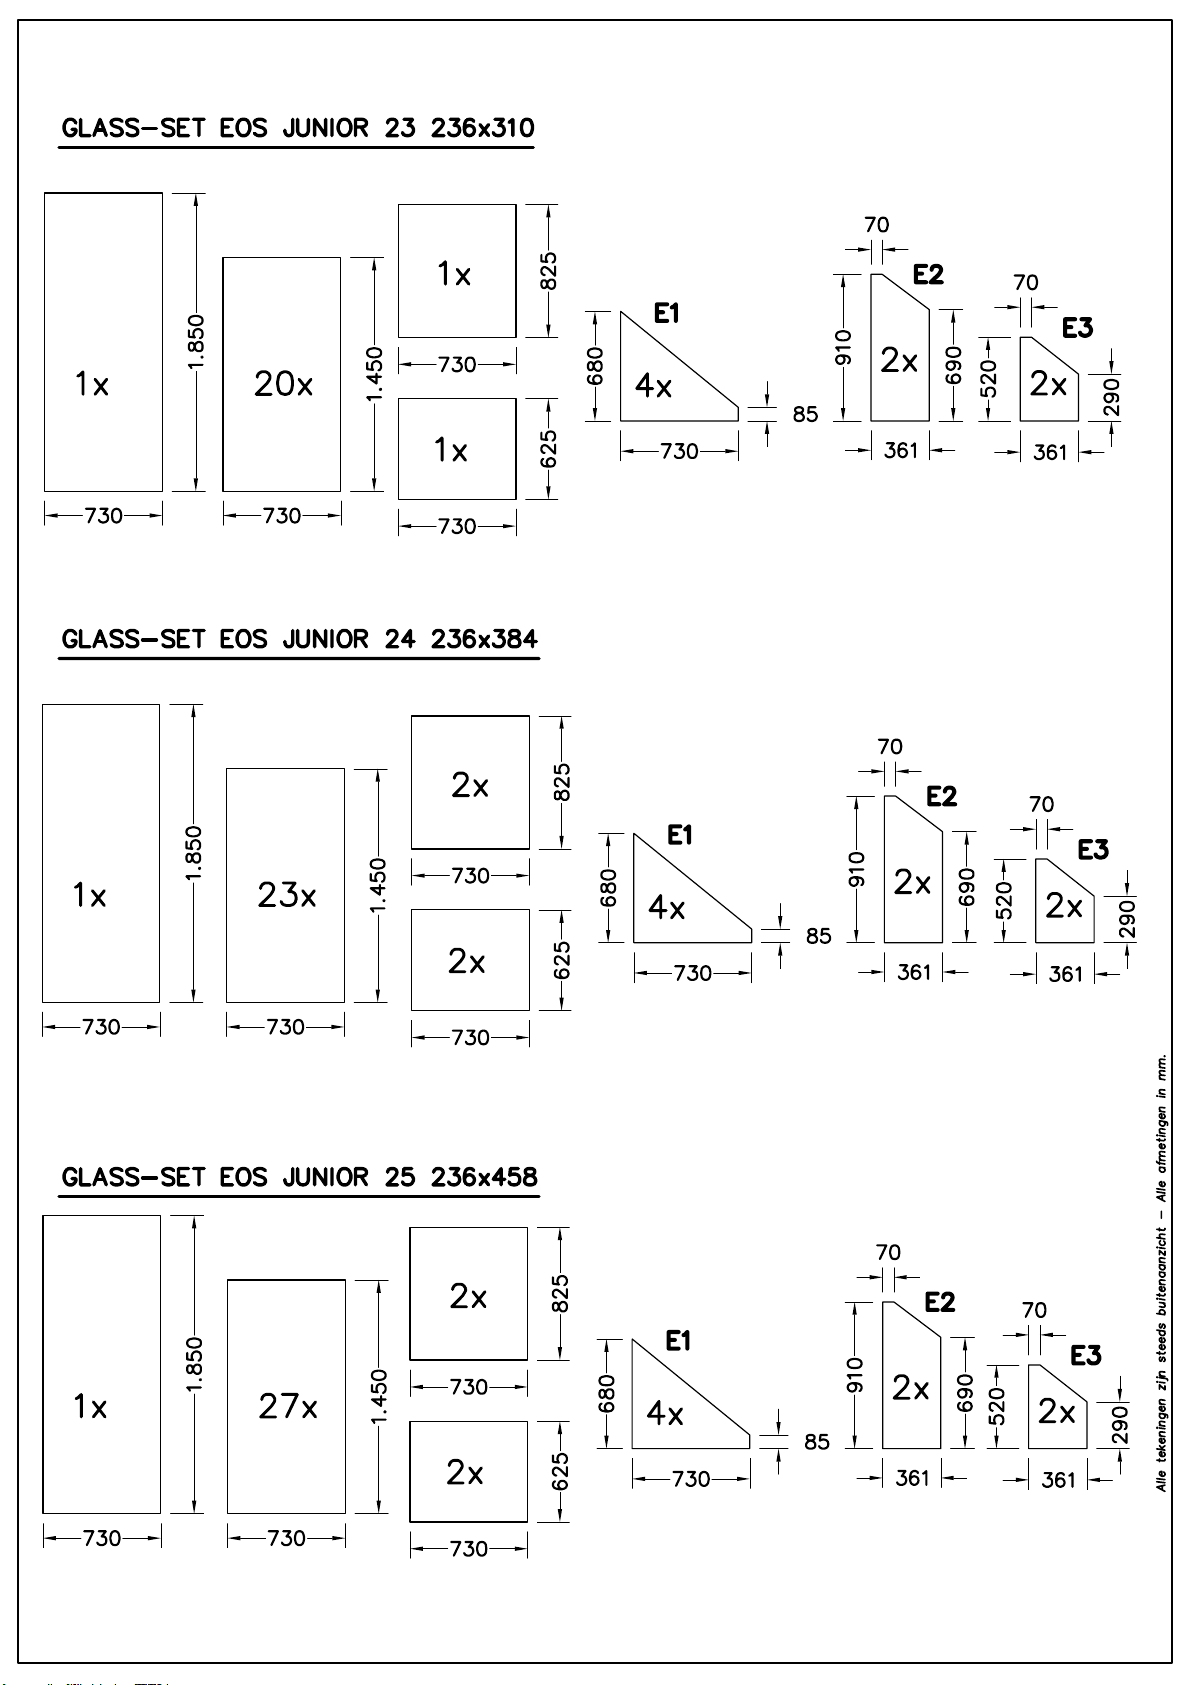
All Glass is 4mm / 3/16" thick tempered
safety glass and replacments may be
ordered from a local glass shop.

PRO6120
PRO6578
PRO20779
PRO20229
PRO40091
PRO210
PRO1456
PRO6918
PRO1456
PRO20229
Model shown is a JVIC 25
5

EOS JUNIOR 1
A
A
A
3x
Note: When assembling the foundation in this
step, only hand-tighten the nuts. The corners
may needto be slightly loose to attach the
corner uprights (PRO6578).
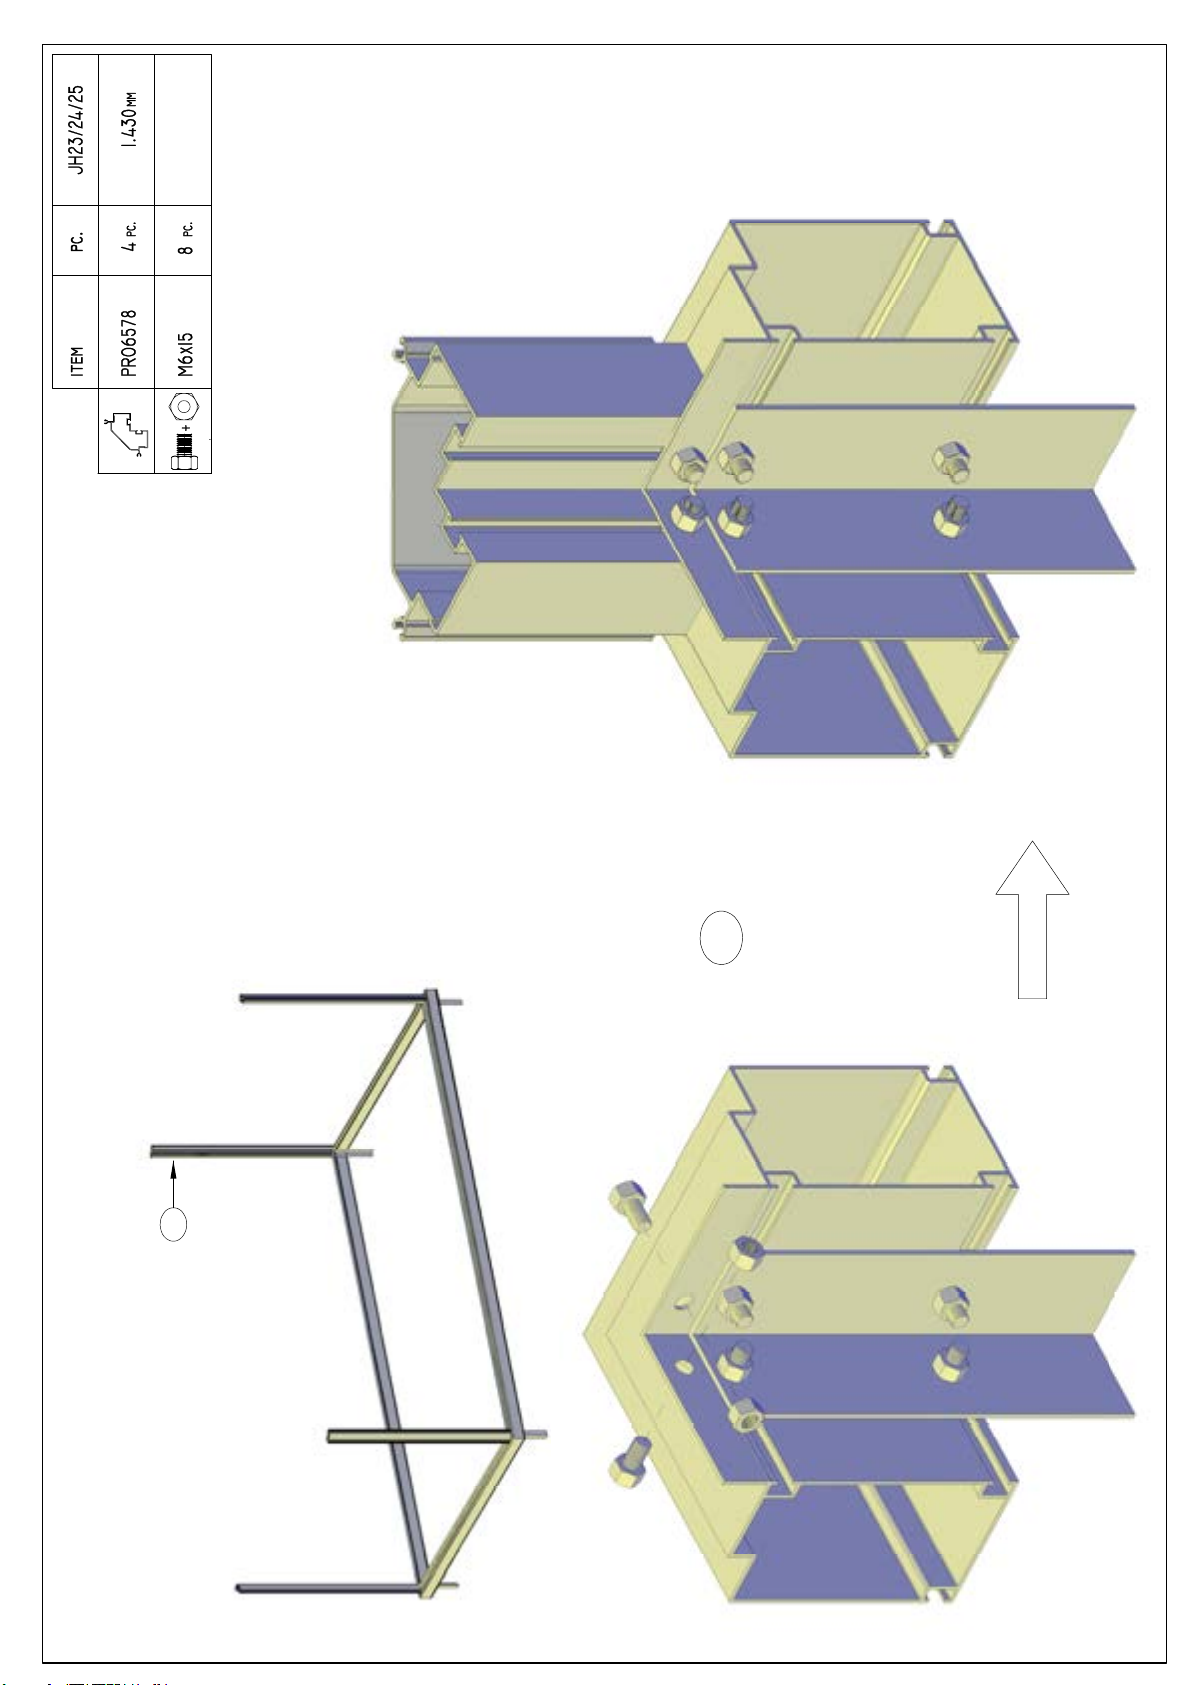
Before attaching, insert 3
M6x15 bolts as shown for
the sliding door guide.
Suggestion: If installed on a concrete
foundation you may cut PRO210 flush
with the bottom of PRO6120. To
anchor, use cut off PRO210 pieces as L-
brackets to secure the PRO6120 to the
concrete foundation. Please see
YouTube animated Royal Victorian
assembly video for more information.
Ensure your diagonals are equal and
foundation is level before proceeding.
6
EOS JUNIOR 2
A
A
Helpful tip: If you are struggling with the corner post (PRO6578), loosen the nuts on the corner
anchor to give you a bit of wiggle, then tighten all nuts. It is also helpful to have a second person
hold the threaded ends of the bolt to orient the head correctly while the assemble places the corner
post (PRO6578).
7

EOS JUNIOR 3
A
A
Optional: Insert a bolt into each corner post
channel for where the top shelf and/or Seed Tray
will be located. See shelf/seedtray pages for
location information.
8

EOS JUNIOR 4
A
A
OPTIONAL: If you
purchased shade curtains,
insert the slider loops into
the gutter profile channel
before this assembly step.
See shadecloth pages for
more information.
9
EOS JUNIOR 5
1830 mm
item pc. L
M6x12
PRO20229 768 mm L + R + LR
+
3
12
pc.
pc.
PRO1456 2 2.130 mm
pc.
REF EJ 13
3
1
4
1
2
3
4
2
10
Height of the door header bar will be 1830mm/72" high
EOS JUNIOR 6
A
B
A
B
11
Optional: if you ordered a seedtray shelf,
you may insert a bolt in these vertical
supports
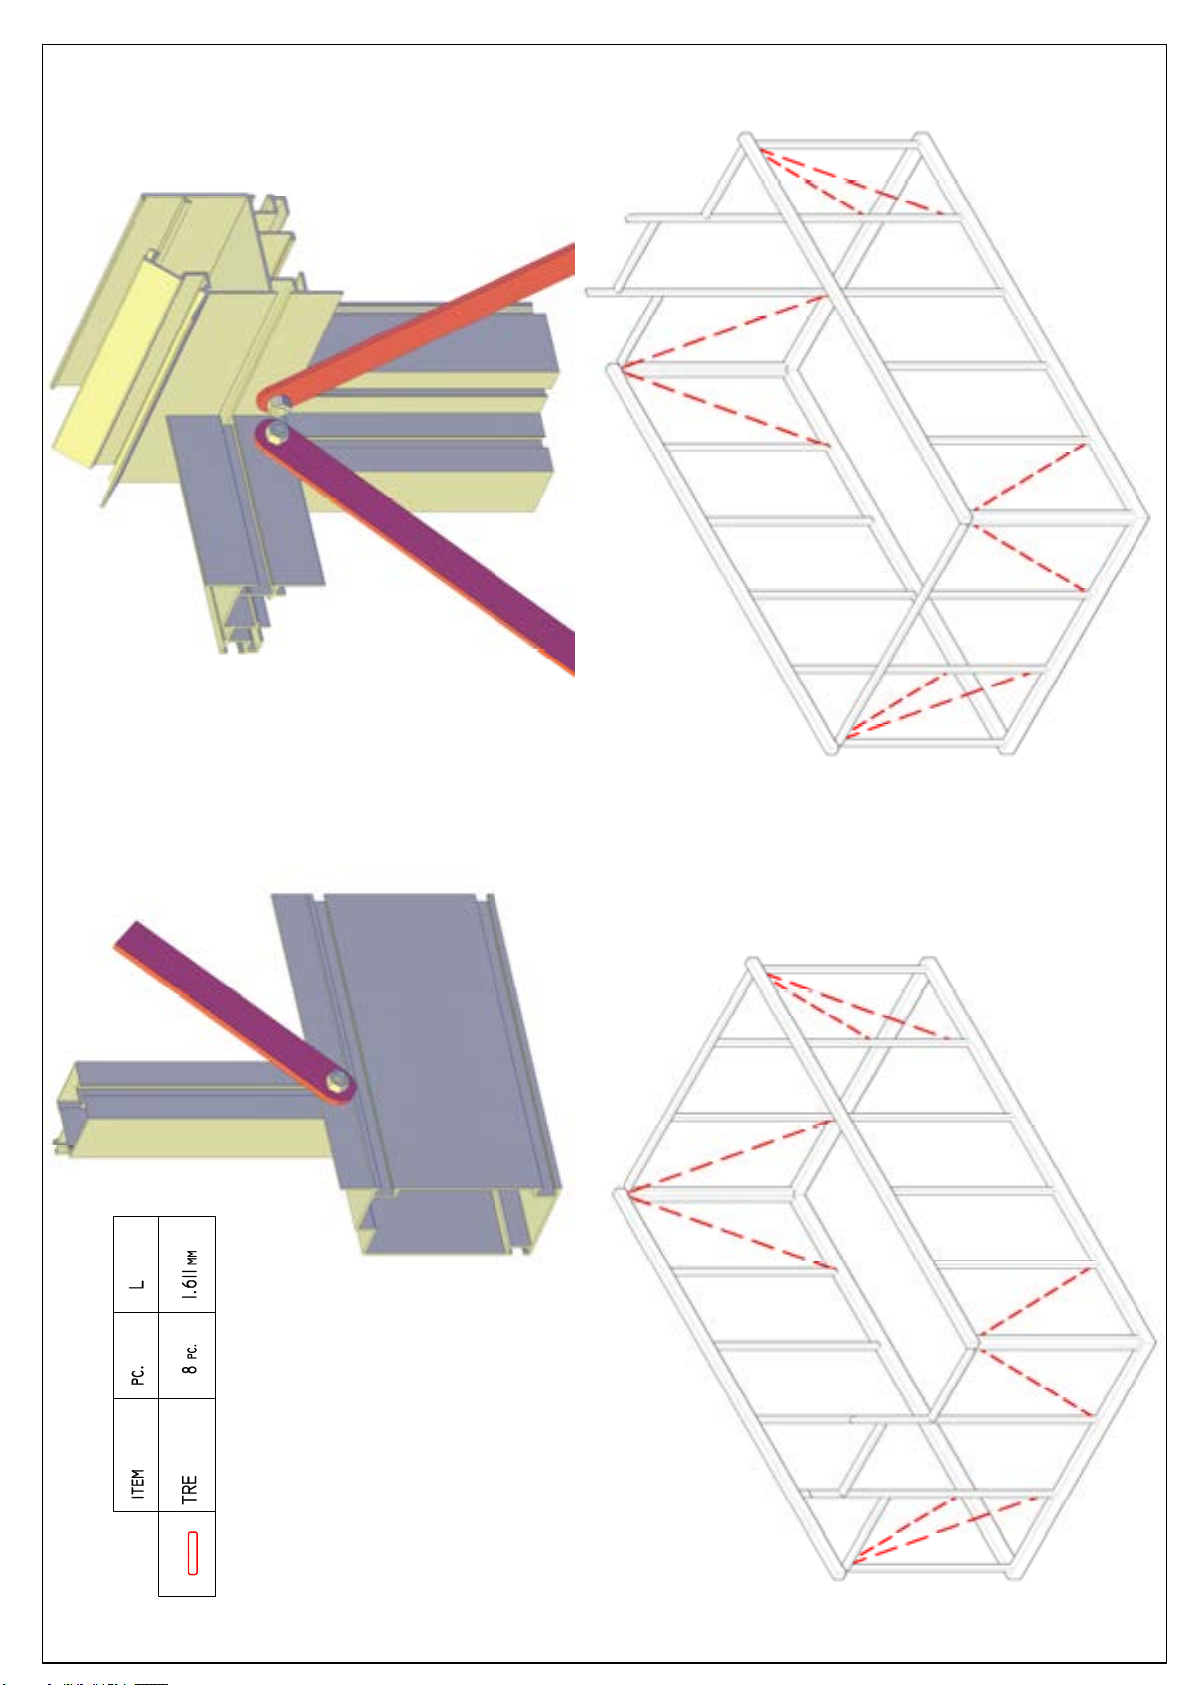
EOS JUNIOR 7
If your wind braces do not reach where they are designed to
attach, your greenhouse is not level/square. You may need to
make adjustments at this time so they will reach.
12

EOS JUNIOR 8
AB
A
A
PAG. EJ 11
B
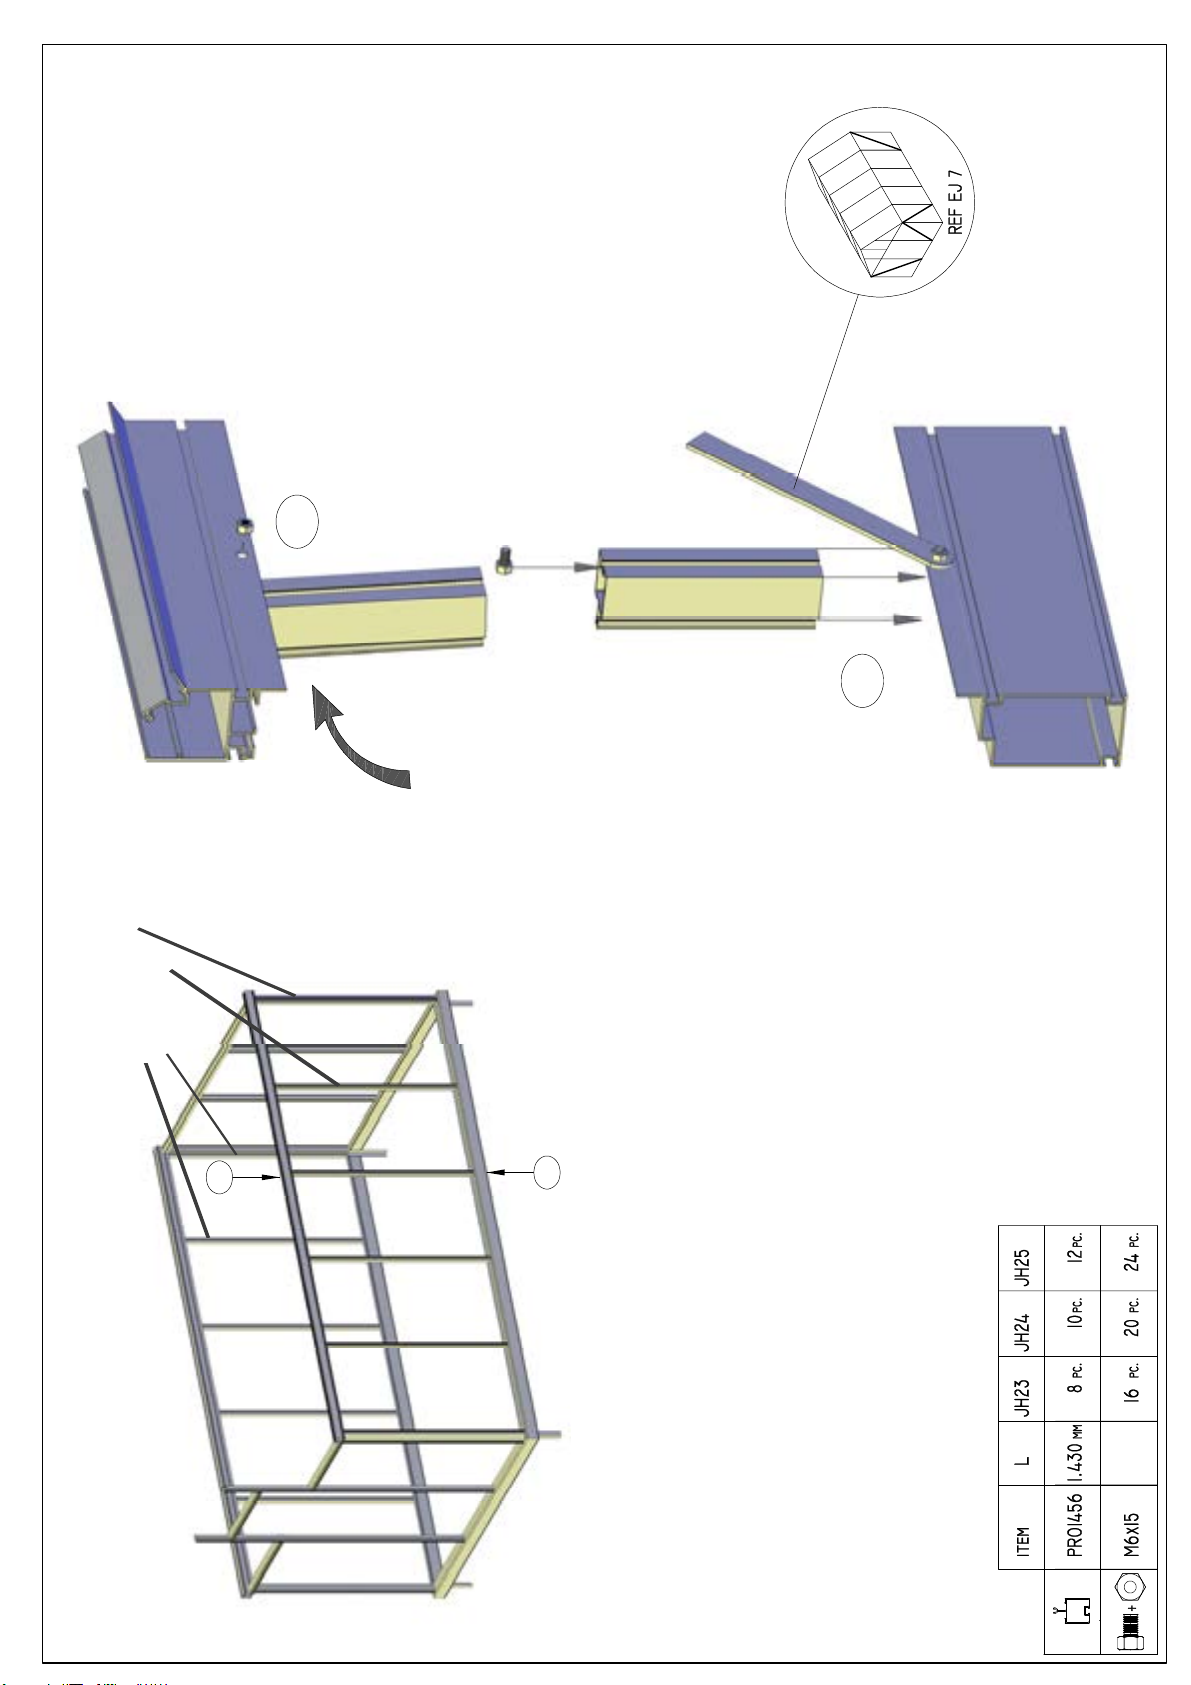
Insert 1 M6 bolt into channel on PRO6918 to attach
gable verticals shown in B on next page.
Note! If you have a shadecloth, it is a good
time to insert the shadecloth sliders into your
ridge beam channel. See shadecloth pages for
information and amount to insert.
13

EOS JUNIOR 9
C
A
B
A
B
C
A
BPAG. EJ 11
C
14
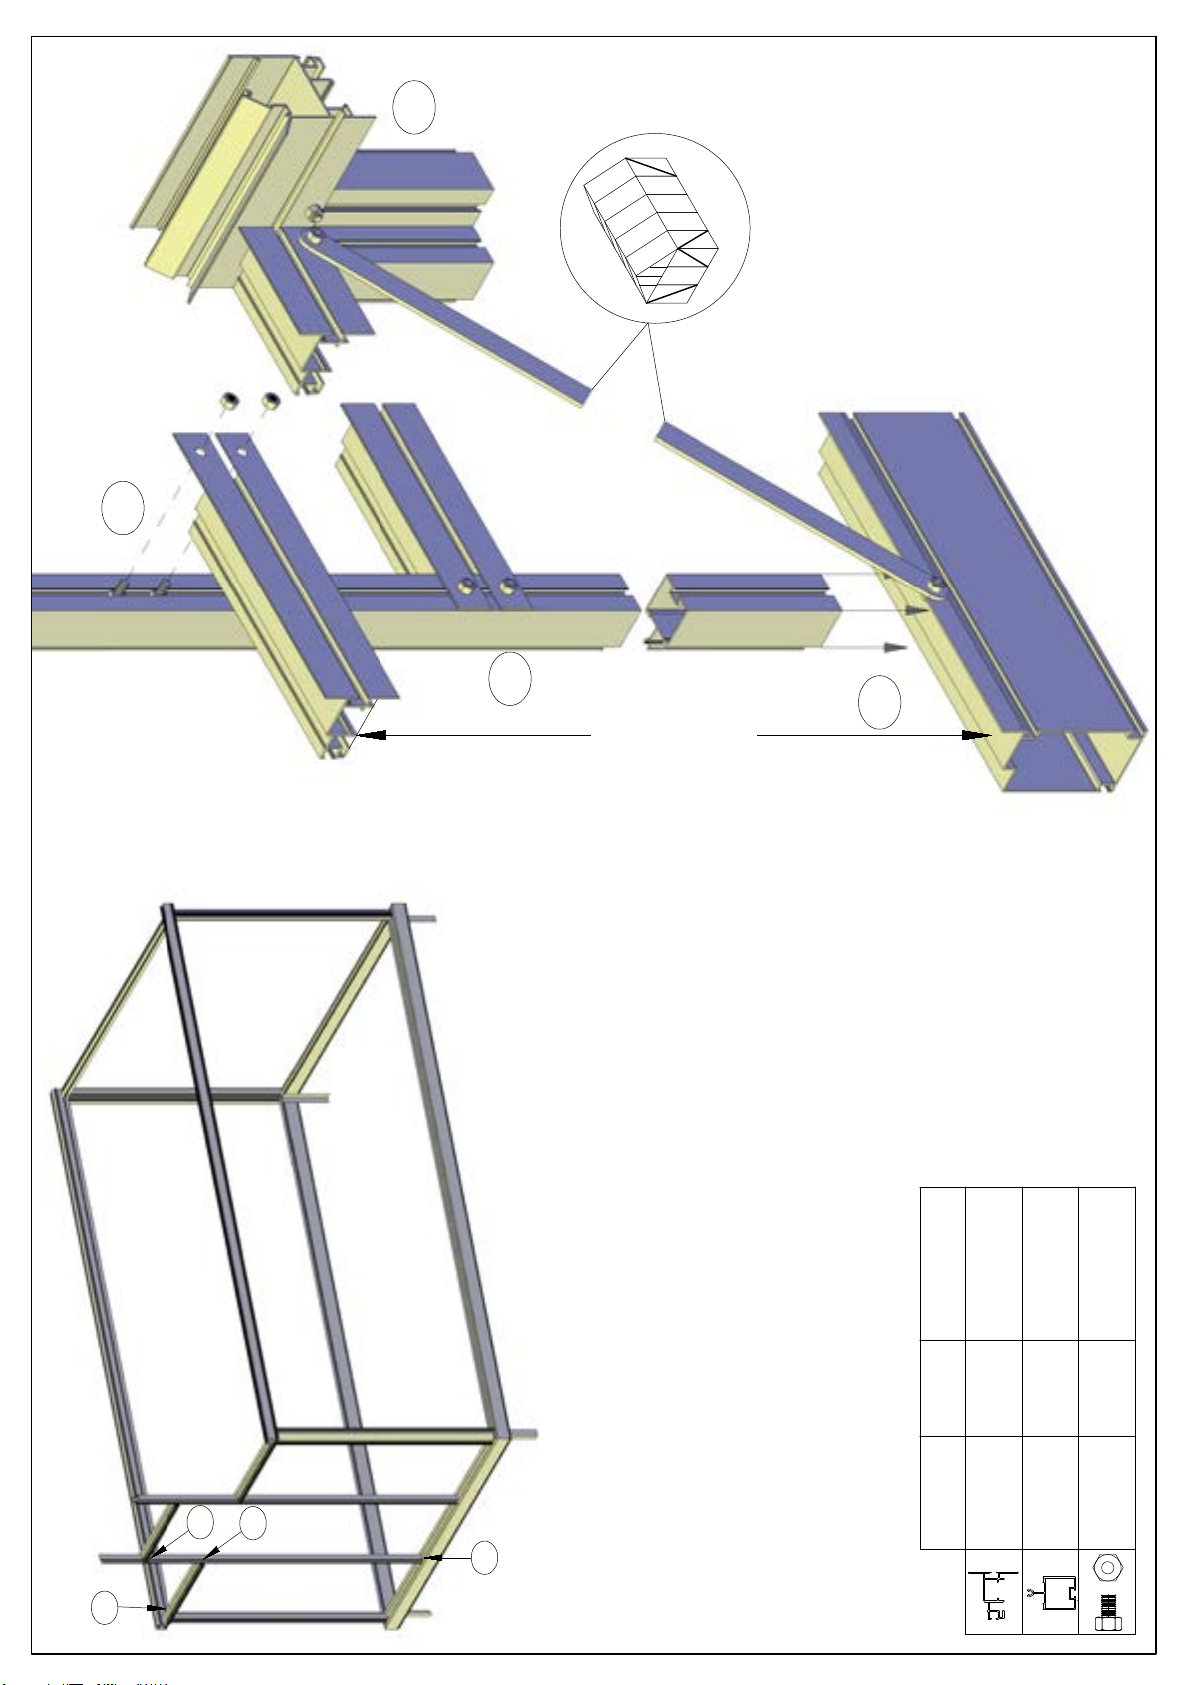
Note: The vertical PRO1456
should be inset 1/8" from the
end of the ridge beam.

EOS JUNIOR 10
A
B
A
B
CC
C
Crossbar and brackets for framing roof
vent opening can be found in the
window bundles. Roof Vents can be
installed in any bay. Insert bolts to
attach conntecting plate. The crossbar
should be located about 790mm (just
over 31") from the connection point
with the ridge beam. You may need to
adjust slightly when placing the glass.
15

EOS JUNIOR 11
X = Affix midpoint of wind brace to PRO1456 with screw
after greenhouse is complete and glass is installed.
X
X
X
X
If your windbraces do not reach the proper
connection point, your greenhouse is not
level/square, make adjustments as needed.
16

EOS JUNIOR 12
Downspout Note: We recommend
assembling the downspout system and
then adding screws in spots marked
with a red "X" to secure each piece. To
attach the elbow to the greenhouse
base, run a self tappinge screw through
the exit hole to the inside of the elbow
and into the greenhouse base.
17
Secure end
point of roof
decoration
with a screw
x
x
x
x
Roof decorations are optional and may be omitted

EOS JUNIOR 13
Pro 20780
4 mm
GLASS
Overview Notes on Glass Installation - Instructions on
subsequent pages:
- We recommend beginning with the angled gable glass
at the front of the pallet, then the roof glass, so that you
can maneuver your ladder better while working.
- Place one piece at a time, adding the ridge gasket
(E400330) at the top and heavy duty gasket (PRO1748)
after placing each pane on the roof.
- Slide roof vents into position after all roof glass has been
placed.
- Then install side wall glass panes
Glazing supports slide onto the gutter
profile from the end. Space them 100mm
or 4 inches from each roof profile.
18
Other Exaco Greenhouse Kit manuals

Exaco
Exaco VICTORIAN VI 46 User manual

Exaco
Exaco HOKLARTHERM Riga XL 5 User manual

Exaco
Exaco Junior Victorian User manual

Exaco
Exaco Riga XL VI User manual

Exaco
Exaco EOS Retro SL User manual

Exaco
Exaco VI23 User manual

Exaco
Exaco Tulip House User manual

Exaco
Exaco EOS ROYAL MUR User manual

Exaco
Exaco EOS ROYAL User manual

Exaco
Exaco VI23 User manual


Popular Greenhouse Kit manuals by other brands

ACF Greenhouses
ACF Greenhouses GROW MORE GM13 Assembly instructions

juwel
juwel Profiline 20346 Quick start manual

Elite Greenhouses
Elite Greenhouses 7'5" WIDE TITAN Instructions & Illustrations

Palram
Palram Hybrid' x10'6 Nature Assembly instructions

Dancover
Dancover TITAN Arch+ 320 manual

Grandio
Grandio GRA-LVR installation manual


