Exaco EOS ROYAL User manual

ASSEMBLY MANUAL
EOS ROYAL - Ground Mounted
Version 2020_1
www.EXACO.com
Need help?
Call 877-760-8500

PRODUCT INFORMATION
Dear customer
Thank you for buying a high-quality aluminium greenhouse.
REMARKS
In all drawings you find the mounting-instructions for all basic standard-models. However this manual should be a sufficient
guidance for all special-case greenhouses. This greenhouse is designed for cultivation of plants/flowers. Therefore leakage,
water drops and condensation inside the building are allowed. The building may only be entered by competent persons
during cultivation or maintenance. Aluminium profiles that are not painted may show black stains, these stains are not a
production error: they can be easily removed with a aluminium cleaner available at every good drugstore. The rubber strips
have been treated with oil/silicone on the interior to facilitate the assembly. The building should be mounted on a solid
concrete foundation deep enough to get a solid and frost-free ground. Anchoring of the foundation should be made by the
owner or operator and should be checked periodically. During winter the roof has to be cleared of snow or supported in a
suitable way. The greenhouse should be built in a location protected from strong winds. Protective gear (such as protective
gloves) should be used during mounting in order to avoid injuries. One should at all times pay attention to the local building
regulations.
ASSEMBLY ORDER
The assembly procedure is the same for all our greenhouses.
- Sorting of the profiles according the model.
- Mounting of the complete aluminium construction.
- Leveling of the construction using a waterlevel.
- Securing the building to the ground
- Glazing.
REQUIRED TOOLS
10 mm Socket Wrench
10 mm Open End Wrench
Level
Phillips Screw Driver
Power Drill
5/32 Drill Bit
Scissors (to cut rubber gasket)
Utility Knife
Ladder - 6 Foot Minimum
We reserve the right to change the construction without prior notice!

" ROYAL - T"
829mm
1
2360mm2
829mm3
A
= 1+2+3
3098mm
4
829mm
5
B
= 4+5
A
= 4018
B
= 3927
Note: Do not set concrete in
the corners until the entire
greenhouse frame is
complete, level, and square.
You may need some play to
install the uprights.

ITEM PC
ROOFWINDOW 4 pc
BAG_SILICONE 1 pc
DOUBLE TURNING DOOR 1 pc
SPANDREL 10 pc
RIDGE DECORATION (box) 2 + 1 pc
LOUVRE VENT 2 pc
BAG_GLASS SPACERS (80 pcs) 2 pc
PALLET 1 ROYAL T
WEIGHT: 342 kg
DIMENSIONS:
800 x 900 x 2200 mm
POSITION GLAS DIMENSIONS PC
ROOF 450 X 1850 MM 2 pc
ROOF 361 X 1850 MM 4 pc
ROOF 361 X 1450 MM 4 pc
ROOF 361 X 1020 MM 8 pc
ROOF 730 X 825 MM 4 pc
MODEL RT8 361 X 1391 X 1850 MM (*32 MM) 2 pc
MODEL RT7 361 X 890 X 1392 MM 2 pc
MODEL RT6 361 X 1065 X 1450 MM (*35 MM) 2 pc
MODEL RT5 361 X 640 X 1066 MM 2 pc
MODEL RT2 432 X 287 X 882 MM 2 pc
TRIANGLE RT1 625 X 545 MM 2 pc
MODEL E11 361 X 888 X 1090 MM (*75 MM) 4 pc
MODEL E10 361 X 620 X 882 MM 4 pc
MODEL E9 361 X 351 X 614 MM 4 pc
MODEL E8 361 X 83 X 348 MM 4 pc
MODEL R3 361 X 490 X 710 MM (*70 MM) 2 pc
MODEL R2 361 X 186 X 480 MM 2 pc
MODEL E6 361 X 85 X 379 MM 2 pc
ITEM PC
PRO6120 foundation profile 459 mm L 1 pc
PRO6120 foundation profile 459 mm R 1 pc
PRO20229 horizontal gable prof 401 mm 2 pc
PRO1456 glazing bar 1005mm 4 pc
PRO1456 glazing bar 603 mm 2 pc
PRO1456 glazing bar 203 mm 2 pc
PRO1456 glazing bar 472 mm L 1 pc
PRO1456 glazing bar 472 mm R 1 pc
PRO1456 glazing bar 645 mm L 1 pc
PRO1456 glazing bar 645 mm R 1 pc
PRO1456 glazing bar 1075 mm L 1 pc
PRO1456 glazing bar 1075 mm R 1 pc
PRO1456 glazing bar 900 mm L 1 pc
PRO1456 glazing bar 900 mm R 1 pc
PRO1456 glazing bar 1408 mm L 1 pc
PRO1456 glazing bar 1408 mm R 1 pc
ITEM PC
PRO6120 foundation profile 2009 mm L 1 pc
PRO6120 foundation profile 2009 mm R 1 pc
PRO6120 foundation profile 829 mm L 2 pc
PRO6120 foundation profile 829 mm R 2 pc
PRO20779 gutter profile 2009 mm L 1 pc
PRO20779 gutter profile 2009 mm R 1 pc
COLLI 2 ROYAL T
WEIGHT: 19 kg
DIMENSIONS:
240 x 200 x 2600 mm
ITEM PC
PRO40091 ridge profile 2009 mm 2 pc
RIDGE ROYAL-T 1 pc
SPANDREL 1 pc
U 30X30X30 1500 mm 1 pc
K 30X30 1500 mm 1 pc
COLLI 4 ROYAL T
WEIGHT: 17 kg
DIMENSIONS:
300 x 120 x 2600 mm
PALLET 2 ROYAL T
WEIGHT: 375 kg
DIMENSIONS:
800 x 900 x 2200 mm
ITEM PC
PRO6578 corner profile 1630 mm 6 pc
PRO40633 inner corner profile 1630 mm 2 pc
PRO6918 endbar roof 1830 mm 4 pc
PRO1456 glazing bar 1830 mm 9 pc
PRO1456 glazing bar 1630 mm 25 pc
PRO6918 endbar roof 1430 mm 2 pc
PRO1456 glazing bar 1430 mm 4 pc
PRO10980 round tube Ø40 1700 mm 4 pc
TRE wind bracings sides 1975 mm 2 pc
TRE wind bracings sides 1795 mm 10 pc
TRE wind bracings sides 1673 mm 2 pc
TRE wind bracings sides 1611 mm 2 pc
PRO1748 rubber 12,5 m/rol 14 pc
POSITION GLAS DIMENSIONS PC
GABLE 557 X 1748 MM 2 PC
GABLE 361 X 1650 MM 30 PC
GABLE 450 X 1650 MM 2 PC
GABLE 361 X 625 MM 4 PC
ITEM PC
PRO6120 foundation profile 3098 mm 2 pc
PRO20229 horizontal gable prof 2982 mm 2 pc
PRO1456 glazing bar 1090 mm 2 pc
PRO1456 glazing bar 871 mm L 2 pc
PRO1456 glazing bar 871 mm R 2 pc
PRO1456 glazing bar 602 mm L 2 pc
PRO1456 glazing bar 602 mm R 2 pc
PRO1456 glazing bar 334 mm L 2 pc
PRO1456 glazing bar 334 mm R 2 pc
PRO21214 wind bracing gable Ø 19 mm 2 pc
TRE wind bracings sides 2365 mm 2 pc
SAPAK_EOS 1 pc
L 40x40 GATFUND 400 mm 4 pc
E400330 glazing rubber 20 m/rol 1 pc
COLLI 1 ROYAL T
WEIGHT: 26 kg
DIMENSIONS:
240 x 170 x 2600 mm
ITEM PC
L 30 x 60 1930 mm 1 pc
PRO20229 horizontal gable prof 1511 mm 1 pc
PRO1456 glazing bar 2026 mm L 1 pc
PRO1456 glazing bar 2026 mm R 1 pc
PRO1456 glazing bar 718 mm 1 pc
PRO41942 valley roofbeem 1942 mm 2 pc
PRO20779 gutter profile 829 mm L 2 pc
PRO20779 gutter profile 829 mm R 2 pc
L 40x40 GATFUND 400 mm 4 pc
PRO2290 heavy rubber 2500 mm 2 pc
ZAK T-MODEL 1 pc
SAPAK ROYAL-T 236 1 pc
BAG BOLTS_NUTS 7 pc
COLLI 3 ROYAL T
WEIGHT: 25 kg
DIMENSIONS:
240 x 200 x 2600 mm

PRO6120
PRO6578
PRO40633
PRO20779
PRO20229
PRO40091
PRO41942
PRO210
PRO1456
PRO6918
PRO1456
L 30x60
Key to Profile (Extrusion) Placement

PRO210
PRO6120
item pc. L
8 pc
1+1 pc
400 mm
2.010 mm
PRO6120 2+2 pc 829 mm
M6x12
+
M6x50
+
PRO6120 1+1 pc 459 mm
ROYAL-T 1
A B
A
B
C
C
1 pc 600 mm
12 pc
PRO6120 2 pc 3.098 mm
L 30X60 1 pc 1.930 mm
D
D
32 pc
32 pc
Tip: Exaco recommends
that you use a tape
measure to distinguish
between similar looking
pieces of different
lengths.
Your greenhouse was
manufactured in Europe,
all measurements will be
listed in millimeters.
To convert millimeters to
inches divide by 25.4.
Metric
When assembling the
foundation in this step, make
the nuts hand tight. This
leaves the corners slightly
loose. The extra 'give' may
be necessary to attach the
corner uprights.
Note: If installing on a concrete
slab, cut PRO210 flush with the
bottom of PRO6120.
To anchor, use the cut off
PRO210 pieces as L-brackets to
secure the PRO6120 to the
concrete foundation.
Please see YouTube animated
assembly video for more
information.
B
A
B
ROYAL-T 2
PRO6578
item pc. L
6 pc 1.630 mm
M6x12
+
PRO40633 2 pc 1.630 mm
A
18 pc
C
PRO1456 1+1 pc 2.026 mm
C
M6x25
+8 pc
PAGE ROYAL T 16
M6x25 M6x25

ROYAL-T 3
A
A
item pc. L
M6x12
PRO20229 2.982 mm
+
2 pc
14 pc
PRO20229 1.511 mm1 pc
1.930
PRO20229 401 mm1+1 pc
B
B
ROYAL-T 4
C
B
B
C
SILICONEN
item pc. L
M6x12
PRO20779 1+1 pc
10 pc
2.010 mm
+
PRO20779 2+2 pc 829 mm
A
A
item pc. L
20x55x20 1 pc
15x20 600 mm
1 pc
600 mm
M6x12 4 pc
+
LG 2 pc
2 pc
4 pc
Silicon all edges where
this piece meets the
frame.
This will prevent future
water leakage.

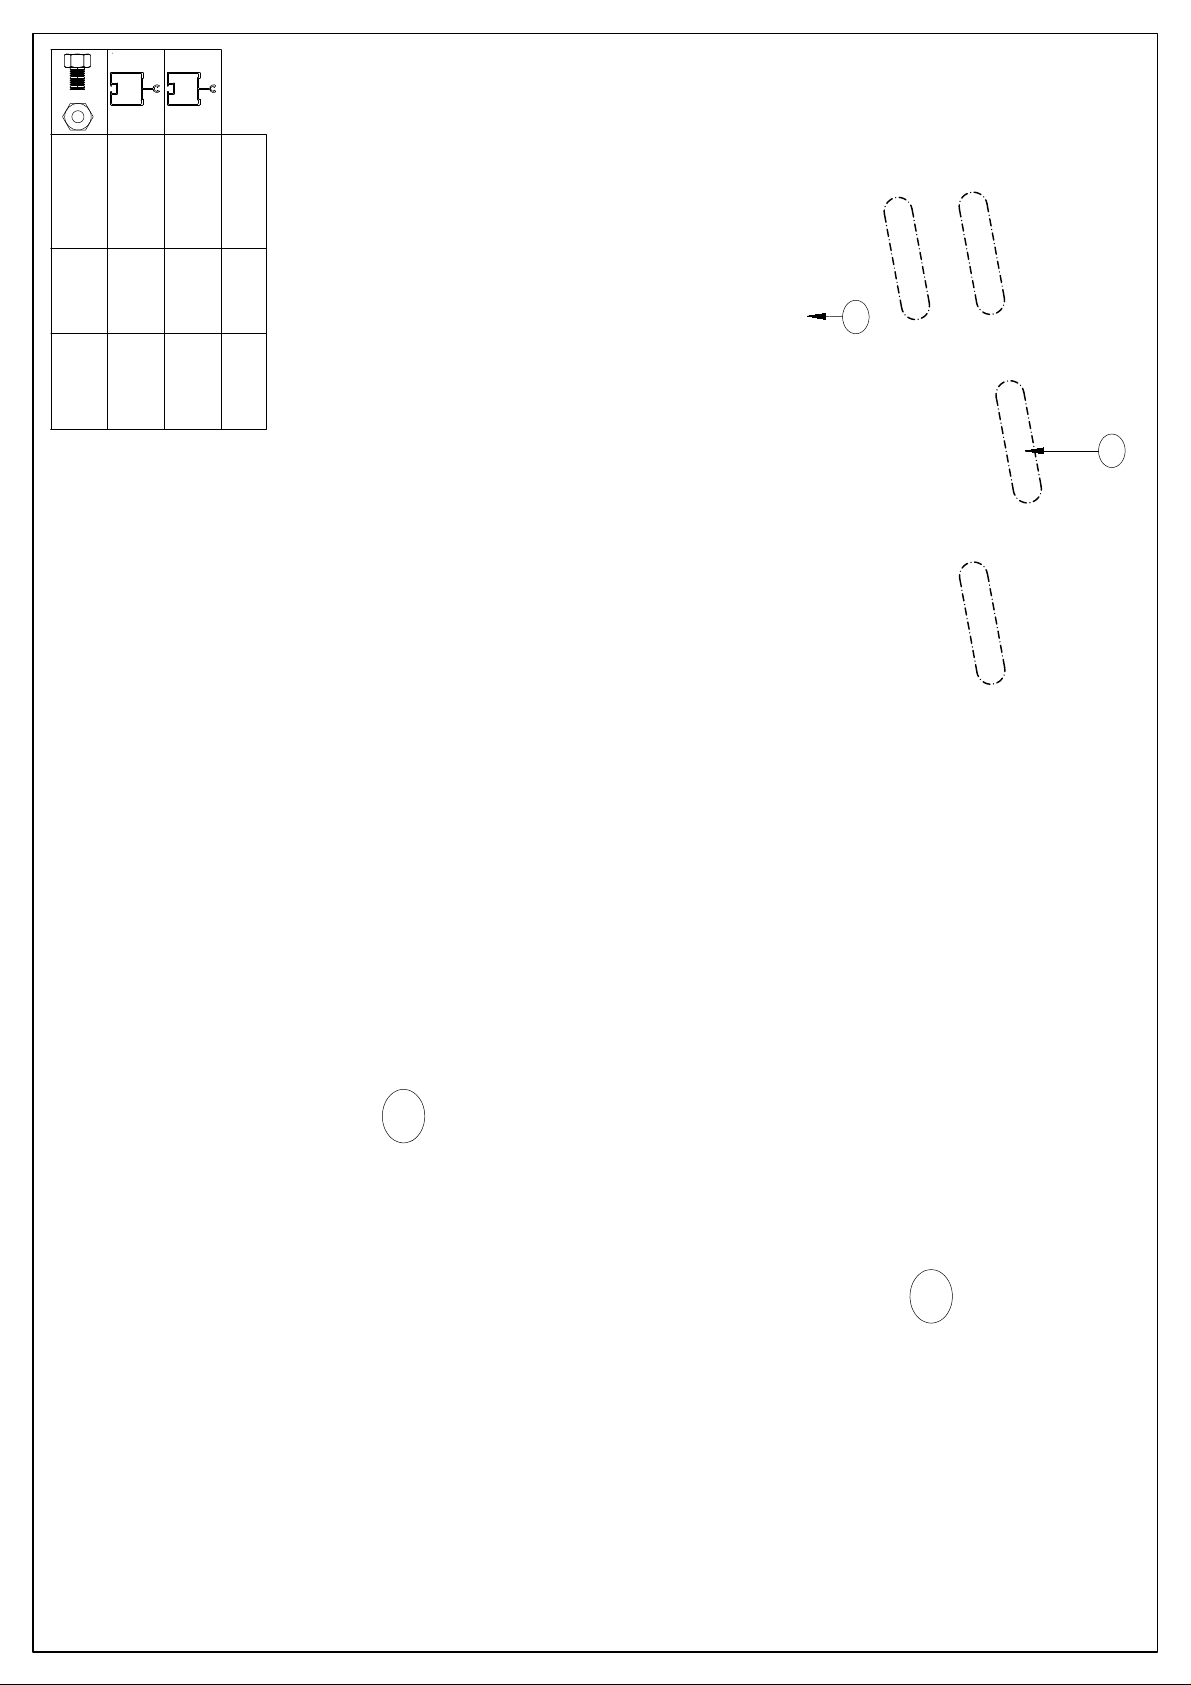
ROYAL-T 5
item pc. L
M6x12
1.630 mm
+
25 pcPRO1456
PAGE ROYAL T 18
1
1
2
2
M6x25
+
50+8+2 pc
6 pc
PAGE ROYAL T 6 PAGE ROYAL T 16
M6x12 M6x25
PAGE ROYAL T 13
A
A
A
M6x12
Seed Tray - Install in
either of the locations
outlined in red. Do not
install a Louvre window in
the same location.
Louvre Window - Install in
locations along the back
wall outlined in green.
May install in locations
outlined in red only if a
seed tray is not present.
Note: Before securing vertical
profile insert bolts for
Louvered Window, see pg.
LR 1-2

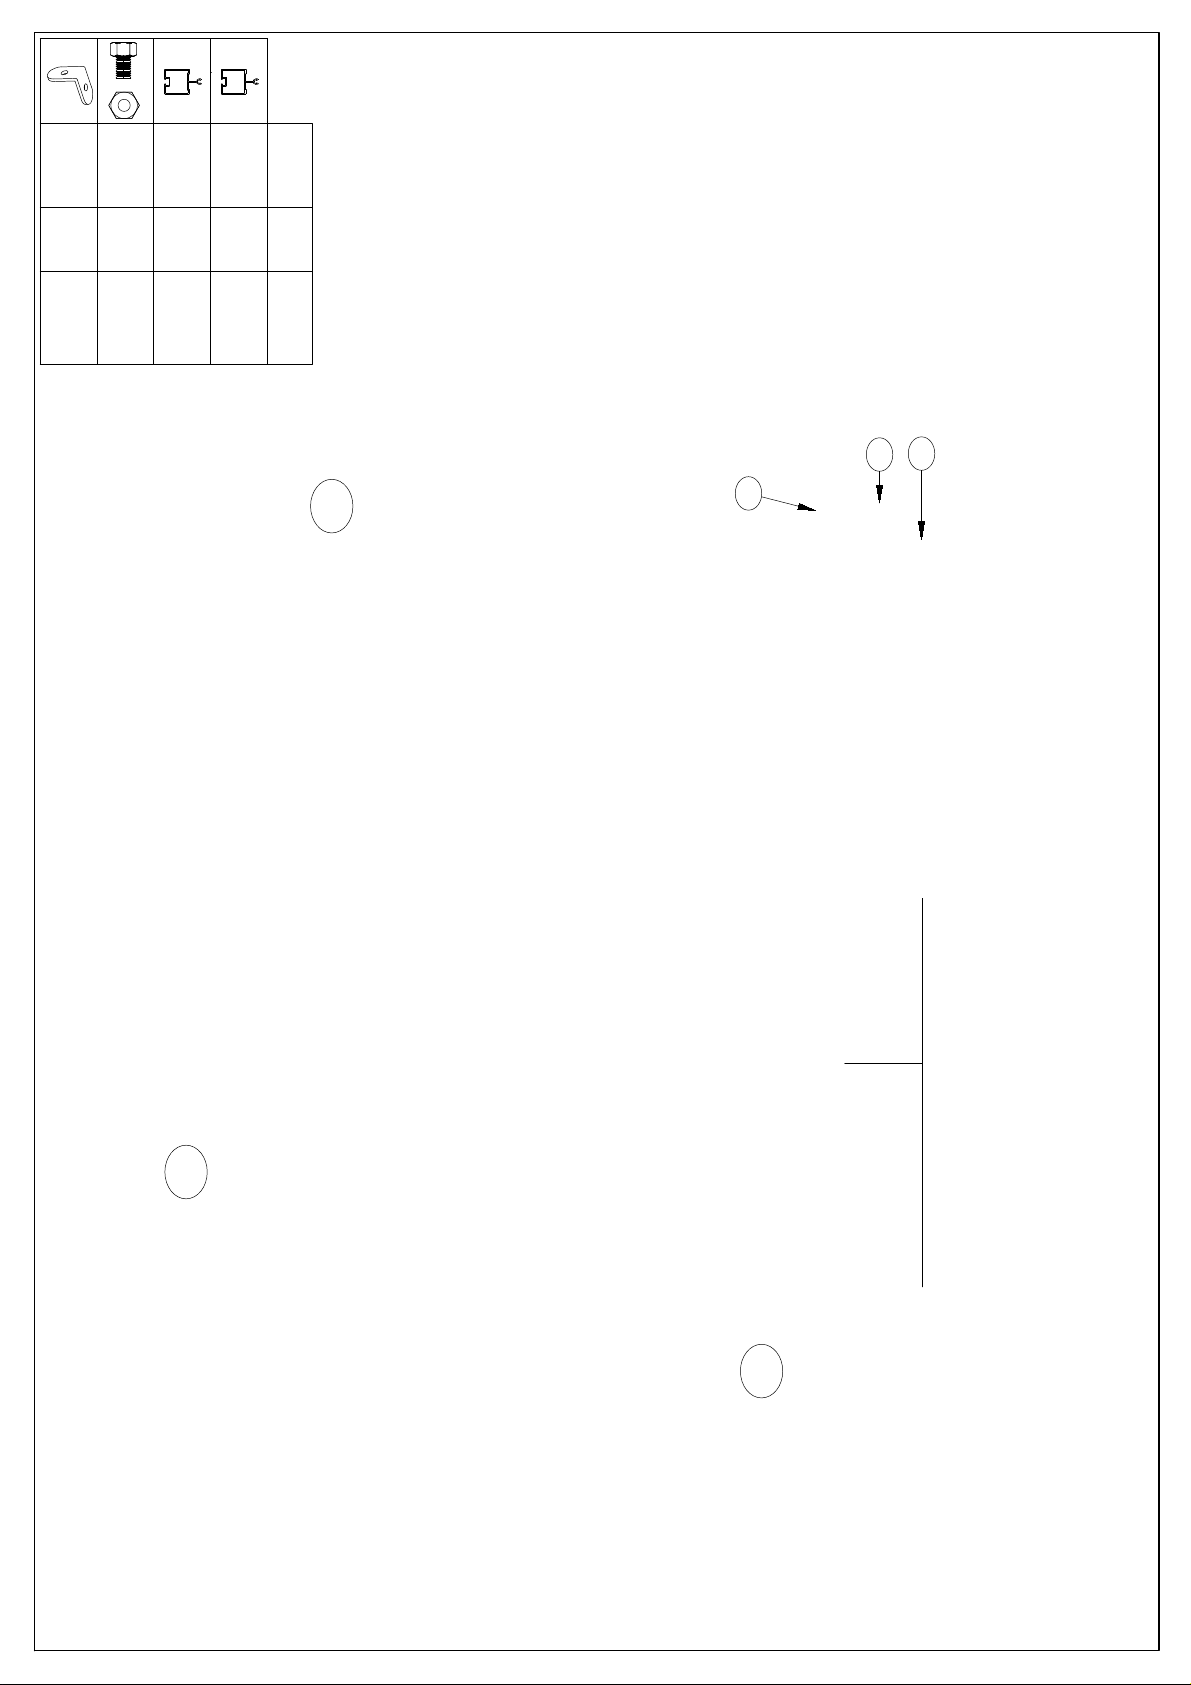
ROYAL-T 6
item pc. L
M6x12
+
2 pcPRO1456
1
1
2
2
703 mm
2 pc
12 pc
603 mm
PRO1456
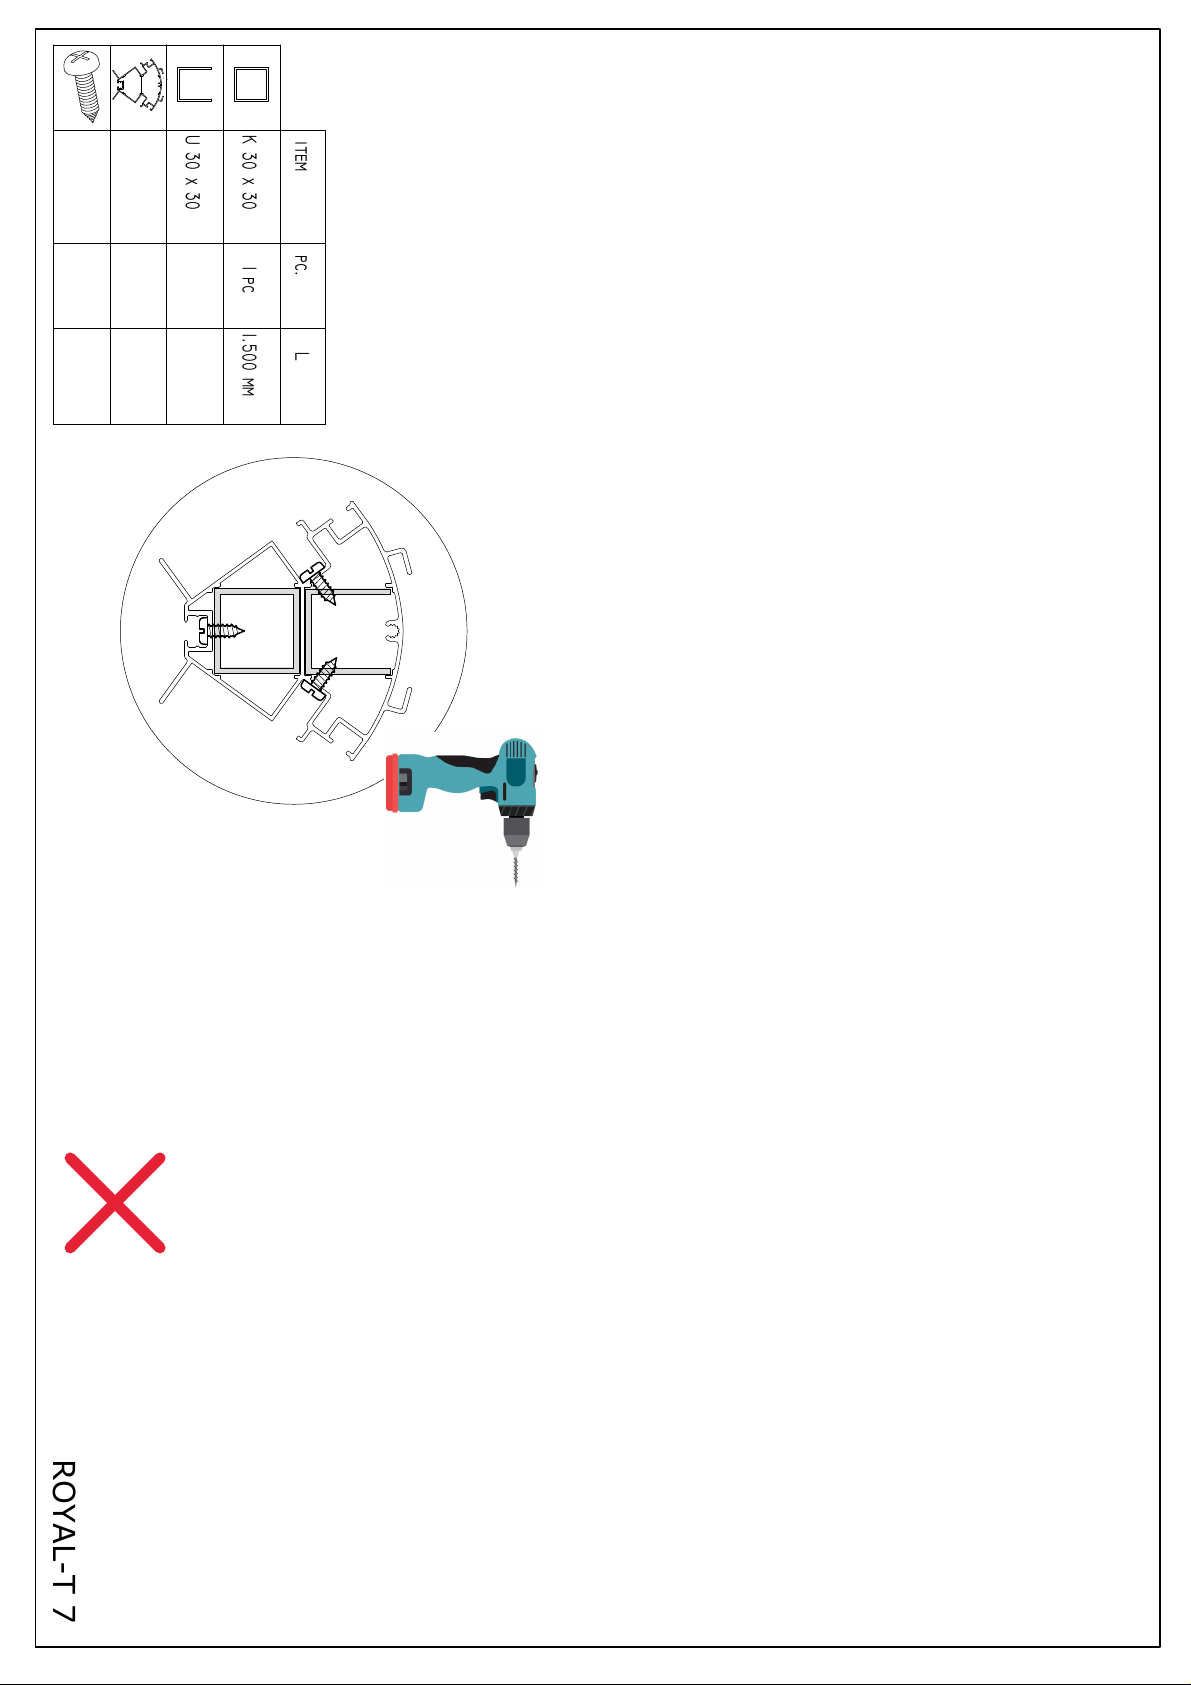
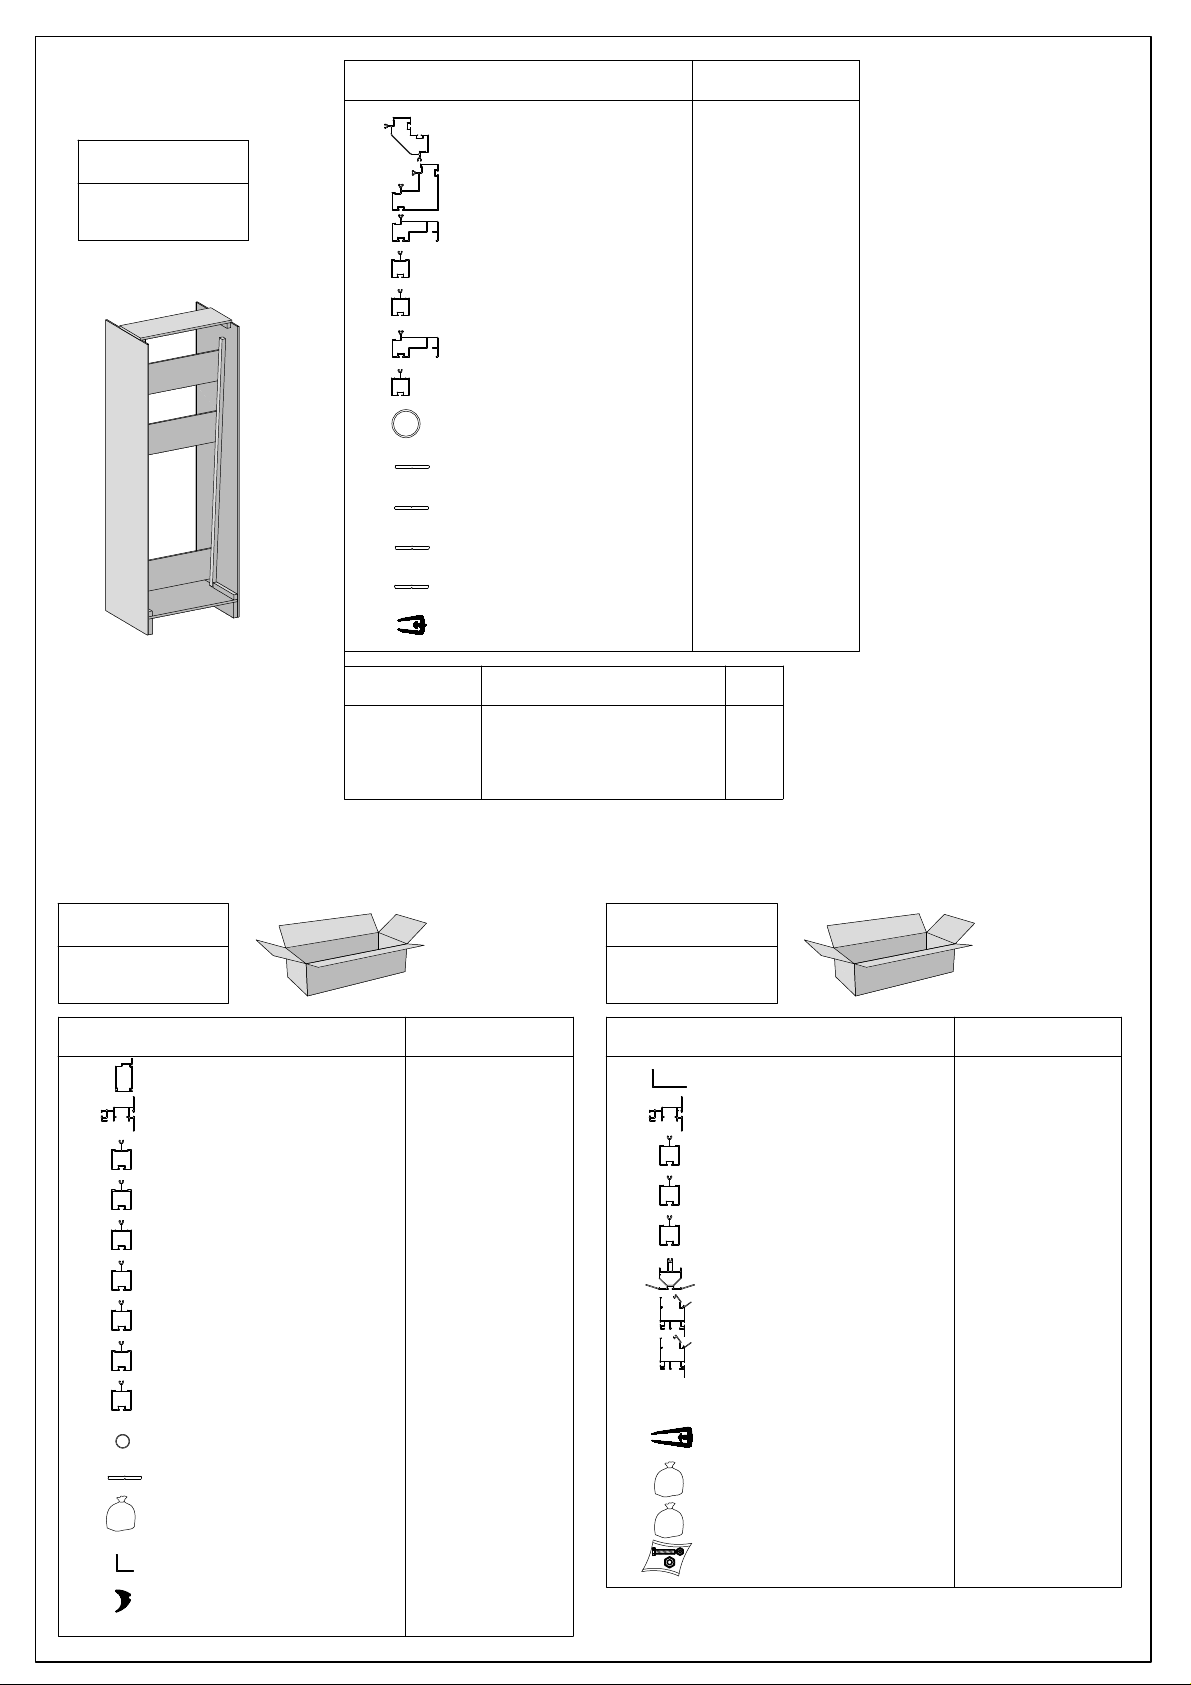
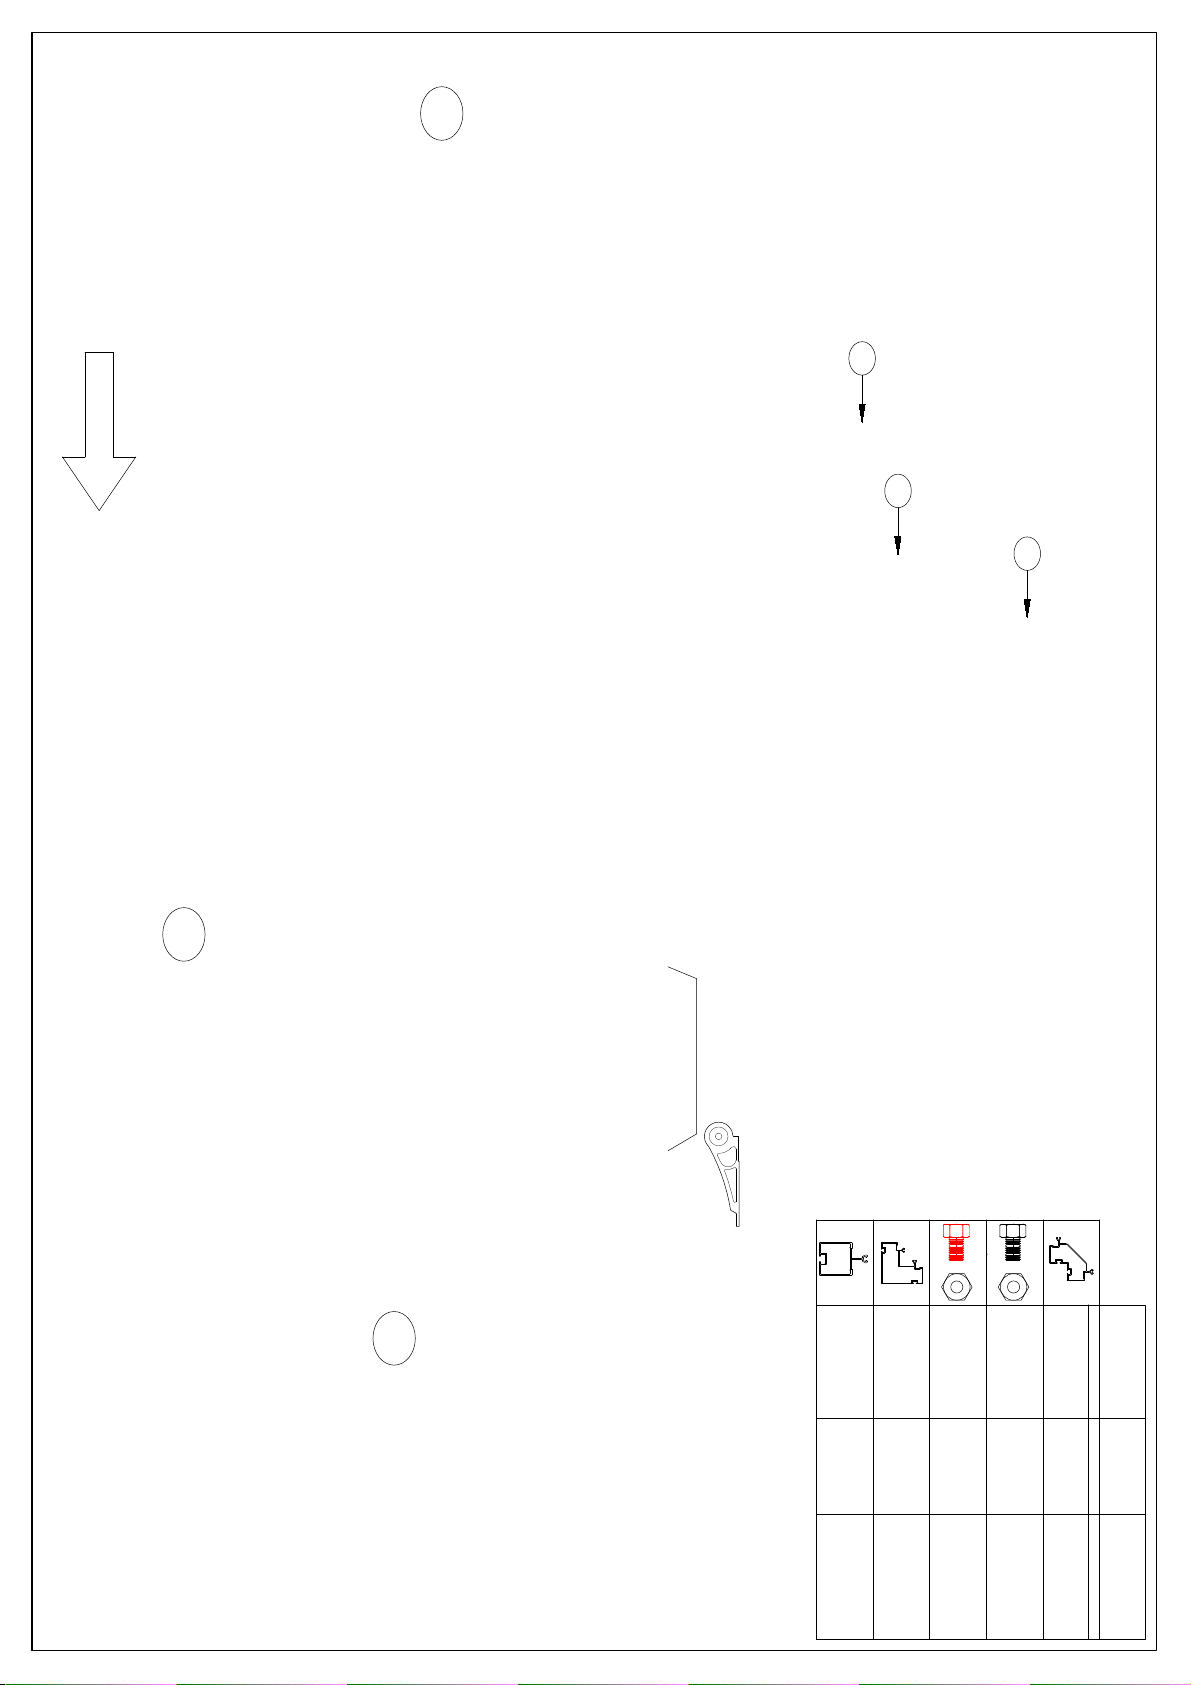
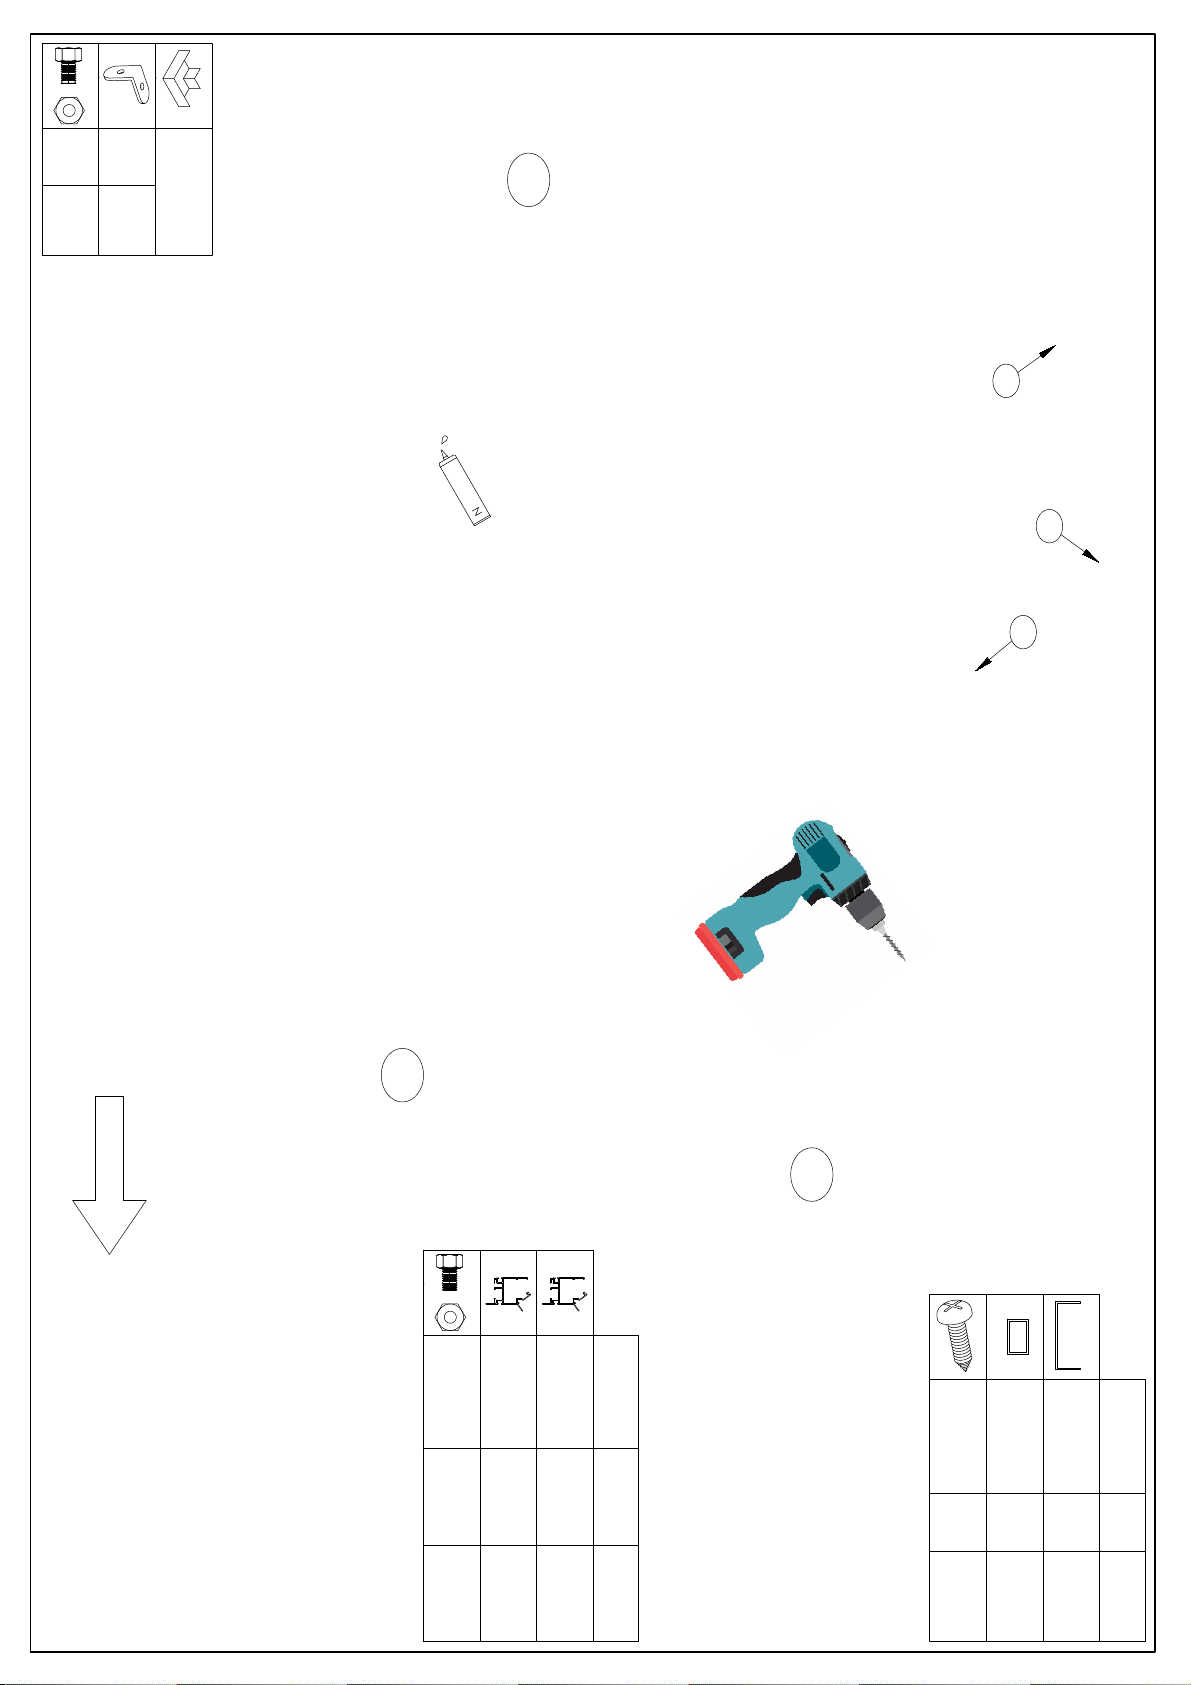
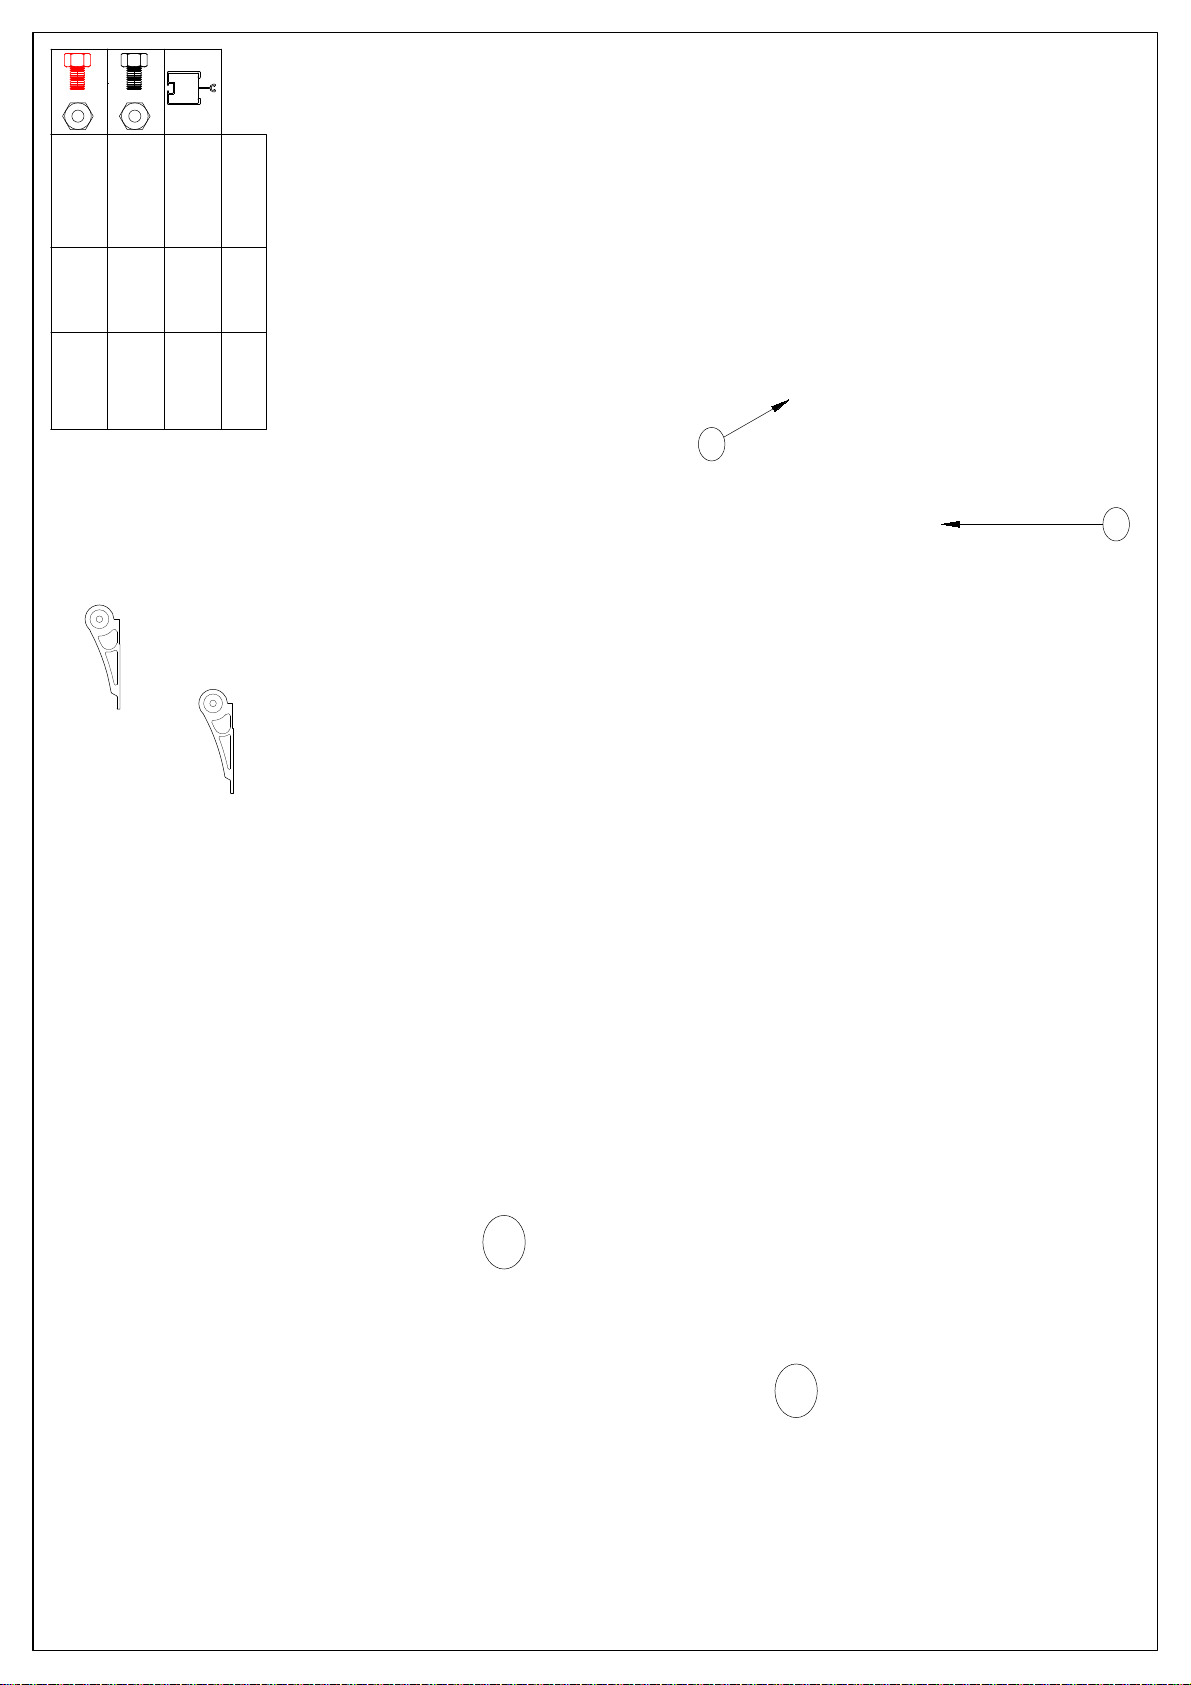
ROYAL-T 7
item pc. L
K 30 x 30
U 30 x 30
1.500 mm1 pc
1+1 pc
1.500 mm1 pc
12 pc
PRO40091 2.010 mm
SUPPORT
Optional: Use a piece of
wood to provide extra
support.
Buy 10ft 2x4 and cut to
fit.
NOTE: Use a power drill to
pre-drill holes before adding
the screws.

ROYAL-T 8
item pc.
M6x12
PRO6918
8+4+16 pc.
1.830 mm
+
4 pc.
A
B
A
B
PAGE ROYAL T 7
L
PAGE ROYAL T 9
PAGE ROYAL T 17
PAGE ROYAL T 9 + 11

ROYAL-T 9
PRO1456
item pc.
2 pc.
M6x15
+
PRO1456 4 pc.
1.090 mm
334 mm
LG
L
28+2 pc.
14 pc.
C
A
B
A
B
C
A
B
C
PAGE ROYAL T 18
PRO1456 4 pc. 602 mm
PRO1456 4 pc. 871 mm
PAGE ROYAL T 17
Turn to this page
for additional tips
Turn to this page
for additional tips
NOTE: The wind braces
(BLUE) can be tricky to
install. If you are having
trouble, try temporarily
un-attaching Piece A
from the hub (depicted
above). It can be
reattached later, and its
removal should allow for
some wiggle room.

ROYAL-T 10
item pc. L
M6x12 18+12 pc.
1.830 mm
+
9 pc.PRO1456
M6x25
+20 pc.
B
A
B
PAGE ROYAL T 16
A
PAGE ROYAL T 16
PAGE ROYAL T 16
PAGE ROYAL T 11
PAGE ROYAL T 11
M6x25
M6x25
M6x25
M6x12
M6x12
M6x12
M6x12
M6x12
M6x12
M6x12
M6x12
M6x12
M6x12
PAGE ROYAL T 16
M6x25
ROYAL-T 11
item pc. L
M6x12 24 pc.
703 mm
+
4 pc.PRO1456
A
B
B
A
1.005 mm4 pc.PRO1456

ROYAL-T 12
item pc.
M6x12
PRO6918
6+4 pc.
1.430 mm
+
2 pc.
B
A
B
SILICONEN
L
1 pc.
PRO40091*
C
A
C
PAGE ROYAL T 9
PAGE ROYAL T 9
M6x12
M6x12
Insert bolts to connnect short
uprights to the PRO6918. You will
need as many bolts as you have short
uprights.
ROYAL-T 13
PRO1456
item pc.
1 pc.
M6x15
+
PRO1456 2 pc.
718 mm
LG
L
7 pc.
5 pc.
A
B
A
B
C
PAGE ROYAL T 18
C
472 mm
Turn to this page
for additional tips
NOTE: The wind braces
(BLUE) can be tricky to
install. If you are having
trouble, try temporarily
un-attaching Piece A
from the hub (depicted
above). It can be
reattached later, and its
removal should allow for
some wiggle room.
ROYAL-T 14
item pc. L
M6x12 8 pc.
1.430 mm
+
4 pc.PRO1456
M6x25
+8 pc.
A
B
A
B
M6x12
M6x12
M6x12
M6x12
M6x25
M6x25
PAGE ROYAL T 16
PAGE ROYAL T 16
Table of contents
Other Exaco Greenhouse Kit manuals

Exaco
Exaco EOS JUNIOR VICTORIAN User manual

Exaco
Exaco Tulip House User manual

Exaco
Exaco VI23 User manual

Exaco
Exaco HOKLARTHERM Riga XL 5 User manual

Exaco
Exaco HELIOS/EOS T User manual

Exaco
Exaco GIGANT User manual

Exaco
Exaco VICTORIAN VI 46 User manual

Exaco
Exaco HOKLARTHERM Riga XL 5 User manual

Exaco
Exaco Riga XL VI User manual

Exaco
Exaco EOS Retro SL User manual


Popular Greenhouse Kit manuals by other brands


Mueller
Mueller 9x12 Greenhouse Kit instructions

One Stop Gardens
One Stop Gardens ONE STEP GARDEN 92050 Assembly & operating instructions

Palram
Palram Americana manual

Mercia Garden Products
Mercia Garden Products 04GREEN0806SD-V6 manual

Infloria
Infloria GS010997 Assembly instructions

Dancover
Dancover TITAN Arch+ 60 manual


