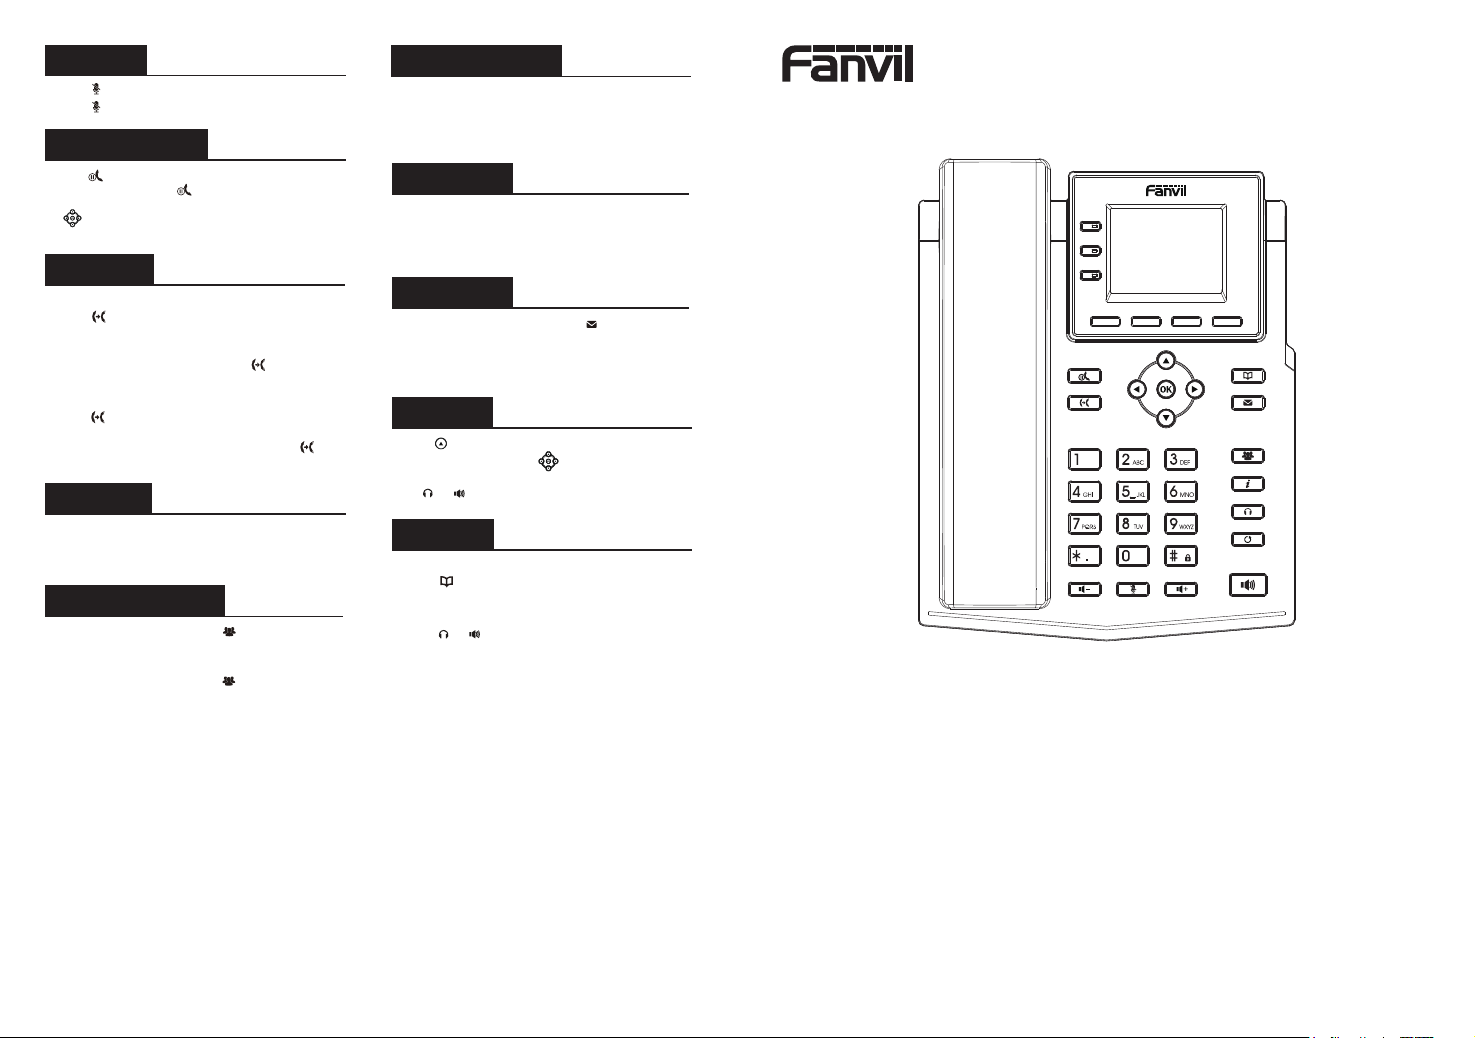
manuals.online logo
Brands
  1. Home
  2. •
  3. Brands
  4. •
  5. Fanvil
  6. •
  7. IP Phone
  8. •
  9. Fanvil X303W User manual

Fanvil X303W User manual

Other Fanvil IP Phone manuals

Fanvil F52 User manual

Fanvil

Fanvil F52 User manual

Fanvil V Series User manual

Fanvil

Fanvil V Series User manual

Fanvil VH05 User manual

Fanvil

Fanvil VH05 User manual

Fanvil X3S/G User manual

Fanvil

Fanvil X3S/G User manual

Fanvil X210 User manual

Fanvil

Fanvil X210 User manual

Fanvil X4G User manual

Fanvil

Fanvil X4G User manual

Fanvil D800 User manual

Fanvil

Fanvil D800 User manual

Fanvil X3S Basic Quick guide

Fanvil

Fanvil X3S Basic Quick guide

Fanvil X6U User manual

Fanvil

Fanvil X6U User manual

Fanvil X7C User manual

Fanvil

Fanvil X7C User manual

Fanvil X7 User manual

Fanvil

Fanvil X7 User manual

Fanvil FNVL-X6 User manual

Fanvil

Fanvil FNVL-X6 User manual

Fanvil X6 User manual

Fanvil

Fanvil X6 User manual

Fanvil X210i User manual

Fanvil

Fanvil X210i User manual

Fanvil X5S User manual

Fanvil

Fanvil X5S User manual

Fanvil X210i User manual

Fanvil

Fanvil X210i User manual

Fanvil X3G User manual

Fanvil

Fanvil X3G User manual

Fanvil V67 User manual

Fanvil

Fanvil V67 User manual

Fanvil C62 User manual

Fanvil

Fanvil C62 User manual

Fanvil X3S Basic User manual

Fanvil

Fanvil X3S Basic User manual

Fanvil F52 User manual

Fanvil

Fanvil F52 User manual

Fanvil BW320 User manual

Fanvil

Fanvil BW320 User manual

Fanvil X3S Basic User manual

Fanvil

Fanvil X3S Basic User manual

Fanvil BW530 User manual

Fanvil

Fanvil BW530 User manual

Popular IP Phone manuals by other brands

Cortelco C62 VoIP Phone user guide

Cortelco

Cortelco C62 VoIP Phone user guide

VanillaIP Polycom IP300 user manual

VanillaIP

VanillaIP Polycom IP300 user manual

Yealink Yealink SIP-T22P Quick installation guide

Yealink

Yealink Yealink SIP-T22P Quick installation guide

Viking SR-IP product manual

Viking

Viking SR-IP product manual

Yealink VP59 Teams user guide

Yealink

Yealink VP59 Teams user guide

Panasonic KX-UT133-B Administrator's guide

Panasonic

Panasonic KX-UT133-B Administrator's guide

Avaya one-X 9600 Series overview

Avaya

Avaya one-X 9600 Series overview

AVA Enterprises B179 Installation and administration guide

AVA Enterprises

AVA Enterprises B179 Installation and administration guide

Cisco Unified 7900 Series System guide

Cisco

Cisco Unified 7900 Series System guide

Polycom SoundPoint IP 450 datasheet

Polycom

Polycom SoundPoint IP 450 datasheet

Cisco SPA-500 Series user guide

Cisco

Cisco SPA-500 Series user guide

IPitomy IP290 user manual

IPitomy

IPitomy IP290 user manual

Polycom SoundPoint IP 650 user guide

Polycom

Polycom SoundPoint IP 650 user guide

Proximus Maestro 3016 IP quick start guide

Proximus

Proximus Maestro 3016 IP quick start guide

Polycom IP 450 user guide

Polycom

Polycom IP 450 user guide

Snom 320 quick start guide

Snom

Snom 320 quick start guide

Avaya Integral 5 R3.0 user guide

Avaya

Avaya Integral 5 R3.0 user guide

Yealink Yealink SIP-T46G Guide

Yealink

Yealink Yealink SIP-T46G Guide

manuals.online logo
manuals.online logoBrands
  • About & Mission
  • Contact us
  • Privacy Policy
  • Terms and Conditions

Copyright 2025 Manuals.Online. All Rights Reserved.

- 4 -
Programmable keys
1. You can configure shortcuts for the programmable keys.
2. Press Menu > Basic > Keyboard, select among the
configurable items, and select your desired type and value,
press OK key.
Do notdisturb
1. Press DND soft key, and enable the device do not disturb
mode.
2. Or press Menu > Features > DND, and select the Mode and
Type, and press OK key.
Voice mail
1. To access your voice mailbox, press or Menu
> Message > Voice Message, number of messages will be
indicated if provided by your server or pbx.
2. Select the line and press Play to call.
Call Mute
1. Press to Mute the microphone during the call.
2. Press again to un-mute the conversation.
Call forward
1. Press Menu > Features > Call Forward.
2. Select the line, the type of forward, enter the destination
number and status , and press OK soft key.
Call list
Phonebook
Access phonebook:
Add new entry:
1. Press or Contact soft key or Menu > Contact >
Local Contacts.
2. Select All Contacts or other group.
3. To dial an entry, press Dial soft key or pickup handset
or press or .
1. Press Contact soft key, Press All Contacts or other
group > Press Add.
2. Enter name and number and press OK soft key.
1. Press key or Menu > CallLog > Local Call Logs.
2. Scroll through the list using .
3. Todial an entry, press Dial soft key or pickup handsetor
press or .
Call transfer
Attended transfer:
Blind transfer:
1. Press key or Xfer soft key during the active conversation,
the call is put on hold.
2. Dial the second telephone number.
3. When the call is answered, then press key or Xfer soft
key to complete the operation.
1. Press key or Xfer soft key during the active conversation,
the call will be on hold.
2. Then enter the 2nd telephone number and press key
or Xfer soft key.
Putting a call on hold
1. Press key or Hold soft key, caller is put on hold.
2. Toretrieve the call press key or Resume soft key.
Note: with more than one active call, select desired call with
the navigator keys and use the corresponding soft key to
hold or resume.
Multiparty conference
1. Once in line with 1st caller, press key or Conf soft key,
1st caller is put on hold.
2. Then call the 2nd number.
3. After,2nd call is established, press key or Conf soft key to
setup the conference.
Quick Installation Guide
Fanvil Technology Co., Ltd
www.fanvil.com
X303W
V1.0
Regulatory Compliance
Federal Communication Commission (FCC) — USA
This device complies with Part 15 of FCC Rules. Operation is subject to the following two conditions: (1) this device may not cause harmful interference, and (2) this device
must accept any interference received; including interference that may cause undesired operation.
This equipment has been tested and found to comply with the limits for a Class B digital device, pursuant to Part 15 of the FCC Rules. These limits are designed to provide
reasonable protection against harmful interference in residential installation. This equipment generates, uses, and can radiate radio frequency energy, and if it is not installed
and used in accordance with the instruction manual, it may cause harmful interference to radio communications. However, there is no guarantee that interference will not
occur in a particular installation. If this equipment does cause harmful interference to radio or television reception, which can be determined by turning the equipment off and
on, the user is encouraged to try to correct the interference by one or more of the following measures:
• Reorient or relocate the receiving antenna.
• Increase the separation between the equipment and receiver.
• Connect the equipment into an outlet on a circuit different from that to which the receiver is connected.
• Consult the dealer or an experienced radio/TV technician for help.
Warning: Any changes or modifications to this unit not expressly approved by the party responsible for compliance could void the user’s authority to operate the equipment.
•This equipment complies with FCC radiation exposure limits set forth for an uncontrolled environment. This equipment should be installed and operated with minimum
distance of 20cm between the radiator and your body. This transmitter must not be co-located or operating in conjunction with any other antenna or transmitter.
This equipment complies with Part 68 of the FCC rules and the requirements adopted by the ACTA. On the bottom of this equipment is a label that contains, among other
information, a product identifier in the format US: 3I1IPNANX303W. If requested, this number must be provided to the telephone company.
Fanvil Technology Co., Ltd
Website: www.fanvil.com
EMail: [email protected] [email protected]
Tel: +86-755-2640-2199 Fax: +86-755-2640-2618
Add: 10/F Block A, Dualshine Global Science Innovation Center,
Honglang North 2nd Road, Bao'an District, Shenzhen, China
Screen icon
In hands-free mode
In headset mode
In handset mode
Mute activated
Silent mode
Packaging list
- 2 - - 3 -
Call is on hold VPN activated
Internet connected
Internet is disconnected
X
No IP address
!
Auto-answering
activated
VLAN activated
Disable do not disturb (Blue)
Call Forward activated
SIP hotspot activated
Do not disturb
activated (Red) Keypad locked
Forward call(s)
New VM Messages
Voice quality level
of call
New SMS
SMS
Received call(s)
Dialed call(s)
Missed call(s)
Configuration via web
1. Getthe IP address from the phone: Press key, or Menu >
Status > ETH .
2. Login: Input the IP address in the web browser.The PC and
phone should be in the same IP address segment (The default
username and password are both ‘admin’.)
3. Configure:Select network/account etc, and fill the relevant
content.
4. Save the configuration.
Language setting
1. Press Menu key > Basic > Language.
2. Select the desired language and press OK soft key.
Making a call
Accepting a call
1. Pre-dialing: enter the phone number and pick up the handset.
2. Direct dialing: lift the handsetand enter the phone number.
3. Handsfree: enter phone number and press or vice versa.
4. Headset: enter phone number and press or vice versa.
1. Using the handset: pick up the handset.
2. Using the headset: press .
3. Using the handsfree: press .
Configuration
Configuration via LCD menu of phone
1. Press Menu > Advanced (default password 123)
2. Select Network: To configure the Network Settings
(IPv4/IPv6/IPv4&IPv6,DHCP/Static/PPPoE).
3. Select Accounts: To configure enable the account, fill the SIP
server address, port, user name, password etc.
4. Save the configuration.
5. Designated line: press line key, enter phone number and
press dial key.
Wireless network
connected
Wireless network
disconnected
Wireless network failure
Redial
1. Press redial a call number.
IP Phone Handset
Handset Cord
Stand Power Adapter
(Optional)
Ethernet Cable Quick Installation Guide
Wall Stand
(Buy separately)
Please follow the instructions in below picture to install the
device.
Bracket desktop installation
Wall mounting (Wall Stand need buy separately)
Connecting to the device
Please connect power adapter, network, PC, handset, and
Note: The installation height of the wall-mounted
bracket is less than 2 meters from the ground.
headsetto the corresponding ports as described in below
picture.
①Power port: connect the power adapter.
②Network port: connecting local area network or Internet.
③PC port: the network portconnect to the computer.
④Headset port: connect headset.
⑤Handset port: connect IP Phone handset.
Internet DC 5VPC Headset Handset
⑤④
③ ① ②
Network connect
Using Ethernet
1. The power on the device and connect the WAN portof the
phone to the RJ45 socketof a hub/switch or arouter
(LAN side of the router)using the Ethernetcable.
2. The defaultis DHCP mode.
Using WiFi
1. The power on the device and make sure the phone is idle.
2. Press Menu > Basic > WLAN, Enabled the WiFi Feature.
3. Press scan to search for currently available wireless network.
4. Enter the available network and select the WiFi you want to
connect.
5. Press connect soft key and enter the appropriate password to
connect to the WiFi. The defaultis DHCP mode.
Key features
In idle mode:
activate/deactivate silent mode
In communication mode:
mute/un-mute a call
In idle mode or during ringing:
increase or decrease ringer volume
In communication:
increase or decrease handset,
headset or hands-free volume
Long press to lock keypad.
Enter PIN to unlock keypad (default 123)
Message waiting indicator
Left and right navigation keys
Up navigation key, Shortcut to call log
Down navigation key, Shortcut to Status
OK key, Shortcut to Menu
Call transfer key
Voice messages key
Conference key
State key
Headset key, Activate/
deactivate headset
Redial key, Access to
redial the last record
Hands-free key, Activate/
deactivate hands free
Phonebook key
Hold key, Hold/Resume the call
Soft keys
DSS Keys, It can be set as line key/ Line keys
function key/speed dial key, etc
Device Installation