manuals.online logo
Brands
  1. Home
  2. •
  3. Brands
  4. •
  5. Fisher-Price
  6. •
  7. Baby Swing
  8. •
  9. Fisher-Price CMR45 User manual

Fisher-Price CMR45 User manual

1
CMR45
fisher-price.com
IMPORTANT! Keep these instructions for future reference.
Please read these instructions before assembly and use of this product.
Product features and decorations may vary from photographs and diagrams.
¡IMPORTANTE! Guardar estas instrucciones para futura referencia.
Leer estas instrucciones antes de ensamblar y usar este producto.
Las características y decoración del producto pueden variar de las mostradas.
Side-to-side
Lado a lado
Head-to-toe
Adelante hacia atrás
2
WARNING
ADVERTENCIA
Prevent death: Keep seat fully reclined until child is at least 4 months old AND
can hold head up without help. Young infants have limited head and neck control.
If seat is too upright, infant’s head can drop forward and compress the airway,
resulting in DEATH.
Prevent serious injury or death from falls or strangling in the restraint system:
• Never leave child unattended.
• This product is not intended to replace a crib or bassinet for prolonged periods
of sleep.
• Always use the restraint system.
• Discontinue use of product when infant attempts to climb out (approximately
9 months).
Evitar la muerte: mantener la silla totalmente reclinada hasta que el bebé cumpla
4 meses de edad Ypueda mantener la cabeza derecha sin ayuda. Los bebés
pequeños tienen un control limitado de cabeza y cuello. Si la silla está en posición
vertical, la cabeza del bebé podría caer hacia el frente y comprimir el flujo de aire,
causando la MUERTE.
Para evitar lesiones graves o la muerte como resultado de caídas o quedar
estrangulado en el sistema de sujeción:
• Nunca dejar al niño sin supervisión.
• Este producto no está diseñado para reemplazar una cuna o moisés por periodos
prolongados de sueño.
• Siempre usar el sistema de sujeción.
• Descontinuar el uso del producto cuando el niño intente bajarse (aprox. a los
9 meses).
Consumer Information
Información para el consumidor
IMPORTANT! The maximum weight limit for this product is 25 lb (11,3 kg). If your child weighs
less than 25 lb (11,3 kg), but is really active and appears to be able to climb out of the swing,
immediately discontinue its use.
¡IMPORTANTE! La capacidad máxima de este producto es de 11,3 kg (25 lb). Si el bebé pesa
menos de 11,3 kg pero es muy activo y parece poder salirse del columpio, descontinuar de
inmediato el uso.
3
Consumer Information
Información para el consumidor
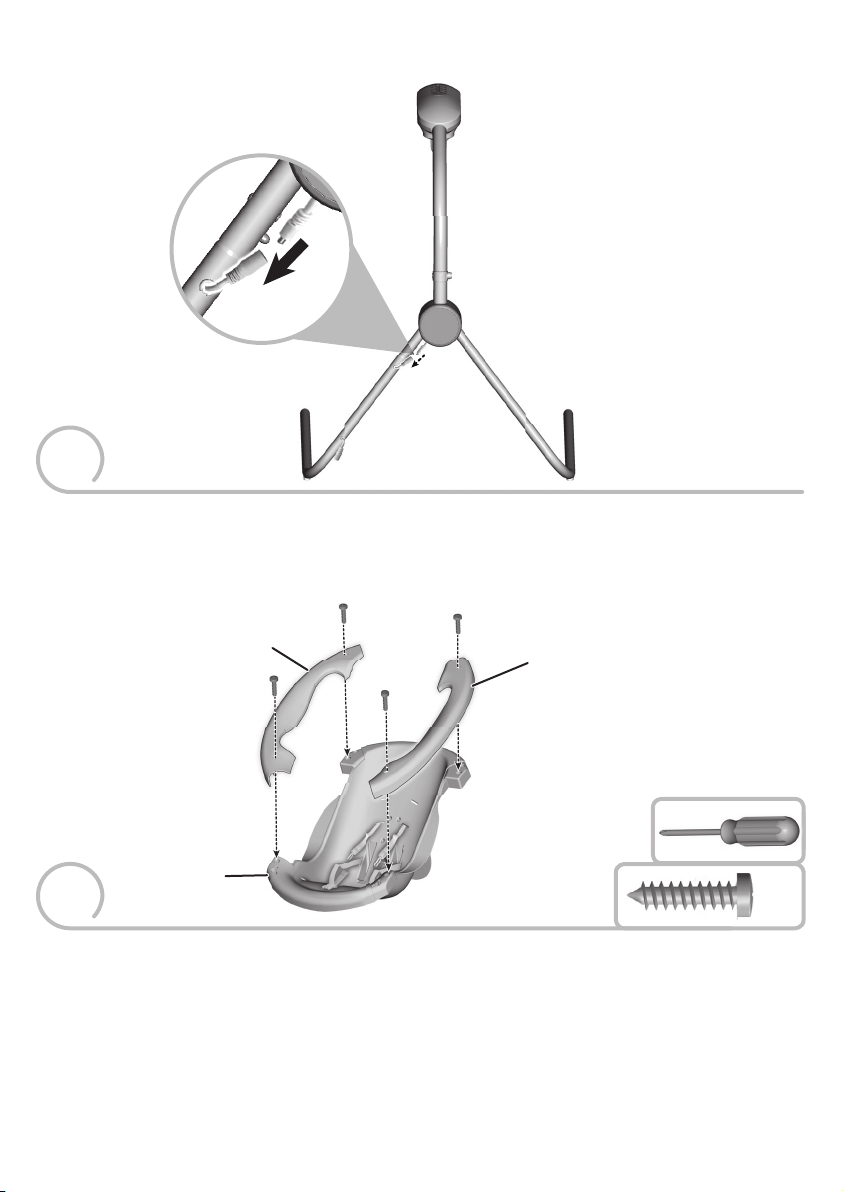
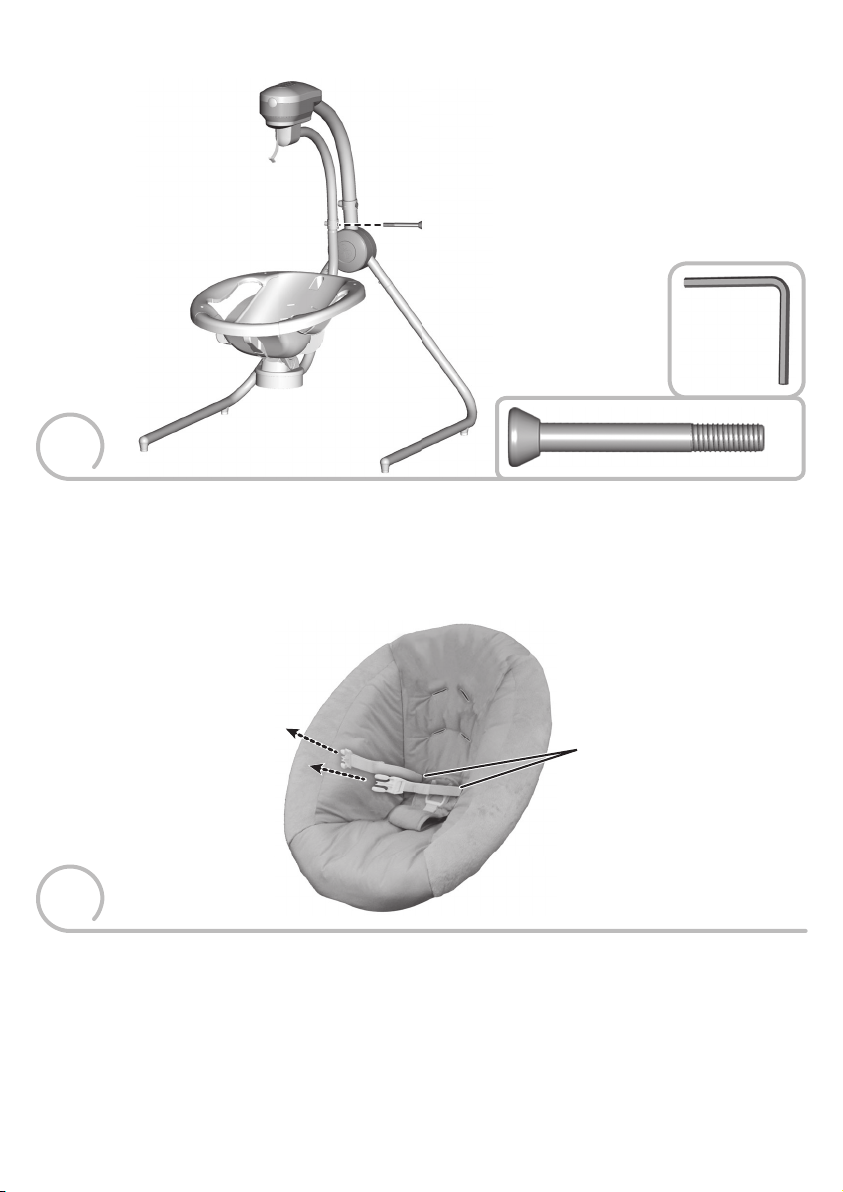
• Adult assembly is required. Tools needed for assembly: Allen wrench (included) and Phillips
screwdriver (not included).
• Requires AC adapter (included) (input 100 - 240 VAC, 50 - 60Hz, with an output of 6 VDC) for
swing operation.
• Always use the swing where there is adequate ventilation. To prevent overheating, keep the
swing away from heat sources such as radiators, heat registers, direct sunlight, stoves,
amplifiers, or other appliances which produce heat.
• Never use extension cords with the AC adapter.
• Never use the swing near water (ie.: bathtub, sink, laundry tub or wet basement, etc.).
• Do not connect to more than the recommended number of power supplies.
• The product must only be used with the recommended AC adapter.
• The AC adapter is not a toy.
• Disconnect the AC adapter from the swing before cleaning.
Note: This product may come with replacement warning labels which you can apply over the
factory applied warning label if English is not your primary language. Select the warning label
with the appropriate language for you.
• Requiere montaje por un adulto. Herramientas necesarias para el montaje: llave hexagonal
(incluida) y desatornillador de cruz (no incluido).
• El columpio funciona con un adaptador de corriente alterna (entrada de 100 - 240 V~, 50 - 60Hz,
salida de 6 Vcc), incluido.
• Siempre usar el columpio donde haya ventilación adecuada. Para evitar sobrecalentamiento,
mantener el columpio alejado de fuentes de calor tales como radiadores, registradoras de calor,
contacto solar directo, estufas, amplificadores u otro equipo que genere calor.
• Nunca usar extensiones de cables eléctricos con el adaptador de corriente alterna.
• No usar el columpio cerca de agua (p. ej., bañera, lavabo, fregadero, sótano mojado, etc.).
• No conectar a más suministros eléctricos de los recomendados.
• Solo usar el producto con el adaptador de corriente alterna recomendado.
• El adaptador de corriente alterna no es un juguete.
• Desconectar el adaptador de corriente alterna del columpio antes de limpiarlo.
Atención: este producto viene con etiquetas de advertencia en español que puede pegar sobre las
etiquetas de fábrica, en caso de que el inglés no sea su idioma primario. Seleccionar la etiqueta
de advertencia en el idioma de su elección.
4
Allen Wrench
Llave hexagonal
Parts Piezas
2 Seat Arms
2 brazos de la silla
Mobile
Móvil
Upper Frame
Parte superior del armazón
2 Lower Frame Tubes
2 tubos de armazón inferiores
Seat
Asiento
Pad
Almohadilla
Body Support
Soporte corporal
Seat Tube
Tubo de asiento
AC Adapter
Adaptador de
corriente alterna
pp
5
Parts Piezas
All fasteners shown actual size. Tighten and
loosen the screws with the enclosed
Allen wrench or a Phillips screwdriver.
Los tornillos se muestran a tamaño real.
Apretar y aflojar los tornillos con la llave
hexagonal incluida o un desatornillador de cruz.
M4,5 x 19 mm Screw – 7
Tornillo M4,5 x 19 mm – 7
M5 x 45 mm Screw – 1
(This screw is located in the upper seat tube retainer. You
will need to remove it to assemble the upper seat tube to
the seat tube.)
Tornillo M5 x 45 mm – 1
(Este tornillo se encuentra en el retenedor del tubo de
asiento superior. Será necesario quitarlo para ensamblar
el tubo de asiento superior en el tubo de asiento.)
6
Assembly Montaje
IMPORTANT! Before each use or assembly, inspect this product for damaged hardware, loose joints,
missing parts or sharp edges. Do not use the product if any parts are missing, damaged or broken.
Do not use accessories or replacement parts other than those approved by the manufacturer.
¡IMPORTANTE! Antes del montaje y de cada uso, revisar que el producto no tenga piezas dañadas,
conexiones sueltas, piezas faltantes o bordes filosos. NO usar el producto si falta o está rota alguna
pieza. No usar accesorios ni piezas de repuesto, salvo aquellos aprobados por el fabricante.
1
• While pressing the button on a lower frame tube, fit the lower frame tube into the upper
frame tube.
• Repeat this procedure to assemble the remaining lower frame tube to the remaining upper
frame tube.
• Mientras presiona el botón de un tubo de armazón inferior, insertar el tubo de armazón inferior
en el tubo de armazón superior.
• Repetir este procedimiento para ensamblar el otro tubo de armazón inferior en el otro tubo de
armazón superior.
Upper Frame
Parte superior
del armazón
Lower Frame Tube
Tubo de armazón inferior
PRESS
PRESIONAR
PRESS
PRESIONAR
7
Assembly Montaje
2
• Plug the power cord from the upper frame tube into the power cord in the lower frame tube.
• Enchufar el cable eléctrico del tubo del armazón superior en el cable eléctrico del tubo del
armazón inferior.
BACK VIEW
VISTA DE ATRÁS
3Seat
Asiento
Seat Arm
Brazo de la silla
Seat Arm
Brazo de la silla
• Fit the seat arms to the tabs on the seat.
• Insert four M4,5 x 19 mm screws into the seat arms. Fully tighten the screws with a Phillips screwdriver.
• Ajustar los brazos de la silla en las lengüetas de la silla.
• Insertar cuatro tornillos M4,5 x 19 mm en los brazos de la silla. Apretar totalmente los tornillos
con un desatornillador de cruz.
x4
8
Assembly Montaje
4
• Turn the seat over so the bottom side faces you.
Hint: For ease of assembly, we recommend placing on a table.
• At an angle, fit the end of the seat tub onto the retainer in the seat.
• Voltear la silla de modo que la parte de abajo apunte hacia usted.
Atención: para que sea más fácil el montaje, colocar la silla sobre una mesa.
• En ángulo, ajustar el extremo del tubo del asiento en el retenedor de la silla.
5
• Insert three M4,5 x 19 mm screws into the seat tube. Fully tighten these screws with
a Phillips screwdriver.
• Insertar tres tornillos M4,5 x 19 mm en el tubo del asiento. Apretar totalmente los tornillos con un
desatornillador de cruz.
Seat Tube
Tubo del asiento
3 Screws
3 tornillos
Retainer
Retenedor
Seat
Silla
TOP VIEW
VISTA DE ARRIBA x3
9
Assembly Montaje
6
IMPORTANT! The screw used to assemble the seat tube to the upper seat tube is located in the
upper seat tube retainer. Loosen the M5 x 45 mm screw in the upper seat tube retainer with the
Allen wrench and remove it. This screw will be used in assembly step 8.
¡IMPORTANTE! El tornillo para ensamblar el tubo del asiento al tubo de asiento superior se
encuentra en el retenedor del tubo del asiento superior. Aflojar el tornillo M5 x 45 mm en el
retenedor del tubo del asiento superior con la llave hexagonal y quitarlo. Este tornillo se usará en
el paso 8.
Remove this screw
Quitar este tornillo
FRONT VIEW
VISTA DEL FRENTE
7
• Fit the seat tube into the upper seat tube.
Hint: You may need the help of another adult for this assembly step.
• Insertar el tubo del asiento inferior en el tubo del asiento superior.
Atención:
pedir la ayuda de otra persona para completar este paso de montaje.
Upper Seat Tube
Tubo de asiento superior
Seat Tube
Tubo de asiento
10
Assembly Montaje
8
• Insert the M5 x 45 mm screw into the upper seat tube retainer and tighten with the Allen
wrench. Make sure the screw is fully tightened.
• Insertar el tornillo M5 x 45 mm en el retenedor del tubo del asiento superior y apretarlo con la
llave hexagonal. Asegurarse de que el tornillo esté bien apretado.
x1
9
• Insert the waist belts through the lowest slots in the pad. Make sure the waist belts are
not twisted.
• Insertar los cinturones de la cintura en las ranuras más bajas de la almohadilla. Asegurarse de que los
cinturones no estén torcidos.
Lowest Slots
Ranuras más bajas
11
Assembly Montaje
10
Lower Slots
Ranuras inferiores
Smaller Baby
• Insert the ends of the shoulder belts through the lower slots in the pad.
Bebé más pequeño
• Insertar los extremos de los cinturones de hombro en las ranuras inferiores de la almohadilla.
11
Upper Slots
Ranuras superiores
Larger Baby
• This product is shipped with the shoulder belts installed in the lower slots in the seat. For
a larger baby, you will need to push the ends of the shoulder belts back through back side lower
slots in the seat. Then, fit the shoulder belt ends through the front side upper slots in the seat.
Pull on the shoulder belts to be sure they are secure in the seat.
• Insert the shoulder belts through the upper slots in the pad.
Bebé más grande
• Este producto está instalado de fábrica con los cinturones de hombro en las ranuras inferiores
de la silla. Para un bebé más grande, será necesario empujar los extremos de los cinturones
de hombro de vuelta por las ranuras inferiores de la silla. Luego, ajustar los extremos de los
cinturones de hombro por las ranuras superiores del frente de la silla. Jalar los cinturones de
hombro para asegurarse que están seguros en la silla.
• Insertar los cinturones de hombro en las ranuras superiores de la almohadilla.
12
Assembly Montaje
12
• Fit the pad edges around the rim of the seat.
• Ajustar los bordes de la almohadilla alrededor del borde del asiento.
13
Body Support
Soporte corporal
• Insert the restraint pad through the large slot, the waist belts through the lower slots and the
shoulder belts through the upper slots in the body support.
• Clip the link on the toy to the restraint pad.
• Insertar la almohadilla de sujeción en la ranura grande, los cinturones de la cintura en las
ranuras inferiores, y los cinturones de hombro en las ranuras superiores del soporte corporal.
• Conectar el aro del juguete en la almohadilla de sujeción.
13
Assembly Montaje
14
• Fold the end of the strap on the upper frame and fit it into the slot on the mobile.
• Tug on the mobile to be sure it is attached to the upper frame.
• Doblar el extremo de la cinta del armazón superior e introducirlo en la ranura del móvil.
• Jalar el móvil para asegurarse que está bien ajustado en el armazón superior.
Mobile
Móvil
Strap
Cinta
14
Setup and Use Preparación y uso
WARNING
ADVERTENCIA
Prevent death: Keep seat fully reclined until child is at least 4 months old AND
can hold head up without help. Young infants have limited head and neck control.
If seat is too upright, infant’s head can drop forward and compress the airway,
resulting in DEATH.
Prevent serious injury or death from falls or strangling in the restraint system:
• Never leave child unattended.
• This product is not intended to replace a crib or bassinet for prolonged periods
of sleep.
• Always use the restraint system.
• Discontinue use of product when infant attempts to climb out (approximately
9 months).
Evitar la muerte: mantener la silla totalmente reclinada hasta que el bebé cumpla
4 meses de edad Ypueda mantener la cabeza derecha sin ayuda. Los bebés
pequeños tienen un control limitado de cabeza y cuello. Si la silla está en posición
vertical, la cabeza del bebé podría caer hacia el frente y comprimir el flujo de aire,
causando la MUERTE.
Para evitar lesiones graves o la muerte como resultado de caídas o quedar
estrangulado en el sistema de sujeción:
• Nunca dejar al niño sin supervisión.
• Este producto no está diseñado para reemplazar una cuna o moisés por periodos
prolongados de sueño.
• Siempre usar el sistema de sujeción.
• Descontinuar el uso del producto cuando el niño intente bajarse (aprox. a los
9 meses).
15
Restraint System Sistema de sujeción
Restraint Pad
Almohadilla de sujeción
Waist Belt
Cinturón de
la cintura
Shoulder Belt
Cinturón de
hombro
Waist Belt
Cinturón de
la cintura
Shoulder Belt
Cinturón de
hombro
1
• Place your child in the seat. Position the restraint pad between your child's legs.
• Fit the end of each waist belt through the end of each shoulder belt.
• Fasten the waist/shoulder belts to the restraint pad. Make sure you hear a "click" on both sides.
• Check to be sure the restraint system is securely attached by pulling it away from your child.
The restraint system should remain attached.
• Sentar al niño en la silla. Colocar la almohadilla de sujeción entre las piernas del niño.
• Insertar el extremo de cada cinturón de la cintura en el extremo de cada cinturón del hombro.
• Ajustar los cinturones de la cintura/hombros en la almohadilla de sujeción. Asegurarse de oír un
clic en ambos lados.
• Asegurarse de que el sistema de sujeción esté bien asegurado, jalándolo en dirección opuesta al
niño. El sistema de sujeción debe permanecer conectado.
2
Restraint System
Sistema de sujeción
• Tighten each waist belt so that the restraint system is snug against your child. Please refer to the
next section for instructions to tighten the waist/shoulder belts.
• Apretar cada cinturón de la cintura de modo que el sistema de sujeción quede bien ajustado al
niño/a. Consultar la siguiente sección para mayores detalles sobre cómo apretar los cinturones
de la cintura/hombros.
16
3LOOSEN
AFLOJAR
TIGHTEN
APRETAR
• To tighten the waist belts: Feed the anchored end of the belt up through the buckle to form
a loop A. Pull the free end of the belt B. Repeat this procedure to tighten the other belt.
• To loosen the waist belts: Feed the free end of the belt up through the buckle to form a loop A.
Enlarge the loop by pulling on the end of the loop toward the buckle. Pull the anchored end of
the belt to shorten the free end of the belt B. Repeat this procedure to loosen the other belt.
Note: After adjusting the belts to fit your child, make sure you pull on them to be sure they are
securely fastened.
• Para apretar los cinturones de la cintura: introducir el extremo fijo del cinturón en la hebilla
para formar un espacio A. Jalar el extremo libre del cinturón B. Repetir este procedimiento
para apretar el otro cinturón.
• Para aflojar los cinturones de la cintura: introducir el extremo libre del cinturón en la hebilla
para formar un espacio A. Agrandar el espacio jalando el extremo libre del cinturón hacia la
hebilla. Jalar el extremo fijo del cinturón para acortar el extremo libre del cinturón B. Repetir
este procedimiento para aflojar el otro cinturón.
Atención: después de ajustar los cinturones al tamaño del niño, asegurarse de tirar de ellos para
verificar que están bien ajustados.
LOOSEN
AFLOJAR
TIGHTEN
APRETAR
Adjusters
Ajustadores
4
To tighten the shoulder belts:
• Hold the adjuster Aand pull the front shoulder strap down B.
To loosen the shoulder belts:
• Slide the adjuster down.
Para apretar los cinturones de los hombros:
• Sujetar los ajustadores Ay jalar hacia abajo los cinturones delanteros de los hombros B.
Para aflojar los cinturones de los hombros:
• Deslizar hacia abajo los ajustadores.
Restraint System Sistema de sujeción
17
Adjust Seat Motion
Ajustar el movimiento de la silla
• While holding the sides of the swing seat, turn the seat to adjust the motion direction to
side-to-side or head-to-toe.
• Mientras sujeta los lados de la silla del columpio, voltear la silla para ajustar la dirección del
movimiento de lado a lado o adelante hacia atrás.
iento
de
la
sill
a
Ajustar
el
movi
m
Side-to-side
Lado a lado Head-to-toe
Adelante hacia atrás
18
Adjust Seat Position Ajustar la posición de la silla
• From behind the seat, squeeze and hold the seat position latch.
- Lift the seat back to the upright position.
- Lower the seat back to the recline position.
• Release the latch.
• De la parte trasera de la silla, mantener apretado el seguro de posición de la silla.
- Levantar el respaldo a la posición vertical.
- Bajar el respaldo a la posición reclinada.
• Soltar el seguro.
SQUEEZE
SQUEEZE
APRETAR
APRETAR
Recline
Recline
Reclinada
Reclinada
Upright
Upright
Vertical
Vertical
19
Swing AC Power
Uso del columpio con corriente alterna
• Place the swing near a standard wall outlet.
• Insert the AC adapter pin into the socket in the swing base.
• Plug the AC adapter into the wall outlet.
• Use the AC adapter only in a wall outlet. Do not plug the AC adapter into a ceiling outlet.
• Poner el columpio cerca de un tomacorriente de pared estándar.
• Insertar la clavija del adaptador de corriente alterna en la conexión de la base del columpio.
• Enchufar el adaptador de corriente alterna en el tomacorriente de pared.
• Enchufar el adaptador de corriente alterna solo en un tomacorriente de pared. No enchufar el
adaptador de corriente alterna en un tomacorriente de techo.
20
Swing Power, Music, Sounds and Light Settings
Opciones de luz, música y sonidos y encendido
del columpio
• There is no timeout feature for swing motion. Be sure to turn power OFF when not in use.
• The music/sounds time out after approximately 30 minutes. Press the music/sound button
to restart.
• No hay opción de pausa para el movimiento del columpio. APAGAR la unidad cuando el
producto no esté en uso.
• Después de aproximadamente 30 minutos, la música/sonidos se apagarán. Para reiniciarlos,
presionar el botón de música/sonidos.
Press the power button to turn
swing power ON.
Presionar el botón de encendido
para ENCENDER el columpio.
Press the sound button to turn
sounds ON. Press the button
again to change the sound.
Presionar el botón de sonidos
para ACTIVAR los sonidos.
Presionar el botón otra vez
para cambiar el sonido.
Press the swing speed buttons
to adjust the swing speed. LED
display lights up to indicate the
speed setting.
Presionar los botones de
velocidad del columpio
para ajustar la velocidad del
movimiento. La luz LED se
ilumina para indicar el nivel
del movimiento.
Press the volume buttons to
adjust the volume level. LED
display lights up to indicate the
volume level. To turn sound off,
press the volume buttons until
LED display turns off.
Presionar los botones del
volumen para ajustar el
volumen. Las luces LED se
iluminan para indicar el nivel del
volumen. Para apagar el sonido,
presionar los botones del
volumen hasta que se apaguen
las luces LED.
Press the music button to turn
music ON. Press the button
again to change the music.
Presionar el botón de música
para PRENDER la música.
Presionar el botón otra vez para
cambiar la música.
LED Display
Luces LED

Other Fisher-Price Baby Swing manuals

Fisher-Price CMR46 User manual

Fisher-Price

Fisher-Price CMR46 User manual

Fisher-Price G3048 User manual

Fisher-Price

Fisher-Price G3048 User manual

Fisher-Price T2803 User manual

Fisher-Price

Fisher-Price T2803 User manual

Fisher-Price V3667 User manual

Fisher-Price

Fisher-Price V3667 User manual

Fisher-Price V7597 User manual

Fisher-Price

Fisher-Price V7597 User manual

Fisher-Price C6408 User manual

Fisher-Price

Fisher-Price C6408 User manual

Fisher-Price T8377 User manual

Fisher-Price

Fisher-Price T8377 User manual

Fisher-Price FLG84 User manual

Fisher-Price

Fisher-Price FLG84 User manual

Fisher-Price L8339 User manual

Fisher-Price

Fisher-Price L8339 User manual

Fisher-Price GPW67 User manual

Fisher-Price

Fisher-Price GPW67 User manual

Fisher-Price W5993 User manual

Fisher-Price

Fisher-Price W5993 User manual

Fisher-Price G5912 User manual

Fisher-Price

Fisher-Price G5912 User manual

Fisher-Price J6295 User manual

Fisher-Price

Fisher-Price J6295 User manual

Fisher-Price P0098 User manual

Fisher-Price

Fisher-Price P0098 User manual

Fisher-Price GKH31 User manual

Fisher-Price

Fisher-Price GKH31 User manual

Fisher-Price G8653 User manual

Fisher-Price

Fisher-Price G8653 User manual

Fisher-Price X2897 User manual

Fisher-Price

Fisher-Price X2897 User manual

Fisher-Price DELUXE PORT-A-SWING 9122 User manual

Fisher-Price

Fisher-Price DELUXE PORT-A-SWING 9122 User manual

Fisher-Price G8661 User manual

Fisher-Price

Fisher-Price G8661 User manual

Fisher-Price CMR22 User manual

Fisher-Price

Fisher-Price CMR22 User manual

Fisher-Price GPN16 Quick setup guide

Fisher-Price

Fisher-Price GPN16 Quick setup guide

Fisher-Price H5988 User manual

Fisher-Price

Fisher-Price H5988 User manual

Fisher-Price 79006 User manual

Fisher-Price

Fisher-Price 79006 User manual

Fisher-Price B8869 User manual

Fisher-Price

Fisher-Price B8869 User manual

Popular Baby Swing manuals by other brands

Mainstays MSS129900298041 Assembly and Care Guide

Mainstays

Mainstays MSS129900298041 Assembly and Care Guide

Kids II Bright Starts 10114-NA manual

Kids II

Kids II Bright Starts 10114-NA manual

Chelino STARLITE SWING user manual

Chelino

Chelino STARLITE SWING user manual

ingenuity ConvertMe Swing-2-Seat Nash manual

ingenuity

ingenuity ConvertMe Swing-2-Seat Nash manual

Costway Saucer Tree Swing user manual

Costway

Costway Saucer Tree Swing user manual

Terra Bound Solutions 581-438 Assembly manual

Terra Bound Solutions

Terra Bound Solutions 581-438 Assembly manual

southpaw enterprises 120175 instruction sheet

southpaw enterprises

southpaw enterprises 120175 instruction sheet

Vuly Ring Swing manual

Vuly

Vuly Ring Swing manual

stilum simius2 Maintenance instructions

stilum

stilum simius2 Maintenance instructions

TP Pirate Boat TP903 Instructions for assembly, maintenance and safe use

TP

TP Pirate Boat TP903 Instructions for assembly, maintenance and safe use

Graco 1481 owner's manual

Graco

Graco 1481 owner's manual

HAGS Lillie w Kiddy installation guide

HAGS

HAGS Lillie w Kiddy installation guide

eibe fantallica 552024143 Series Assembly and maintenance guide

eibe

eibe fantallica 552024143 Series Assembly and maintenance guide

Moon Valley M-100 Assembly instructions

Moon Valley

Moon Valley M-100 Assembly instructions

mothercare please look after me user guide

mothercare

mothercare please look after me user guide

Barton 94055 manual

Barton

Barton 94055 manual

Graco SnugGlider owner's manual

Graco

Graco SnugGlider owner's manual

KIDWELL MAVERICK BUELMAV01A0 user manual

KIDWELL

KIDWELL MAVERICK BUELMAV01A0 user manual

manuals.online logo
manuals.online logoBrands
  • About & Mission
  • Contact us
  • Privacy Policy
  • Terms and Conditions

Copyright 2025 Manuals.Online. All Rights Reserved.