manuals.online logo
Brands
  1. Home
  2. •
  3. Brands
  4. •
  5. Flash Cover
  6. •
  7. Automobile Accessories
  8. •
  9. Flash Cover MN020 User manual

Flash Cover MN020 User manual

IATF 16949
ISO 9001
BUREAU VERITAS
Certification
/ashcoverocial
MN020
C A P O T A S M A R Í T I M A S
Installation Manual Tonneau Cover | Manual de Instalación Capota Marítima
COD.
DESCRIPTION
DESCRIPCIÓN
COD.
DESCRIPTION
DESCRIPCIÓN
Rev: 02 - 05/06/2020
COD.
DESCRIPTION
DESCRIPCIÓN
QT.
QTY. | CANT.
IMPORTANTE
IMPORTANT Owner: ask the installer for using and handling instructions. Correctly using will expand your cover lifespan.
ash the cover using only water and mild soap, avoiding chemical products. They compromise the sewing resistance and stain the vinyl.W
IMPORTANTE
01
• Introduzir a peça -F- no bolso da lona conforme a figura 1, fixar a peça -F- no perfil
dianteiro -B- e colar a ponta da borracha esponjosa -I- na peça de junção -F- conforme
a figura 2.
• Con la pieza de fijación -F- en las manos, debemos introducirla por dentro del bolsillo
de la lona como se muestra en la figura 1.
Atornillar la pieza -F- junto al perfil delantero -B-. Unir la punta de la goma esponja -I- en
la pieza de unión -F- como se muestra en la figura 2.
• Insert the part -F- inside the pocket of the canvas as show in figure 1, then screw the
part -F- next to the front profile -B-. We must attach the end of sponge rubber -I- on the
fixing part as show in figure 2.
Chave Allen nº5
Allen Key nº5
Llave Allen nº5
I
B
F
2
F
1
A
B
02
• Para fixação do perfil dianteiro -B-, utilizar peça de fixação -E-, e os parafusos -L- que
seguem no kit.
E
L
B
Chave Allen nº5
Allen Key º5
llave Allen nº5
Chave Philips
Llave Philips
Phillips key
• Para la fijación del perfil delantero -B-, utilice pieza de fijación -E-, y los tornillos -L- que siguen en el kit.
• For fixing the front profile -B-, use the -E- fixing part, and the -L- screws that accompany the kit .
03
B
N
Strada
• Retire os parafusos originais da parte frontal e prende a barra-B- com os parafusos que acompanham no kit.
Deixar a aba da borracha virada para cima.
Leave the rubber flap facing up.
Dejar la lengüeta del caucho hacia arriba.
Instrução para o MODELO NOVA STRADA
Tinstrucciones para el modelo Nova Strada
Chave Torx nº25
Llave Torx nº25
Torx Key nº25
Instruction for New Strada Model.
Remove the original screws from the front and secure the B-bar with the screws that come with the kit.
Retire los tornillos originales del frente y asegure la barra B con los tornillos que vienen con el kit.
04
Utilizado em alguns modelos de capota quando acompanhado no kit
Used on some tonneau models when accompanied in the kit.
Se usa en algunos modelos de lonas marineras cuando se acompaña en el kit.
Strada
F
I
A
T
M
M
• Segue junto ao kit calços -M- para nivelar os perfis -H-.
Acompaña al kit calzones -M- para nivelar los perfiles -H-
Follow with the kit shims -M- for leveling the profiles -H-
M
Tools Necessary
Heramientas necesárias
Chave Allen nº5
Allen Key nº5
Llave Allen nº5
Chave Philips
Llave Philips
Phillips Key
Chave Torx nº25
Llave Torx nº25
Torx Key nº25
SIDE PROFILE SHOES | CALZOS PERFIL LATERAL
CALÇOS PERFIL LATERAL
TURNBUCKLE TIP | PUNTA DEL TENSOR
PONTEIRA TENSOR
02
04
-M-
-N-
-L- 08 PARAFUSOS M5X25
M5X25 SCREWS | TORNILLOS M5X25
SUPORTES DO TREK
02
-K-
-J- 02 PONTEIRAS ABAULADA
SPONGE RUBBER | GOMA ESPONJOSA
BORRACHA ESPONJOSA
-I- 01
-H- 02 ALUMINUM PROFILES (SIDE BAR) | PERFILES DE ALUMINIO (BARRA LATERAL)
PERFIS DE ALUMÍNIO ( BARRA LATERAL)
ROD BRACKET | SOPORTES DE VARILLA DELANTERA
SUPORTES DO VARÃO
04
-G-
-F- 02 PEÇAS DE JUNÇÃO LATERAL
FRONT FASTENING PARTS | PIEZAS DE FIJACIÓN DELANTERA
PEÇAS DE FIXAÇÃO DIANTEIRA
02
-E-
02
-D- TENSIONS BAR | BARRA DE TENSORES
VARÕES TENSORES
CANTONEIRAS DO TREK
02
-C-
-B- 01 PERFIL DE ALUMÍNIO ( BARRA DIANTEIRA)
-A- 01
LONA
CANVAS
LONA
PERFIL
LATERAL
Lateral Profile
Perfil Lateral
• Encaixar o Baguete existente na lona -A- nos
perfis de alumínio -B-.
Attach the existing plastic profile to the canvas -A- in the aluminum profiles -B-.
Encaje el perfil plástico existente en la lona -A- en los perfiles de aluminio -B-.
Lubrificar os pinos
e mantê-los lubrificados
Aceitar los pinos y
mantenerlos aceitados.
Lubricate the pins and
keep them lubricated.
C
K
Conjunto de Trek
| Conjunto de Trek
Set Trek
• Encaixar corretamente o
Conjunto do Trek e pressionar
suavemente as duas extremidades
até o seu travamento.
• Para cerrar, encaja correctamente el Conjunto
del Trek y presiona suavemente las
dos extremidades hasta su trabamiento.
• To close, correctly attach the Trek Set and
softly press both edges until they lock.
• Verificar se o conjunto de trek está encaixado corretamente.
• Fechar de forma simultânea as duas extremidades da capota.
Check that the trek set is properly seated.
Simultaneously close the two ends of the tonneau cover.
Compruebe que el conjunto de trek está correctamente acoplado.
Cerrar de forma simultánea los dos extremos de la lona marinera.
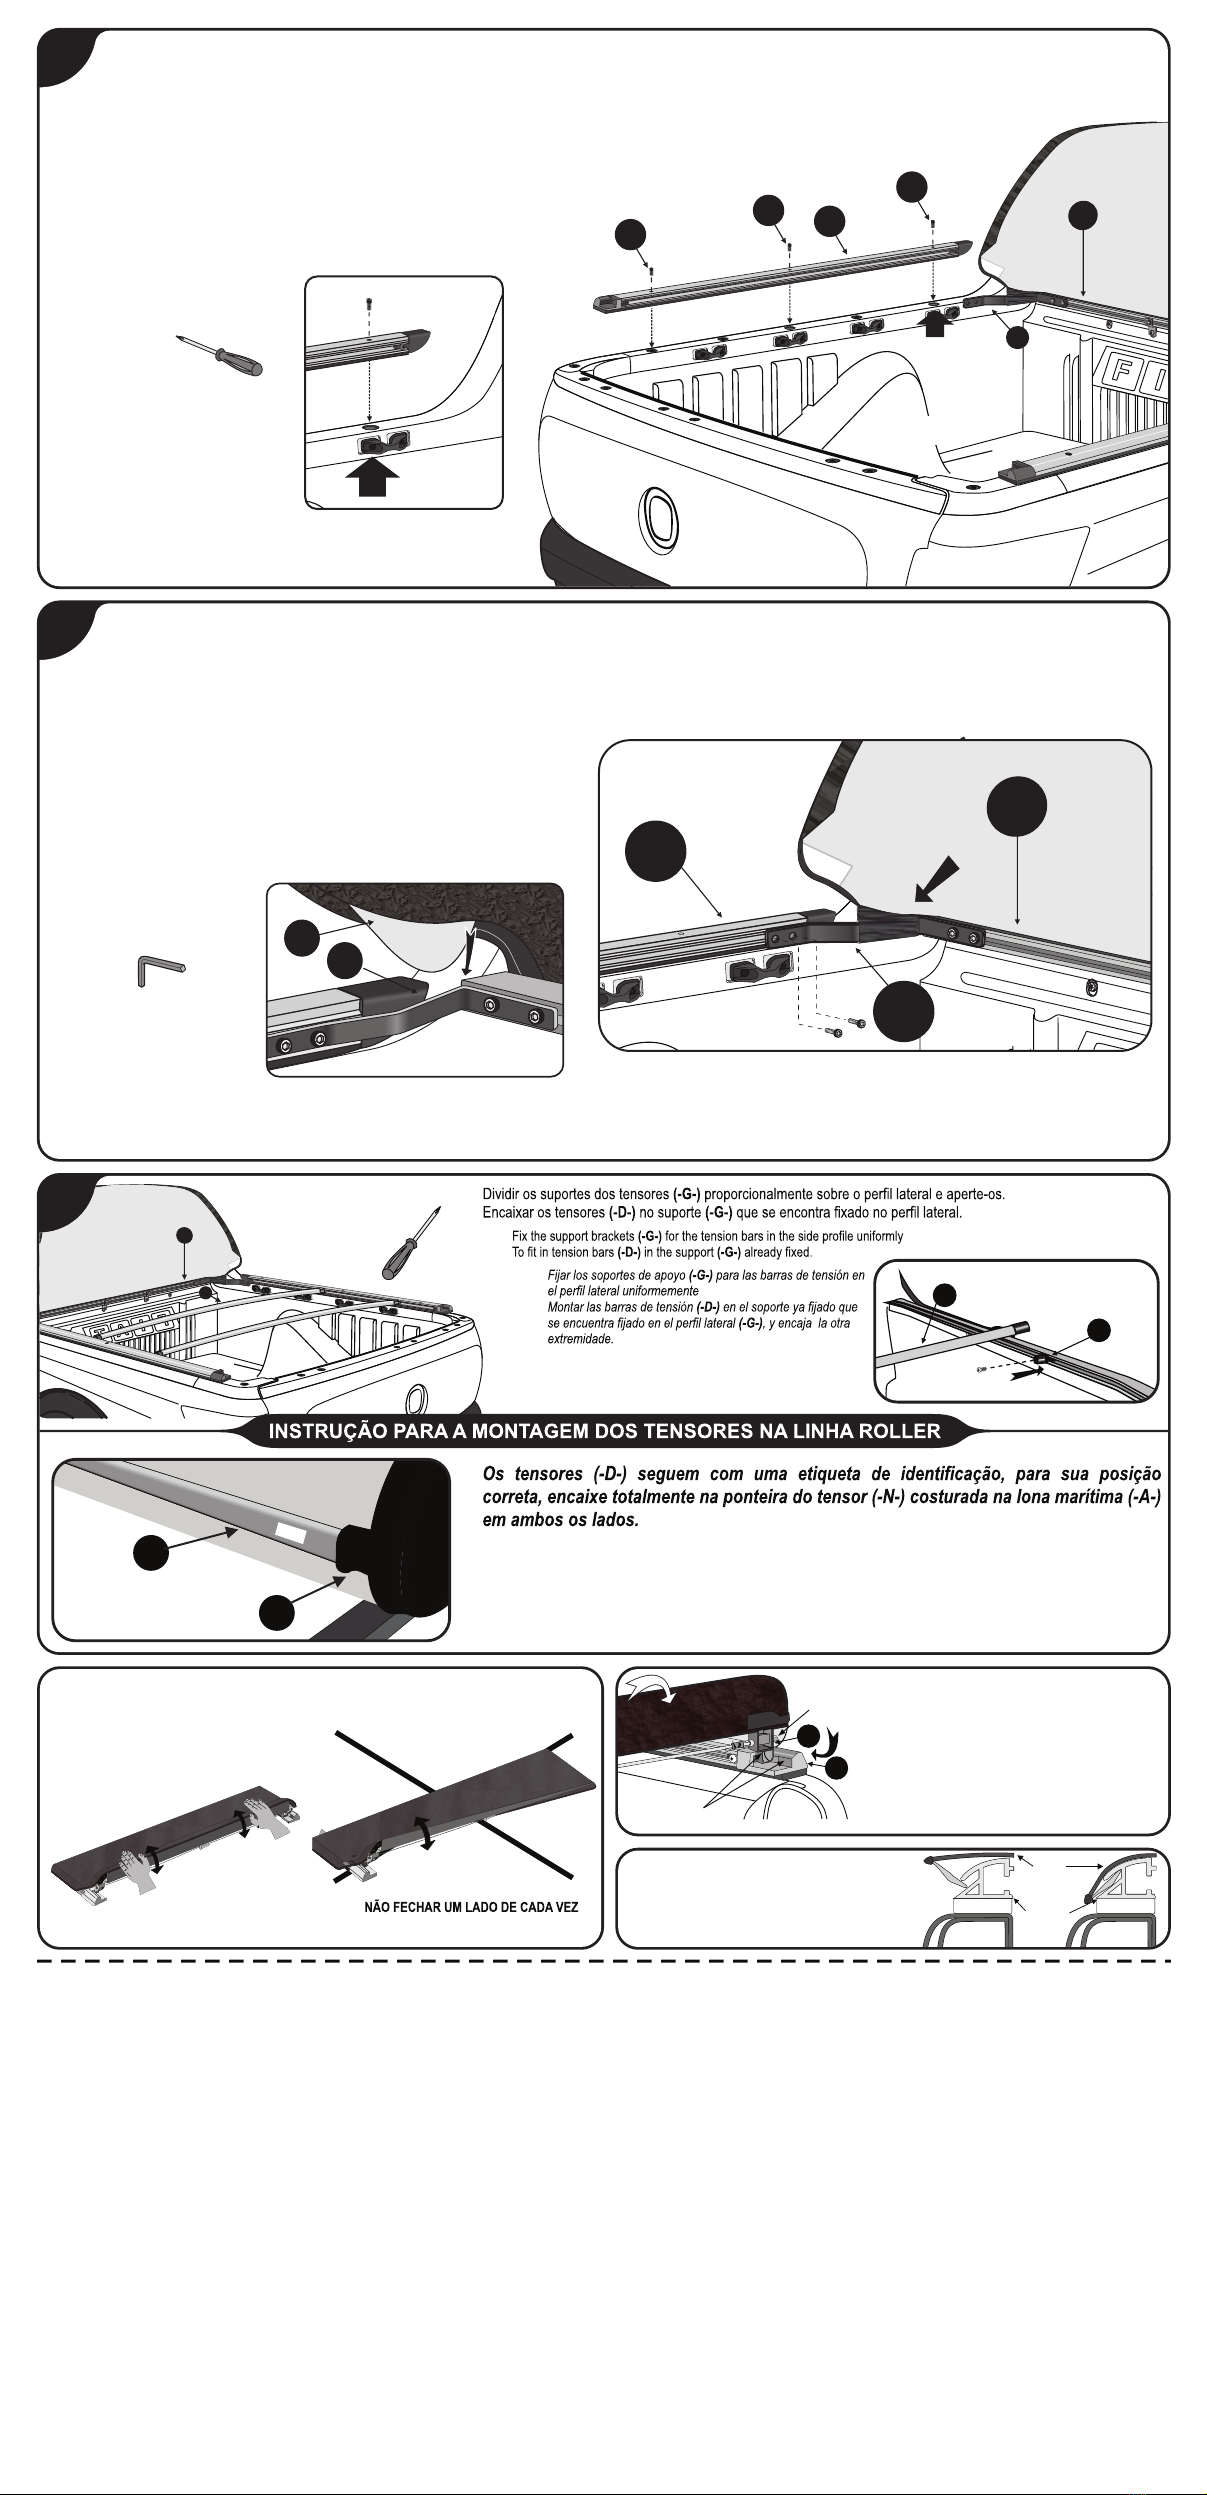
ERRADO
Mal
Wrong
DO NOT CLOSE ONE SIDE AT A TIME.
NO CERRAR UN LADO DE CADA VEZ.
•Fixar as barras de alumínio (-H-) utilizando os parafusos (-L-) e realizar o alinhando pela furação 1 conforme ilustração.
•Fix the aluminum bars (-H-) using the screws (-L-) and perform the alignment by drilling 1 as shown.
•Fije las barras de aluminio (-H-) con los tornillos (-L-) y alinee perforando 1 como se muestra.
1
Chave Philips
Llave Philips
Phillips Key
Strada
F
I
A
T
B
H
L
F
1
L
L
• Encaixar a lâmina plástica da lona -A- por baixo da ponteira abaulada -J- para
um bom acabamento.
• Parafuse a peça de junção lateral -F- no perfil -H-.
• Screw the lateral junction parts -F- inprofile -H-.
Fit the plastic canvas blades -A- below the bulging tip -J- for the good finishing.
• Atornille la pieza de unión lateral -F- en el perfil lateral -H-.
Encaje la lámina plástica de la lona -A- por debajo de la punta abultada -J- para un buen
acabado.
J
A
H
H
B
F
Chave Allen nº 5
Allen key nº 5
Llave Allen nº 5
06
05
07
Strada
F
I
A
T
01
05
B
D
The tensioners (-D-) follow with a label identifying which position is correct, fully fitting the tip seam
(-N-)on the vinyl (-A-) both sides.
Los tensores (-D-) siguen con una etiqueta identificando cuál es la posición correcta, encaje
totalmente en la punta (-N-) de la costura en la lona (-A-) ambos lados
Chave Philips
Llave Philips
Spanner Philips
D
N
Tensor traseiro
Barra tensora trasera
Rear tension bar
G
D
TONNEAU COVER WARRANTY IS GRANTED TO THE FIRST USER WITHIN:
LA GARANTÍA DE LAS LONAS MARÍTIMAS ES DADA AL PRIMER USUÁRIO EN EL PLAZO DE:
A GARANTIA DAS CAPOTAS MARÍTIMAS É DADA AO PRIMEIRO USUÁRIO NO PRAZO DE:
a) O certificado estiver devidamente preenchido e no prazo estabelecido; b) A capota apresentar: defeitos de fabricação ou de matéria-prima mediante análise do Departamento Técnico, e ou não tenha sido submetida a reparos por terceiros;
c) Após análise da Flash Cover, se for identificado problema de fabricação ou de matéria-prima, reserva-se o direito de trocar, ou consertar apenas a parte ou componente específico do problema, sem direito de o consumidor exigir a substituição total
do produto; d) Não terá Garantia se o produto sofrer acidentes, se for alterada sua condição original ou usada de forma indevida (sem os tensores ou demais componentes) ou da montagem inadequada em desacordo com as especificações contidas
no Manual de Montagem; e) se houver utilização de qualquer produto químico em vez de água e sabão neutro; f) Conservação, limpeza e durabilidade: Para limpeza utilizar somente água, sabão neutro, esponja ou flanela. Nunca utilizar produtos
químicos ou abrasivos. Utilizar sempre as travessas centrais que dão sustentação e facilitam o escoamento de água. Lubrificar os pinos e mantê-los lubrificados.
ESTA GARANTIA É VÁLIDA QUANDO:
ESTA GARANTÍA ES VÁLIDA CUANDO:
a) El certificado está debidamente cumplimentado y dentro del plazo establecido; b) La lona marinera muestra: defectos de fabricación o materia prima, después del análisis del Departamento Técnico, y si ha sido reparado o no por terceros; c) Después del análisis de Flash Cover, si se identifica un problema de
fabricación o materia prima, se reserva el derecho de intercambiar o reparar solo la parte o componente específico del problema, sin que el consumidor correcto exija el reemplazo total del producto; d) No habrá garantía si el producto sufre accidentes, si su condición original se cambia o se usa de forma
incorrecta (sin tensores u otros componentes), o un ensamblaje incorrecto en desacuerdo con las especificaciones contenidas en el Manual de ensamblaje; e) Si se usa algún químico en lugar de agua y jabón neutro; f) Conservación, limpieza y durabilidad: Para limpieza utiliza solamente água, jabón neutro,
esponja o franela. Jamás utiliza productos químicos o abrasivos. Utiliza siempre las travesas centrales que sostienen y facilitan el desague. Lubrifica los pinos y los manternelos aceitados.
a) The certificate is duly completed and within the established period;
b) The tonneau cover shows: manufacture defects or raw material, upon analysis of the Technical Department, and whether or not it has undergone repairs by third parties; c) After Flash Cover analysis, if a manufacturing or raw material problem is identified, reserves the right to exchange, or repair only the
specific part or component of the problem, without the right consumer to demand the total product replacement; d) There will be no Warranty if the product suffers accidents, if its original condition is changed or used in improper form (without tensioners or other components), or improper assembly in disagreement
with the specifications contained in the Assembly Manual; e) If any chemical is used instead of water and neutral soap; f) Maintenance, cleaning and durability: for cleaning, use only water, mild soap, sponge or flannel. Never use chemical or abrasive products. Always use the central crossmember that support
and facilitate the water draining. Lubricate pins and keep them lubricated.
THIS WARRANTY IS VALID WHEN:

Other Flash Cover Automobile Accessories manuals

Flash Cover MN010 User manual

Flash Cover

Flash Cover MN010 User manual

Flash Cover MN024 User manual

Flash Cover

Flash Cover MN024 User manual

Flash Cover MN003 User manual

Flash Cover

Flash Cover MN003 User manual

Flash Cover MN023 User manual

Flash Cover

Flash Cover MN023 User manual

Flash Cover MN019 User manual

Flash Cover

Flash Cover MN019 User manual

Flash Cover MN024 User manual

Flash Cover

Flash Cover MN024 User manual

Flash Cover MN008FD User manual

Flash Cover

Flash Cover MN008FD User manual

Flash Cover MN008 User manual

Flash Cover

Flash Cover MN008 User manual

Flash Cover MN014 User manual

Flash Cover

Flash Cover MN014 User manual

Flash Cover MN021 User manual

Flash Cover

Flash Cover MN021 User manual

Flash Cover MN012 User manual

Flash Cover

Flash Cover MN012 User manual

Flash Cover MN008 User manual

Flash Cover

Flash Cover MN008 User manual

Flash Cover Tonneau Cover User manual

Flash Cover

Flash Cover Tonneau Cover User manual

Flash Cover MN001 User manual

Flash Cover

Flash Cover MN001 User manual

Flash Cover MN025 User manual

Flash Cover

Flash Cover MN025 User manual

Flash Cover MN015 User manual

Flash Cover

Flash Cover MN015 User manual

Flash Cover MN008 User manual

Flash Cover

Flash Cover MN008 User manual

Flash Cover MN009 User manual

Flash Cover

Flash Cover MN009 User manual

Flash Cover MN017 User manual

Flash Cover

Flash Cover MN017 User manual

Flash Cover MN038 User manual

Flash Cover

Flash Cover MN038 User manual

Flash Cover Slim MN009CT User manual

Flash Cover

Flash Cover Slim MN009CT User manual

Flash Cover MN034 User manual

Flash Cover

Flash Cover MN034 User manual

Flash Cover MN026 User manual

Flash Cover

Flash Cover MN026 User manual

Flash Cover MN002 User manual

Flash Cover

Flash Cover MN002 User manual

Popular Automobile Accessories manuals by other brands

Silvercrest SBTF 10 C2 operating instructions

Silvercrest

Silvercrest SBTF 10 C2 operating instructions

PROPOINT HEADACHE RACK user manual

PROPOINT

PROPOINT HEADACHE RACK user manual

Ezgo 72684G01 installation instructions

Ezgo

Ezgo 72684G01 installation instructions

pro user DIAMANT TG Assembly instruction and safety regulations

pro user

pro user DIAMANT TG Assembly instruction and safety regulations

BM PRO THOR RVMASTER owner's manual

BM PRO

BM PRO THOR RVMASTER owner's manual

FormFit Tough Guard TG 8A15 installation instructions

FormFit

FormFit Tough Guard TG 8A15 installation instructions

FormFit HDW 11D 04 installation instructions

FormFit

FormFit HDW 11D 04 installation instructions

TREX Upper Class Series installation instructions

TREX

TREX Upper Class Series installation instructions

Steel mate PTS810 V10 manual

Steel mate

Steel mate PTS810 V10 manual

FormFit SD 13R07-5 installation instructions

FormFit

FormFit SD 13R07-5 installation instructions

FormFit HD 23A 07 installation instructions

FormFit

FormFit HD 23A 07 installation instructions

Omegalink CRIMESTOPPER OL-HRN-RS-HA7 install guide

Omegalink

Omegalink CRIMESTOPPER OL-HRN-RS-HA7 install guide

etrailer SD e98971 Operator's manual

etrailer

etrailer SD e98971 Operator's manual

TigerTough 32201 installation guide

TigerTough

TigerTough 32201 installation guide

GreenValley Green Trail 3 instructions

GreenValley

GreenValley Green Trail 3 instructions

Let's Go Aero WingMan BVK093 user manual

Let's Go Aero

Let's Go Aero WingMan BVK093 user manual

Jegs 41535 installation guide

Jegs

Jegs 41535 installation guide

Nex-tech OBD II instruction manual

Nex-tech

Nex-tech OBD II instruction manual

manuals.online logo
manuals.online logoBrands
  • About & Mission
  • Contact us
  • Privacy Policy
  • Terms and Conditions

Copyright 2025 Manuals.Online. All Rights Reserved.