GE Vivid E9 Series User manual

GE Healthcare
Vivid*E9 Features
used during
Percutaneous
Mitral Valve Repair
NOTE
For more information please refer to the user manual and/or reference manual.
* Trademark of General Electric Company
01/2013

GE Healthcare
- 2 -
Content
Contents
VIVID E9 FEATURES USED DURING PERCUTANEOUS MITRAL VALVE REPAIR ..............................1
Content ...................................................................................................................................................................................1
Basic operation Vivid E9 ....................................................................................................................................................4
VIVID E9 FEATURES USED DURING PERCUTANEOUS MITRAL VALVE REPAIR ..............................5
Overview ................................................................................................................................................................................5
Div. Modalities.......................................................................................................................................................................5
Touch panel...........................................................................................................................................................................6
Generic: Rotation, Clear button, Angle button…..………………………………………………………………………………………… 7
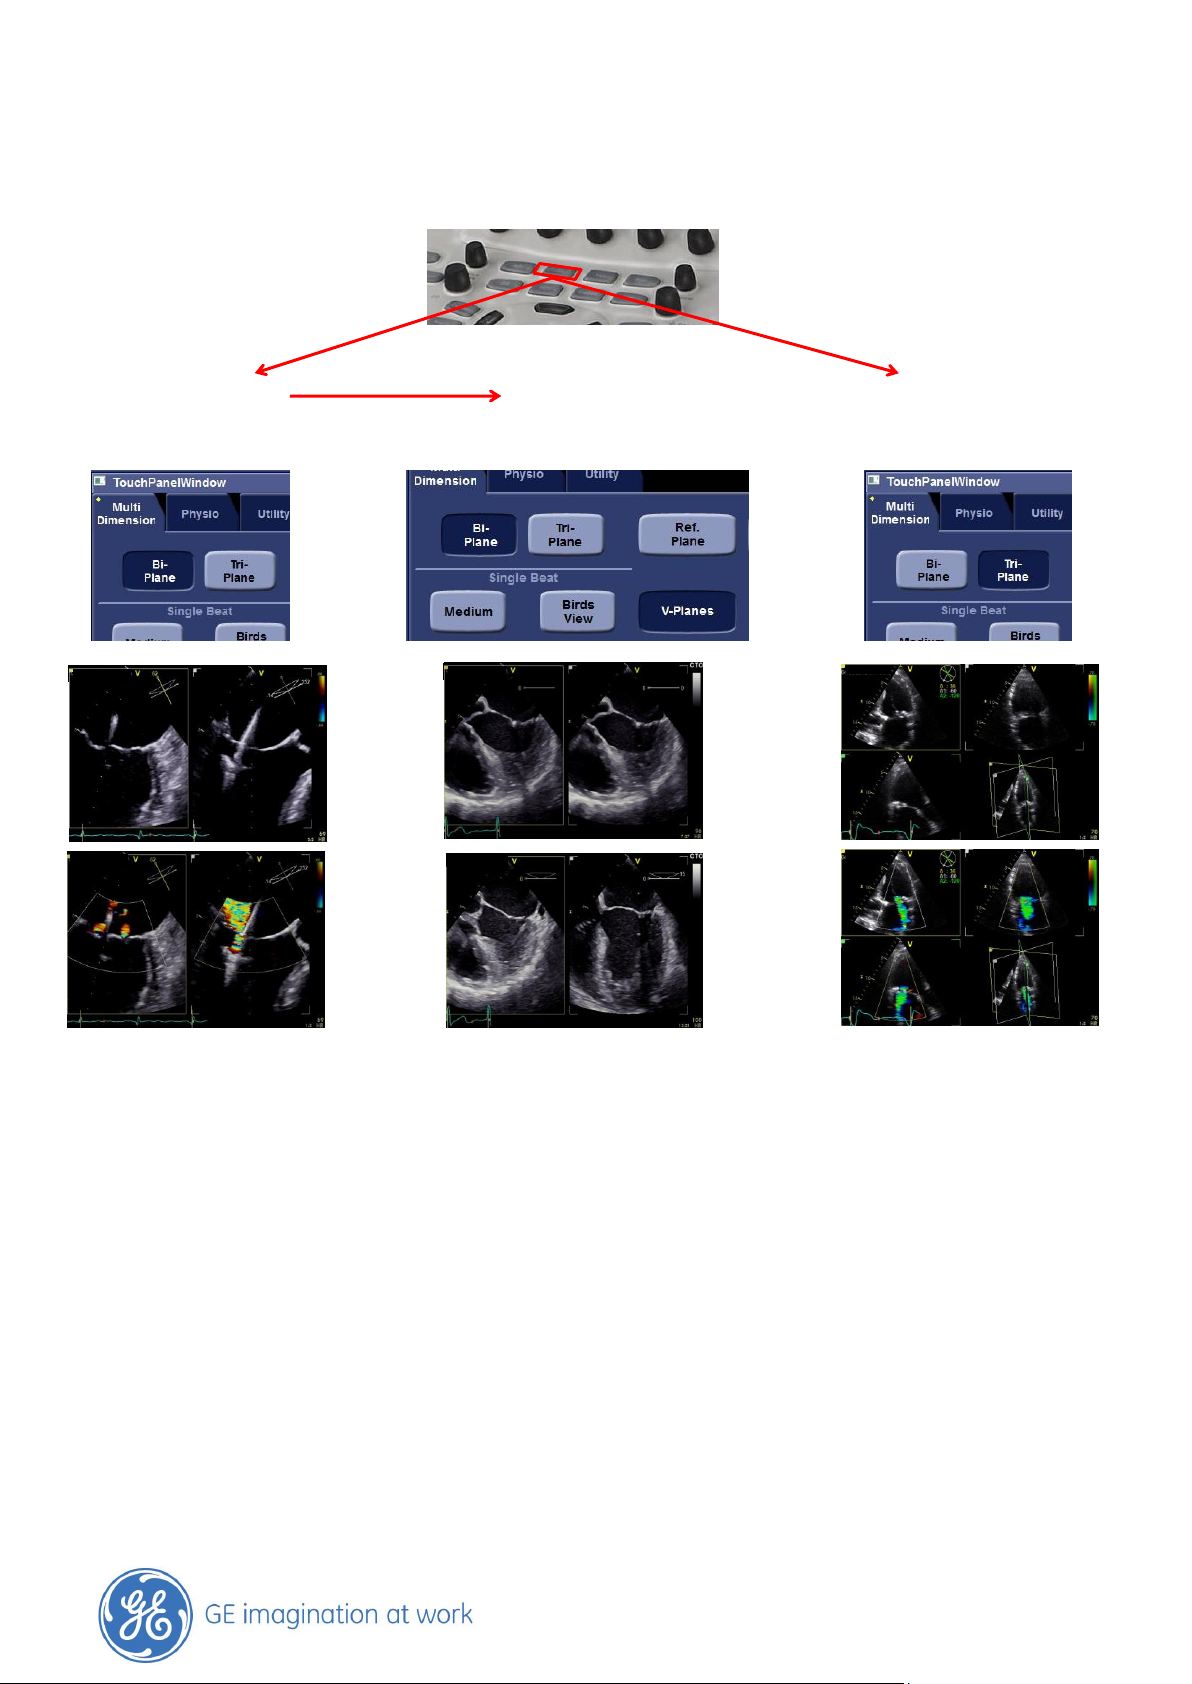
MULTI D..............................................................................................................................................8
Bi - Plane / Tri –Plane / V - Plane ...................................................................................................................................8
4D GENERAL INFORMATION.............................................................................................................9
Screen Layout .......................................................................................................................................................................9
Image optimization.............................................................................................................................................................9
4D Navigation.................................................................................................................................................................... 10
4 D ZOOM ........................................................................................................................................11
MV ACQUISITION WITH VIVID E9 4D TOE .....................................................................................11
4D Zoom / MV acquisition on Vivid E9 4D TOE ........................................................................................................ 12
General remarks................................................................................................................................................................ 12
Getting started................................................................................................................................................................... 12
Prepare your Zoom Region of interest....................................................................................................................... 12
Adjust Zoom region of interest..................................................................................................................................... 13
MV button............................................................................................................................................................................ 15
2 CLICK CROP ..................................................................................................................................17
2 Click Crop......................................................................................................................................................................... 18
General ................................................................................................................................................................................. 18
Getting started................................................................................................................................................................... 18
Exit 2 Click Crop................................................................................................................................................................. 22
4D COLOR FLOW .............................................................................................................................23
4D Color flow prepare ..................................................................................................................................................... 23
LASER LINES ....................................................................................................................................24
Where to access ............................................................................................................................................................... 25

GE Healthcare
- 3 -
FLEXI SLICE ......................................................................................................................................28
How to work with Flexi Slice.......................................................................................................................................... 29
How to operate ................................................................................................................................................................. 30
Movements to be done ................................................................................................................................................... 30
Tools to navigate the volume dataset ....................................................................................................................... 30
Rotation of the entire dataset....................................................................................................................................... 30
Rotate your cut plane...................................................................................................................................................... 30
Flexi Slice on rendered image....................................................................................................................................... 31
4D CFM Dataset with Flexi Slice ................................................................................................................................... 32
Leaving Flexi slice............................................................................................................................................................. 32
RENDER DEPTH MODE.............................................................................................................................33
MEASUREMENTS ......................................................................................................................................34
STEREO VISION.........................................................................................................................................35
NOTE
For more information please refer to the user manual and/or reference manual.

GE Healthcare
- 4 -
Switching on the system: Press the On/Off button (1)
Login on into the archive: Press the Patient (2) button. Select the Operator-add the Password-then press Log on
Create a new patient examination: Enter the patient data: Last name, first name, Pat .ID, Birthdat e
Press Create Patient (9) if the patient is new OR
Select the patient from the list and Add Exam (9)
Select the probe: Press the Probe button (3), choose the probe and take the right preset from the list
Image optimization
2D image Depth (6)–2D Gain (7)- TGC–Sector width (10)–Frequency (10)- Focus position (10)
M-Mode Press the Cursor button (5)- position the line on the right place- press the M-Mode button (4)
Active Mode Gain (8) - Horizontal sweep (10)
Press the 2D button (4) to go back to normal 2D imaging
Color flow While in the 2D press the CFM button (4)
Move the ROI with the trackball–change the ROI size by pressing Set (15) and use the trackball –
Active Mode Gain (8)
Doppler Press the Cursor (5) button–position the line on the right place–add PW/CW- Doppler (4)
Active Mode Gain (8)–Baseline (10)–Scale (10)- Horiz. Sweep (10)
Press the 2D button (4) to go back to normal 2D imaging
Image storage: Loop: while the image is running press the Image store button (14)
EITHER the loop is stored automatically OR
see the loop running on the screen and decide if it fits. If yes press the Image store
button (14) again. If not press the Freeze button (11) and start scanning again
Still frame: press the Freeze button (11) to stop the image, scroll with the trackball to select
an image and press the Image store button (14)
Measurements: Press the Freeze button (11)–scroll with the trackball if needed- press Caliper (12) for basic
measurements or the Measurements button (13) for measurement packages
Finishing the examination: Press the Patient (2) button - select End examination (9)
Basic operation Vivid E9
1. On / Off
2. Archive
3. Probe selection
4. Div. Modalities
5. Cursor
6. Depth
7. 2D Gain
8. Active Mode
Gain
9. Touchpanel
10. Rotation knobs
11. Freeze
12. Caliper
13. Measurement
14. Image store
15. Set button
1
3
4
5
6
7
8
9
10
11
12
14
2
13
15

GE Healthcare
- 5 -
1
3
4
5
6
7
8
9
10
11
12
14
2
13
15
Vivid E9 Features
used during
Percutaneous Mitral Valve Repair
Overview
Div. Modalities
4D Multi-D TVI PW
4D gain (while in 4D)
2D gain Zoom
Depth
2D MM Color CW
1. On / Off
2. Archive
3. Probe selection
4. Div. Modalities
5. Cursor
6. Depth
7. 2D Gain
8. Active Mode Gain
9. Touchpanel
10. Rotation knobs
11. Freeze
12. Caliper
13. Measurement
14. Image store
15. Set button

GE Healthcare
- 6 -
Touch panel
The Touch panel enables the access of modality driven controls. The mode / function controls (1)
are organized in tabbed folders. Several pages (2) may be accessed within each folder.
At the button of the Touch panel, there are five rotary / push buttons. The functionality of these
button changes, based on the active mode / function.
1
2
1
rotate the button to adjust the active control
press the button to apply the active control

GE Healthcare
- 7 -
Generic
1 2 3
Rotation / Image Store
1 2D life: Rotation scan plane counter clock wise
2 2D life: Image store
Freeze: Image store
3 2D life: Rotation scan plane clock wise
Quick rotate
Rotates all scan planes to predefined angles
(30° steps in 2 directions)
Rotate
1° steps manually with Rotary button
Clear button
While pressing the Clear button the system jumps
immediately to the 0° position in 2D or to the default
setting in Multi –D and 4 D.
Angle button
Press the Angle button to rotate the scan plane to
predefined angles.

GE Healthcare
- 8 -
Multi D
Multi - Dimensional
Bi –Plane V- Plane Tri –Plane
(Default)
Bi - Plane / Tri - Plane
Scan plane rotation
The angle increment of scan plane 2 or 3 relative to the scan plane 1 (fixed) can be adjusted with the
trackball. The rotation is done around the crossing line between the scan planes with the rotary
button.
Tilting scan plane 2
In Bi –plane mode, the scan plane 2 can be tilted around the top of the scanning sector using the
trackball.
V –Plane
In Bi - plane Mode scan plane 2 has the same angle as scan plane 1 .The scan plane 2 can be tilted.
Navigator (4)
Displays the position of the scan planes as seen from the probe.
1
1
2
3
2
3
4
1
2
1
2
4
1
1
2
2
4

GE Healthcare
- 9 -
4D General Information
Screen Layout
Image optimization
Overall Gain
Same rotational knob as 2D gain
Adjusts the overall amount of gain to the received echo signals
Not only increasing the tissue information, will also increase noise
4D Gain
Rotational knob for the active mode gain
Removes low level echo signal
Will remove the noisy signal, but will also remove low level signals inside the tissue
Both gain settings need to be adjusted carefully!
Color maps
Press the Depth/Color map button on the touch panel and make your selection
from the list.
UD Clarity
An increase of UD Clarity creates a crisper image. Press the UD Clarity button on the
touch panel and make your selection.
Volume optimize
Optimizes the volume rendering by adjusting several display controls simultaneously (e.g.
Shading, Smoothness etc.). Use the Volume optimize rotational knob for your selection.
Azimuth Plane
shows the image
according to the
probe position
Rendered Image
Elevation Plane
Shows an image
in a 90° angle to
the azimuth plane

GE Healthcare
- 10 -
4D Navigation
Absolute or Relative
Absolute navigation
Trackball up/down: Tilt the dataset up/down
Trackball left/right: Rotate counter clockwise/clockwise
Translation can be done, by using the rotational knob or by pressing the
Set button to change the Trackball function from
Rotation to Translation
Trackball function is shown at the lower right corner at the screen.
Relative navigation
Trackball up/down: Tilt the dataset up/down
Trackball left/right: Tilt the dataset left/right
Rotate Z: Rotate counter clockwise/clockwise by using the rotational knob
Translation: Press the Rotate Z rotational knob or the
Set button to change the Trackball function from
Rotation to Translation
Factory default:
6VT- D set up to Relative Navigation: recommended setting
4V-D set up for Absolute navigation
Configuration
Absolute or Relative navigation can be
selected on Page 2, while in 4D imaging.
Absolute or Relative navigation can be stored with the user preset.

GE Healthcare
- 11 -
4 D Zoom /
MV acquisition with Vivid E9 4D TOE
AV
Anterior MV leaflet
Posterior MV leaflet

GE Healthcare
- 12 -
4D Zoom / MV acquisition on Vivid E9 4D TOE
General remarks
While scanning with VE9 BT12 and 4D TEE there is an easy way to get a quick acquisition of the Mitral
valve in a surgical view.
By using the dedicated Mitral valve button the image will be displayed automatically in the position
with view from left atrium towards the Mitral valve and Aortic valve placed on top of the screen at 12
o’clock position. This specific view is known as the surgeons view onto the Mitral valve.
In order for the system to position correctly, the software is making assumption about the heart
orientation. It assumes that a 4Ch view would correspond to an angle of 0 degree.
This is just a geometrical assumption.
Using this information, the mitral valve will be shown in the surgeon orientation regardless of the
starting angle (angles when being in the 4D prepare zoom).
Basically with Mitral Valve, the zoom acquisition can be started from any angle.
Getting started
Select 6VT-D probe with preset of choice.
Depending on the individual workflow, the user can start from either a single plane 2D image or from
a Biplane Imaging mode.
Prepare your Zoom Region of interest
Press 4D Zoom Prepare on touch panel

GE Healthcare
- 13 -
A biplane image appears on the screen.
The Zoom region of interest appears with a standard width in the middle of the planes.
Adjust Zoom region of interest
Note
When adjusting the Zoom ROI, it’s recommended to adjust the size not too tight. Adjusting the ROI
very tight, landmarks for orientation can get cut i.e. the Aortic valve, which can make the orientation
in the dataset a bit difficult at the end.
Adjust the zoom ROI with several Trackball operations:
Default function on the trackball is to adjust the Position of the ROI
the elevation plane moves in the same way together with the azimuth plane.

GE Healthcare
- 14 -
Press the Set button to change from Position to ROI Size and
adjust accordingly.
Use the Set button to change between Position and Size and optimize until satisfied.
To further adjust in Elevation plane, press the Trackball button or use the Ref Plane button on the
touch panel.
Adjust Width and Position in the elevation plane (switch between those two functions with Set
button)
Finally when ready with the adjustments press the 4D Button to start the 4D Zoom Acquisition

GE Healthcare
- 15 -
MV button
The intention of the MV button is to get instantaneous access to the surgical view (Aortic valve at
12o’clock position) with one push of a button.
Once the Zoom ROI is set properly press the Mitral valve button on the touch panel
Rendered image
A rendered zoomed image of the MV is displayed in the rendered mode.
The viewing plane looks from the left atrium towards the Mitral Valve.
The dataset is rotated 90° counter clockwise to have AV in 12 o’clock position.
By moving the trackball with the Rotation function the dataset can be
further optimized to the correct positioning.
Rotation clockwise/counter clockwise can be done by using the Rotate Z rotational
Knob
Rotate Z is only available when in Relative Navigation Mode
(Page 2 on the touch panel)
Translation of the viewing plane can be used to move closer to the MV if needed.
Either use the Translation rotational knob on the touch panel (press on Rotate Z
to change to Translation)
or
press the Set button to change the trackball function from Rotation to
Translation
AV
Anterior MV
leaflet
Posterior MV
leaflet

GE Healthcare
- 16 -
Translation of the viewing plane closer to MV:
Before After
Press Image Store once satisfied with the image.
Temporal resolution
If higher temporal resolution is needed a multi-beat acquisition might be necessary.
By splitting the entire volume into several sub volumes (by keeping the selected
volume size from single beat), higher volume rates can be achieved, without losing
spatial resolution
Adjust your single beat acquisition as describe above.
Then select the number of heart cycles you want to collect.
Possible settings are 2-3-4 or 6 cycles.
Note
The volume will be split in several sub volumes according to the selection of
the number of heart cycles. This will increase the frame rate by 2 times,
3times, 4 or 6 times according to the number of cycles.
Press Multi Beat to start the stitched acquisition.
Press Image store whenever satisfied with the dataset.

GE Healthcare
- 17 -
2 Click Crop

GE Healthcare
- 18 -
2 Click Crop
General
2 Click Crop can be used in Live or in Post processing.
Just with 2 clicks the image will be cropped and the viewing direction is getting adjusted to the
position where you wanted to look from.
Getting started
While in 4D imaging or in Post processing the 2 Click Crop button is available on the Touch panel on
the scanner or on the Menu bar in EchoPAC.
Vivid E9 EchoPAC
Where to apply
Use either the 2D slice images or the render image to make your decision.
The first click
Simply set the first point on the position where you want to start to look from and then move the
cursor in the direction you want to look at.

GE Healthcare
- 19 -
Where to go
While moving the cursor the system immediately shows you the result in the rendered image.
As long as the end point is not set, the cursor can be adjusted in all directions and the rendered
image will visualize the cropped area. In this way you can map through the structures to find the
best position.
Adjust the cursor to visualize the structure you want to see

GE Healthcare
- 20 -
The 2nd click
Move the cursor to the final position, and then set the second point. Now the cropping is set fixed.
Note
Once the second point is set you cannot adjust the cropping further more. Simply click on a new
position to start the cropping from a different position.
Table of contents
Other GE Medical Equipment manuals
Popular Medical Equipment manuals by other brands

Otto Bock
Otto Bock Genium Protector 4X880 Series Instructions for use

Bosch
Bosch PFP5230 operating instructions

Lowenstein Medical
Lowenstein Medical SOMNOvent auto-S Instructions for use

Labomed
Labomed eVA 500 user manual

Chattanooga
Chattanooga 3D ActiveTrac user manual

Fukuda Denshi
Fukuda Denshi DynaScope 7000 Series Operation manual

THERALASE
THERALASE TLC-2000 Series quick start guide

SOMNOmedics
SOMNOmedics SOMNO HD Eco instruction manual

Gira
Gira Plus 5981 00 Short instructions

medi
medi circaid juxtafit essentials lower leg inelastic compression... manual

Encision
Encision AEM e-Edge Series Instructions for use

DJO Global
DJO Global ARTROMOT-E2 COMPACT operating instructions