Gima 32780 User manual

ATTENTION:
The operators must carefeully read
and completely understand the present
manual before using the product.
M-32780-GB-Rev.0.04.15
z
IVD
Σ
1
PHTHALATES
32780
z
IVD Σ
1
PHTHALATES
0476
Gima S.p.A.
Via Marconi, 1 - 20060 Gessate (MI) - Italy
Made in P.R.C.
BLOOD PRESSURE
MONITORING SYSTEM
Gima S.p.A. - Via Marconi, 1 - 20060 Gessate (MI) Italy
Italia: tel. 199 400 401 - fax 199 400 403
Export: tel. +39 02 953854209/221/225 - fax +39 02 95380056
gima@gimaitaly.com - export@gimaitaly.com
www.gimaitaly.com
PROFESSIONAL MEDICAL PRODUCTS
Instruction manual

2
TABLE OF CONTENTS
1 Overview .....................................................................3
2 Checklist .....................................................................4
3 Safety Precautions.......................................................4
4 Battery Installation.......................................................5
5 Setting Up System.......................................................5
5.1 Date & Time Setting .............................................5
5.2 1stTime Period Setting.........................................6
5.3 2nd Time Period Setting ......................................7
5.4 Time Interval Setting ............................................9
6 Taking Measurement .................................................10
6.1 Applying the Arm Cuff........................................10
6.2 Preparing and Educating the Patient .................10
6.3 Irregular Heartbeat .............................................11
7 Retrieving the Data (via PC or from the Unit).............12
7.1 Reading Data from the Unit ...............................12
7.2 Retrieving Data via PC .......................................13
8 Troubleshooting ........................................................16
9 Storage & Maintenance ............................................17
10 Specications ............................................................17

3
1. OVERVIEW
DB-51H Ambulatory Blood Pressure Monitoring System is
a non-invasive oscillometric blood pressure monitor
capable of measuring blood pressure at pre-programmed
intervals throughout the day. It is intended to be used
at home to record patient blood pressure over a 24 hour
period for
gathering trending information in non-critical settings.
It is not intended to be used as real time monitoring
of patients in critical care environment.
It is intended for use by a trained medical practitioner as
an aid or adjunct to diagnosis and treatment.
DB-51H unit is worn by a waist belt or shoulder strap and
is connected to a cuff wrapped around the non-dominant
upper arm. The cuff is inated automatically at
pre-programmed intervals. Heart pulse can also be
measured.

4
2. CHECKLIST
Package contains the following:
• 32780unit
• PC-linksoftwarewithCD-R&USBplug
• Monitorpouch,Waistbeltandshoulderstrap
• Adultsizecuff
• Lithiumrechargeablebattery
• Usermanual
PC minimum requirements
• WindowsXPorlater
• Pentium233MHz
• 4GBharddisk
• 128MBram
• Monitorresolution:XGA800x600orhigher
3. SAFETY PRECAUTIONS
• Babies,youngchildrenorindividualswhocannotexpress
their consent are not suitable to take blood pressure
measurement.
• Individualswithseriousarteriosclerosisarenotsuitable
to take blood pressure measurement.
• Bloodpressurereadingsmaychangeincaseof
pregnancy. Pregnant women can consult their doctor
before taking measurement.
• Itisintendedforusefollowingconsultation
and instruction by a physician.
• Theinterpretationofbloodpressuremeasurementvalues
should only be performed by a physician. The accuracy
of measurement may be affected by position of the
subject,physicalconditions,movement,anduseoutside
the operating instructions written in this manual.

5
4. BATTERY INSTALLATION
1. Remove the screw and lift the
cover to open the battery
compartment.
2.Install1Lithiumrechargeable
batteries as indicted.
Maresuretomatchpolarities(+,-)
on the batteries.
3. Replace the battery cover by
inserting and tightening
the screw.
Please remove the battery when
not in use for more than 3 months.
Otherwise,batterymayleak
and cause damage to the unit.
5. SETTING UP THE SYSTEM
Tosetuptheunit,simplyinputtheparametersbypressing
the buttons on the unit without using computer. User can
setTWOtimeperiods.
5.1 Date & Time Setting
1. Press and hold the “ ” button for a few seconds
until the Year display ashes.
2. Press the “M” or button to select the current
year.
3. Press the “ ” button to conrm Year Setting.
4.FollowthesamestepstosettheMonth,Date,Hour
and Minute.

6
5.2 1st Time Period Setting
5.2.1 Set Time Start
1.Screenshows“C---“.Toenable24-hourfunction,
press the “M” or button to select “ON”
and press the “ ” button to conrm.
2.Screenshows“A---“.Tosettherststartingtime,
press the “M” or button to select “ON”
and press the “ ” button to conrm.
3.WhenHourdigitashes,pressthe“M” or
button to select Hour. Press the “ ” button
to conrm.
4.WhenMinutedigitashes,pressthe“M” or
button to select Minute. Press the “ ” button
to conrm.
5.Forexample,youhaveset8:00youwanttostart
the 1st measurement.

7
5.2.2 Set Time End
1.Afterthat,youwilljumptopage“2”onthescreen.
2.Screenshows“A---”.Tosettherstendingtime,press
the “M” or button to select “ON” and press
the “ ” button to conrm.
3.WhenHourdigitashes,pressthe“M” or
button to select Hour. Press the “ ” button
to conrm.
4.WhenMinutedigitashes,pressthe“M” or
button to select Minute. Press the “ ” button
to conrm.
5.Forexample,youhaveset12:00youwanttoendthe
1st measurement.
5.3 2nd Time Period Setting
5.3.1 Set Time Start
1.Afterthat,youwilljumptopage“3”onthescreen.

8
2.Screenshows“A---“.Todisable2ndsetoftime,
press the “M” or button to select “OFF”
and press the “ ” button to conrm.
Toset2ndsetofpredeterminedtime,pressthe“M”
or button to select “ON”. Press the “ ”
button to conrm.
3.WhenHourdigitashes,pressthe“M” or
button to select Hour. Press the “ ” button
to conrm.
4.WhenMinutedigitashes,pressthe“M” or
button to select Minute. Press the “ ” button t
o conrm.
5.Forexample,youhaveset15:00youwanttostart
the second measurement.
5.3.2 Set Time End
1.Afterthat,youwilljumptopage“4”onthescreen.
2.Screenshows“A---“.Todisable2ndsetoftime,
press the “M” or button to select “OFF”
and press the “ ” button to conrm. To set the
secondendingtime,pressthe“M” or button
to select “ON” and press the “ ” button
to conrm.

9
3.WhenHourdigitashes,pressthe“M” or
button to select Hour. Press the “ ” button
to conrm.
4.WhenMinutedigitashes,pressthe“M” or
button to select Minute. Press the “ ” button
to conrm.
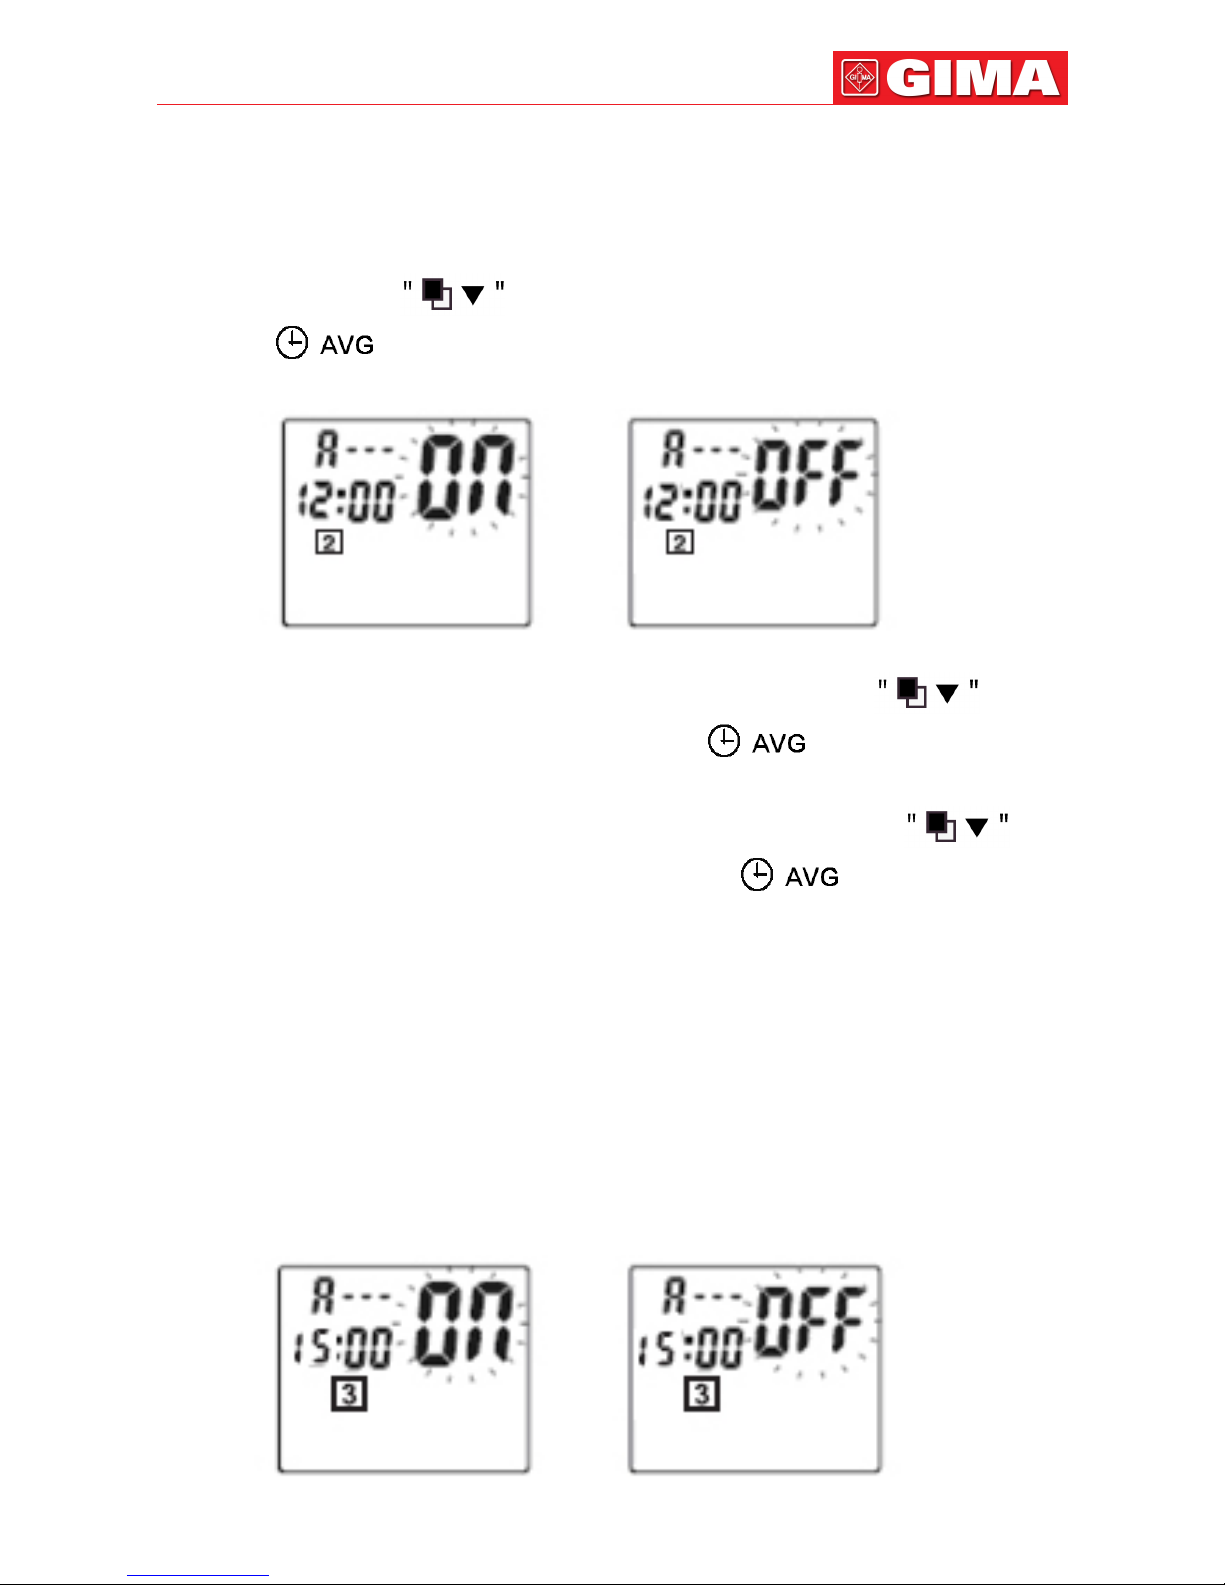
5.Forexample,youhaveset20:00youwanttoend
the second measurement.
5.4 Time Interval Setting
1.Afterthat,thescreenshows“AbP”.
2.WhenHourdigitashes,pressthe“M” or
button to select Hour. Press the “ ” button
to conrm. (It allows you to adjust from 0 to 9).
3.WhenMinutedigitashes,pressthe“M” or
button to select Minute. Press the “ ” button
to conrm. (It allows you to adjust from 0 to 55).
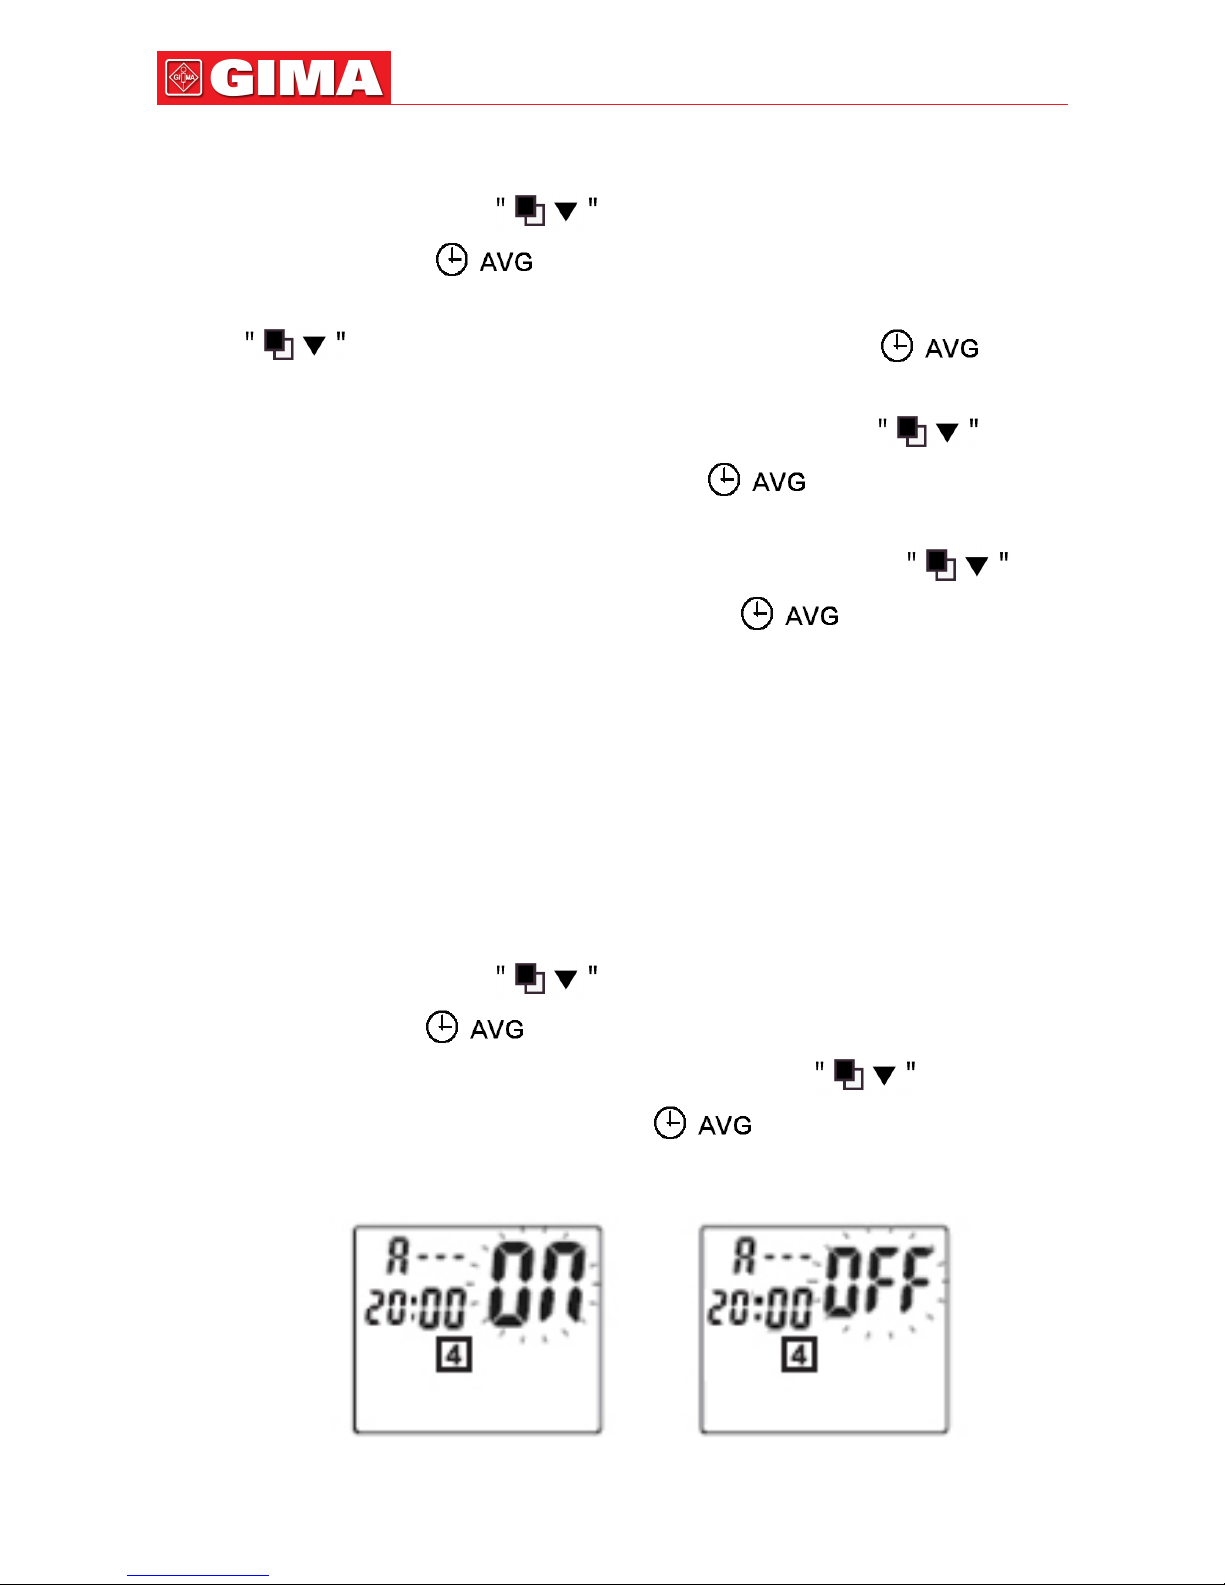
4.Forexample,youhaveset00:20(20min).Thentheunit
willstarttomeasureon08:00,08:20,08:40,09:00,09:20,
09:40,10:00,10:20,10:40,11:00,11:20,11:40,12:00;
15:00,15:20,15:40,16:00,16:20,16:40,17:00,17:20,
17:40,18:00,18:20,18:40,19:00,19:20,19:40,20:00)

10
6. TAKING MEASUREMENT
6.1 Applying the arm cuff
1.Toapplythecuff,simplyslidethesleeveupthepatient’s
arm,ensuringthesizeindicatorisatthetopofthecuff.
Thecuffshouldbeapproximately1-2cmbetween
the bottom of the cuff and your elbow joint.
2. Connect the tube from the cuff to the unit. Drape the tube
overthepatient’sshoulder,aroundtheneck,acrossthe
opposite side of the body.
3. Put the unit into the pouch. Attach the pouch to the
patient using either the waist belt or shoulder strap
dependingonthepatient’spreference.
4.Toensureproperunitoperation,startameasurement
bypressing“START”button.Ifproblemoccurs,review
the setup and tting of the system.
6.2 Preparing and Educating the Patient
Whenthemeasurementstarts,thepatientshould:
• avoidexcessmovementduringmeasurements,
• relaxtheinstrumentedarm,slightlyawayfromthebody,
• avoidhandmovement,
• avoidexingthemusclesduringmeasurement,
• notremovethecuffbetweenmeasurement.
The patient can stop a measurement in progress
by pressing “ ” button.
The patient can start a measurement at any time by pres-
sing “START” button.

11
6.3 Irregular Heartbeat
This unit has a unique feature that alerts user of irregular
heartbeat detection during measurement.
Note:Anirregularheartbeatisdened
as a heartbeat rhythm that has a
variation of more than 25% from the
average rhythm detected during
measurement.
If such irregular rhythm occurs twice or
moreduringthesamemeasurement,
the display screen will show the pulse
value and “IH” symbol alternately.
Example:(90/IH).
Note:pleaseconsultyourdoctorifirregular
heartbeat occurs often.
Regular but Below Normal Heartbeat
If the monitor detects a pulse rate
Below 60 beats per minute during
measurement,themonitorwill
displaythepulsevalueand“LO”
symbolalternately.Example:(58/LO).
Regular but Above Normal Heartbeat
If the monitor detects a pulse rate
above 100 beats per minute during
measurement,themonitorwilldisplay
the pulse value and “HI” symbol
alternately.Example:(102/HI).

12
7. RETRIEVING THE DATA (Via pc or from the unit)
Beforeretrievingthedatafromtheunit,disconnecttheunit
from the patient. You could retrieve the data via PC or from
the unit.
7.1 Reading Data from the Unit
7.1.1 View Past Readings
1. Press the “M” button to enter memory function.
2. Press the button to select page “1”.
3. Press the “M”buttontodisplaythenextsetsofvalues.
Past readings are displayed from the most recent to the
oldest.
4. This can store up to 396 sets of past readings.
5. Each page can store 99 sets of past readings. Select
page“2”forthe100th–198thsets,selectpage“3”
for the 199th – 297th sets and select page “4” for
298th – 396th sets of past readings.
7.1.2 View Average Readings
1. Press the “ ” button to enter Average function.
2. Press the button to select page “1”.
3. Press the “ ” button to view different Average
values. 5 different Average Values are available.
Symbol on Display Average Values of
1 h One Hour
1 d One Day
7d OneWeek
30 d One Month
ALL AllReadings

13
7.1.3 Delete Past Readings
1. Press the button to select page “1”.
2. Press and hold the “M” & buttons
simultaneouslyfor5seconds.Symbolof“ALLEE”
will be displayed and all past readings stored in page “1”
will be deleted.
3.Followthesamestepstodeletepage“2”,“3”and“4”.
7.2 Retrieving Data via PC
1. Install PC-link software to your computer. It suits for
windowXPorlater.
2. Connect USB cable to your computer and blood pressure
monitor.
3. Open PC-link software.
View Data
Add User
Edit User
Delete User
Exit

14
4.InputNewUserinformationlikename,sex,dateofbirth
by pressing “Add User” icon.
5. Double-click the user name.
6. Turn on the blood pressure monitor. Choose Page “1”
by press button.
7. Press the “transfer data” button on the software.
DisplayGraph
Transfer Data
Import Data
ExportData
Home

15
8.Ontheunit,press“M” and “ ” two buttons at the
same time without release till “PC” word is shown on the
screen.
9. You could display the data in graphic chart in different
date(morning,daytime,evening,average)anddifferent
time(yearly,monthly,weekly,custom).
10. You could save the data and print the data.

16
8. TROUBLE SHOOTING
Problem Cause Solution
Note:Ifyourproblemcannotbesolvedbytheabove,
consult your store of purchase. Do not disassemble
the unit.
No display
when you press
thePower/Start
button
“Err P” displayed
“Err 1” displayed
“Err 2” displayed
“Err 3” displayed
Have the batteries
run out?
Are the battery
polarities wrong?
Fail to inate
Deate too rapidly
Movement during
measurement
Signal interference
Incorrect results
Replace new
batteries
Re-align batteries in
correct polarities
Check if the cuff is
properly connected.
Replace the air tube
if it is broken
Return for servicing
Do not move during
measurement
Remove interfering
source e.g. mobile
phones,magnets
Measure again

17
9. STORAGE & MAINTENANCE
• Keepawaytheunitfromdirectsunlight,extreme
temperatures,humidityormoisture.
• Useadry,softclothtocleantheunit,orifdesired,
use a cloth lightly dampened with water.
• Donotusealcohol,benzene,thinnerorothervolatile
liquids to clean the unit.
• Donotwashorexposethearmcufftoliquid.
• Removebatteriesfromtheunitwhenitwillnotbeused
for more than 3 months.
10. SPECIFICATIONS
Model No. 32780
Measurement Method Oscillometric
MeasurementRange Pressure:20–280mmHg
PulseRate:40–195beats/min
Accuracy Pressure:+/-3mmHg
PulseRate:+/-5%
Ination Pump driven
Pressure Detection Semi-conductor
PowerSupply Lithiumrechargeablebattery
Auto Power Off 3 minutes after last operation
StorageEnvironment -20°Cto60°C,10%to95%RH
OperationEnvironment 10°Cto40°C,30%to85%RH
ExternalDimensions 184(L)x84(W)x33(H)mm
NetWeight 260g(batteriesexcluded)
Cuff Dimensions For arm circumference of 22-34 cm
(Specialsizetobeordered
separately)
Note:Subjecttomodicationwithoutpriornotice.

18
Disposal: The product must not be disposed of along
with other domestic waste. The users must dispose
of this equipment by bringing it to a specific recycling
point for electric and electronic equipment.
For further information on recycling points contact
the local authorities, the local recycling center
or the shop where the product was purchased.
If the equipment is not disposed of correctly, fines
or penalties may be applied in accordance with
the national legislation and regulations.
GIMA WARRANTY CONDITIONS
CongratulationsforpurchasingaGIMAproduct.Thisproduct
meets high qualitative standards both as regards the material
and the production. The warranty is valid for 12 months
fromthedateofsupplyofGIMA.
Duringtheperiodofvalidityofthewarranty,GIMAwillrepair
and/orreplacefreeofchargeallthedefectedpartsdueto
productionreasons.Laborcostsandpersonneltraveling
expensesandpackagingnotincluded.Allcomponentssubject
to wear are not included in the warranty. The repair or replace-
mentperformedduringthewarrantyperiodshallnotextendthe
warranty.Thewarrantyisvoidinthefollowingcases:repairs
performedbyunauthorizedpersonnelorwithnon-originalspare
parts,defectscausedbynegligenceorincorrectuse.
GIMAcannotbeheldresponsibleformalfunctioningon
electronicdevicesorsoftwareduetooutsideagentssuchas:
voltagechanges,electro-magneticelds,radiointerferences,etc.
z
IVD Σ
1
PHTHALATES

19

Table of contents
Other Gima Blood Pressure Monitor manuals