Gima DOMINO User manual

Gima S.p.A.
Via Marconi, 1 - 20060 Gessate (MI) Italy
gima@gimaitaly.com - export@gimaitaly.com
www.gimaitaly.com
SFIGMOMANOMETRO DIGITALE DOMINO
DIGITAL SPHYGMOMANOMETER DOMINO
TENSIOMÈTRE NUMÉRIQUE DOMINO
DIGITAL-BLUTDRUCKMESSGERÄT DOMINO
ESFIGMOMANÓMETRO DIGITAL DOMINO
ESFIGMOMANOMETRO DIGITAL DOMINO
ΨΗΦΙΑΚΌ ΠΙΕΣΌΜΕΤΡΌ DOMINO
DOMINO
M32803-M-Rev.1-01.19
PROFESSIONAL MEDICAL PRODUCTS
Gima S.p.A.
Via Marconi, 1
20060 Gessate (MI) Italy
Made in China
ATTENZIONE: Gli operatori devono leggere
e capire completamente questo manuale
prima di utilizzare il prodotto.
ATTENTION: The operators must carefully
read and completely understand the present
manual before using the product.
AVIS: Les opérateurs doivent lire et bien
comprendre ce manuel avant d’utiliser le produit.
ACHTUNG: Die Bediener müssen vorher dieses Handbuch
gelesen und verstanden haben, bevor sie das Produkt benutzen.
ATENCIÓN: Los operadores tienen que leer y entender
completamente este manual antes de utilizar el producto.
ATENÇÃO: Os operadores devem ler e entender
completamente este manual antes de usar o produto.
ΠΡΟΣΟΧΗ: Οι χειριστές αυτού του προϊόντος πρέπει να διαβάσουν και να
καταλάβουν πλήρως τις οδηγίες του εγχειριδίου πριν από την χρήση του.
32803 - 32804 0476
Manuale d’uso - User manual
Manuel de l’utilisateur - Gebrauchsanweisung
Guía de Uso - Guia para utilização
Οδηγίες χρήσης -

2
1. Struttura principale
2. Display
3. Connettore aria
4. Spina tubo
5. Tubo dell’aria
6. Bracciale
7. Anello D-ring
8. Pulsante “F”
9. Pulsante “M1”
10. Pulsante “M2”
11. Pulsante “START”
12. Custodia
13. 4 Batterie AA
14. Adattatore AC
1. Main Body
2. Display
3. Air Connector
4. Tube Plug
5. Air Hose
6. Cuff
7. D-ring
8. Button ‘F’
9. Button ‘M1’
10. Button ‘M2’
11. Button ‘START’
12. Storage Case
13. 4xAA Batteries
14. AC Adapter
1. Corps principal
2. Écran
3. Connecteur de l’air
4. Fiche tuyau
5. Tuyau de l’air
6. Brassard
7. Anneau D-ring
8. Bouton « F »
9. Bouton « M1 »
10. Bouton « M2 »
11. Bouton « START »
12. Étui
13. 4 piles AA
14. Adaptateur AC
1. Hauptstruktur
2. Display
3.
Luftanschlussbuchse
4. Schlauchstecker
5. Luftschlauch
6. Armmanschette
7. D-Ring
8. Taste “F”
9. Taste “M1”
10. Taste “M2”
11. Taste “START”
12. Gehäuse
13. 4 AA-Batterien
14. AC-Netzteil
1. Estructura principal
2. Display
3. Conector aire
4. Clavija tubo
5. Tubo del aire
6. Manguito
7. Anillo D-ring
8. Botón “F”
9. Botón “M1”
10. Botón “M2”
11. Botón “START”
12. Estuche
13. 4 Pilas AA
14. Adaptador AC
1. Estrutura principal
2. Visor
3. Conector ar
4. Espinha tubo
5. Tubo do ar
6. Braçadeira
7. Anel D-ring
8. Botão “F”
9. Botão “M1”
10. Botão “M2”
11. Botão “START”
12. Estôjo
13. 4 Pilhas AA
14. Adaptador AC
1. Βασική σύνθεση
2. Οθόνη
3. Συνδετήρας αέρα
4. Βύσμα σωλήνα
5. Σωλήνας αέρα
6. Περιβραχιόνιο
7. Δαχτύλιος D-ring
8. Πλήκτρο “F”
9. Πλήκτρο “Μ1”
10. Πλήκτρο “Μ2”
11. Πλήκτρο “START’
12. Θήκη
13. 4 Μπαταρίες ΑΑ
14.
Προσαρμογέας ΑΟ

11
PRINCIPLE OF OPERATION
This device adopts the oscillometric technology with Fuzzy Algorithm measuring the arterial blood pres-
sure and pulse rate. The cuff is wrapped around the arm and automatically inated by the air pump. The
sensor of the device catches weak uctuation of the pressure in the cuff produced by extension and
contraction of the artery of the arm in response to each heartbeat. The amplitude of the pressure waves
is measured, converted in millimeters of the mercury column, and is displayed by digital value.
Annotation: This device can not provide reasonable accuracy if used or stored in the temper-
ature or humidity beyond the range stated in the section <SPECIFICATIONS> of this manual.
TIPS UN TAKING BLOOD PRESSURE MEASUREMENT
1. Generally arterial blood pressure is lower in summer and higher in winter. Arterial blood pressure
changes with atmosphere pressure and is affected considerably by many factors, e.g. physical loads,
emotional excitability. stress, meals, etc. Medicines, drinking, smoking affects greatly the level of
individual blood pressure. Blood pressure will raise in low temperature, so it is better to take blood
pressure measurement in room temperature (approximately 20°C). If this device was stored in low
temperature, it is necessary to leave it in room temperature for at least 1 hour, otherwise the meas-
urement can be inaccurate. Blood pressure does vary with age and individual, and it is recommended
to write down the readings in blood pressure record daily, then you can check with your doctor to nd
out what is “normal blood pressure” for you.
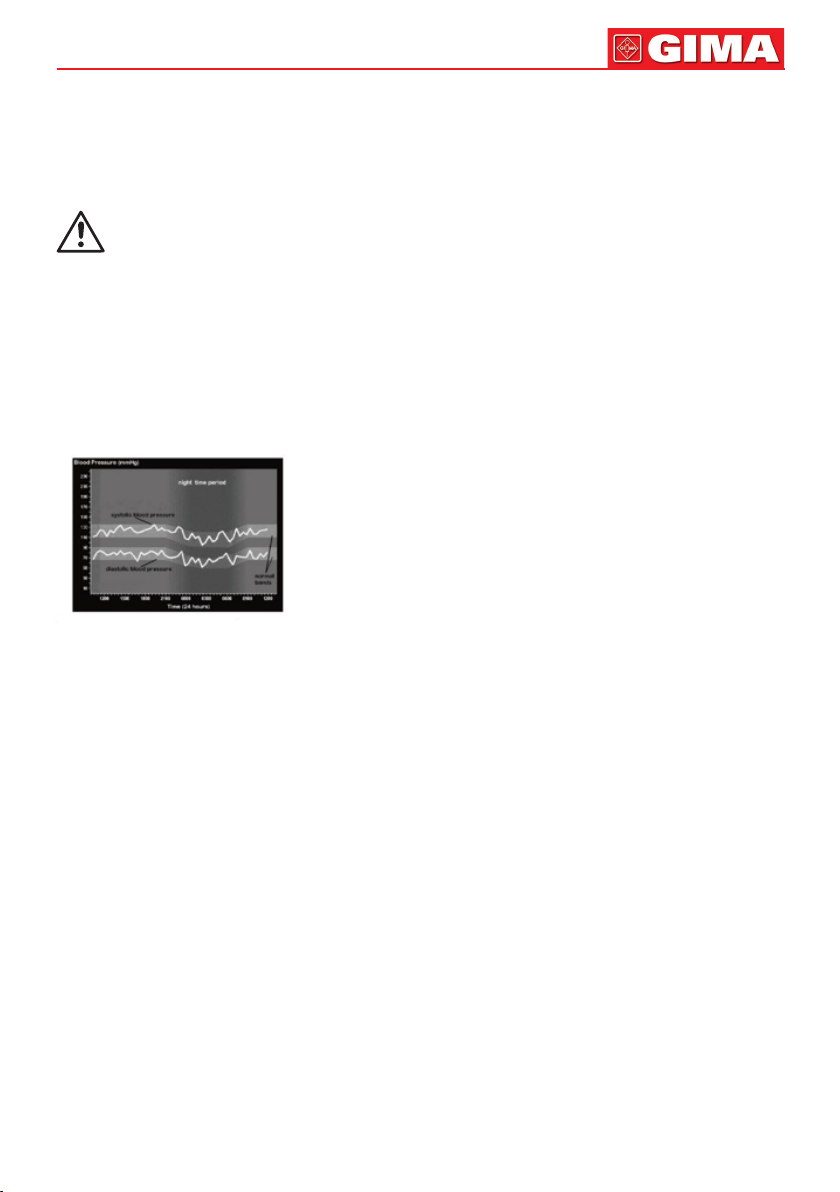
The illustration is from British Hypertension Society
2. Take measurement under doctor’s instruction for patients with cardio-vascular diseases.Under no
circumstances should you alter the dosages of any drugs prescribed by your doctor!
3. Accurate measurement of blood pressure may be difcult in serious arteriosclerosis, weak pulse, or
in patients with obvious uctuation of heart contraction rhythm. Please consult qualied physician
interpret your blood pressure readings.
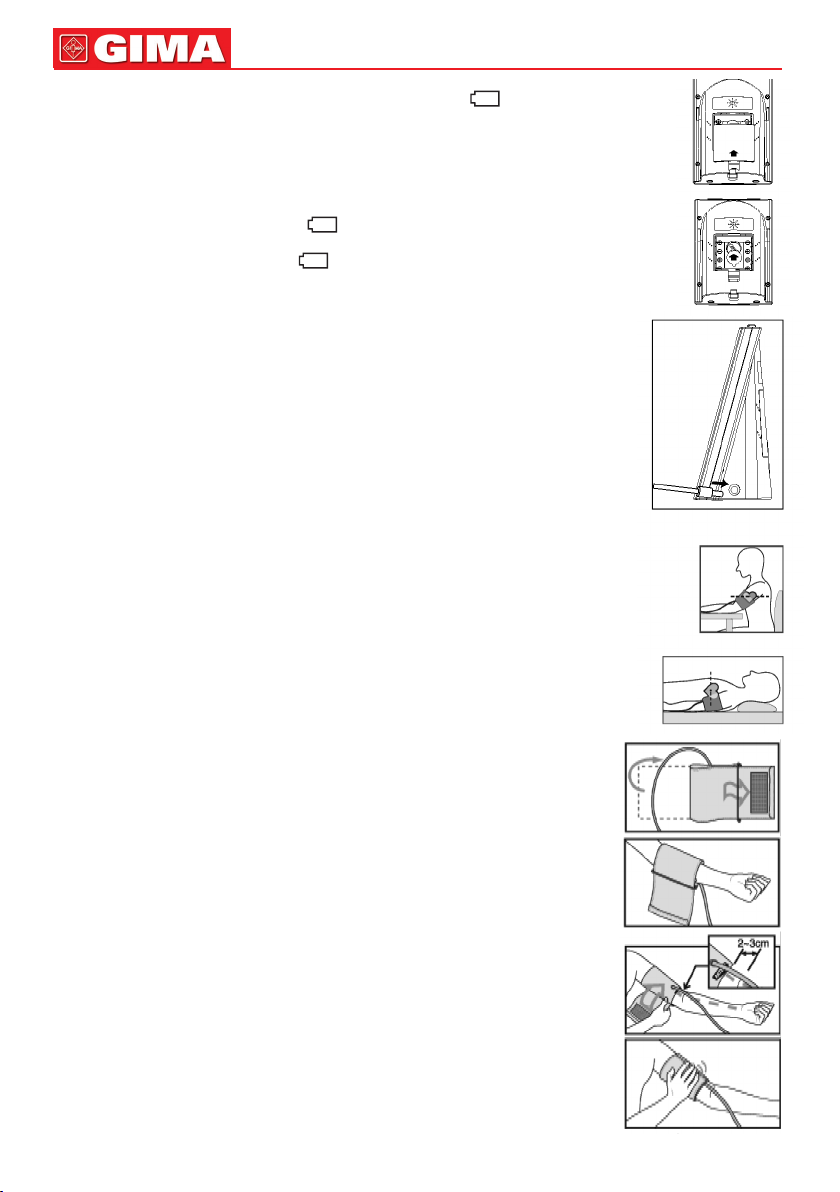
4. Measurement should be conducted in quiet environment. Don’t eat or smoke before a measurement.
This device is supplied with the standard cuff which is t for the arm size 22-32 cm. Children and
adults with cuff size fall outside the range 22-32 cm should select special size cuffs. Piease contact
the dealer to get these special size cuffs.
ATTENTION: Do not use cuff other than the original cults contained In this kit
5. Repeated measurements with interval at 3 minutes are recommended, s you can calculate the aver-
age to get more accurate measurement. Atherosclerosis patients are required longer interval (10-15
minutes) as elasticity of patients‘ vessels decreased signicantly in these diseases. 10-15 minutes
interval is also applicable for patients suffering from diabetes for a long time
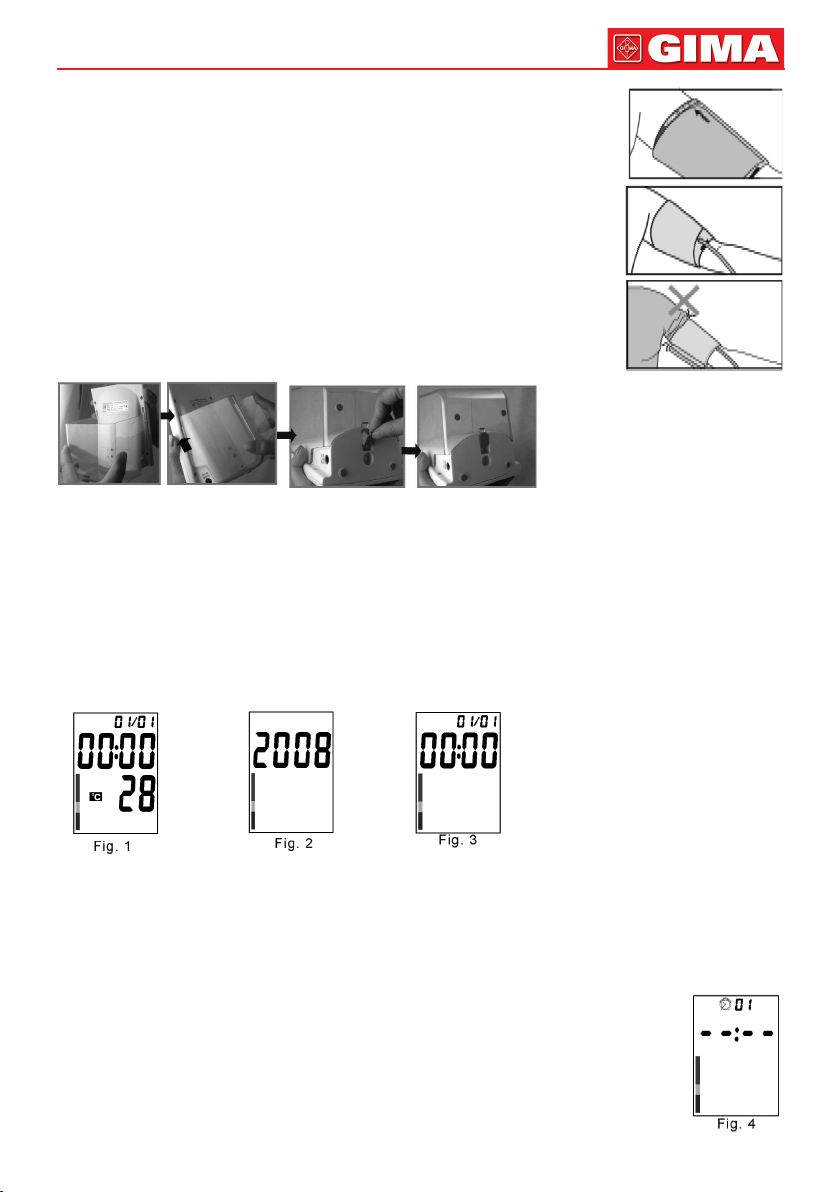
BATTERY INSTALLATION
1. Open the battery cover and then open the button battery cover, then install one ‘CR2025’button bat-
tery into the button battery compartment;
2. Close the button battery compartment cover;
3. Install four ‘AA’ type batteries into the battery compartment as indicated. Make sure that the polarity
is correct; batteries can be shorter than the recommended;
4. Close the battery compartment cover.
- Inbuilt button battery for keeping the date/time uninterruptedly during changing the batteries (4x AA
batteries).
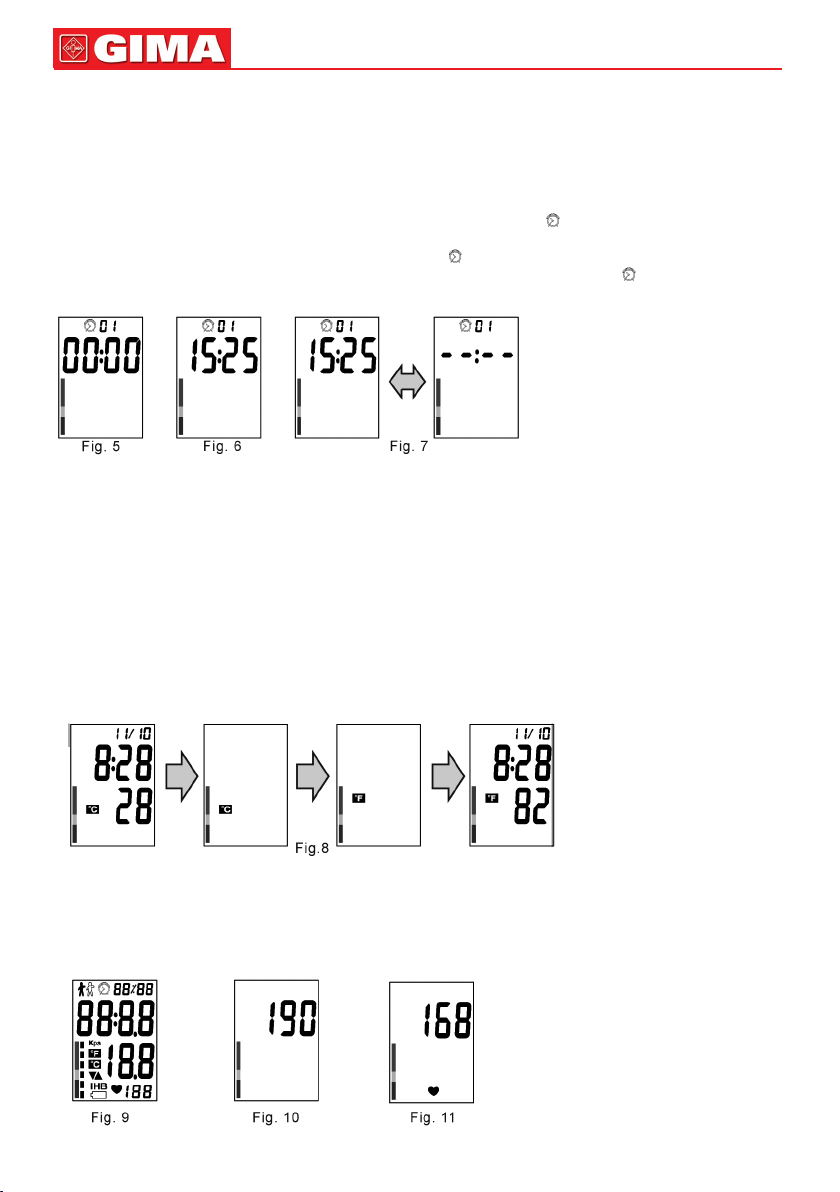
If the new batteries are installed into the device, the date and time displays ‘01/01’ and ‘00:00’ icon in
the LCD, it indicates that you need change the new button battery.
ENGLISH

12
ENGLISH
- Replace the batteries when the replacement indication ‘ ’ appears in the dis-
play or nothing after ‘START’ button is pressed;
- Batteries in this kit are intended to check work capacity of the device and the life-
span of the batteries can be shorter than the recommended;
- Replace all batteries simultaneously, and don’t use rechargeable batteries;
- If the device is to be unused for long time, please take out the batteries;
- Don’t leave the worn batteries in the device;
- When the low battery indication ‘ ’ ashes on the LCD during measurement,
it reminds that the user will change all the batteries but can be used currently,
when the low battery indication ‘ ’ in the LCD and at the same time the buzzer
beeps for 4 times continuously, it indicates that the user need change all batteries
at once.
USE THE DEVICE WITH AC POWER ADAPTER
Besides batteries you can use AC power adapter as the power supply.
AC power adapter is optional for the device for sale.
The connector of AC power adapter is located in right side of the device.
Use only AC power adapter with below specied technical features:
Output voltage: 6V±5%
Max. output current: At least 600 mA
Output plug polarity: <-> inner
External diameter: 5.5±0.1 mm
Internal diameter: 2.1± 0.1 mm
Length: 10± 0.3 mm
CORRECT POSTURE FOR MEASUREMENT
1. Sit at the table and let the table support your arm as you take the measurement.
Make sure that the cuff on the upper arm is at approximately the same level as
the heart, and that the forearm is extended naturally on the table;
2. You may lie on your back and take measurement.
Look at the ceiling, keep calm, and don’t move your neck or body during the
measurement. Make sure that the cuff on the upper arm is at approximately the
same level as the heart.
ASSEMBLY THE CUFF
1. Insert the edge of the cuff approximately 5 centimeters into the D-ring as
shown in gure.
2. Put the cuff on the left upper arm with the tube pointing to the direction of
palm.
If measurement on your left arm is difcult, you can use right arm for
measurement.
In this case, it is necessary to know that the readings may differ about
5-10 mmHg between left arm and right arm.
3. Wrap cuff around your upper arm with the lower edge of the cuff approxi-
mately 2-3 centimeters above the elbow. The mark <ART ERY > must be
over the artery of the arm.
4. Press the cuff to make sure that it is attached securely. The cuff should not
be too tight or too loose. Two ngers should be easily put in between cuff
and upper arm.

13 ENGLISH
5. The mark <INDEX> on the cuff must point to area <NORMAL> (22-32
cm).
This means the cuff size is correct. If mark <INDEX> points to the area
beyond area <NORMAL>, please consult your dealer whether you need
another size cuff.
6. Sometimes it is difcult to make the cuff regular owning to the shape of the
user’s upper arm, the cone-shape assembly of cuff is also acceptable.
7. If your clothes restrict blood circulation of your upper arm, or you roll your
sleeve up so as to result in such restriction. Please take off your clothes to
get accurate measurement if necessary.
ASSEMBLY THE STORAGE CASE
1. Three hooks of storage case aim at the concaves of device respectively;
2. Push the storage case upwards;
3. To ll tightly with the plug.
SETTING THE DATE AND TIME
The function provides accurate measuring time for each measurement.
To get accurate date and time, the user should preset the date and time correctly before the rst use of
this device.
The operation procedure for presetting Date/Time is as follows:
1. When the device is connected to power supply at rst time,the display will show as Fig. 1;
2. Press button ‘F’, and the year number ashes;
3. Press button ‘M1’ or ‘M2’ to subtract or add the number, and press button ‘START’ for conrmation;
4. When the year setup is nished, the month number will ash automatically as Fig.3. Please follow the
same instruction as above to set month, date and time;
5.Press button ‘START’ to nish setup. If you want to change the date and time, please repeat proce-
dure 2.3.4.
FUNCTION OF REMINDERS
Setting reminders
This monitor has 3 reminder alarms. You can set 3 different reminder alarms within a
24 hours period.
1. When the device stands by, press button ‘F’ two times to enter into alarm 01 mode,
the display will show as Fig.4;
2. Press button ‘M1’ or ‘M2’ the display will show as Fig.5 and at the same time the hour
number ashes;

14
3. Press button ‘M1’ or ‘M2’ again to subtract or add the number, and press button
‘START’ for conrmation;
4. When the hour number setup is nished, the minute number will ash automatically. Please follow the
same instruction as above to set minute number;
5. Press button ‘START’ for conrmation.
6. When the device stands by, press button ‘F’ three and four times respectively to enter into alarm 02
and 03 mode. Repeat the above process if you need a second and third alarm clock.
Annotation: When the alarm is on under device stands by, the icon ‘ ’ ashes on LCD and goes with
beep for 1 minute. Press the button ‘START’ to turn off the alarm.
When the alarm is on during measurement, the icon ‘ ’ ashes on LCD for 1 minute without beep.
Under this situation, if you press the button ‘START’, it will stop both the icon ‘ ’ ashing and meas-
urement.
Reminders clearance
1. When the device stands by, press button ‘F’ two times to enter into alarm 01 mode, then press button
‘M1’ for at least 5 seconds, the display will show as Fig.7 which means the alarm 01 is removed.
2. When the device stands by, press button ‘F’ three and four times respectively to enter into alarm 02
and 03 mode . Repeat the above process to remove the alarm 02 and alarm 03.
AMBIENT TEMPERATURE DISPLAY AND ADJUSTMENT
This monitor can display the ambient temperature and the unit °C and °F can be adjustable. °C mode
display in the LCD when the rst time used.
1. When the device stands by, press button ‘F’ ve times to enter into the temperature adjustable mode,
then press button ‘M1’ to turn into °F mode and press button ‘START’ for conrmation.
2. Press button ‘M2’ to convert °F mode into °C mode.
Annotation: When under the mode of function reset, if without any operation in 1 minute, the device will
automatically return to standby mode.
CARRY OUT A MEASUREMENT
1. Insert the tube plug into the air connector. Before the measurement, take 3~5 times deep breath and
relax yourself. Don’t talk or move your arm;
2. Press button ‘START’, and all symbols will appear on display in 2 seconds as Fig.9. Then two short
beep will sound and ‘0’ will appear on the screen. Pump begins to inate with display showing the
reading of pressure. Generally the pressure will reach 190mmHg as Fig.10;
ENGLISH

15
3. The pump stop inating and pressure begins to decrease gradually, during which the user’s blood
pressure and pulse will be calculated as Fig.11;
4. There will be a long beep following the accomplishment of measurement. The air in the cuff will deate
quickly and the blood pressure reading, pulse reading will show in the display. Moreover the meas-
uring time will also display together in two screens alternately. At the same time, the ‘ ’ will ash to
remind the user to record the reading as Fig.12;
5. Press button ‘M1’ or button ‘M2’ to record the reading in corresponding memory. For example, if
button ‘M2’ is pressed, the display will show as Fig.13. If the user does not press button, the reading
won’t be recorded;
6. Press the button ‘START’ to return to standby mode. Please rest for at least 3 minutes for another
measurement. The device keeps unused for 3 minutes, the device will be return to standby mode
automatically.
Automatic ination
There are 4 given levels of given ination pressure for this device: 190mmHg, 230mmHg, 270mmHg
and 300mmHg.
When 190mmHg is not enough or movement of arm occurs, the device will automatically inate to rea-
sonable pressure level to ensure a successful measurement. It is not a fault.
Rapid deation during measurement
If you do not feel well during measurement or want to stop the measurement for some reason, you can
press the START button. The device will quickly release the air in cuff and the device will be returned to
standby mode.
The indicator displays a segment, based on the current data, corresponding to the WHO classication.
For example, if your blood press is 145mmHg (Systolic Pressure), 88mmHg (Diastolic Pressure), ac-
cording to the world health organization standard, your blood pressure level is Mild Hypertension
Note: If the systolic blood pressure and diastolic blood pressure fall into different categories, the higher
value should be taken for classication.
FUNCTION OF MEMORY
Memory recall
1. Domino can store 60 sets of readings each in ‘ ’ and ‘ ’ , and will automatically calculate the average
value of the latest 3 readings for ‘M1’ and ‘M2’ respectively. When the memory is full (60 sets of read-
ings are stored), the oldest reading will be replaced by new one. Memory will not clear away even if
power supply is removed;
2. After a measurement is nished or when the device stands by, the user can press button ‘M1’ or but-
ton ‘M2’ to recall memory. Press button ‘M1’ or ‘M2’, the display will show the average value of the
latest 3 readings as Fig.14;
ENGLISH

16
3. Press again, the display will show ‘01’, which means the latest reading, then turns to another screen
to show readings and measuring time as Fig.15;
4. Press again, the display will show ‘02’, which means the second to the latest reading…
Memory clearance
After a measurement is nished or when the device stands by, hold down button ‘M1’ or
‘M2’ for at least 5 seconds, the display will show ‘CLR’ which means the stored reading
for ‘M1’ or ‘M2’ is removed.
IRREGULAR HEARTBEAT DETECTOR
Model Domino digital blood pressure monitor provides a blood pressure and pulse rate
measurement even when an irregular heartbeat occurs. When the device detects the
irregular heartbeat or any excessive body movement during measurement, the ‘IHB ’
icon will display in the LCD. It is important that you be relaxed, remain still and do not
talk during measurement.
Note: We recommend contacting your physician if you see this ‘IHB’ indicator frequent-
ly.
ERROR AND LOW BATTERY INFORMATION
CARE, STORING, REPAIR AND RECYCLING
1. It’s necessary to protect this device against high moisture, direct sunlight, shock, solvent, alcohol and
gasoline.
2. Remove the batteries if the device is to be stored for a long time, and keep the batteries far from the
children.
3. Keep the cuff from sharp subject and don’t extend or twist the cuff.
4. Use only soft and dry cloth to clean the device.
5. The cuffs are sensitive and must be handled with care. You can clean the cuff cover with damp cloth.
WARNING: Under no circumstances may you wash the inner bladder!
6. It is necessary to consult specialists yearly for checking technical condition of the device. Please
consult your dealer for more information.
INDICATION POSSIBLE REASON CORRECTION METHODS
The cuff is put on wrongly or the tube
plug is inserted too loosely. Make sure that cuff is put on correctly
and the tube plug is inserted tightly and
repeat the measurement.
Movement of arm/hand or talking during
measurement. Repeat the measurement with following
completely recommendations of ma-
nual.
The cuff is not inated to necessary
pressure. Repeat the measurement with pumping
cuff on 30-40 mmHg above expected
systolic pressure.
The batteries are weak. Replace all 4 batteries with new ones.
ENGLISH

17
7. Since neither the device nor batteries are household waste, follow your local recycling rules and dis-
pose them at appropriate collection sites.
TROUBLESHOOTING
.
SPECIFICATIONS
Model: Domino
Size: 158(L) ×120(W) ×127(H)mm
Weight: Approximately 490g without batteries
Measuring method: Oscillometry
Measuring range: 40 to 260 mmHg (blood pressure); 40 to 160 beats/minute (pulse rate)
Measuring accuracy: ± 3 mmHg for systolic and diastolic pressure;
± 5% of the reading for the pulse rate
Ination: Automatic by the pump
Rapid deation: Automatic electronic valve
Batteries: 4“AA”×1.5V
Adapter: Optional component, 6V, 600mA
Memory: 2×60 sets of memories
Operation temperature and humidity: +10. to + 40, 85% and below
Storage temperature and humidity: -20. to + 50, 85% and below
Cuff size: Applicable for arm size 22-32 cm
Complete kit: Main body, storage case, cuff, 4×AA batteries (Optional),1xCR2025 button battery,
adapter (Optional), instruction manual
SYMPTOM CHECK POINT REMEDY
No display when the
START button is pres-
sed.
The batteries have run down.
The polarity of battery is wrong.
The contact of battery compart-
ment is polluted
Replace all the batteries with new ones.
Install the batteries correctly.
Clean the battery terminals with dry
cloth.
Ination stops and
reinate later.
The automatic ination for ensuring
correct measurement.
Did you talk or move your arm (or
hand) during measurement?
See <AUTOMATIC INFLATION>.
Keep quiet and silent during the
measurement.
The reading is extre-
mely low or high. Is the cuff at the same level as the
heart?
Is the cuff wrapped right?
Did you strain your arm during
measurement?
Did you talk or move your arm (or
hand) during measurement?
Make sure that your posture is right.
Wrap the cuff correctly.
Relax during measurement.
Keep quiet and silent during the mea-
surement.
Pulse rate is too low or
too high. Did you talk or move your arm (or
hand) during measurement?
Did you make measurement right
after exercise?
Keep quiet and silent during the mea-
surement.
Take measurement again after resting
for more than 5 minutes.
The batteries are run
down soon. Faulty batteries are used. Use alkaline batteries of known manu-
facturers.
ENGLISH

18
ENGLISH
Symbols
Medical Device complies
with Directive 93/42/EEC Product code WEEE disposal
Caution: read instructions
(warnings) carefully Lot number Keep away from sunlight
Follow instructions for use Manufacturer Keep in a cool, dry place
Type BF applied part Date of manufacture Serial number
Disposal: The product must not be disposed of along with other domestic waste. The users
must dispose of this equipment by bringing it to a specic recycling point for electric and electro-
nic equipment. For further information on recycling points contact the local authorities, the local
recycling center or the shop where the product was purchased. If the equipment is not disposed
of correctly, nes or penalties may be applied in accordance with the national legislation and
regulations.
GIMA WARRANTY CONDITIONS
Congratulations for purchasing a GIMA product. This product meets high qualitative standards both as
regards the material and the production.
The warranty is valid for 12 months from the date of supply of GIMA.
During the period of validity of the warranty, GIMA will repair and/or replace free of charge all the de-
fected parts due to production reasons.
Labor costs and personnel traveling expenses and packaging not included.
All components subject to wear are not included in the warranty.
The repair or replacement performed during the warranty period shall not extend the warranty. The
warranty is void in the following cases: repairs performed by unauthorized personnel or with non-original
spare parts, defects caused by negligence or incorrect use.
GIMA cannot be held responsible for malfunctioning on electronic devices or software due to outside
agents such as: voltage changes, electro-magnetic elds, radio interferences, etc. The warranty is void if
the above regulations are not observed and if the serial code (if available) has been removed, cancelled
or changed.The defected products must be returned only to the dealer the product was purchased from.
Products sent to GIMA will be rejected.

72
Guidance and manufacture’s declaration-electromagnetic immunity
The device is intended for use in the electromagnetic environment listed below, and should only be
used in such environments:
Immunity test EN 60601
test level Compliance
level Electromagnetic
environment-guidance
Electrostatic
discharge (ESD)
IEC 61000-4-2
±6kV contact
±8kV air ±6kV contact
±8kV air Floors should be wood, concrete or
ceramic tile. If oor are covered with
synthetic material, the relative humidity
should be at least 30%.
Power frequency
magnetic eld
IEC 61000-4-8
3A/m 3A/m Power frequency magnetic elds should
be at levels characteristic of a typical lo-
cation in a typical commercial or hospi-
tal environment.
Electrical fast
transient/burst
IEC 61000-4-4
±2kV for power
supply lines ±2kV for power
supply lines Mains power quality should be that of a
typical commercial or hospital environ-
ment.
Surge
IEC 61000-4-5 ±1kV line(s)
to line(s) ±1kV line(s)
to line(s) Mains power quality should be that of a
typical commercial or hospital environ-
ment.
Interruptions and
voltage variations
on power supply
input lines
IEC 61000-4-11
<5% UT
(>95% dip in UT)
for 0.5 cycle
40% UT
(60% dip in UT)
for 5 cycles
70% UT
(30% dip in UT)
for 25 cycles
<5% UT
(>95% dip in UT)
for 5sec
<5% UT
(>95% dip in UT)
for 0.5 cycle
40% UT
(60% dip in UT)
for 5 cycles
70% UT
(30% dip in UT)
for 25 cycles
<5% UT
(>95% dip in UT)
for 5sec
Mains power quality should be that of a
typical commercial or hospital environ-
ment.

73
Guidance and manufacture’s declaration-electromagnetic immunity
The device is intended for use in the electromagnetic environment listed below, and should only be
used in such environments:
Immunity test IEC 60601
test level Compliance
level Electromagnetic environment -
guidance
Conducted RF
IEC61000-4-6
Radiated RF
IEC61000-4-3
3Vrms
150KHz to 80MHz
10V/m
80MHz to 2.5GHz
3Vrms
3V/m
Portable and mobile RF communica-
tions equipment should be used no clo-
ser to any part of the device, including
cables, than the recommended separa-
tion distance calculated from the equa-
tion applicable to the frequency
of the transmitter.
Recommended separation distance
80MHz to 800MHz
800MHz to 2.5GHz
Where Pis the maximum output power
rating of the transmitter in watts (W) ac-
cording to the transmitter manufacturer
and dis the recommended separation
distance in meters (m).
Field strengths from xed RF transmit-
ters, as determined by an electroma-
gnetic site survey,ashould be less than
the compliance level in each frequency
range.b
Interference may occur in the vicinity of
equipment marked with
the following symbol:
NOTE 1 At 80MHz and 800 MHz, the higher frequency range applies.
NOTE 2 These guidelines may not apply in all situations. Electromagnetic propagation is affected by
absorption and reection from structures, objects and people.
a Field strengths from xed transmitters, such as base stations for radio (cellular/cordless) telepho-
nes and land mobile radios, amateur radio, AM and FM radio broadcast and TV broadcast cannot
be predicted theoretically with accuracy. To assess the electromagnetic environment due to xed RF
transmitters, an electromagnetic site survey should be considered. If the measured eld strength in
the location in which the device is used exceeds themapplicable RF compliance level above, the de-
vice should be observed to verify normal operation. If abnormal performance is observed, additional
measures may be necessary, such as reorienting or relocating the device.
b Over the frequency range 150 KHz to 80 MHz, eld strengths should be less than 3V/m.
3.5
V1
√P
d=
3.5
E1
√P
d=
7
E1
√P
d=


This manual suits for next models
2
Table of contents
Other Gima Blood Pressure Monitor manuals