Gima 32924n User manual

SFIGMOMANOMETRO DIGITALE
AUTOMATICO DA BRACCIO
AUTOMATIC UPPER ARM BLOOD
PRESSURE MONITOR
AUTOTENSIOMÈTRE BRACHIAL
DE LA PRESSION ARTÉRIELLE
MONITOR AUTOMÁTICO DE BRAZO
DE PRESIÓN SANGUÍNEA
M32924-M-Rev.5-02.22
PROFESSIONAL MEDICAL PRODUCTS
0476
Gima S.p.A.
Via Marconi, 1 - 20060 Gessate (MI) Italy
gima@gimaitaly.com - export@gimaitaly.com
www.gimaitaly.com
Made in China
32924
93%
0%
70°C
-25°C
IP22

21 ENGLISH
Table of Contents
Medical Disclaimer ............................................................................................. 21
Intended Use...................................................................................................... 21
About Blood Pressure ........................................................................................ 22
Precautions ........................................................................................................ 23
Device Overview................................................................................................. 25
Symbol Denitions ............................................................................................. 26
Features.............................................................................................................. 27
Installing Batteries.............................................................................................. 29
Using the AC/DC adapter................................................................................... 30
Applying the Cuff................................................................................................ 30
Measurement Procedure.................................................................................... 31
Memory Function ............................................................................................... 32
Storage and Maintenance .................................................................................. 33
Troubleshooting.................................................................................................. 34
Specications..................................................................................................... 35
Note.................................................................................................................... 36
Appendix ............................................................................................................ 37
MEDICAL DISCLAIMER
This manual and product are not meant as a substitute for advice provided by your doctor.
You are not to use the information contained herein, or this product for diagnosing or treat-
ing a health problem or prescribing any medication. If you have or suspect that you have a
medical problem, promptly consult your healthcare provider.
INTENDED USE
This device uses the oscillometric method to automatically measure systolic and diastolic
blood pressure as well as heart rate. The measurement position is at human being’s arm.
All values can be read out in one LCD panel. The device is designed for home use and
recommended for use by adults aged 18 years and older with upper arm circumference
ranging from 9 ~13” (approx. 23 ~ 33 cm).

22
ABOUT BLOOD PRESSURE
1. What is blood pressure?
Blood pressure is the measurement of the force of blood pushing against the walls of the
arteries. Arterial blood pressure is constantly uctuating during the course of the cardiac
cycle. The highest pressure in the cycle is called the systolic blood pressure, and rep-
resents the pressure in the artery when the heart is beating. The lowest pressure is the
diastolic blood pressure, and represents the pressure in the artery when the heart is at
rest. Both the systolic and the diastolic pressure are necessary for a physician to evaluate
the status of a patient’s blood pressure.
Many factors such as physical activity, anxiety or the time of day, can inuence your blood
pressure. Blood pressure is typically low in the mornings and increases from the afternoon
to the evening. It is on average lower in the summer and higher in the winter.
2. Why is it useful to measure blood pressure at home?
Having one’s blood pressure measured by a doctor in a hospital or a clinic, is often asso-
ciated with a phenomenon called “White Coat Hypertension” where the patient becomes
nervous or anxious, thus raising his blood pressure. There are also numerous other factors
that might cause your blood pressure to be raised at a specic time of day. This is why
medical practitioners recommend home monitoring as it is important to get readings of
blood pressure during different times of the day to really get an idea of your real blood
pressure.
Medical practitioners generally recommend the “Rule of 3”, where you are encouraged to
take your blood pressure three times in a row (at 3-5 minutes interval), three times a day
for three days. After three days you can average all the results and this will give you an
accurate idea of what your blood pressure really is.
A. WHO blood pressure classications:
Standards for assessment of high or
low blood pressure without regard to
age, have been established by the
World Health Organization (WHO), as
shown in the chart.
However this chart is not exact for
classication of blood pressure and
it’s intended to be used as a guide
in understanding non-invasive blood
pressure measurements.
Please consult with your physician for proper diagnosis.
ENGLISH

23 ENGLISH
B. Variations in blood pressure:
Individual blood pressures vary great-
ly both on a daily and a seasonal ba-
sis.
These variations are even more pro-
nounced in hyper tense patients.
Normally the blood pressure rises
while at work and is at its lowest dur-
ing sleeping period.
(hyper tense: means a person who
has high blood pressure symptom.)
The graph below illustrated the variations in blood pressure over a whole day with meas-
urement taken every ve minutes.
The thick line represents sleep. The rise in blood pressure at 4 PM (A in the graph) and 12
PM (B in the graph) correspond to an attack of pain.
PRECAUTIONS
* Do not use this manual and product as a substitute for advice, diagnosing or treating
a health problem or prescribing any medication by your doctor. If you have a medical
problem, promptly consult your healthcare provider.
* Read the Instruction Manual thoroughly before measuring and keep it at hand for your
reference at any time.
* This device uses the oscillometric method to measure systolic and diastolic blood pres-
sure as well as your heart rate. It’s recommended for use by people over the age of 18
and not to be used on infant or children.
* The device is designed for home use and not suitable for clinical use.
• Do not take a measurement in a low (less than 41°F/5°C) and high (more than 104°F/
40°C) temperature, nor in a place outside humidity ranges (15% ~ 93% R.H.), and at-
mospheric pressure ranges (700 ~ 1060 hPa) or you may get inaccurate readings.
• Wait 30 ~ 45 minutes before measurement if you’ve just consumed caffeinated beverag-
es or smoked cigarettes.
• Rest at least 5 ~ 10 minutes before taking a measurement.
• To allow your blood vessels to return to the condition prior to taking the measurement,
please wait at least 3 ~ 5 minutes in between measurements. You may need to adjust
the wait time according to your personal physiological situation.
• We recommend you using the same arm (preferably the left arm) and measuring around
the same time each day.
• Sit down comfortably and place your elbow on the table with your feet at on the oor.
Please do not cross your legs during measurements.
• Keep the device at heart level. Relax your hand with the palm facing up.
• Perform measurements in a quiet and relaxed environment at room temperature.

24
• Do not move or shake the device during a measurement. Please keep quite and do not
talk at the same time.
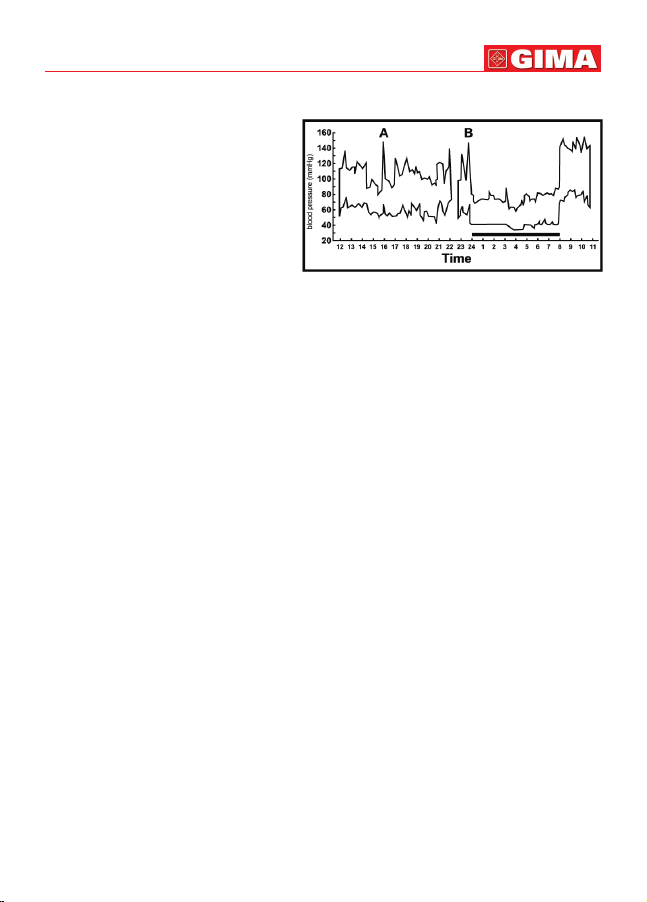
• Keep in mind that blood pressure naturally varies from time to time throughout the day
and is affected by lots of different factors such as stress, eating, smoking, alcohol con-
sumption, medication, and physical activity, etc.
Normally the blood pressure rises while at work and is at its lowest during sleeping
period.
• Blood pressure measurements should be interpreted by a physician or a trained health
professional who is familiar with your medical history. Using the unit and recording the
results regularly for your physician to interpret, you will keep your physician informed of
the continuing changes in your blood pressure.
• If you have one of the circulatory problems as arteriosclerosis, diabetes, liver disease,
kidney disease, severe hypertension, peripheral circulation.., please consult your health-
care professional before using the device.
• This product is not suitable for people with arrhythmias and pregnant women.
• Blood pressure measurements taken with this device are equivalent to those obtained
by a trained observer using the cuff / stethoscope auscultation method and are within
the accuracy limits prescribed by the Standard of EN 1060-4.
Attention!
1. Do not use the device on infants, children, or those who cannot express their own
intention.
2. The device is equipped with sensitive electronic components. While measuring, avoid
strong electrical or electromagnetic elds, e.g. mobile phones, microwave ovens, etc;
or it may lead to temporary reading error or inaccuracy.
3. To avoid accidental strangulation, keep this product away from children and do not
drape tube around neck.
4. Over high frequency measurements may result in blood ow interference, which is like-
ly to cause uncomfortable sensations, such as partial subcutaneous hemorrhage, or
temporary numbness to your arm. In general, these symptoms should not last long.
However, if you do not recover in time, please seek your medical practitioners for help.
ENGLISH

DEVICE OVERVIEW
Part names and product components
*Caution!
Substitution of a component different from that supplied might result in measurement
error.
25 ENGLISH
6V 1A AC Adapter
(Excluded)
MEMORY BUTTON
AA (1.5V) ALKALINE BATTERY X 4
START / STOP BUTTON
SET BUTTON
MODE BUTTON
LCD DISPLAY

26
Unit Display
SYMBOL DEFINITIONS
Hour : Minute
(Also represents YEAR in Setting Mode)
Month / Date
Blood Pressure Unit
Low Battery
Symbol
Pulse Symbol
Irregular Heartbeat
Detector
Risk Category
Indicator
Systolic Rate
Diastolic Rate
Heart Rate
Memory Record
Number
ENGLISH
SYMBOLS DEFINITIONS
Low Battery
Symbol
This symbol appears when the battery power is excessively
low or the polarity reverses.
We suggest you replace all batteries with new ones, and
make sure the +/- polarities are properly positioned.
Pulse Symbol
Once pulse is detected, the symbol ashes with each pulse
beat.
Our suggestion: Please do not talk or move during meas-
urements.
Irregular
Heartbeat Detector
This symbol appears for 1 minute when the user was talking,
moving, shaking, or an irregular heart beat was detected dur-
ing measurements.
Our suggestion:
Please do not talk or move during measurements. Repeat the
measurement after resting for at least 5 minutes, and restart
your measurement while sitting down comfortably and quietly.
BP Category
Indicator
The arrowhead points out the specic BP Category that your
measurement reading ts in.
Memory Record
Symbol
Figures beside this symbol represent the order of memory
stored.

27 ENGLISH
FEATURES
Irregular Heartbeat Detector
The symbol will appear on screen indicating a certain heartbeat irregularity
was detected during measurement.
The heartbeat rhythm that is more than or less than 25% from the average rhythm is usu-
ally dened as an irregular heartbeat rhythm.
Talking, moving, shaking or an irregular pulse during the measurement can result in the
appearance of this symbol.
Usually this is not a cause for concern, however if the symbol appears often, we recom-
mend you seek medical advice.
And please note that the device does not replace a cardiac examination, but serves to
detect pulse irregularities at an early stage.
*Note!
• The pulse display is not suitable for checking the frequency of heart pacemakers.
If a certain pulse irregularity is detected during measurement often, we recommend you
seek medical advice
• As a safeguard, we recommend that if you have arrhythmias such as atrial or ventricular
premature beats and atrial brillation or any other special conditions you should check
with your physician before using your device.
• The IHB function is not designed for use by people with arrhythmias nor for diagnosing
or treating an arrhythmic problem. In order to lter the unstable status of user and avoid
affecting the detection of heart rate from any movement, shaking or talking in the begin-
ning of measurement, the method of averaging heart beat intervals of subject device is
calculated with the three proper heart beat pulses detected in the beginning of measure-
ment and that is different from a strict mathematical averaging of all recorded intervals.
• At least 3 beats with at least 25% difference from the average heart beat interval will
generate the IHB icon on the screen.

Risk Category Indicator
This device is equipped with Risk Category Indicator which classies your blood pressure
measurements into six stages (Optimal to Severe hypertension) as shown in below chart:
Stages of Blood Systolic Diastolic Color Recommendations by SIGN n. 49:
Pressure Levels (mmHg) (mmHg) Hypertension in older people
Grade 3 Severe ≥180 ≥110 Red Conrm immediately and repeat BP in one
Hypertension day and again within one week depending
on clinical situation.
Grade 2
Moderate
160 ~ 179 100 ~ 109 Red Serial blood pressures repeated within
Hypertension one month.
Grade 1 Mild 140 ~ 159 90 ~ 99 Red Provide advice about lifestyle modication
Hypertension and conrm within two months.
High-Normal 130 ~ 139 85 ~ 89 Orange Provide advice about lifestyle modication
and recheck in one year.
Normal 120 ~ 129 80 ~ 84 Yellow Recheck in 2 - 5 years.
(patients aged > 75 years offered annual
Optimal < 120 < 80 Green health check).
Source: WHO 2003
After each measurement is completed, LCD display will show your position automatically
on the six segments of the bar indicator which corresponds to Risk Category Indicator.
*Note!
When a person’s systolic and diastolic pressures fall into different categories, the higher
category should apply.
e.g. systolic rate 181 & diastolic rate 99 Red category (Severe Hypertension)
e.g. systolic rate 110 & diastolic rate 95 Red category (Mild Hypertension)
28
ENGLISH

29 ENGLISH
*Note!
The above table is not exact for classication of blood pressure and it’s intended to be
used as a guide in understanding non-invasive blood pressure measurements.
Usually this is not a cause for concern; however we recommend you consult with your
physician for proper diagnosis or seek medical advice according to our recommendation
mentioned above. Please note that the device does not appropriate to diagnose hyperten-
sion, and it is only for user reference on blood pressure monitoring.
INSTALLING BATTERIES
When LOW BATTERY SYMBOL appears on the display, or nothing appears on the
display when the power is switched on, please change the batteries.
Replace all the batteries with new ones and do not mix new and old batteries.
Do not mix alkaline, standard (carbon-zinc) or rechargeable (cadmium) batteries either.
It may shorten the battery life or cause the device to malfunction.
Remove the battery cover and insert
4 AA alkaline batteries into the battery
compartment as shown.
Make sure the polarities “+” and “–”
ends are properly positioned.
*Attention!
• Batteries are hazardous waste. Do not dispose of them together with the household
garbage. Please take the used batteries to the recycling collection point according to
your local regulations.
• Keep the battery away from small children in case they swallow it.
• To prolong the battery life and prevent damage caused by leakage, remove
the batteries from the device if the device is not to be used for a long period.
• Memories (if any) will not be deleted during battery replacement.
• After replacing the batteries, reset the date and time.

USING THE AC/DC ADAPTER
This monitor is designed for operation with batteries or an AC/DC adapter.
Please use only a compatible AC/DC adapter with required voltage and current as indi-
cated in this manual.
Note!
• No batteries are needed when operating with an AC/DC adapter.
• Please unload the batteries when operating with an AC/DC adapter for an extend-
ed period of time.
• Leaving the batteries in the compartment for a long time may cause leakage, which
may lead to damage of the unit.
• Recommend Adapter specication, do not use otherwise:
Model: SINPRO, HPU15-102 (optional)
Rating:
Input: 100 ~ 240V, AC, 47 ~ 63 Hz, 0.4 ~ 0.2 A
Output: 5.99V, DC, 2A,
Note!
When you use the blood pressure monitor with AC/DC adapter, do not position the device
to make it difcult to disconnect the adapter plug.
APPLYING THE CUFF
• Press your brachial artery approximately 1 inch (2 ~ 3 cm) above the elbow on the inside
of your left arm to determine where your strongest pulse is.
• Slide the end of arm cuff furthest from the tube through the metal ring to a loop.
The smooth cloth should be on the inside of the cuff.
• Wrap the cuff on a bare arm or over thin clothing. Thick clothing or a rolled up sleeve will
cause inaccurate blood pressure measurements.
• If the cuff is located correctly, the velcro will be on the outside of the cuff and metal ring
will not touch your skin.
• Put left arm through the cuff loop.
The bottom of the cuff should be approximately
1 inch (2 ~ 3 cm) above the inner elbow.
The tube should lie over the brachial artery on
the inner part of the arm.
• Pull the cuff so that the top and bottom edges
are tightened around your arm.
• When the cuff is positioned properly, press the
velcro rmly against the pile side of the cuff.
• Sit on a chair and lay your forearm on the ta-
ble so that the cuff is at the same level as your
heart.
30
ENGLISH

31 ENGLISH
• Relax your arm and turn your arm upward.
• Make sure there are no kinks in the air tube.
*Note!
• Fit the cuff snugly, leaving enough space for 1 inch (2 ~ 3 cm) between the inner elbow
and the lower edge of the cuff, or the measurement may not be accurate.
• This monitor comes with one size of arm cuff: 9” ~ 13” (23 ~ 33 cm).
• In case the cuff kept pumping up non-stop, open the cuff at once.
• Do not wrap the cuff around any body part other than your arm.
• The device is not supposed to be used when your arm is wounded or injured.
MEASUREMENT PROCEDURE
Switch on the monitor
A. Press button to switch on the monitor.
B. All segments appear on the screen.
Setting year, date and time
A. Press button (“YEAR” ashes). Press +button
to adjust YEAR value.
B. Press button (“MONTH” ashes). Use +button to adjust MONTH
(1, 2, 3,……, 12).
C. Adjust DATE (1, 2, 3,…, 31), HOUR (1, 2, 3,……..12PM,1PM,…, 12) and MINUTE
(00,01,02,03,.....59) as described in Step A above.
When settings are done, press button to conrm the entries.
The device is ready for use.
Taking a Measurement
A. Before measurement, press +button to select User 1, 2, or 3.
B. With the cuff wrapped around your arm, press button to start measurement.
All display units appear on the screen.

*Note!
Do not inate the cuff until it is wrapped around your arm.
After all symbols disappear, the display will show “00”.
The monitor is “Ready to Measure” and will automatically
inate to the level that is right for you.
C. After ination of the cuff, the pressure will slowly decrease.
When pulse is detected, PULSE SYMBOL ashes.
*N.B.!
• If the cuff does not stop inating, remove the cuff at once.
• To stop measurement, press button.
D. LCD screen displays your systolic rate, diastolic rate,
pulse, Risk Category Indicator Bar, and Irregular Heartbeat
Detector symbol with date and time for 1 minute.
E. Without any operation for 1 minute, device automatically
shuts off.
MEMORY FUNCTION
Storing data
After each measurement, the systolic and diastolic pressure, heart rate with date and time
will be automatically stored.
The monitor can store 120 memories total for 3 users, and automatically replace the oldest
data with new one.
Recalling data
A. Press +button to select User 1, 2, or 3.
B. Press M button to enter Memory Mode. LCD displays av-
erage of last 3 measuring results rst.
C. Press M button again, LCD displays the latest measuring
result. Keep pressing M button, user can scroll through
following measurements in sequence.
D. To stop reading memories, press button, and switch
to Standby Mode.
32
ENGLISH

33 ENGLISH
Erasing data
A. Press +button to select User 1, 2, or 3.
B. Press M button to enter Memory Mode.
C. Press and hold and +buttons at the same time, the
data will be erased automatically.
D. To conrm the data in the selected user has been erased,
press M button and no data should appear.
Note: Once deleted, your data can NOT be restored.
STORAGE AND MAINTENANCE
General Use
• Do not in any way twist the cuff.
• Do not press button if the cuff is not wrapped around your upper arm.
• Do not drop the product and avoid any strong impacts.
Maintenance
• Use a piece of cloth with water or mild cleansing agent to wipe the device and dry it
immediately with a dry cloth.
• Do not use detergent or any strong chemicals to clean the device.
• Use only a dry cloth to wipe the cuff.
• Do not attempt to disassemble or change any parts of the monitor, including arm cuff,
due to substitution of a component different from that supplied might result in measure-
ment error.
• If any suggestion or service is requested, please consult your service station.
Disinfection
Use a piece of cloth with 75% alcohol to wipe the surface of the cuff for 10 seconds.
Storage
• If the device is not to be used for a long time, please remove the batteries from the
device (leaking of battery acid can cause the device to malfunction).
• Always store the unit in the storage case after use.
• Do not place the device directly under sunlight, in high temperature, or in humid or dusty
places.
• Do not store the device in extremely low (less than –13°F/–25°C) and high (more than
158°F/70°C) temperature, nor in a place its humidity exceeds 93% R.H.

TROUBLESHOOTING
Note: If “EP” appears on the display, just return the device to your local distributor
or importer.
34
ENGLISH
SYMBOLS/SYMPTOMS CONDITIONS/CAUSES INDICATION/CORRECTION
No power-on by pressing
button.
Worn-out batteries. Replace them with 4 new
AA alkaline batteries.
Battery polarities have been
positioned incorrectly. Re-insert the batteries in the
correct positions.
Measuring Error Symbol
appears when blood
pressure value displayed
is excessively low or high.
Cuff has been placed
incorrectly. Wrap the cuff properly so that it
is positioned correctly.
Did you talk or move during
measurement? Measure again.
Keep arm steady during
measurement.
Shaking of the arm with
the cuff on.
Measuring Error
Symbol.
Air circuit abnormality.
Cuff tube may not be plugged into
monitor correctly.
Check cuff connection.
Measure again.
Measuring Error
Symbol.
Ination pressure exceeding
300 mmHg. Switch the unit off, then measure
again.
Measuring Error
Symbol.
Error determining
measurement data. Measure again.

35 ENGLISH
SPECIFICATIONS
*The contents of this manual and the specications of the device covered by this
manual are subject to change for improvement without notice.
Model Number 32924
Measurement Method Oscillometric
Measurement Range Pressure: 0 ~ 300 mmHg
Pulse: 40 ~ 199 Beats/Minute
Accuracy Pressure: ± 3 mmHg
Pulse: ± 5% Max.
Rated Range of Determination 40~280 mmHg
Ination Automatic Ination (Air Pump)
Deation Automatic Air Release Control Valve
Display Liquid Crystal Display
Memory 120 Memory Total for 3 Users
Unit Dimensions 5.51 x 4.09 x 1.97 inch (L x W x H)
140 x 104 x 50 mm (L x W x H)
Unit Weight 8.73 ± 0.35 oz (247.5 ± 10 g)
(Cuff and Batteries Excluded)
Cuff Size 23 ~ 33 cm (9 ~ 13 inch)
Storage/ Transportation
Environment
Temperature: -25°C ~ 70 C (-13°F ~ 158°F)
Humidity: ≤ 93% R.H.
Atmospheric pressure: 700 hPa ~ 1060 hPa
Operation Environment Temperature: 5°C ~ 40°C (41°F ~ 104°F)
Humidity: 15% ~ 93% R.H.
Power Supply 1. AA (1.5V) alkaline battery x 4
2. 6V 1A AC Adapter (Excluded)
Battery Life Approx. 300 measurements
Power-saving Mode Without any operation for 1 minute,
device automatically shuts off
Accessories 4 AA Alkaline Batteries, Arm Cuff with Tube,
Instruction Manual, Pouch
Product life 5 years (4 times per day)

NOTE
This blood pressure monitor complies with the EC Directive and bears
the CE mark This blood pressure monitor also complies with mainly
following standards (included but not limited).
Device information:
• Internally powered equipment.
• Not suitable for use in presence of ammable anesthetic mixture with air or with Oxygen
or nitrous oxide.
• Continuous operation with short-time loading.
To avoid inaccurate results caused by electromagnetic interference between elec-
trical and electronic equipments, do not use the device near a mobile phone or
microwave oven. At least keep a maximum output power of 2 W yields and a
distance 3.3m away from this equipment.
36
ENGLISH
SYMBOLS
Keep in a cool, dry place
Keep away from sunlight
Follow instructions for use
Medical Device complies
with Directive 93/42/EEC
Product code
Lot number
Serial number
Manufacturer
Temperature limit
Date of manufacture
IP22 Covering Protection rate
WEEE disposal
Type BF applied part
%
Humidity limitation
Caution: read instructions
(warnings) carefully
0476

37 ENGLISH
APPENDIX
Guidance and manufacturer’s declaration – electromagnetic emissions
The device is intended for use in the electromagnetic environments listed below, and
should only be used in such environments:
Guidance and manufacturer’s declaration – electromagnetic immunity
The device is intended for use in the electromagnetic environments listed below, and
should only be used in such environments:
Emissions test Compliance Electromagnetic environment – guidance
RF emissions CISPR 11 Group 1 RF energy is used only to maintain device’s oper-
ation. Therefore, its RF emissions are so low that
it’s not likely to cause any interference in nearby
electronic equipment.
RF emissions CISPR 11 Class B The device is suitable for use in all establish-
ments, including domestic establishments, and
those directly connected to the public low-voltage
power supply network that supplies buildings
used for domestic purposes.
Harmonic emissions
IEC 61000-3-2
Class A
Voltage uctuations/ icker
emissions IEC 61000-3-3
Complies
IMMUNITY TEST IEC 60601
TEST LEVEL
COMPLIANCE
LEVEL
ELECTROMAGNETIC ENVIRON-
MENT –GUIDANCE
Electrostatic
discharge (ESD)
IEC 61000-4-2
± 8 kV contact
discharge
± 15 kV air
discharge
± 8 kV contact
discharge
± 15 kV air
discharge
In the case of air discharge testing,
the climatic conditions shall be
within the following ranges:
Ambient Temperature:15°C~35°C,
Relative Humidity: 30%~60%.
Power frequency
(50 or 60 Hz)
magnetic eld
IEC 61000-4-8
30 A/m
50 or 60 Hz
30 A/m
50 or 60 Hz
Power frequency magnetic elds
should be at levels characteristic of
a typical location in a typical com-
mercial or hospital environment.
Electrical fast
transient/burst
IEC 61000-4-4
± 2 kV for power
supply lines
± 1 kV for input/out-
put lines
± 2 kV for power
supply lines
± 1 kV for input/
output lines
Mains power quality should be that
of a typical commercial or hospital
environment.
Surge
IEC 61000-4-5
AC Power port
±1 KV Line to Line
AC Power port
±1 KV Line to Line
Mains power quality should be that
of a typical commercial or hospital
environment.
Interruptions and
voltage variations
on power supply
input lines
IEC 61000-4-11
0% UT; 0.5 cycle
At 0°,45°, 90°,
135°, 180°, 225°,
270°and 315°.
0% UT; 1 cycles
70% UT;
25/30 cycles
0% UT;
250/300 cycle
0% UT; 0.5 cycle
At 0°,45°, 90°, 135°,
180°, 225°, 270°
and 315°.
0% UT; 1 cycles
70% UT;
25/30 cycles
0% UT;
250/300 cycle
Mains power quality should be that
of a typical commercial or hospital
environment. If the user of the de-
vice requires continued operation
during power mains interruptions,
it is recommended that the device
be powered from an uninterruptible
power supply or a battery.

Guidance and manufacturer’s declaration – electromagnetic immunity
The device is intended for use in the electromagnetic environments listed below, and
should only be used in such environments:
38
ENGLISH
IMMUNITY
TEST
IEC 60601
TEST LEVEL
COMPLIANCE
LEVEL
ELECTROMAGNETIC ENVIRON-
MENT GUIDANCE
Conducted RF
IEC 61000-4-6
3V rms
At 0.15-80 MHz
6V rms
At ISM & Radio
Amateur Freq.
3V rms
At 0.15-80 MHz
6V rms
At ISM & Radio
Amateur Freq.
Portable and mobile RF communi-
cations equipment should be used
no closer to any part of the device,
including cables, than the recom-
mended separation distance calculat-
ed from the equation applicable to the
frequency of the transmitter.
Radiated RF
IEC 61000-4-3
(Proximity
elds from RF
wireless com-
munications
equipment
IEC 61000-4-3)
110 V/m at
80-2700 MHz
AM Modulation
And 9-28V/m
at 385-6000MHz,
Pulse Mode and
other Modulation.
The system shall
be tested as
specied in
IEC60601-1-2
Table 9 for proximity
elds from RF
wireless communi-
cations equipment
using the test
methods specied
in IEC 61000-4-3
10 V/m at
80-2700 MHz
AM Modulation
And 9-28V/m
at 385-6000MHz,
Pulse Mode and
other Modulation.
The system shall
be tested as
specied in
IEC60601-1-2
Table 9 for proximity
elds from RF
wireless communi-
cations equipment
using the test
methods specied
in IEC 61000-4-3
Recommended separation distance
Considering to reduce the minimum
separation distance, based on RISK
MANAGEMENT, and using higher IM-
MUNITY TEST LEVELS that are appro-
priate for the reduced minimum sepa-
ration distance. Minimum separation
distances for higher IMMUNITY TEST
LEVELS shall be calculated using the
following equation:
E = 6/d
where Pis the maximum power in W, d
is the minimum separation distance in
m, and Eis the IMMUNITY TEST LEV-
ELS in V/m.
Field strengths from xed RF transmit-
ters, as determined by an electromag-
netic site survey,a should be less than
the compliance level in each frequency
range.b
Interference may occur
in the vicinity of equip-
ment marked with the
following symbol:
NOTA 1 At 80 MHz and 800 MHz, the higher frequency range applies.
NOTE 2 These guidelines may not apply in all situations. Electromagnetic propagation is affected by
absorption and reection from structures, objects and people.
a. Field strengths from xed transmitters, such as base stations for radio (cellular/cordless) telephones
and land mobile radios, amateur radio, AM and FM radio broadcast and TV broadcast cannot be
predicted theoretically with accuracy. To assess the electromagnetic environment due to xed RF
transmitters, an electromagnetic site survey should be considered. If the measured eld strength in
the location in which the device is used exceeds the applicable RF compliance level above, the device
should be observed to verify normal operation. If abnormal performance is observed, additional meas-
ures may be necessary, such as reorienting or relocating the device.
b. Over the frequency range 150 kHz to 80 MHz, eld strengths should be less than 3 V/m.
√P

39 ENGLISH
Disposal: The product must not be disposed of along with other domestic waste.
The users must dispose of this equipment by bringing it to a specic recycling
point for electric and electronic equipment.
GIMA WARRANTY TERMS
The Gima 12-month standard B2B warranty applies.
Test frequency (MHz) Modulation IMMUNITY TEST LEVEL (V/m)
385 Pulse modulation 18 Hz 27
450 FM ± 5 kHz deviation 1kHz sine 28
710
Pulse modulation 217 Hz
9
745
780
810
Pulse modulation 18 Hz
28
870
930
1720
Pulse modulation 217 Hz
28
1845
1970
2450 Pulse modulation 217 Hz 28
5240
Pulse modulation 217 Hz
9
5500
5785
NOTE: If necessary to achieve the IMMUNITY TEST LEVEL, the distance between the transmitting
antenna and the ME EQUIPMENT or ME SYSTEM may be reduced to 1 m, the 1 m test distance is
permitted by IEC 61000-4-3.
a). The carrier shall be modulated using a 50% duty cycle square wave signal.
b). AS an alternative to FM modulation, 50% pulse modulation at 18 Hz may be used because while it
does not represent actual modulation, it would be worst case.
Test specications for enclosure port immunity to RF wireless communications equip-
ment.
Table of contents
Other Gima Blood Pressure Monitor manuals