Gima Cardio-A Palm ECG Parts list manual

ECG Palmare Cardio A
Cardio-A Palm ECG
ECG de poche Cardio A
ECG Palmar Cardio A
M33260-M-Rev.3.02.17
MANUALE D’USO E MANUTENZIONE
USE AND MAINTENANCE BOOK
INSTRUCTIONS DE FONCIONNEMENT ET ENTRETIEN
MANUAL DE USO Y MANTENIMIENTO
0476
Fabbricante
Manufacturer
GIMA Spa
Via Marconi, 1 - 20060
Gessate (MI) - Italia - Made in P.R.C.
ATTENZIONE: Gli operatori devono leggere e capire completamente questo manuale
prima di utilizzare il prodotto.
ATTENTION: The operators must carefully read and completely understand the present
manual before using the product.
AVIS: Les opérateurs doivent lire et bien comprendre ce manuel avant d’utiliser le produit.
ATENCIÓN: Los operadores tienen que leer y entender completamente este manual
antes de utilizar el producto.
Gima S.p.A. - Via Marconi, 1 - 20060 Gessate (MI) Italy
gima@gimaitaly.com - export@gimaitaly.com
www.gimaitaly.com

16
WARNING
1. Check the device to make sure that there is no visible damage that may aect user’s safety and
measurement performance. Stop using the unit, when there is obvious damage.
2. Do NOT make diagnosis oneself by the measurement and measurement results, always consult the
doctor if abnormal information is presented frequently.
3. It is NOT designed or intended for medical diagnosis.
4. Do NOT use the device in the bathroom or moist circumstance.
5. Do NOT use it if you are using a debrillator.
6. Do NOT use if you carry a cardiac pacemaker.
7. Do NOT operate in the environment where strong electro-magnetic interference exists.
8. Necessary service must be performed by qualied service engineers ONLY.
9. Clinical ECG examination is suggested for normal examination of your heart condition.
10. Connect/Disconnect data cable to the monitor gently and carefully, do NOT wring or shake the data cable
plug with force to insert into or unplug from data interface port, or the data interface port may be damaged.
11. When the monitor is inoperable due to an overload or saturation of any part of the amplier, it will
prompt “Contact?” to remind operator.
12. Do not touch the metal electrodes or place the electrodes of lead wire on patient for ECG measurement
during USB connected to PC, otherwise no predictable hazard will be caused by the ECG combination
leakage currents.
13. Dispose of the expired device and its accessories according to applicable local regulations.
Caution: U.S. federal law restricts this device to sale by or on the order of a physician.
1 Overview
1.1 Appearance
12
3
4
10
5 Electrode I
5 Electrode II
6 Electrode III
7
8
9
ENGLISH

17
1. (Power/Back button): Long time pressing (about 2 seconds) powers on or o the device; short time pressing
exits the operation, or back to upper level menu.
2. (Navigation key): The main operating button group for this device. Press the four directions’ key for function
selection or parameter setting; press the left navigation key for turning on/o the LCD backlight quickly.
3. Battery cover: Insert/take out the battery by opening/replacing the cover.
4. (Conrmation key): Press this key for the selection at dierent levels of menu.
5. Metal electrode I, II: When measuring, both selectrodes should be held in the right hand.
6. Metal electrode III: When measuring, it should be held in the other hand or on the chest or on the left leg.
7. LCD screen: Display ECG waveform and dierent parameters.
8. Data interface port: Transmit data memories to the computer by this port (optional).
9. Lead wire socket: the lead wire connector shall be inserted into this socket if the measurement of ECG is done by
lead wires.
10. Hanging hole: for mounting the hanging cord.
1.2 Name and Model
Name: Cardio-A Palm ECG
Model: PC-80A
1.3 Structure
The Cardio-A Palm ECG Monitor comprises main board, LCD, electrodes etc.
1.4 Features
Two input connections for ECG signal:
- Embedded metal electrodes
- Lead wire connector (optional).
Two output modes for ECG data:
- LCD display
- Serial output interface.
The features are described in detail as follows:
- Measure ECG easily at any time.
- ECG waveform and measurement results are displayed clearly on the LCD screen.
- 8 types of arrhythmia can be analyzed and presented.
- 30-second records each ECG measurement.
- 24 records can be reviewed or sent to PC by a serial port.
- Shut down automatically while no key is pressed for about 35 seconds.
- Data records can be locked to avoid inadvertent deletion.
- Two new AAA size batteries can be used for more than 500 times measurement; the battery power status is indicated
on the screen.
- Small in size and light in weight to carry.
- Easy to operate, especially suitable for old people.
1.5 Scope of Application
The device is intended for self-monitoring and storing ECG waveform and heart rate.
The device is not the monitor used in clinical institution or hospital, but is used for spot-check purpose ONLY.
It can not be used to substitute the normal ECG examination or real time monitoring. The measurement
results are a useful reference for doctor, but do not make direct diagnostic or analytical decision based
on the information provided by this device.
ENGLISH

18
1.6 Working Environment
Operating temperature: 5°C ~ 40°C
Operating humidity: 30% 80%
Atmospheric pressure: 70 ~ 106kPa
2 Installation of batteries
1. Open the battery cover (see the beside picture).
2. Insert two AAA size batteries directly.
3. Close the battery cover.
- Two new AAA size batteries can be used for more than 500 times
measurement.
- The battery power status is indicated on the screen.
Do NOT insert batteries with their polarities reversed. Dispose of the used batteries according to applicable
local regulations.
3 Operation
3.1 Cautions
In order to get a more credible measuring result, you should pay attention to the following advice
- Do NOT engage in vigorous exercise prior to testing.
- Keep you relax while testing.
- Do NOT move and talk, try to keep as still as possible during testing.
3.2 Start to measure ECG
2. Press the (Power/Back) button (Lasting for 2 seconds) to turn on
the device.
After boot-strap, the device starts to initialize, and displays the following pictures.
2. After initialization, the device will enter into a preparing phase; this
phase will last 6 seconds (see the beeside picture), during this period
the device will judge whether the placed position is betting. Please
adjust your hand-hold position to obtain good ECG signal if the detected
waveform is not smooth.
3. During the preparing phase, the user can use 4 methods to measure ECG:
- Measure through both hands, name as palm measurement.
- Measure through right hand and chest, name as chest measurement.
- Measure through right hand and left leg, name as leg measurement.
- Measure through ECG lead wire, name as lead wire measurement.
Note: when you use one of methods to measure, if you can’t
obtain enough intensity of ECG signal to analyze, please try to
use another measuring method.
I Palm measurement
Hold the device with right hand. Make sure that the palm and ngers touch
the metal electrode I and II reliably.
Press the electrode III close against the center of the left palm. The ECG
signal detected by Palm measurement is equivalent to Lead I ECG signal.
Improper operating method:
A. Waving your both hands at will.
B. Both hands loose contact with electrodes during measurement.
C. Not palm contacts the electrode.
ENGLISH

19
II Chest measurement
If palm measurement is not ideal, please adopt chest
measurement. Hold the device with the right hand. Make
sure that the palm and ngers touch the metal electrode
I and II reliably. Place the electrode III on bare skin about
5cm away below the left nipple. The ECG signal detected
by Chest measurement is similar to Lead V ECG signal.
Improper operating method
A. The contact place of electrode III deviates from left chest.
B. The holding gesture is incorrect.
C. The electrode can not contact bare skin completely.
(For example place the electrode on clothing.)
III Leg measurement
If palm measurement is not ideal and it is not convenient to use chest
measurement, the leg measurement is recommended. When measuring, hold
the device with the right hand. Make sure that the palm and ngers touch the
metal electrode I and II reliably. Place the electrode III on the skin 10cm away
above the left foot ankle. The ECG signal detected by Leg measurement is
equivalent to Lead II ECG signal.
Improper operating method
A. You moved your foot.
B. Wrong holding gesture.
C. The electrode III can not contact bare skin completely (For example, place
the electrode III on the sleeve of trousers or socks.).
IV Lead wire measurement
For the sake of obtaining high quality ECG, lead wire measurement can
be used. Connect the lead and the device eectively by lead wire socket.
Place the electrodes and connect the lead wires as the gure below to
obtain the Lead II ECG signal; if you want to measure Lead I and Lead III
ECG signal, please connect the lead wires to the electrodes according to
the following table.
Improper operating method
A. Wrong in connecting lead port.
B. Place the electrode in the wrong part of your body.
ECG Leads Conguration and Electrodes Location Table
Electrode Lead
Location
Lead
I
Lead
II
Lead
III
The intersection between the centerline of the right
clavicle and Rib 2. RA RA LA
The intersection between the centerline of the left
clavicle and Rib 2. LL LA RA
Between the left edge of the breast bone and Rib 5 LA LL LL
ENGLISH

20
4. ECG waveform display
After the preparation, it enters the phase of ECG. The following is the detected
ECG waveform
On-screen display
16:54:01 Current time
The electrodes contact well.
X2: ECG waveform X1/2 Half size of the nominal scale
amplitude scale X1 Nominal scale
X2 Twice the size of the nominal scale
Heart beat indicator. It ashes while heart beats.
Status of battery power
Scale bar for 1mV amplitude
ECG waveform
Status bar of measurement progress
Note: In order to obtain appropriate waveform display, the amplitude scale of ECG waveform is determined at the
beginning of the measurement automatically (×2, ×1/2, and × 1).
3.2.1 The measuring time lasts about 30 seconds. Then enter the analysis
phase in turn.
Note: Refer to the period of result description for several detailed
analysis.
3.2.2 The analysis result screen can last for 6 seconds. Then will store data
automatically and enter into the main menu. To press the power/back button
can store the current measuring result and enter the main menu screen too.
3.2.3 The system stores 24 pieces of record at most. When the memory is
full, this icon will appear on the main menu screen.
If the system detects that the record is full when starting the
device, it will automatically delete a piece of the oldest records
for users to measure.
ENGLISH

21
3.2.4 During the measuring preparation, if poor contact with the electrodes,
the screen displays the beside gure. Press the power/back button (or wait
for 6 seconds) to enter the main menu screen.
3.3 Operation of Main Menu
On the measuring preparation screen or on the analysis result screen, press
the power/back button to enter the main menu screen as gure (1). Meanwhile,
press the key or of Navigation key to select corresponding target
(gure (2), (3), (4)).
the display of battery power
indicates low voltage, please replace the batteries with new ones or it will be o automatically.
3.3.1 ECG measurement
On the main menu screen, press the key or of Navigation key to select ECG measurement and press to
measure ECG. Refer to 3.2 for details.
3.3.2 The function of waveform review
1. On the main menu screen, press the key or of Navigation key to
select Waveform Review and press to enter the record menu screen as
the beside gure (The order of the record is that the latest one displays in the
front of the record).
2. On the waveform menu screen, press the key or of Navigation
key to select corresponding record and press to view the corresponding
waveform. Press the key or of Navigation key to review the current
complete waveform. Press the power/back button to return to the previous menu.
On-screen display
X2: ECG waveform amplitude scale X1/2 Half size of the nominal scale
X1 Nominal scale
X2 Twice the size of the nominal scale
HR = 78 Heart Rate
Scale bar for 1mV amplitude detected ECG
Waveform
Status bar of measurement progress
Figura 1
Figura 3 Figura 4
Figura 2
ENGLISH

22
3.3.3 Reviewing the detected result
1. On the main menu screen, press the key or of Navigation key to
select Analysis Result and press to enter the result menu screen.
2. On the result menu screen press the key or of Navigation key to
select the result description and press to review the corresponding result
introduction. The following is the detailed description:
2.4 When find suspicious arrhythmia waveform, through analyzing the
measurement results, the conclusions “Suspected early beat”, “Suspected
bigeminy”, “Suspected trigeminy”, “ Suspected short run”, “Suspected missing
beat” and “May be the others arrhythmia” are obtained. The beside gure
describes the suspicious early beat.
Note: Always consult your doctor for the measurement results and
analysis. Do not attempt self-diagnosis.
2.5 If the detected signal is too weak, the beeside description can be seen.
Please try again.
2.6 On the result description screen press the power/back button to return to
the previous menu.
Messages Table
1 No apparent irregularity
2 Suspected fast beat
3 Suspected slow beat
4 Suspected early beat
5 Suspected missing beat
6 Suspected bigeminy
7 Suspected trigeminy
8 May be the others arrhythmia
9 Poor signal, try again.
Note: DO NOT provide the information for direct diagnostic or analytical decision, but used for reference
ONLY.
3.3.4 Deletion Operation
1. On the main menu screen press the key or of Navigation key to
select delete and press to enter the deletion menu screen.
2. On the deletion menu screen press the key or of Navigation key to
select a piece of record and press , the beside gure can be seen.
2.1 No apparent irregularity 2.2 Fast beat 2.3 Slow beat
ENGLISH

23
3. According to the gure above, press , the corresponding record is deleted.
Press any other key can cancel deleting.
4. When pitching on any record on the deletion Menu screen, press , this
record is locked, and can’t be deleted.
5. Unlocking. Choose the locked record and press , the lock is opened and
the icon disappears.
6. Press the power/back button to return to the previous menu.
3.3.5 System Settings
On the main menu screen, press the key or of Navigation key to select System Settings and press to
enter the system settings screen (1). Then press the key or to pitch on setting option.
3.3.5.1 Date/Time Setting
1. On the system settings screen, press the key or of Navigation key
to select Date/Time Setting and press to enter time setup screen (see the
following gure).
2. On the time setting screen, press the key or to move the cursor for
selecting setting option, and then press the key or to set numerical value.
3. Press the power/back button to complete the setting and return to the previous
menu.
3.3.5.2 Beeper Setting
1. On the system settings screen press the key or of Navigation key
to select Beeper and press to enter Beeper Setting screen (see the beside
gure).
2. On the beeper setting screen press the key or of Navigation key, the
Beeper Status ON/OFF will be set.
3. Press the power/back button to complete saving and return to the previous
menu.
4.Beeper Setting indicates the sound of pressing keystroke and the sound of heartbeat when measuring.
3.3.5.3 LCD Setting
1. On the system settings screen, press the key or of Navigation key
to select Contrast and press to set the contrast (see the beside gure).
2. Press the key or of Navigation key, the options of 01 to 07 are
provided.
3. Press the power/back button to complete and save the setup. At the same
time, it returns to the previous menu.
ENGLISH

24
3.3.5.4 LCD Backlight Setting
1. On the system settings screen press the key or of Navigation key
to choose Backlight Setting and press to enter Backlight settings screen
(see the following gure).
2. Press the key or of Navigation key to set backlight on/o.
3. Press the power/back button to complete saving and return to the previous
menu.
4. On the others screen (except Waveform screen and Setting screen) short press the right key of Navigation key is
able to turn on/o the backlight quickly.
3.3.5.5 Software Version
1. On the system settings screen press the key or of Navigation key to
select Version and press to enter Software Version screen.
2. Press the power/back button to return to the previous menu.
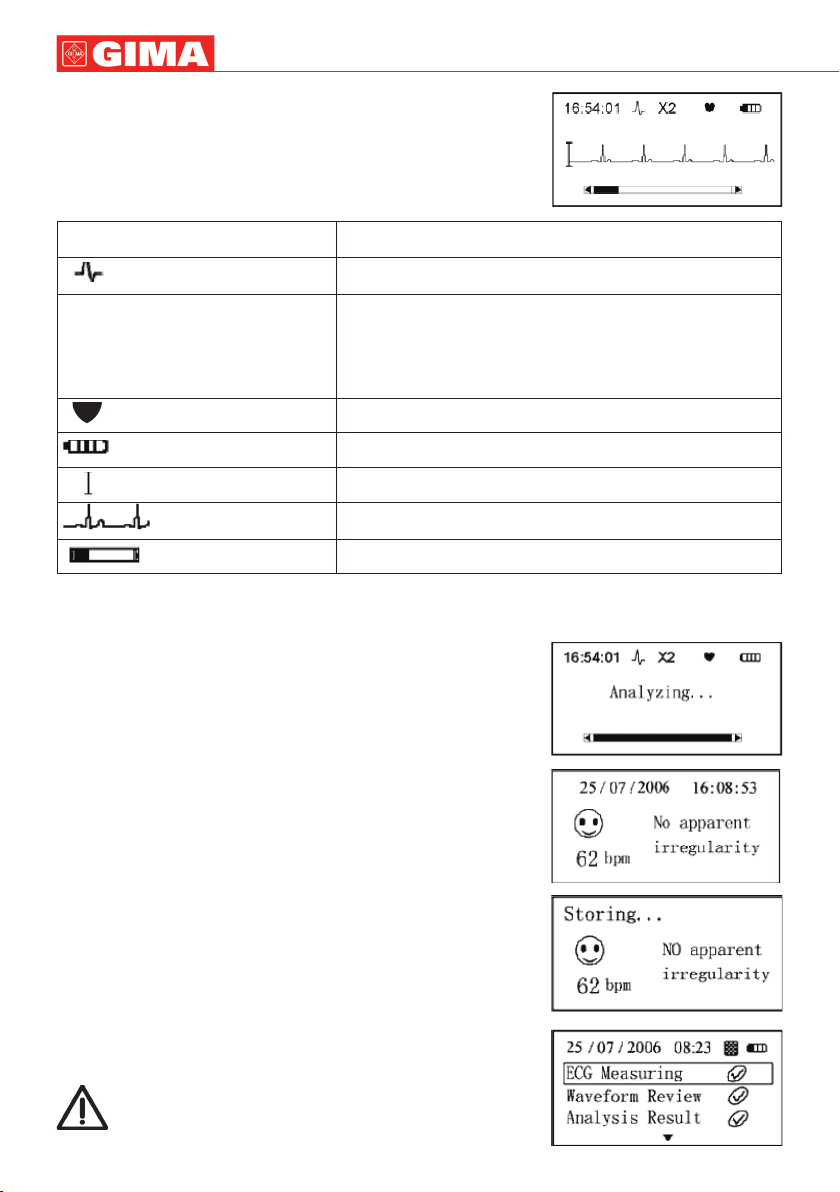
3.3.6 Upload ECG Data
1. On the system settings screen press the key or of Navigation key to
select Upload ECG data and press to enter into Upload ECG data screen.
On upload data screen, connect the monitor to PC with appropriative data
cable, all the records of waveform recall list and waveform description list can
be uploaded to PC for saving after entering into ECG Viewer System. Refer to
ECG Viewer Manager User Manual for details.
Notes:
- During uploading, the keys and power key are eective. After upload, turn o the device and restart it again to
start measurement.
- Keep the monitor and data cable still during uploading data. Unplug the data cable plugs on the halfway of uploading
data is not recommended.
- If the battery power is not enough, please change the batteries, or uploading operation will be interrupted.
This function is optional, and needs software support
(ECG Viewer Manager System).In addition, an appropriative data cable supplied by GIMA is required.
4. Technical Parameters
4.1 ECG Monitoring
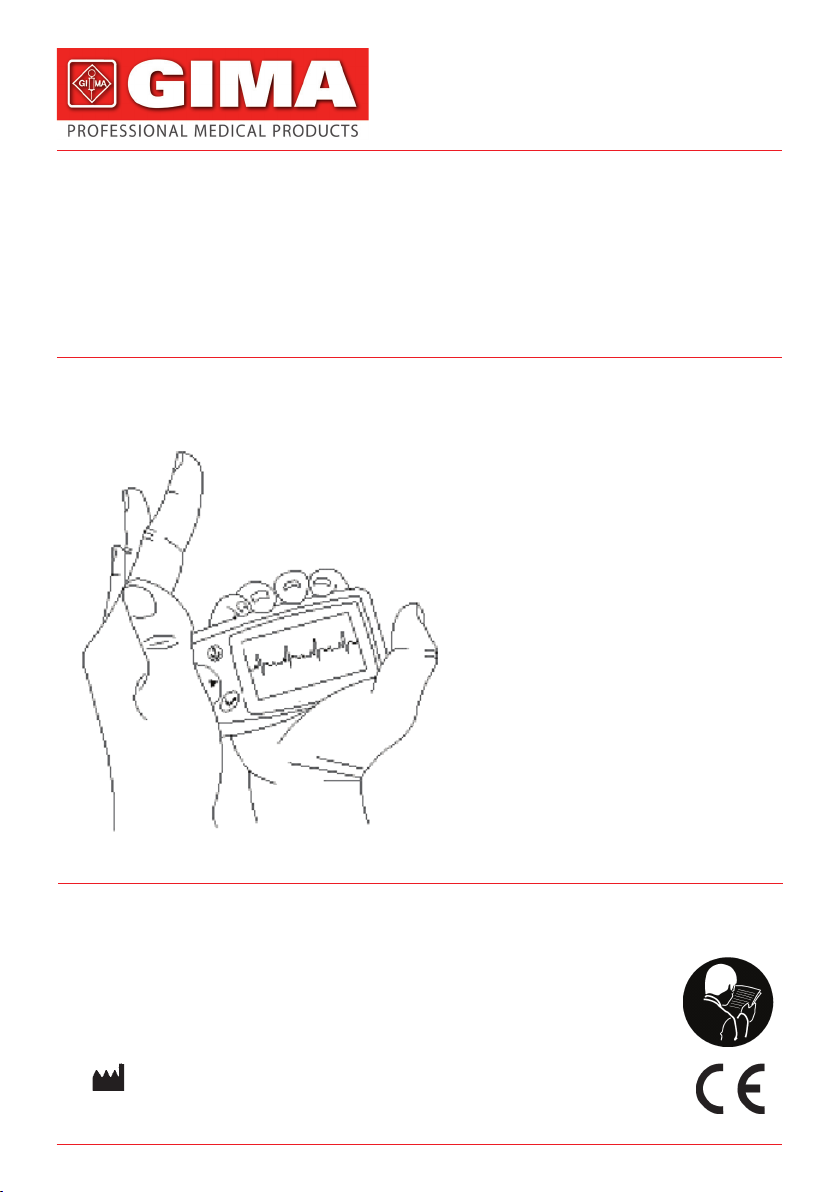
- The number of channels: single (dierential input).
- Electrodes: 3 embedded metal electrodes or using 3 adhesive ECG electrodes by connection to the lead wire.
- Body measurement: the detecting ECG signal can be the following lead selection:
Lead I (between right hand and left hand);
Chest Lead (between right hand and chest);
Lead II (between right hand and left leg).
- Signal bandwidth: 0.5Hz~40Hz
- Internal noise level: =30µVp-p
- Heart rate measuring range: 30bpm~240bpm
- Heart rate measuring precision: ±2bpm
- Display sensitivity: 5.0 mm/mV±10%
- Common-mode rejection ratio (CMRR): >=60dB
- Sweeping speed: 20mm/s±10%
- Input loop current: ≤0.1μA
- Input impedance: ≥MΩ
4.2 Display
- 128×64dot-matrix single color LCD
- Display dimension: 49mm×25mm
- Display of waveform: 128×48 pixels
- Backlight: LED backlight.
ENGLISH

25
4.3 Power
Power: 2×AAA alkaline batteries
Supply voltage range: 2.7~3.3VDC
Max average working current: ≤50mA (backlight o)
Auto power-o: 35s±5s (without operation)
Low battery indication: 2.5VDC±0.2VDC
4.4 Data Memory
- Data memory of up to about 30 seconds of ECG for every piece of record.
- Ability to Store 600 pieces of record at most.
- Able to transfer data records to the computer by data interface port. (Optional)
4.5 Overall Dimension and Weight
Dimensions: (L)115×(W)58×(H)18 mm
Weight: 100g (including 2 AAA batteries)
4.6 Classication
- The type of protection against electric shock: Internally powered equipment
- The degree of protection against electric shock: Type BF applied part
- The degree of protection against harmful ingress of water: Ordinary equipment without protection against ingress of water.
- Electro-Magnetic Compatibility: Group I, Class B
5 Accessories
A hanging cord
Two batteries (AAA)
A pouch
A User Manual
A Data Cable (optional)
An ECG lead wire (optional)
Note: The accessories are subject to change. Detailed items and quantity see the Packing List.
6 Maintenance and Service
6.1 Maintenance
Please change the batteries, when appears low-voltage icon.
It is recommended to wipe the metal electrode with medical alcohol, when the measuring signal is too weak.
Please wipe the surface of the unit with clean cloth or let it dry in air.
Please take out the batteries if the unit will not be used for a long time.
Storage and Transportation
Ambient temperature: -20 to 60ºC
Relative humidity: 10~ 95%
Atmospheric pressure: 50~107.4KPa
This device should be transported by land (vehicle or railway) or air in accordance with the contractual
terms. Do not hit or drop it with force and protect it from sunlight and rain.
Keep it away from corrosive substances, explosive substances, high/low temperature and moisture.
If the device gets wet or has water steam, please stop operating it.
When it is taken from cold environment to warm and humid environment, please DO NOT use it immediately.
DO NOT operate the button on front panel with sharp materials.
DO NOT immerge the device into liquid. Do NOT spray any liquid on it directly.
The life of this unit is 5 years. In order to ensure its long service life, please pay attention to the use of
maintenance.
6.2 Cleaning and Disinfecting Instruction
Surface-clean sensor with a soft gauze by saturating with a solution such as 75% isopropyl alcohol, if low-level disinfection
is required, use a 1:10 bleach solution. Then surface-clean with a damp cloth and dry with a piece of cloth.
Caution: Do not sterilize by irradiation steam, or ethylene oxide.
ENGLISH

26
7 Troubleshooting
Trouble: The device can not turn on.
Solution
1. Change batteries.
2. Reinstall batteries.
3. Please contact the local service center.
Possible Reason
1. The batteries are drained or almost drained.
2. The batteries are not inserted properly.
3. The device is broken out.
Trouble: The device is failure in measuring heart rate.
Solution
1. Place the electrode correctly.
2. When measuring, please keep quiet and avoid moving.
3. Keep away from interference source.
4. Change a place (chest) to measure.
Possible Reason
1. Electrode and body does not contact well.
2. Moved when measuring.
3. Electromagnetic interference.
4. Weak signal.
Trouble: ECG waveform excursion, strong irrelevant waveform.
Solution
1. Clean skin with soap and water and eliminate skin
crumb and grease to make the skin wet and greaseless.
2. Press the electrode with a certain force.
3. Keep hand relax while measuring.
Possible Reason
1. Skin is dry or oily.
2. Electrode and body does not contact tightly.
3. Muscle strain.
8 Key of Symbols
Symbol Description
Type BF applied part
Lead wire socket
Warning - See User Manual
Heart Rate - Unit: beats per minute
Battery Indicator
Conrmation button
Power/Back button
Record lock icon
Electrode contracts well.
Memory is full.
Data Interface Port
Serial number
The device is CE marked and meets the requirements of the Medical Device Directive 93/42/EEC
Manufacturer
Date of production
ENGLISH

27
IMPORTANT INFORMATION FOR CORRECT DISPOSAL OF THE PRODUCT IN ACCORDANCE WITH
EC DIRECTIVE 2012/19/UE-WEEE:
The symbol on the device indicates the separated collection of electric and electronic equipment. At
the end of life of the device, don’t dispose it as mixed solid municipal waste, but dispose it referring to a
specic collection centre located in your area or returning it to the distributor, when buying a new device
of the sample type to be used with the same functions.
Disposing of the product separately, avoids possible negative consequences for the environment and
health deriving from its inadequate disposal. This makes it possible to recover the materials of which it
is composed in order to obtain an important saving of energy and resources. The symbol on the label
indicates the separate collection of electrical and electronic equipment.
Caution: The wrong disposal of electric and electronic equipment may involve sanctions
GIMA WARRANTY CONDITIONS
Congratulations for purchasing a GIMA product. This product meets high qualitative standards both as regards the
material and the production. The warranty is valid for 12 months from the date of supply of GIMA.
During the period of validity of the warranty, GIMA will repair and/or replace free of charge all the defected parts due to
production reasons. Labor costs and personnel traveling expenses and packaging not included. All components subject
to wear are not included in the warranty.
The repair or replacement performed during the warranty period shall not extend the warranty.
The warranty is void in the following cases: repairs performed by unauthorized personnel or with non-original spare
parts, defects caused by negligence or incorrect use. GIMA cannot be held responsible for malfunctioning on electronic
devices or software due to outside agents such as: voltage changes, electro-magnetic elds, radio interferences, etc.
The warranty is void if the above regulations are not observed and if the serial code (if available) has been removed,
cancelled or changed. The defected products must be returned only to the dealer the product was purchased from.
Products sent to GIMA will be rejected.
Appendix
General Knowledge of ECG
Normal sinus rhythm: In sinus conditions, S heart rate is in the
range of 60 to 100 times per minute and the rhythm is regular. P wave
is normal and each one is followed by a QRS wave. P-R interval:
0.12~0.20s;
QRS wave: 0.06~0.10s; No ectopic ECG activity.
Symptom: Sinus rhythm, heart rate: 60~100bpm
Indication: Normal
Several abnormal ECG waveforms
1) Tachycardia: The heartbeat becomes faster. Tachycardia is
determined by the rhythm of the heart, the average rhythm beats
faster than 100 times a minute is considered as Tachycardia. The
result description “Suspected fast beat” in this device may be doubted
as Tachycardia.
Symptom: heart rate>100bpm
Indication: It may occur with the normal people who have these physiology
conditions: rage, fatigue, smoking, drinking too much wine, excessive coee and strong tea, etc.
Pathology: anemia, Hyperthyroidism, blood hypoxia, myocarditis, hypokalemia, fever, inuence of some medication
(such as atropine, epinephrine etc.).
Suggestion: If it belongs to pathology condition, please go to hospital.
2) Bradycardia: The heartbeat becomes more slowly. It is determined
by the rhythm of the heart, the average rhythm is less than 60 beats per
minute is considered as Bradycardia. The result description “Suspected
slow beat” in this device may be doubted as Bradycardia.
Symptom: heart rate<60bpm
Indication: It occurs when healthy people fall asleep, and it can be
found in athlete (or those who love doing sports frequently), old people,
or vagus excitement person.
Pathology: Sick sinus syndrome, Ischemic heart disease,Cardiomyopathy, intracranial hypertension, increased hypokalemia,
Low temperature, period of convalescence of acute infectious disease or after use some medicines such as digitalis.
Suggestion: If it belongs to the pathology condition, please see the doctor.
ENGLISH

28
3) Premature beat: In a normal beat a QRS waveform appears prematurely
and is followed by a comeback pause. The result description “Suspected
occasional short beat interval” in this device may be doubted as Premature
beat.
What is premature beats?It is premature contraction. The normal heart
beat is always regularly, and each beat interval is also symmetrically;
Premature beat is out of his general regulation, the heart beats
prematurely and followed by a long time interval; the phenomena of a
premature beat between two heart beats is called inserting premature
beat. The display of “early beat” may be suspected Premature beat.
According to dierent original positions it can be divided into Premature Atrial Contraction,
Premature Nodal Contraction and Premature Ventricular Contraction (PVC), which needed to be judged by experts.
Symptom: The heart beat is arrhythmic, it occurs as the phenomenon that the heart suddenly beats and then stops for
a while. Some people have palpitation or have no symptom.
Indication: The premature beat can be found occasionally in healthy people, with no distinct symptom or sometimes
with palpitation. This may be caused by fatigue,
anxiety, insomnia, smoking too much, or drinking too much wine, coee, strong tea etc. It can be recovered without
treatment. However, if premature beat occurs frequently, continuously or in multi-focus, it will indicate functional
cardiovascular disease. please see a doctor as soon as possible.
Suggestion: The character of premature beat needs professional to conrm, so please save the temporal gure in time.
When seeing a doctor , you can recall it to doctor to judge the character of premature(Premature Atrial Contraction,
Premature Nodal Contraction, Premature Ventricular Contraction or multi-focus premature beat and help cure.
Testee’s Symptom: Normal heart beat is followed by a premature beat.
4) Bigeminy: It is a type of PVC in which a normal beat is coupled
with a premature beat.
Indication: PVC occurs frequently.
Suggestion: Please see the doctor.
5) Trigeminy: It is a type of PVC in which two normal beats are coupled
with a premature beat.
Indication: PVC occurs frequently.
Suggestion: Please see the doctor.
The result description “Suspected irregular beat interval” in this device
may be doubted as Bigeminy or Trigeminy.
6) Short run of tachycardia: PVC (Premature Ventricular Contraction)
occurs more than 3 times continuously.
Testee’s Symptom: PVC occurs More than 3 times continuously. The
heart beat is fast and regularly, but starts and stops suddenly.
According to the dierent of active original position, it can be divided
into:Short Run, SVE Short Run (Needing professional to judge).
Short Run:It is caused by Premature Atrial Contraction or Nodal
Premature Beat, frequency>180bpm.
Indication:Most commonly found in healthy people, it causes by deep respiration, tachypnea, positional changes, swallow,
rage etc. It also appears in functional cardiac disease,such as Wol - Parkinson-White Syndrome, rheumatic heart
disease, coronary heart disease, Cardiomyopathy, Congenital heart disease, medicinal reaction(digitalis toxicosis)etc.
Suggestion:If it occurs time after time, please see the doctor as soon as possible.
Ventricular Tachycardia:Caused by Premature Ventricular Contraction, Heart Rate >140bpm.
Indication:Most commonly found in heart disease patient, it can cause ventricle brillation if it’s serious, so the tester
needs to see a doctor immediately.
Suggestion:The character of short run needs professional to conrm, so please save the temporal gure in time. And
you can provide it to doctor as a reference.
ENGLISH

29 ENGLISH
7) Missed beats: If the interval of heartbeats is twice the interval
of prevenient heartbeats (on average) and is not followed by PVC
(Premature Ventricular Contraction), it detected as missed beat. The
display of “missing beat” may be doubted as Missed beats.
Symptom: arrhythmia,a long time interval.
Indication: May be the conduction system of heart blocks,it often occurs
in functional cardiovascular disease, Hyperthyroidism and myocardial
disease. But sometimes it occurs in health people whose vagus is
excited excessively(such as trained athlete).
Suggestion: Save the gure and see a doctor.
Table of contents
Other Gima Medical Equipment manuals

Gima
Gima 32579 User manual

Gima
Gima CONTEC08A-VET User manual

Gima
Gima PC-80B User manual

Gima
Gima AP500GIMA User manual

Gima
Gima Sonoline C 29480 User manual

Gima
Gima 34301 User manual

Gima
Gima 28194 User manual

Gima
Gima SUPER VEGA BATTERY User manual

Gima
Gima OXY-0 Instruction Manual

Gima
Gima 34291 Parts list manual
Popular Medical Equipment manuals by other brands

Medi-Globe
Medi-Globe Endo-Flex Beissring SU instruction manual

Ossur
Ossur ICEROSS SEAL-IN V Instructions for use

bort medical
bort medical activemed quick guide

Aseptiscope
Aseptiscope DiskCover System Instructions for use

CA.MI
CA.MI NEW VAPINAL instruction manual

HEBU medical
HEBU medical HF 9928-01 operating manual