Gima 25585 Parts list manual

MANUALE D’USO E MANUTENZIONE
USE AND MAINTENANCE BOOK
INSTRUCTIONS DE FONCIONNEMENT ET ENTRETIEN
BETRIEBS UND WARTUNGS ANWEISUNGEN
MANUAL DE USO Y MANTENIMIENTO
MANUAL DE USO E MANUTENÇÃO
ÅÃ×ÅÉÑÉÄÉÏ ×ÑÇÓÇÓ ÊÁÉ ÓÕÍÔÇÑÇÓÇÓ
ª¦BkZ{A¥ |B}lKaÂA |¦{X
M25585-M-Rev.6.12.18
Gima S.p.A.
Via Marconi, 1 - 20060 Gessate (MI) Italy
www.gimaitaly.com
TERMOMETRO FRONTALE
FOREHEAD THERMOMETER
THERMOMÈTRE FRONTAL
STIRNTHERMOMETER
TERMÓMETRO FRONTAL
TERMÔMETRO FRONTAL
ÈÅÑÌÏÌÅÔÑÏ ÌÅÔÙÐÏÕ
ATTENZIONE: Gli operatori devono leggere e capire completamente questo manuale
prima di utilizzare il prodotto.
ATTENTION: Theoperators must carefully read andcompletely understand the present
manualbefore using theproduct.
AVIS: Lesopérateursdoiventlireetbiencomprendrecemanuelavantd’utiliserleproduit.
ACHTUNG: DieBedienermüssenvorherdiesesHandbuchgelesenundverstandenhaben,
bevor sie das Produkt benutzen.
ATENCIÓN: Losoperadorestienenque leeryentender completamenteestemanual antes
de utilizar el producto.
ATENÇÃO: Osoperadores devem ler e entendercompletamente este manual antes de
usaroproduto.
ÐÑÏÓÏ×Ç: Ïé ÷åéñéóôÝò áõôïý ôïõ ðñïúüíôïò ðñÝðåé íá äéáâÜóïõí êáé íá êáôáëÜâïõí
ðëÞñùò ôéò ïäçãßåò ôïõ åã÷åéñéäßïõ ðñéí áðü ôçí ÷ñÞóç ôïõ.
.PK}{A |B}lKaBI XI{A |Iv £{}ByI |¦{X{A AY¡ ~¢s¥ ©AZv |B}l{A «{k :ZYR{A
ﻲﻨﻴﺒﺠﻟا ةراﺮﺤﻟا ناﺰﻴﻣGIMA
0476
Gima S.p.A. - Via Marconi, 1
20060 Gessate (MI) - Italy
Made in China
25585

1) Press the ON/MEM button. After you hear two beep sounds and the icon
appears, the thermometer is ready for use.
2) Approach the thermometer to your temple(within 1cm), analyzing the area
shown in the figure.
3)Press the SCAN button and detect the value at close range around the
temple, with a very slow twisting motion.. While scanning, you will hear a
beep sound, which indicates the newest measurement is taking place.
Measurement has been completed after two short beeps are heard, after
7
FEATURES
The GIMA forehead thermometer was designed with advanced infra-red technologies and room temperature
compensation technology for immediate and accurate measurements.
Do not use this device in situations of vital importance or for applications concerning safety.
Specifications
Temperature measurement range: Foreheadmode:34~42.2°C(93.2~108°F),Scanmode:-22~80°C(-7.6~176°F)
Operating temperature range: 10~40°C (50~104°F)
Storage temperature range: -20~50°C (-4~122°F), RH 85%
Transportation temperature shall be less than 70°C, RH 95%
Accuracy: ForForeheadmode: +/-0.2°C(0.4°F)during35~42°C (95~107.6°F),+/-0.3°C(0.5°F) forotherrange.
Forscan mode:+/-0.3°C (0.5°F) during22~42.2°C(71.6~108°F),forother range+/-4%or+/-2°C(4°F)
whicheverisgreater.
Battery: one lithium battery (CR2032)
FUNCTION
Before each use make sure the probe is clean and without damage.
Press ON/MEM button. The thermometer is ready for use after you hear two beep sounds.
Setting date and time
Correctly setting the clock will assure a proper interpretation of the stored
measurements.
Press and hold the ON/MEM button for 5 seconds. When the Set icon starts to flash, it indicates that you
are in the setting screen. Use the ON/MEM button to scroll the 12/24 hour settings, the year, month and
date. Use the SCAN button to set the clock.
Choosing between Fahrenheit and Celsius
To change the unit of measure of the temperature between °C and °F, press and hold the
SCAN button with device switched off, then press and release the ON/MEM button until the
display shows the symbol °F or °C. Repeat the procedure to change the unit of measure again.
Note: holding the thermometer too long may cause a higher ambient temperature
reading of the probe. This could make the body temperature measurement
lower than usual.
Forehead temperature measuring
Make sure the probe lens and the forehead are clean and dry.
5-30 seconds from the beginning of the measurement. The temperature
is now shown on the display. This is just an indication of the temperature
and determines only whether there is a temperature or not.
ENGLISH

8
Fever alarm
If thermometer detects a body temperature greater than 37.5° C there will be a long beep
sound followed by three short beep sounds.
Temperature level colored LED indicator
If the thermometer measures a body temperature lower than 37.5 ° C, the led will be green,
If the temperature is greater than 37.5 ° C and 38.0 ° C, the led will be yellow, if the
temperature is > = 38.0 ° C, the led will be red.
Measuring temperature under Scan mode
This mode is not suitable for the measurement of human body temperature.
Scan mode measures the temperature of objects and liquids (for example milk or bath water). After switching
on the device, press and hold the ON/MEM button, and press SCAN once until the LCD display shows the
icon for “infrared thermometer” mode. In this mode it is possible to measure the surface temperature of
objects and liquids.
If you press and hold the “SCAN” button, the reading of measurement will be continuously updated.
After measurement
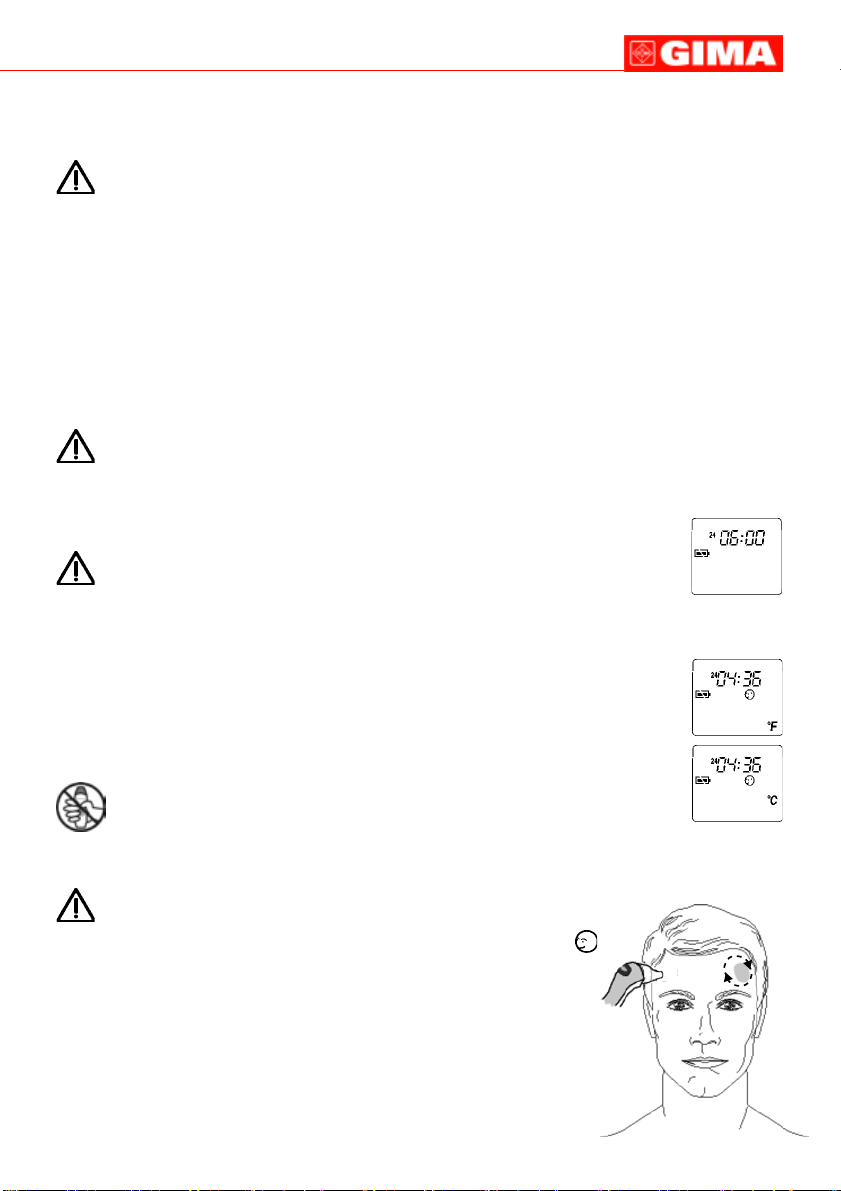
Device will automatically shut off if left idle for more than 1 minute to extend battery life. The
LCD will only show the date, time and room temperature in stand-by mode. For an
accurate measurement of room temperature, the thermometer should be placed on a table,
far from elements that can affect the measurement. Wait approx. 15 minutes.
Memorizing temperatures
The memory function can be used to show the last 9 measurements with date, time,
temperature and mode. Press the ON/MEM button when power is on to see the temperatures
stored.
Stop watch
After switching on the thermometer, press and hold the ON/MEM button and press the
SCAN button twice for stop watch mode to see the icon appear. In this mode you can count
by 0.01 seconds to three minutes. To start or stop the count press the SCAN button. To set
count to zero press the ON/MEM button. To exit function press and hold the ON/MEM
button and press the SCAN button.
WARNINGS
- Temperature can be influenced by several external factors; variation between one measurement
and the other are normal.
- Before the measurement, please stay in a stable environment for 5 mins.
- Avoid bath or exercise before measuring body temperature; keep the measurement area
clean and dry, free from cosmetics or creams
- During measurement avoid direct exposure to sun, rain or wind; do not measure near heat
sources or in excessively humid places.
- Always keep device at a temperature between -20 and 50°C (-4 and122°F), in a dry place
away from liquids and direct sunlight.
- in case of extraordinary maintenance interventions, contact the nearest retailer.
ENGLISH

9
MAINTENANCE
Care and cleaning
The probe is the most delicate part of the thermometer. Use with care when cleaning the probe
to avoid damage.
Delicately clean the lens with a cotton cloth (soft cloth) moistened with water or 70%alcohol and allow the
probe to fully dry. Clean probe after each use to assure accurate reading and avoid crossed contamination.
Put on lid when not using the thermometer.
Battery replacement
The device is supplied with one lithium battery (CR2032 x 1); don’t forget to switch it off before changing the
battery (see illustration). The positive (+) side of the battery must face up. Keep the battery away from
children.
Disposal: The product must not be disposed of along with other domestic waste. The users
must dispose of this equipment by bringing it to a specific recycling point for electric and
electronic equipment.
For further information on recycling points contact the local authorities, the local recycling
center or the shop where the product was purchased. If the equipment is not disposed of
correctly, fines or penalties may be applied in accordance with the national legislation and
regulations.
GIMA WARRANTY CONDITIONS
Congratulations for purchasing a GIMA product.
This product meets high qualitative standards both as regards the material and the production. The warranty
is valid for 12 months from the date of supply of GIMA.
During the period of validity of the warranty, GIMA will repair and/or replace free of charge all the defected
Error
Message
Solution
Remove the battery, wait for 1 minute and
repower it. If the message reappears, contact
the retailer for service.
Wait until all the icons stops flashing.
Allow the thermometer to rest in a room for
at least 30 minutes at room temperature:
10°C and 40°C (50°F ~104°F).
Please select the target within specifications.
If a malfunction still exists, please contact
the nearest retailer.
Change with a new battery.
Problem
Error 5~9, the system is not functioning
properly.
Measurement before device stabilization.
The device shows a rapid ambient
temperature change.
The ambient temperature is not within the
rangebetween10°C and 40°C (50°F ~104°F).
Forehead: Temperature taken is higher
than +42.2°C (108°F). Scan: Temperature
taken is higher than +80°C (176°F)
Forehead: Temperature taken is lower
than +34°C (93.2°F). Scan: Temperature
taken is lower than -22°C (-7.6°F)
LCD display cannot be powered on to the
ready stage.
TROUBLESHOOTING
ENGLISH

10
parts due to production reasons. Labor costs and personnel traveling expenses and packaging not included.
All components subject to wear are not included in the warranty.
The repair or replacement performed during the warranty period shall not extend the warranty.
The warranty is void in the following cases: repairs performed by unauthorized personnel or with non-original
spare parts, defects caused by negligence or incorrect use.
GIMA cannot be held responsible for malfunctioning on electronic devices or software due to outside agents
such as: voltage changes, electro-magnetic fields, radio interferences, etc.
The warranty is void if the above regulations are not observed and if the serial code (if available) has been
removed, cancelled or changed.
The defected products must be returned only to the dealer the product was purchased from. Products sent
to GIMA will be rejected.
ENGLISH

36
Table of contents
Other Gima Thermometer manuals
Popular Thermometer manuals by other brands

Exergen
Exergen TemporalScanner 2000C Instructions for use

Microlife
Microlife MT 1951 user manual

Extech Instruments
Extech Instruments RH250W quick start

Omron
Omron Flex Temp Smart manual

Summer
Summer 14514 instruction manual

Dwyer Instruments
Dwyer Instruments PT500 Installation and operating instructions