manuals.online logo
Brands
  1. Home
  2. •
  3. Brands
  4. •
  5. Grandview
  6. •
  7. Projector Accessories
  8. •
  9. Grandview Prestige PP R1 Series User manual

Grandview Prestige PP R1 Series User manual

GRANDVIEW CRYSTAL SCREEN CO., LTD.
No. 43 South International Trade Avenue, Hualong,
Panyu, Guangzhou, GuangDong, P.R.C
Tel: +86-20-84899499
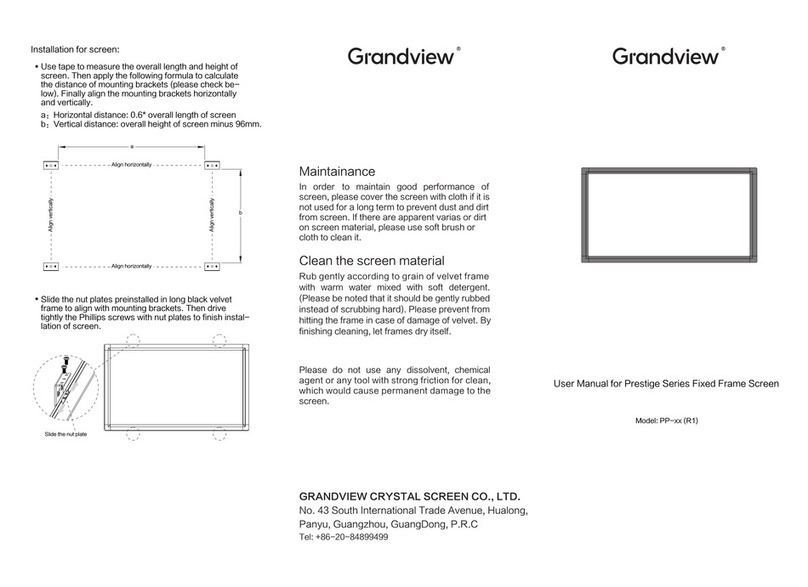
User Manual for Prestige Series Fixed Frame Screen
Model: PP-xx (R1)
Maintainance
In order to maintain good performance of
screen, please cover the screen with cloth if it is
not used for a long term to prevent dust and dirt
from screen. If there are apparent varias or dirt
on screen material, please use soft brush or
cloth to clean it.
Clean the screen material
Rub gently according to grain of velvet frame
with warm water mixed with soft detergent.
(Please be noted that it should be gently rubbed
instead of scrubbing hard). Please prevent from
hitting the frame in case of damage of velvet. By
finishing cleaning, let frames dry itself.
Please do not use any dissolvent, chemical
agent or any tool with strong friction for clean,
which would cause permanent damage to the
screen.
Installation for screen:
Use tape to measure the overall length and height of
screen. Then apply the following formula to calculate
the distance of mounting brackets (please check be-
low). Finally align the mounting brackets horizontally
and vertically.
a:Horizontal distance: 0.6* overall length of screen
b:Vertical distance: overall height of screen minus 96mm.
Align horizontally
Align horizontally
a
b
Align vertically
Align vertically
Slide the nut plates preinstalled in long black velvet
frame to align with mounting brackets. Then drive
tightly the Phillips screws with nut plates to finish instal-
lation of screen.
Slide the nut plate
Dear Customer:
Preparation for installation
Parts:
Long black velvet frame × 2 pcs
Long tension rod × 2 pcs
Short tension rod × 2 pcs
Screen material × 1 pcs
Installation of screen material:
Instruction for installation
Assembly of frames:
Mounting bracket × 4 pcs
Tension rod
Snap lug x some
Thanks for your purchasing Grandview product of
Prestige Series Fixed Frame Screen. Please go
through the user manual before use. Please keep
the user manual well for future reference.
Short black velvet frame × 2 pcs
Put the long and short frames on clean floor with
the rear side up to form a rectangle shape, please
see below:
Connect long frame with short frame by inserting locat-
ing pin on short frame into the hole on long frame. Then
insert grub hexagon screw to drive tightly with hexagon
key according to the order mentioned above.
Face the screen material rear side up and lay it flat
on clean floor. Insert the tension rod from the tunnel of
screen material (advise to insert tension rod by two
people to avoid damage of fabric). Please check
below:
Insert the snap lugs into long and short black velvet
frames according to the number of round holes on the
edge of screen material.
Lay flat screen material on the connected frame (both
of frame and screen material should face rear side up),
then align snap lugs with holes on screen material one
by one. And then fix the screen material on the frame
by inserting snap lugs through the holes on screen ma-
terial. Please check below:
After inserting all of snap lugs through holes on screen
material, necessary adjustment would be needed to
make to assure screen material has no wrinkles with
well-distributed tension.
Order to connect frames:①②③④
①②
③④
Grub hexagon screw × 4 pcs
tapping screw × 8 pcs
expansion fixture × 8 pcs
Phillips screw × 8 pcs
P l e a s e pr e p a r e f o r s u i t a b l e t o o l s su c h a s
gradienter, tape, marker, hexagon key, etc
Please make sure precise installation distance and
proper installation position for upper and nether
mounting brackets.
Use the proper screws for installation according to
the site. (use tapping screws for wooden wall and
tapping screws with expansion fixture for concrete
wall)
This manual suits for next models

1

Other Grandview Projector Accessories manuals

Grandview GPCM-F User manual

Grandview

Grandview GPCM-F User manual

Grandview GPCM-B User manual

Grandview

Grandview GPCM-B User manual

Grandview GPAC76Series User manual

Grandview

Grandview GPAC76Series User manual

Grandview U-WORK User manual

Grandview

Grandview U-WORK User manual

Grandview GPAD64 Series User manual

Grandview

Grandview GPAD64 Series User manual

Grandview Cyber Series User manual

Grandview

Grandview Cyber Series User manual

Grandview PT-Uxx User manual

Grandview

Grandview PT-Uxx User manual

Grandview Smart combo 106H User manual

Grandview

Grandview Smart combo 106H User manual

Grandview CB-UY60 User manual

Grandview

Grandview CB-UY60 User manual

Grandview GPAD42 Series User manual

Grandview

Grandview GPAD42 Series User manual

Grandview LS-Zxx User manual

Grandview

Grandview LS-Zxx User manual

Grandview GPCM-C User manual

Grandview

Grandview GPCM-C User manual

Grandview GPCM-E3540 User manual

Grandview

Grandview GPCM-E3540 User manual

Grandview GPCM-J Series User manual

Grandview

Grandview GPCM-J Series User manual

Grandview LS-MA III Series User manual

Grandview

Grandview LS-MA III Series User manual

Grandview GPCN- E200 User manual

Grandview

Grandview GPCN- E200 User manual

Grandview Prestige PP R1 Series User manual

Grandview

Grandview Prestige PP R1 Series User manual

Grandview PE-L R3 Series Instruction Manual

Grandview

Grandview PE-L R3 Series Instruction Manual

Grandview GPAD50 Series User manual

Grandview

Grandview GPAD50 Series User manual

Grandview GPCN-E200 User manual

Grandview

Grandview GPCN-E200 User manual

Grandview CN-MI series User manual

Grandview

Grandview CN-MI series User manual

Grandview GPCD50 Series User manual

Grandview

Grandview GPCD50 Series User manual

Grandview Smart Screen User manual

Grandview

Grandview Smart Screen User manual

Grandview GPAD58 Series User manual

Grandview

Grandview GPAD58 Series User manual

Popular Projector Accessories manuals by other brands

Casio YA-S10 Setup guide

Casio

Casio YA-S10 Setup guide

Vidikron Model60-80 Installation and assembly

Vidikron

Vidikron Model60-80 Installation and assembly

Polycom Recording Studio 2000 Getting started guide

Polycom

Polycom Recording Studio 2000 Getting started guide

Kramer VIA GO2 user manual

Kramer

Kramer VIA GO2 user manual

A+K AstroBeam X110 manual

A+K

A+K AstroBeam X110 manual

CHIEF SL220 installation instructions

CHIEF

CHIEF SL220 installation instructions

FONESTAR PPEL-43150-FA quick start guide

FONESTAR

FONESTAR PPEL-43150-FA quick start guide

Exact solutions FRAME-EVO-P30 manual

Exact solutions

Exact solutions FRAME-EVO-P30 manual

Barco Lamp House with 2.5 kW lamp installation manual

Barco

Barco Lamp House with 2.5 kW lamp installation manual

Sanyo LNS-W04 Installation AND REPLACEMENT PROCEDURES

Sanyo

Sanyo LNS-W04 Installation AND REPLACEMENT PROCEDURES

Kramer VP-796 operating instructions

Kramer

Kramer VP-796 operating instructions

Eiki PjNET-20 owner's manual

Eiki

Eiki PjNET-20 owner's manual

Sony LMP-Q130 operating instructions

Sony

Sony LMP-Q130 operating instructions

Linksys WPG12 - Wireless Presentation Player Quick installation

Linksys

Linksys WPG12 - Wireless Presentation Player Quick installation

AVer AW200 user manual

AVer

AVer AW200 user manual

Navitar SSC125 Dimensional drawing

Navitar

Navitar SSC125 Dimensional drawing

Christie Brio Enterprise quick start guide

Christie

Christie Brio Enterprise quick start guide

TOOQ PJ4017WTN-B installation manual

TOOQ

TOOQ PJ4017WTN-B installation manual

manuals.online logo
manuals.online logoBrands
  • About & Mission
  • Contact us
  • Privacy Policy
  • Terms and Conditions

Copyright 2025 Manuals.Online. All Rights Reserved.