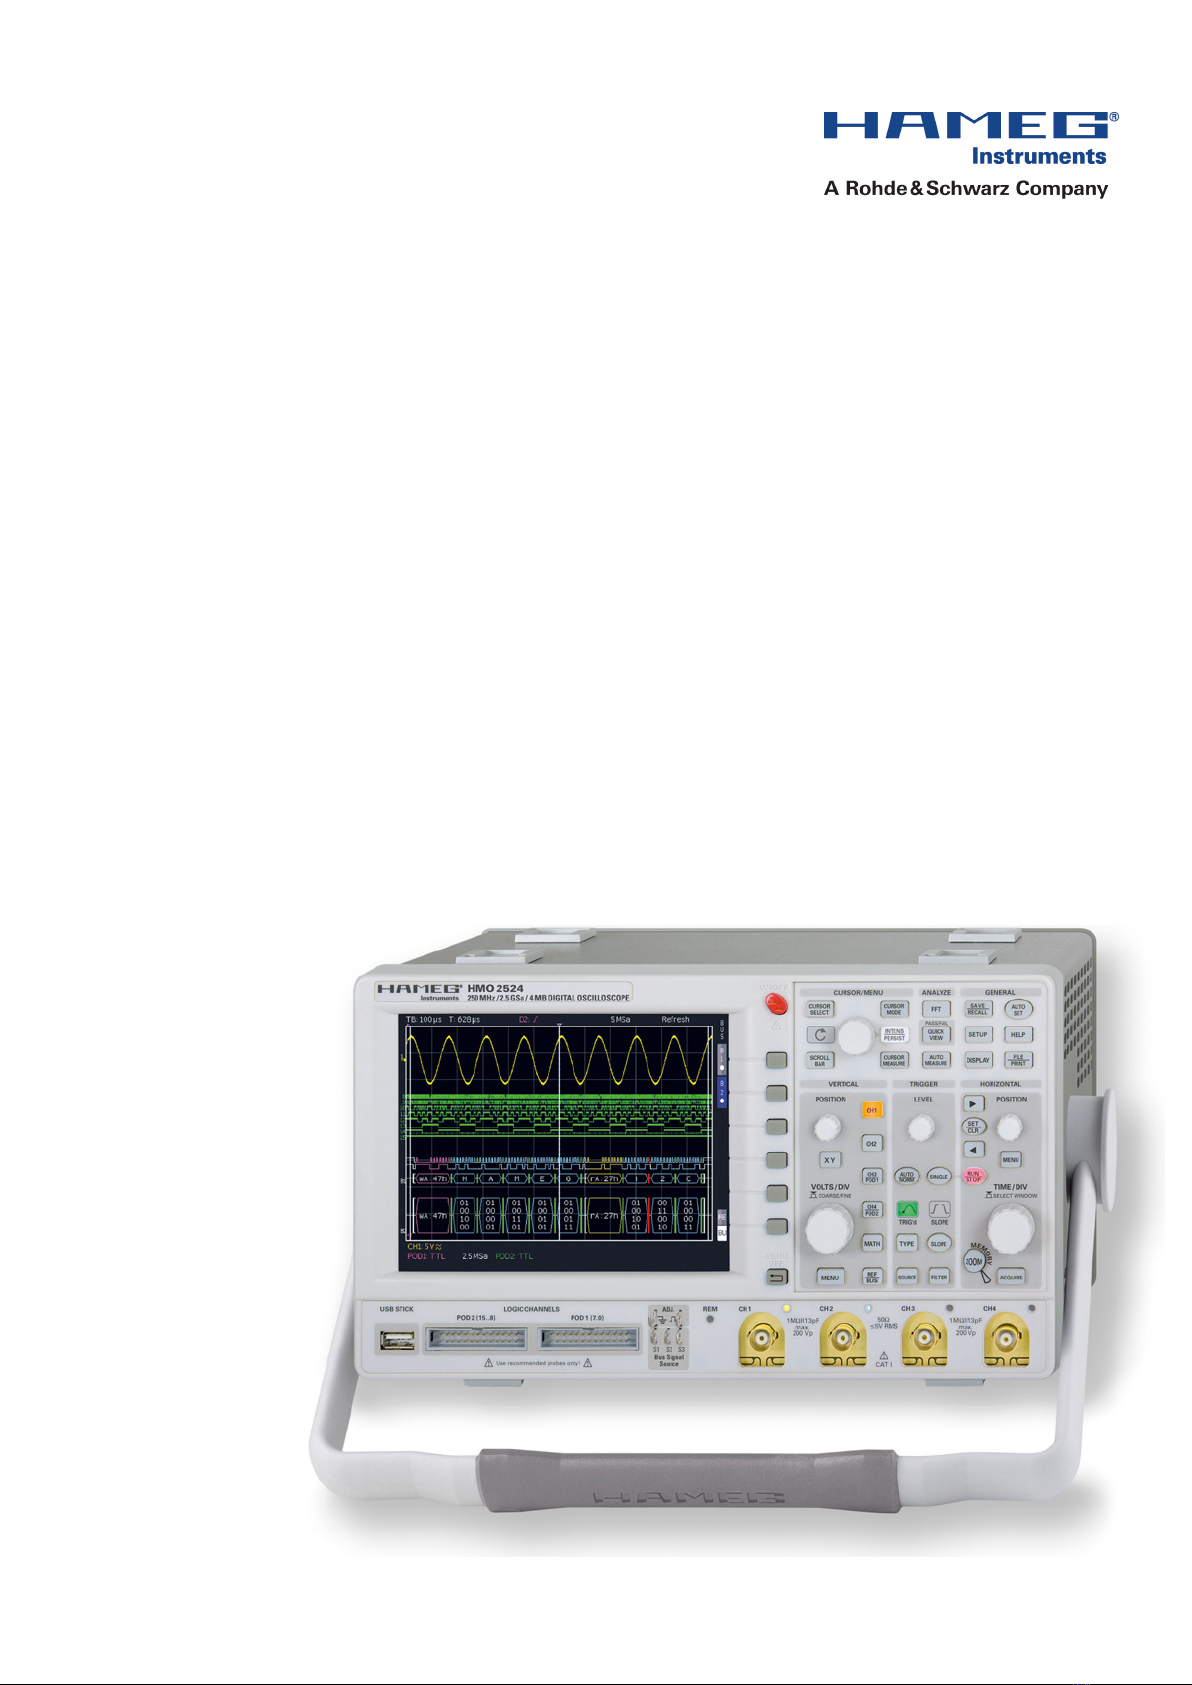
Hameg HMO Series User manual

250/350 MHz
Digital Oscilloscope
HMO Series
Manual
English

2Subject to change without notice
General information regarding the CE marking
HAMEG instruments fulll the regulations of the EMC directive. The
conformity test made by HAMEG is based on the actual generic- and
product standards. In cases where different limit values are applicable,
HAMEG applies the severer standard. For emission the limits for
residential, commercial and light industry are applied. Regarding the
immunity (susceptibility) the limits for industrial environment have
been used.
The measuring- and data lines of the instrument have much inuence
on emission and immunity and therefore on meeting the acceptance
limits. For different applications the lines and/or cables used may
be different. For measurement operation the following hints and
conditions regarding emission and immunity should be observed:
1. Data cables
For the connection between instrument interfaces and external devices,
(computer, printer etc.) sufciently screened cables must be used.
Without a special instruction in the manual for a reduced cable length,
the maximum cable length of a dataline must be less than 3 meters and
not be used outside buildings. If an interface has several connectors
only one connector must have a connection to a cable.
Basically interconnections must have a double screening. For IEEE-bus
purposes the double screened cable HZ72 from HAMEG is suitable.
2. Signal cables
Basically test leads for signal interconnection between test point and
instrument should be as short as possible. Without instruction in the
manual for a shorter length, signal lines must be less than 3 meters
and not be used outside buildings.
Signal lines must screened (coaxial cable - RG58/U). A proper ground
connection is required. In combination with signal generators double
screened cables (RG223/U, RG214/U) must be used.
3. Inuence on measuring instruments
Under the presence of strong high frequency electric or magnetic
elds, even with careful setup of the measuring equipment, inuence
of such signals is unavoidable.
This will not cause damage or put the instrument out of operation. Small
deviations of the measuring value (reading) exceeding the instruments
specications may result from such conditions in individual cases.
4. RF immunity of oscilloscopes.
4.1 Electromagnetic RF eld
The inuence of electric and magnetic RF elds may become visible
(e.g. RF superimposed), if the eld intensity is high. In most cases
the coupling into the oscilloscope takes place via the device under
test, mains/line supply, test leads, control cables and/or radiation.
The device under test as well as the oscilloscope may be effected by
such elds.
Although the interior of the oscilloscope is screened by the cabinet,
direct radiation can occur via the CRT gap. As the bandwidth of
each amplier stage is higher than the total –3dB bandwidth of the
oscilloscope, the inuence of RF elds of even higher frequencies
may be noticeable.
4.2 Electrical fast transients / electrostatic discharge
Electrical fast transient signals (burst) may be coupled into the
oscilloscope directly via the mains/line supply, or indirectly via test
leads and/or control cables. Due to the high trigger and input sensitivity
of the oscilloscopes, such normally high signals may effect the trigger
unit and/or may become visible on the TFT, which is unavoidable. These
effects can also be caused by direct or indirect electrostatic discharge.
HAMEG Instruments GmbH
General information regarding the CE marking
KONFORMITÄTSERKLÄRUNG
DECLARATION OF CONFORMITY
DECLARATION DE CONFORMITE
Hersteller HAMEG Instruments GmbH
Manufacturer Industriestraße 6
Fabricant D-63533 Mainhausen
Die HAMEG Instruments GmbH bescheinigt die Konformität für das
Produkt
The HAMEG Instruments GmbH declares conformity of the product
HAMEG Instruments GmbH déclare la conformite du produit
Bezeichnung: Oszilloskop
Product name: Oscilloscope
Designation: Oscilloscope
Typ / Type / Type: HMO2524, HMO3524, HMO3522
mit / with / avec: HO720
Optionen / Options / Options: HO730, HO740
mit den folgenden Bestimmungen / with applicable regulations / avec
les directives suivantes
EMV Richtlinie 89/336/EWG ergänzt durch 91/263/EWG, 92/31/EWG
EMC Directive 89/336/EEC amended by 91/263/EWG, 92/31/EEC
Directive EMC 89/336/CEE amendée par 91/263/EWG, 92/31/CEE
Niederspannungsrichtlinie 73/23/EWG ergänzt durch 93/68/EWG
Low-Voltage Equipment Directive 73/23/EEC amended by 93/68/EEC
Directive des equipements basse tension 73/23/CEE amendée par
93/68/CEE
Angewendete harmonisierte Normen / Harmonized standards applied
Normes harmonisées utilisées:
Sicherheit / Safety / Sécurité:
EN 61010-1:2001 (IEC 61010-1:2001)
Messkategorie / Measuring category / Catégorie de mesure: I
Überspannungskategorie / Overvoltage category /
Catégorie de surtension: II
Verschmutzungsgrad / Degree of pollution / Degré de pollution: 2
Elektromagnetische Verträglichkeit / Electromagnetic compatibility /
Compatibilité électromagnétique
EN 61326-1/A1 Störaussendung / Radiation / Emission:
Tabelle / table / tableau 4; Klasse / Class / Classe B.
Störfestigkeit / Immunity / Imunitée: Tabelle / table / tableau A1.
EN 61000-3-2/A14 Oberschwingungsströme / Harmonic current
emissions Émissions de courant harmonique: Klasse / Class / Classe
D.
EN 61000-3-3 Spannungsschwankungen u. Flicker / Voltage
uctuations and icker / Fluctuations de tension et du icker.
Datum / Date / Date
11. 01. 2010
Unterschrift / Signature / Signatur
Holger Asmussen
General Manager

3
Subject to change without notice
General information regarding the CE marking 2
350 MHz Digital Oscilloscope HMO3522 / HMO3524 4
Specications 5
1 Installation and safety instructions 6
1.1. Setting up the instrument 6
1.2. Safety 6
1.3. Correct operation 6
1.4. Ambient conditions 7
1.5. Warranty and repair 7
1.6. Maintenance 7
1.7. CAT I 7
1.8. Mains voltage 7
2 Familiarize yourself with your new HAMEG
Digital Storage Oscilloscope 8
2.1 Front view 8
2.2 Control panel 8
2.3 Screen 9
2.4 Rear view 9
2.5 Options 9
2.6 General concept of instrument operation 10
2.7 Basic settings and integrated help 10
2.8 Bus Signal Source 11
2.9 Updates for the instrument settings and 11
2.10 Upgrade with software options 11
3 A quick introduction 13
3.1 Setting up and turning the instrument on 13
3.2 Connection of a probe and signal capture 13
3.3 Display of signal details 13
3.4 Cursor measurements 14
3.5 Automatic measurements 14
3.6 Mathematical functions 15
3.7 Storing data 15
4 Vertical system 17
4.1 Coupling 17
4.2 Sensitivity, Y-Positioning, and Offset 17
4.3 Bandwidth Limit and Signal Inversion 18
4.4 Probe attenuation selection 18
5 Horizontal System (Time Base) 18
5.1 Capturing modes RUN and STOP 18
5.2 Time base adjustments 18
5.3 Capture modes 18
5.4 ZOOM function 19
5.5 Marker function 19
6 Trigger System 20
6.1 Trigger modes Auto, Normal, Single 20
6.2 Trigger sources 20
6.3 Slope trigger 20
6.4 Pulse trigger 21
6.5 Video trigger 21
7 Display of signals 22
7.1 Display settings 22
7.2 Use of the virtual screen area 22
7.3 Signal intensity and persistence functions 22
7.4 XY display 23
8 Measurements 24
8.1 Cursor measurements 24
8.2 Auto measurements 24
9 Analysis 26
9.1 Quick mathematics 26
9.2 Formula editor 27
9.3 Frequency analysis (FFT) 28
9.4 Quickview measurements 28
9.5 PASS/FAIL test based on masks 29
10 Documentation, storing and recalling 30
10.1 Instrument settings 30
10.2 References 30
10.3 Curves 31
10.4 Screenshots 32
10.5 Sets of formulas 32
11 Mixed Signal Operation 33
11.1 Logic trigger 33
11.2 Display functions of the logic channels 33
11.3 Cursor measurements for the logic channels 34
12 Serial bus analysis 35
12.1 I2C bus 35
12.2 I2
12.3 I2C bus triggering 36
12.4 SPI bus 36
12.6 SPI bus triggering 37
12.7 UART/RS-232 bus 37
12.9 UART/RS-232 bus triggering 38
13 Remote control via interface 39
13.1 RS-232 39
13.2 USB 39
14 Appendix 40
14.1 List of pictures 40
14.2 Glossary 40
ContentsGeneral information regarding the CE marking

4Subject to change without notice
HMO3524 / HMO3522
HMO3524
8 Channel
logic probe HO3508
R4GSa/s Real time, 50GSa/s Random sampling,
low noise flash A/D converter (reference class)
R4MPts memory, memory oom up to 100,000:1
RMSO (Mixed Signal Opt. HO3508/HO3516) with 8/16 logic channels
RSerial bus trigger and hardware accelerated decode,
I2C, SPI, UART/RS-232 (Opt. HOO10)
R8 user definable marker for easy navigation
RPass/Fail Test based on masks
RVertical sensitivity 1mV/div., Offset control ±0.2...±20V
R12div. x-axis display range, 20div. y-axis display range
(VirtualScreen)
RTrigger modes: slope, video, pulsewidth, logic, delayed, event
R6 digit counter, automeasurement, formula editor, ratiocursor,
FFT for spectral analysis
RCrisp 16.5cm (6.5”) TFT VGA display, DVI output
RLowest noise fan
R3x USB for mass storage, printer and remote control
optional IEEE-488 or Ethernet/USB
350MHz 2/4 Channel Digital Oscilloscope
HMO3522/HMO3524
Carrying Case HZ99
Active Probe HZO30

5
Subject to change without notice
HMO3524 / HMO3522 Technische Daten
350MHz 2 [4] Channel Digital Oscilloscope
HMO3522 [HMO3524]
All data valid at 23°C after 30 minute warm-up
Display
Display: 16.5cm (6.5”) VGA Color TFT
Resolution: 640 x 480 Pixel
Backlight: LED 400cd/m2
Display area for curves:
without menu 400 x 600 Pixel (8 x 12 div.)
with menu 400 x 500 Pixel (8 x 10div.)
Color depth: 256 colors
Intensity steps per channel: 0…31
Vertical System
Channels:
DSO mode CH 1, CH 2 [CH 1...CH 4]
MSO mode CH 1, CH 2, LCH 0...15 (logic channels)
with 2x Option HO3508
Auxiliary input: Frontside [Rear side]
Function Ext. Trigger
Impedance 1MΩ || 13pF ±2 pF
Coupling DC, AC
Max. input voltage 100V (DC + peak AC)
XYZ-mode: All analog channels on individual choise
Invert: CH 1, CH 2 [CH 1...CH 4]
Y-bandwidth (-3dB): 350MHz (5mV...5V)/div.
100MHz (1mV, 2mV)/div.
Lower AC bandwidth: 2Hz
Bandwidth limiter
(switchable):
approx. 20MHz
Rise time (calculated):<1ns
DC gain accuracy 2%
Input sensitivity: 12 calibrated steps
CH 1, CH 2 [CH 1...CH 4] 1mV/div.…5V/div. (1–2–5 Sequence)
Variable Between calibrated steps
Inputs CH 1, CH 2 [CH 1…CH 4]:
Impedance 1MΩ II 13pF ±2 pF (50 Ω switchable)
Coupling DC, AC, GND
Max. input voltage 200V (DC + peak AC), 50Ω <5Vrms
Measuring circuits: Measuring Category I (CAT I)
Position range ±10Divs
Offset control:
1mV, 2mV ±0.2V
5…50mV ±1V
100mV…5V ±20V
Logic channels With Option HO3508
Select. switching thresholds TTL, CMOS, ECL, 2x User -2…+8 V
Impedance 100kΩ || <4pF
Coupling DC
Max. input voltage 40V (DC + peak AC)
Triggering
Analog channels:
Automatic: Linking of peakdetection and triggerlevel
Min. signal height 0.8div; 0.5div typ.
Frequency range 5Hz…400MHz
Level control range From peak- to peak+
Normal (without peak):
Min. signal height 0.8div; 0.5div typ.
Frequency range 0…400MHz
Level control range -10...+10div.
Operating modes: Slope/Video/Logic/Pulse/Busses (optional)
Slope: Rising, falling, both
Sources: CH 1, CH 2, Line, Ext., LCH 0…15
[CH 1...CH 4, Line, Ext., LCH 0…15]
Coupling: AC: 5Hz...400MHz
DC: 0...400MHz
HF: 30kHz...400MHz
LF: 0...5kHz
Noise rejection: 100 MHz LPF switchable
Video:
Standards PAL, NTSC, SECAM, PAL-M, SDTV 576i,
HDTV 720p, HDTV 1080i, HDTV 1080p
Fields Field 1, field 2, both
Line All, selectable line number
Sync. Impulse Positive, negative
Source CH 1, CH 2, Ext. [CH 1...CH 4]
Logic: AND, OR, TRUE, FALSE
Source LCH 0…15
State LCH 0…15 X, H, L
Indicator for trigger action: LED
Ext. Trigger via: Auxiliary input 0,3V…10Vss
2nd Trigger:
Slope Rising, falling, both
Min. signal height 0.8div.; 0.5div. typ.
Frequency range 0…400MHz
Level control range -10...+10div.
Operating modes:
after time 20ns…0.1s
after incidence 1…216
Busses (Opt. HOO10): I2C/SPI/UART/RS-232
Source LCH 0...LCH 15
Format hexadecimal, binary
I2CTrigger on Start, Stop, Restart, ACK, NACK,
Adress (7 or 10Bit), Data, Adress and Data,
up to 10Mb/s
SPI up to 32Bit Data, Chip select (CS) pos.
or neg., without CS, up to 25Mb/s
UART/RS-232 up to 8Bit Data, up to 62.5Mb/s
Horizontal System
Domain representation: Time, Frequency (FFT), Voltage (XY)
Representation Time Base: Main-window, main- and zoom-window
Memory Zoom: Up to 100,000:1
Accuracy: 15ppm
Time Base:
Refresh operating modes 1 ns/div.…20ms/div.
Roll operating modes 50ms/div.…50s/div.
Digital Storage
Sampling rate (real time): 2x 2GSa/s, 1x 4GSa/s
[4x 2GSa/s, 2x 4GSa/s]
Logic channels: 16x 1GSa/s
Sampling rate (random):50GSa/s (n/a to logic channels)
Memory: 2x 2MPts, 1x 4MPts [4x 2MPts, 2x 4MPts]
Operation modes: Refresh, Average, Envelope, Peak-Detect
Roll: free run/triggered, Smooth
Resolution (vertical) 8Bit
Resolution (horizontal)
Yt Mode 50Pts./div.
XY Mode 8Bit
Interpolation: Sinx/x (CH 1...CH 4), Pulse (LCH 0...15)
Persistence: Off, 50ms...∞
Delay pretrigger: 0...2 Million x (1/samplerate)
posttrigger: 0...8 Million x (1/samplerate)
Display refresh rate: Up to 2500 waveforms/s
Display: Dots, vectors (interpolation), „persistence“
Reference memories: typ. 10 Traces
Operation/Measuring/Interfaces
Operation: Menu-driven (multilingual), Autoset,
help functions (multilingual)
Save/Recall memories: typ. 10 complete instrument parameter
settings
Frequency counter:
0.5Hz...350MHz 6 Digit resolution
Accuracy 15ppm
Auto measurements: Frequency, Period, pulse count,
Vpp, Vp+, Vp-, Vrms, Vavg, Vtop, Vbase, twidth+, twidth-,
tdutycycle+, tdutycycle, trise, tfall
pos. edge count, neg. edge count,
pos. pulse count, neg. pulse count
Cursor measurements: ∆V, ∆t, 1/∆t (f), V to Gnd, Vt related to
Trigger point, ratio X and Y, pulse count,
peak to peak, peak+, peak-
Interface: Dual-Interface USB/RS-232 (HO720)
USB-Stick (frontside)
USB-Printer (rear side) for Postscript Printer
DVI-D for ext. monitor
Optional: IEEE-488 (HO740), Ethernet/USB (HO730)
Display functions
Marker: up to 8 user definable marker for easy
navigation
VirtualScreen: virtual Display with 20div. vertical for all
Math-, Logic-, Bus- and Reference Signals
Busdisplay: up to 2 busses, user definable, parallel or
serial busses (option), decode of the bus
value in ASCII, binary, decimal or
hexadecimal, up to 4 lines
Parallel logic channels can also be used as source
for bus definition
I2C
(Opt. HOO10)
color coded Read- , Write Adress, Data,
Start, Stop, missing acknowledge, Errors
and Trigger condition
350MHz 2 [4] Channel Digital Oscilloscope
HMO3522 [HMO3524]
All data valid at 23°C after 30 minute warm-up
Display
Display: 16.5cm (6.5”) VGA Color TFT
Resolution: 640 x 480 Pixel
Backlight: LED 400cd/m2
Display area for curves:
without menu 400 x 600 Pixel (8 x 12 div.)
with menu 400 x 500 Pixel (8 x 10div.)
Color depth: 256 colors
Intensity steps per channel: 0…31
Vertical System
Channels:
DSO mode CH 1, CH 2 [CH 1...CH 4]
MSO mode CH 1, CH 2, LCH 0...15 (logic channels)
with 2x Option HO3508
Auxiliary input: Frontside [Rear side]
Function Ext. Trigger
Impedance 1MΩ || 13pF ±2 pF
Coupling DC, AC
Max. input voltage 100V (DC + peak AC)
XYZ-mode: All analog channels on individual choise
Invert: CH 1, CH 2 [CH 1...CH 4]
Y-bandwidth (-3dB): 350MHz (5mV...5V)/div.
100MHz (1mV, 2mV)/div.
Lower AC bandwidth: 2Hz
Bandwidth limiter
(switchable):
approx. 20MHz
Rise time (calculated):<1ns
DC gain accuracy 2%
Input sensitivity: 12 calibrated steps
CH 1, CH 2 [CH 1...CH 4] 1mV/div.…5V/div. (1–2–5 Sequence)
Variable Between calibrated steps
Inputs CH 1, CH 2 [CH 1…CH 4]:
Impedance 1MΩ II 13pF ±2 pF (50 Ω switchable)
Coupling DC, AC, GND
Max. input voltage 200V (DC + peak AC), 50Ω <5Vrms
Measuring circuits: Measuring Category I (CAT I)
Position range ±10Divs
Offset control:
1mV, 2mV ±0.2V
5…50mV ±1V
100mV…5V ±20V
Logic channels With Option HO3508
Select. switching thresholds TTL, CMOS, ECL, 2x User -2…+8 V
Impedance 100kΩ || <4pF
Coupling DC
Max. input voltage 40V (DC + peak AC)
Triggering
Analog channels:
Automatic: Linking of peakdetection and triggerlevel
Min. signal height 0.8div; 0.5div typ.
Frequency range 5Hz…400MHz
Level control range From peak- to peak+
Normal (without peak):
Min. signal height 0.8div; 0.5div typ.
Frequency range 0…400MHz
Level control range -10...+10div.
Operating modes: Slope/Video/Logic/Pulse/Busses (optional)
Slope: Rising, falling, both
Sources: CH 1, CH 2, Line, Ext., LCH 0…15
[CH 1...CH 4, Line, Ext., LCH 0…15]
Coupling: AC: 5Hz...400MHz
DC: 0...400MHz
HF: 30kHz...400MHz
LF: 0...5kHz
Noise rejection: 100 MHz LPF switchable
Video:
Standards PAL, NTSC, SECAM, PAL-M, SDTV 576i,
HDTV 720p, HDTV 1080i, HDTV 1080p
Fields Field 1, field 2, both
Line All, selectable line number
Sync. Impulse Positive, negative
Source CH 1, CH 2, Ext. [CH 1...CH 4]
Logic: AND, OR, TRUE, FALSE
Source LCH 0…15
State LCH 0…15 X, H, L
Indicator for trigger action: LED
Ext. Trigger via: Auxiliary input 0,3V…10V
ss
2nd Trigger:
Slope Rising, falling, both
Min. signal height 0.8div.; 0.5div. typ.
Frequency range 0…400MHz
Level control range -10...+10div.
Operating modes:
after time 20ns…0.1s
after incidence 1…216
Busses (Opt. HOO10): I2C/SPI/UART/RS-232
Source LCH 0...LCH 15
Format hexadecimal, binary
I2CTrigger on Start, Stop, Restart, ACK, NACK,
Adress (7 or 10Bit), Data, Adress and Data,
up to 10Mb/s
SPI up to 32Bit Data, Chip select (CS) pos.
or neg., without CS, up to 25Mb/s
UART/RS-232 up to 8Bit Data, up to 62.5Mb/s
Horizontal System
Domain representation: Time, Frequency (FFT), Voltage (XY)
Representation Time Base: Main-window, main- and zoom-window
Memory Zoom: Up to 100,000:1
Accuracy: 15ppm
Time Base:
Refresh operating modes 1 ns/div.…20ms/div.
Roll operating modes 50ms/div.…50s/div.
Digital Storage
Sampling rate (real time): 2x 2GSa/s, 1x 4GSa/s
[4x 2GSa/s, 2x 4GSa/s]
Logic channels: 16x 1GSa/s
Sampling rate (random):50GSa/s (n/a to logic channels)
Memory: 2x 2MPts, 1x 4MPts [4x 2MPts, 2x 4MPts]
Operation modes: Refresh, Average, Envelope, Peak-Detect
Roll: free run/triggered, Smooth
Resolution (vertical) 8Bit
Resolution (horizontal)
Yt Mode 50Pts./div.
XY Mode 8Bit
Interpolation: Sinx/x (CH 1...CH 4), Pulse (LCH 0...15)
Persistence: Off, 50ms...∞
Delay pretrigger: 0...2 Million x (1/samplerate)
posttrigger: 0...8 Million x (1/samplerate)
Display refresh rate: Up to 2500 waveforms/s
Display: Dots, vectors (interpolation), „persistence“
Reference memories: typ. 10 Traces
Operation/Measuring/Interfaces
Operation: Menu-driven (multilingual), Autoset,
help functions (multilingual)
Save/Recall memories: typ. 10 complete instrument parameter
settings
Frequency counter:
0.5Hz...350MHz 6 Digit resolution
Accuracy 15ppm
Auto measurements: Frequency, Period, pulse count,
Vpp, Vp+, Vp-, Vrms, Vavg, Vtop, Vbase, twidth+, twidth-,
tdutycycle+, tdutycycle, trise, tfall
pos. edge count, neg. edge count,
pos. pulse count, neg. pulse count
Cursor measurements: ∆V, ∆t, 1/∆t (f), V to Gnd, Vt related to
Trigger point, ratio X and Y, pulse count,
peak to peak, peak+, peak-
Interface: Dual-Interface USB/RS-232 (HO720)
USB-Stick (frontside)
USB-Printer (rear side) for Postscript Printer
DVI-D for ext. monitor
Optional: IEEE-488 (HO740), Ethernet/USB (HO730)
Display functions
Marker: up to 8 user definable marker for easy
navigation
VirtualScreen: virtual Display with 20div. vertical for all
Math-, Logic-, Bus- and Reference Signals
Busdisplay: up to 2 busses, user definable, parallel or
serial busses (option), decode of the bus
value in ASCII, binary, decimal or
hexadecimal, up to 4 lines
Parallel logic channels can also be used as source
for bus definition
I2C
(Opt. HOO10)
color coded Read- , Write Adress, Data,
Start, Stop, missing acknowledge, Errors
and Trigger condition

6Subject to change without notice
Attention!
The HMO2524 is technically almost the same as the
HMO3524 except the following:
Bandwidth : 250MHz
Real Time Sample Rate: 4x 1,25GSa/s,
2x 2,5GSa/s
Logic-channel: 16 x 1,25GSa/s
Random Sampling: 25GSa/s
The complete technical datasheet of the HMO2524
you can nd in the internet at www.hameg.com.
1 Installation and safety instructions
1.1 Setting up the instrument
handle can be set into
different positions:
A and B = carrying
C = horizontal operating
F = handle removal
G = operating using the feet‘s, batch use and for shipping in
original packaging
Attention!
When changing the handle position, the instrument
must be placed so that it cannot fall (e.g. placed on
a table). Then the handle locking knobs must be
simultaneously pulled outwards and rotated to the
required position. Without pulling the locking knobs
they will latch in into the next locking position.
Removal/tting of the handle: The handle can be removed in
position F, pulling the side parts outside the housing. Adding
the handle works vice versa.
1.2 Safety
electrical measuring, control and laboratory instruments and
was manufactured and tested accordingly. It left the factory in
In order to maintain this condition and to ensure safe opera-
tion the user is required to observe the warnings and other
all measuring terminals are connected to safety ground of the
mains. All accessible metal parts were tested against the mains
with 2200VDC. The instrument conforms to safety class I. The
oscilloscope may only be operated from mains outlets with a
safety ground connector. The mains plug has to be installed
prior to connecting any signals. It is prohibited to separate the
E
D
C
A
B
A
B
C
D
E
F
G
Accessories supplied: Line cord, Operating manual, 2 [4]
Additional accessories
350MHz 2 [4] Channel Digital Oscilloscope
HMO3522 [HMO3524]
All data valid at 23°C after 30 minute warm-up
Display
Display: 16.5cm (6.5”) VGA Color TFT
Resolution: 640 x 480 Pixel
Backlight: LED 400cd/m2
Display area for curves:
without menu 400 x 600 Pixel (8 x 12 div.)
with menu 400 x 500 Pixel (8 x 10div.)
Color depth: 256 colors
Intensity steps per channel: 0…31
Vertical System
Channels:
DSO mode CH 1, CH 2 [CH 1...CH 4]
MSO mode CH 1, CH 2, LCH 0...15 (logic channels)
with 2x Option HO3508
Auxiliary input: Frontside [Rear side]
Function Ext. Trigger
Impedance 1MΩ || 13pF ±2 pF
Coupling DC, AC
Max. input voltage 100V (DC + peak AC)
XYZ-mode: All analog channels on individual choise
Invert: CH 1, CH 2 [CH 1...CH 4]
Y-bandwidth (-3dB): 350MHz (5mV...5V)/div.
100MHz (1mV, 2mV)/div.
Lower AC bandwidth: 2Hz
Bandwidth limiter
(switchable):
approx. 20MHz
Rise time (calculated):<1ns
DC gain accuracy 2%
Input sensitivity: 12 calibrated steps
CH 1, CH 2 [CH 1...CH 4] 1mV/div.…5V/div. (1–2–5 Sequence)
Variable Between calibrated steps
Inputs CH 1, CH 2 [CH 1…CH 4]:
Impedance 1MΩ II 13pF ±2 pF (50 Ω switchable)
Coupling DC, AC, GND
Max. input voltage 200V (DC + peak AC), 50Ω <5Vrms
Measuring circuits: Measuring Category I (CAT I)
Position range ±10Divs
Offset control:
1mV, 2mV ±0.2V
5…50mV ±1V
100mV…5V ±20V
Logic channels With Option HO3508
Select. switching thresholds TTL, CMOS, ECL, 2x User -2…+8 V
Impedance 100kΩ || <4pF
Coupling DC
Max. input voltage 40V (DC + peak AC)
Triggering
Analog channels:
Automatic: Linking of peakdetection and triggerlevel
Min. signal height 0.8div; 0.5div typ.
Frequency range 5Hz…400MHz
Level control range From peak- to peak+
Normal (without peak):
Min. signal height 0.8div; 0.5div typ.
Frequency range 0…400MHz
Level control range -10...+10div.
Operating modes: Slope/Video/Logic/Pulse/Busses (optional)
Slope: Rising, falling, both
Sources: CH 1, CH 2, Line, Ext., LCH 0…15
[CH 1...CH 4, Line, Ext., LCH 0…15]
Coupling: AC: 5Hz...400MHz
DC: 0...400MHz
HF: 30kHz...400MHz
LF: 0...5kHz
Noise rejection: 100 MHz LPF switchable
Video:
Standards PAL, NTSC, SECAM, PAL-M, SDTV 576i,
HDTV 720p, HDTV 1080i, HDTV 1080p
Fields Field 1, field 2, both
Line All, selectable line number
Sync. Impulse Positive, negative
Source CH 1, CH 2, Ext. [CH 1...CH 4]
Logic: AND, OR, TRUE, FALSE
Source LCH 0…15
State LCH 0…15 X, H, L
Indicator for trigger action: LED
Ext. Trigger via: Auxiliary input 0,3V…10Vss
2nd Trigger:
Slope Rising, falling, both
Min. signal height 0.8div.; 0.5div. typ.
Frequency range 0…400MHz
Level control range -10...+10div.
Operating modes:
after time 20ns…0.1s
after incidence 1…216
Busses (Opt. HOO10): I2C/SPI/UART/RS-232
Source LCH 0...LCH 15
Format hexadecimal, binary
I2CTrigger on Start, Stop, Restart, ACK, NACK,
Adress (7 or 10Bit), Data, Adress and Data,
up to 10Mb/s
SPI up to 32Bit Data, Chip select (CS) pos.
or neg., without CS, up to 25Mb/s
UART/RS-232 up to 8Bit Data, up to 62.5Mb/s
Horizontal System
Domain representation: Time, Frequency (FFT), Voltage (XY)
Representation Time Base: Main-window, main- and zoom-window
Memory Zoom: Up to 100,000:1
Accuracy: 15ppm
Time Base:
Refresh operating modes 1 ns/div.…20ms/div.
Roll operating modes 50ms/div.…50s/div.
Digital Storage
Sampling rate (real time): 2x 2GSa/s, 1x 4GSa/s
[4x 2GSa/s, 2x 4GSa/s]
Logic channels: 16x 1GSa/s
Sampling rate (random):50GSa/s (n/a to logic channels)
Memory: 2x 2MPts, 1x 4MPts [4x 2MPts, 2x 4MPts]
Operation modes: Refresh, Average, Envelope, Peak-Detect
Roll: free run/triggered, Smooth
Resolution (vertical) 8Bit
Resolution (horizontal)
Yt Mode 50Pts./div.
XY Mode 8Bit
Interpolation: Sinx/x (CH 1...CH 4), Pulse (LCH 0...15)
Persistence: Off, 50ms...∞
Delay pretrigger: 0...2 Million x (1/samplerate)
posttrigger: 0...8 Million x (1/samplerate)
Display refresh rate: Up to 2500 waveforms/s
Display: Dots, vectors (interpolation), „persistence“
Reference memories: typ. 10 Traces
Operation/Measuring/Interfaces
Operation: Menu-driven (multilingual), Autoset,
help functions (multilingual)
Save/Recall memories: typ. 10 complete instrument parameter
settings
Frequency counter:
0.5Hz...350MHz 6 Digit resolution
Accuracy 15ppm
Auto measurements: Frequency, Period, pulse count,
Vpp, Vp+, Vp-, Vrms, Vavg, Vtop, Vbase, twidth+, twidth-,
tdutycycle+, tdutycycle, trise, tfall
pos. edge count, neg. edge count,
pos. pulse count, neg. pulse count
Cursor measurements: ∆V, ∆t, 1/∆t (f), V to Gnd, Vt related to
Trigger point, ratio X and Y, pulse count,
peak to peak, peak+, peak-
Interface: Dual-Interface USB/RS-232 (HO720)
USB-Stick (frontside)
USB-Printer (rear side) for Postscript Printer
DVI-D for ext. monitor
Optional: IEEE-488 (HO740), Ethernet/USB (HO730)
Display functions
Marker: up to 8 user definable marker for easy
navigation
VirtualScreen: virtual Display with 20div. vertical for all
Math-, Logic-, Bus- and Reference Signals
Busdisplay: up to 2 busses, user definable, parallel or
serial busses (option), decode of the bus
value in ASCII, binary, decimal or
hexadecimal, up to 4 lines
Parallel logic channels can also be used as source
for bus definition
I
2
C
(Opt. HOO10)
color coded Read- , Write Adress, Data,
Start, Stop, missing acknowledge, Errors
and Trigger condition
HMO3522/3524E/080710 · C&E · Subject to change without notice · © HAMEG Instruments GmbH®· DQS-certified in accordance with DIN EN ISO 9001:2008, Reg.-No.: 071040 QM 08
HAMEG Instruments GmbH · Industriestr. 6 · D-63533 Mainhausen · Tel +49(0)61828000 · Fax +49(0)6182800100 · www.hameg.com · info@hameg.com
SPI
(Opt. HOO10)
color coded Read-, Write Adress, Data,
Start, Stop, Errors and Trigger condition
UART/RS-232
(Opt. HOO10)
color coded Read-, Write Adress, Data,
Start, Stop, Errors and Trigger condition
Mathematic functions
Number of formula sets: 5 formula sets with up to 5 formulas each
Sources: All channels and math. memories
Targets: Math. memories
Functions: ADD, SUB, 1/X, ABS, MUL, DIV, SQ, POS, NEG,
INV, INTG, DIFF, SQR, MIN, MAX, LOG, LN
Display: Up to 4 math. memories with label
Pass/Fail functions
Sources: Analog channels
Type of test: Mask around a signal, userdefined
tolerance
Functions: Stop, Beep, screen shot (screen print-out)
and/or output to printer for pass or fail, event
counting up to 4 billion, including the number
and the percentage of pass and fail events.
General Information
Probe ADJ Output: 1kHz/1MHz square wave signal ~0.2Vpp
(ta <4ns)
Internal RTC (Realtime clock):Date and time for stored data
Line voltage: 105...253V, 50/60Hz, CAT II
Power consumption: Max. 70 Watt at 230V, 50Hz
Protective system: Safety class I (EN61010-1)
Operating temperature: +5...+40°C
Storage temperature: -20...+70 °C
Rel. humidity: 5...80% (non condensing)
Dimensions (W x H x D):285 x 175 x 220mm
Weight: 3.6kg
Accessories supplied: Line cord, Operating manual, 2 [4] Probes,
10:1 with attenuation ID (HZ350), Dual-Interface USB/RS-232 (HO720), CD
Optional accessories:
HOO10 Serial bus trigger and hardware acelerated decode,
I2C, SPI, UART/RS-232 on Logic channels
HO3508 active 8 Channel Logic Probe
HO3516 2x HO3508, active 8 Channel Logic Probes
HO730 Dual-Interface Ethernet/USB
HO740 Interface IEEE-488 (GPIB) galvanically isolated
HZ355 Slimline Probe 10:1 with automatically identification
HZ355DU Upgrade from 2x HZ350 to 2x HZ355
HZ46 4RU 19‘‘ Rackmount Kit
HZO20 High Voltage probe 1000:1 (400MHz)
HZO30 single ended active probe (1GHz)
HZO50 AC/DC Currentprobe 20A, DC…100kHz
HZO51 AC/DC Currentprobe 1000A, DC…20kHz
additional accessories you can find at www.hameg.com/HMO3524
Carrying positions
Operating positions
Removing the handle (Pos. F)
Stacking positions
Installation and safety instructions Installation and safety instructions

7
Subject to change without notice
safety ground connection. If suspected that safe operation may
not be guaranteed do not use the instrument any more and lock
it away in a secure place.
Safe operation may be endangered if any of the following was
noticed:
– in case of visible damage.
– in case loose parts were noticed
– if it does not function any more.
– after prolonged storage under unfavourable conditions (e.g.
like in the open or in moist atmosphere).
conforming to the minimum standards of post, rail or trans-
1.3 Correct operation
Please note: This instrument is only destined for use by perso-
nnel well instructed and familiar with the dangers of electrical
measurements. For safety reasons the oscilloscope may only
be operated from mains outlets with safety ground connector.
It is prohibited to separate the safety ground connection. The
plug must be inserted prior to connecting any signals.
The oscilloscope is destined for operation in industrial, business,
manufacturing, and domestic sites.
1.4 Ambient conditions
Operating ambient temperature: +5 °C to +40 °C. During trans-
port or storage the temperature may be –20 °C to +70°C. Please
note that after exposure to such temperatures or in case of
condensation, proper time must be allowed until the instrument
has reached the permissible temperature, and until the con-
densation has evaporated before it may be turned on! Ordinarily
this will be the case after 2 hours. The oscilloscope is destined
for use in clean and dry environments. Do not operate in dusty
or chemically aggressive atmosphere or if there is danger of
explosion. The any operating position may be used, however,
requires the horizontal or inclined position.
Do not obstruct the ventilation holes!
are average values.
1.5 Warranty and repair
Prior to leaving the factory, each instrument is burnt in for 10
hours. By intermittent operation during this period almost all
defects are detected. Following the burn in, each instrument is
in all operating modes; the test gear is calibrated to national
standards.
The warranty standards applicable are those of the country
in which the instrument was sold. Reclamations should be
directed to the dealer.
Only valid in EU countries
Return material authorization (RMA):
number either by internet (http://www.hameg.com) or fax (+49
(0) 6182 800 501). If you do not have an original shipping carton,
1.6 Maintenance
Clean the outer case using a dust brush at regular intervals.
Dirt can be removed from housing, handle, all metal and plastic
parts using a cloth moistened with water and 1 % detergent.
Greasy dirt may be removed with benzene (petroleum ether) or
alcohol. Thereafter wipe the surfaces with a dry cloth. Plastic
parts should be treated with a suitable antistatic solution. No
agents as they may adversely affect the plastic or lacquered
surfaces.
1.7 CAT I
This oscilloscope is destined for measurements in circuits not
connected to the mains or only indirectly. Direct measure-
ments, i.e. with a galvanic connection to circuits corresponding
to the categories II, III, or IV are prohibited! The measuring
circuits are considered not connected to the mains if a suitable
-
surements on the mains are also possible if suitable probes
The measurement category of such probes must be checked
and observed. The measurement categories were derived
corresponding to the distance from the power station and the
transients hence to be expected. Transients are short, very fast
voltage or current excursions which may be periodic or not.
Measurement CAT IV: Measurements close to the power station,
e.g. on electricity meters
Measurement CAT III: Measurements in the interior of buildings
(power distribution installations, mains outlets, motors which
are permanently installed).
Measurement CAT II: Measurements in circuits directly con-
nected to the mains (household appliances, power tools etc).
contain circuit breakers or fuses.
1.8 Mains voltage
The instrument has a wide range power supply from 105 to
voltage selector.
The line fuse is accessible on the rear panel and part of the line
input connector. Prior to exchanging a fuse, the line cord must
undamaged. It can be taken out using a screwdriver put into the
slot. The fuse can be pushed out of its holder and exchanged.
The holder with the new fuse can then be pushed back in place
against the spring. It is prohibited to ”repair“ blown fuses or to
bridge the fuse. Any damages incurred by such measures will
void the warranty.
Installation and safety instructions Installation and safety instructions

8Subject to change without notice
2 Familiarize yourself with your new HAMEG
Digital Storage Oscilloscope
2.1 Front view
The following controls and inputs/outputs are located on the
front: Power switch
1
, the control panel
2
,
A
,
B
,
C
,
D
, the BNC
connectors of the analog inputs
45
to
48
, the probe adjustment
output
51
, the connectors for the optional
52
53
, a USB port for USB sticks
54
, the TFT screen
55
and the
49
for showing activity on the remote interface. At the two
connector at right side.
Please note, the connectors for the active logic
probes HO3508
52
53
are solely for theses probes.
Connecting anything else could destroy the inputs!
2.2 Control panel
The controls on the front panel allow direct access to the most
important functions; all extended functions are available via the
menu structure by using the grey soft keys. The power switch
1
is clearly set apart by its red colour. The most important
-
diately indicate the actual settings. The panel is subdivided in
these four areas:
Area
A
This area encompasses these three portions:
– – .
In the portion
6
8
, the general cursor select and adjustment knob
4
, the
Intensity/Persistence key
7
, and the key for the selection of
virtual screen.
The portion allows direct selection of FFT
9
displays,
the Quick-view mode
10
(all important parameters of the ac-
tual signal display), and the „Automeasure“ function
11
for the
automatic measurement of parameters.
The portion headed comprises the following keys:
12
for saving and recalling instrument settings,
reference signals, signals, screen displays, and sets of for-
16
, DISPLAY
14
for
access to the general display set-
tings,
15
13
for
access to the general settings (e.g.
the language),
17
.
Area
B
:
In the area
controls of the analog channels
such as the position control knob
18
, the XY mode select key
19
, the
vertical gain adjustment knob
20
,
3
A
5
15 16
811 14
910
6712 13
4
17
18
B
19
20
22
23
24
21
25
26
27
49
1
48 47 46 45525354
2
55 A
B C D
51 50
Introduction Introduction
Fig. 2.1: Frontview of the HMO2524
Fig. 2.3: Area B of the
control panel.
Fig. 2.2:
Area A of the
control panel.

9
Subject to change without notice
the extended menu functions key
21
, the channel select keys
22
to
25
22
23
) which
also serve as the selection keys for the optional logic probes
24
25
. There are also the mathematics function key
26
and the
reference signal settings key
27
.
Area
C
:
This area of the control
panel offers all functions for the
adjustment of the trigger level
28
,
the selection of auto or normal
trigger
29
, the trigger type
31
, the
trigger source
32
, single sweep
33
, the trigger slope
34
, the trig-
ger signal filters
36
. In addition,
there are status indicators showing
trigger
conditions
30
and which slope was
selected
34
.
Area
D
:
The keys
37
38
39
on this control
panel area allow to
shift the trigger position horizontal-
ly, either step-by-step or using the
smaller one of the knobs. The back-
lighted key
39
controls the run or
stop modes; the key will light up red
in stop mode. The key
40
activates
the zoom function, the key
44
the
selection of the acquisition modes,
the key
42
the access to the time
base menus. The knob
43
allows to
adjust the time base speed.
To the left of the control panel there
are the soft keys
2
which control the
menu functions.
2.3 Screen
-
play with VGA resolution (640 x 480 pixels). In normal mode (no
menus shown) there are 12 divisions in X direction. If menus
are shown, this will be reduced to 10 divisions. On the left of the
screen area little arrows [1] indicate the reference potentials of
the channels. The line above the graticule contains status and
settings information such as the time base speed, the trigger
delay and other trigger conditions, the actual sampling rate, and
the acquisition mode [2]. On the right of the graticule a short
menu is shown which contains the most important settings of
the channel actually being displayed; these may be selected
using the soft keys [3]. Below the graticule, measurement re-
sults of parameters and cursors, the settings of the activated
vertical channels, of the reference signal, and of the mathe-
matically derived curves [4] are shown. Within the graticule,
the signals of the selected channels are displayed. Normally,
8 vertical divisions are shown; it can be virtually extended to 20
divisions which can be displayed using the SCROLL BAR knob
5
.
2.4 Rear view
On the rear panel there are the mains connector [1], the re-
ceptacle for the interface modules [2] (USB / RS-232,
DVI connector [3] for the connection
of external monitors and projectors, the BNC connector for
the Y output [4] (of the channel selected for triggering) and the
external trigger input [5]. With the two-channel models this
connector is located on the front panel. At the two channel
connector at the front of the instrument.
Fig. 2.7: Rear panel of the HMO2524
2.5 Options
MO series instruments offer some options which allow you
to extend the areas of application considerably. The following
interface modules are available and may be installed by the
customer in the rear receptacle:
web server)
mixed-signal
operation and have the appropriate connectors on the front
<-
rms
bandwidth and up to 1000 A, the 19“ rack-mount set
the instruments.
[1] [2] [2]
[5] [4] [3]
28
C
29
30
33
31
34
35
36
32
37
D
38
37
41
39
42
43
44
40
Introduction
Fig. 2.4: Area C of the
control panel
Fig. 2.5: Area D
of the control panel
Fig. 2.6: Screen

10 Subject to change without notice
2.6 General concept of instrument operation
on a few basic principles which repeat with the diverse settings
and functions.
– Such keys which do not open a soft menu (e.g. quickview)
switch a function on, pushing the key again will switch the
function off.
in turn can call or require more settings will activate the
will call the soft menu (sub menu) for the settings. Pushing
the key a third time will deactivate the function.
close it upon pushing a second time.
– The universal knob is used in the diverse menus either for
selecting numbers or submenus.
– The key OFF below the soft menu keys closes the
present menu or it switches to the next higher level.
– If a channel is deactivated, pushing the respective channel
key will switch it on. If a channel was already activated
earlier, selecting another channel will change operation
a channel is already selected, pushing its lighted key will
deactivate the channel and select the next channel according
>>>
– If cursor measurements are activated, the -
the universal knob. In all menus for alpha-numeric inputs
entries.
The following describes some frequently used navigation ele-
ments in the soft menus.
In the Fig. 2.8 there are two basic soft menu elements for choosing
to press the soft key beside and the element is active (shown as
blue color). A second kind of selecting is shown on the lower two
menu entries. Pressing the respective soft key toggles between
the two choices, again the active selection is marked blue.
The menus are used as shown in Fig. 2.9 if they concern func-
tions which have either to be switched on or where values have
to set. The choice is between OFF and the value presented. The
round arrow in the right corner of the menu window points to
the universal knob which is to be used for selecting the value.
If there is a lower menu level, this will be indicated by a small
triangle in the right lower corner of the respective menu point.
If there are further pages on the same level, the lowest menu
point will be used for navigation. It shows the number of menu
pages on this level as well as the activated number of pages.
Pushing the respective soft menu key will advance by one page,
2.7 Basic settings and integrated help
Basic settings like language for user interface and help, mis-
cellaneous settings and interface settings can be set using
Fig. 2.10: Menu for basic settings
user interface and help
language by pressing the -
The soft key beside MISC opens a menu with the following
selections:
– MENU OFF (choose manual or automatic with time limit of
4s up to 30 s for closing soft menus)
– TIME REFERENCE (position for reference of the trigger time,
choose from –5/DIV up to +5/DIV, 0/DIV is in the middle of
the screen and set as standard)
– DATE & TIME (opens menu to set date and time)
– SOUND (opens menu to set any combination of beep for
control, error and/or trigger)
– DEVICE NAME-
mum of 19 characters are allowed, the name will appear in
Screenshot‘s)
– DEVICE INFOS (opens a window with detailed information
you are using (USB and RS-232 are standard) and possible
settings for that interface.
printers. Pushing this softkey will open a submenu in which you
can select the paper format and the colour mode. If you choose
Introduction Introduction
Fig. 2.8: Selection of basic soft
menu elements
Fig. 2.9: Basic soft menu
elements for settings and
navigation

11
Subject to change without notice
menu key, a window will open which offers the selection of A4,
desired format which will then be indicated on the soft menu key.
the modes Greyscale, Color, and Inverted following the same pro-
cedure. The Greyscale mode converts a color display to a greyscale
display which can be printed on a Black-and-White Postscript
printer. The Color Mode will print the display in colour as it is shown
on the screen (black background). In the Inverted Mode the color
display will be printed in colour with a white background on a color
Postscript printer in order to save toner and ink.
help update, which is explained in detail in the next
the soft key leads you to the menu where you can set whether
the probe adjust output generates a rectangular signal with
frequency. There is a setting AUTOMATIC which
means, that for time base settings up to and including 50µs/
The integrated help function can be activated by pressing the
will open and the text inside is dynamically updated depending
on the key (including softmenu key’s) you are pushing or the
knob you are turning. If you do not need the help anymore, you
can switch off the
backlight of the key and the text window will be switched off.
2.8 Bus Signal Source
provide the following signals according to the respective set-
tings:
– Square wave signal for probe compensation (standard set-
ting),
– SPI signal, data rates 100 kbits/s, 250 kbits/s or 1 Mbits/s
– I2C signal, data rates 100 kbits/s, 400 kbits/s or 1 Mbits/s
– UART signal, data rates 9600bits/s, 115.2 kbits/s or 1 Mbits/s
– parallel stochastic bit pattern,
– parallel counter signal,
The contact at the top left is always ground, the signal levels are
around 1 V. The following table shows the use of the 4 outputs
S1, S2, S3 and (square wave) corresponding to the signal.
Signal S1 S2 S3
Square
wave no signal no signal no signal Square wave
SPI Chip select
low active
clock,
rising edge
data,
high active no signal
I2Cno signal clock SCL data SDA no signal
UART no signal no signal data no signal
Pattern bit 0 bit 1 bit 2 bit 3
Counter bit 0 bit 1 bit 2 bit 3
entry into the bus signal source menu, select the page 2 and
select the operational mode for the bus signal source. For each
mode a picture with the corresponding pattern of signals on
the contacts is displayed. Pressing a soft menu key will open a
submenu for choosing the speed of the mode selected.
The square wave signal for probe compensation is available with
the high frequency compensation, also AUTOMATIC (standard
setting) may be selected. In the automatic mode, the output will
These signals allow to learn and check the settings for the
parallel and optional serial bus analysis.
2.9 Updates for the instrument settings and
interface rmware and the help functions
to download the most recent
Firmware and help are packed into one ZIP data packet. After
downloading the ZIP data unpack it into an USB stick’s basic
directory. Thereupon insert the stick into the USB port of the
the front panel. Choose page 2 in the menu, if this has not been
-
ter selecting this menu item a window will open which displays
the actual
date and build information.
Fig: 2.11: Updating menu and information window
Now choose which to update: the help function.
the appropriate key the respective date will be searched on
the stick, the information of the
of the version will be shown in red, otherwise it will be shown
in green; only then should you activate the updating by pushing
the help function
or add a help
The information window will now display the languages installed,
the date, and the information about the languages available on
the stick. With the soft menu, languages may be added, removed
or updated. Please note the format of the date:YYYY-MM-DD
according to the multi language norm of ISO 8601.
2.10 Upgrade with software options
accessible after inputting a licence key.
-
gering and decoding of the serial buses I2C, SPI, UART/RS-232
Introduction

12 Subject to change without notice
The licence key will be sent to you by email as an appended data
may be opened with an editor, then the true key can be read.
There are two methods for employing the key to use the desired
option: the automatic or the manual input.
into the front panel FRONT
soft menu key, the following menu will open:
Fig. 2.13: „UPGRADE“ menu.
Now open the
menu key. Then press the soft menu key next to „Read Licence
data manager. Use the universal knob
to LOAD. This will load the licence key; the option will be ready
to use immediately after a fresh start of the instrument.
The alternative method is the manual input of the licence key:
to „Manual key input“. This will open an input window, use the
licence key.
Fig. 2.14: Manual licence key input.
After inputting of the complete key please press the soft menu
The option will be activated after a fresh start of the instrument.
Fig: 2.12: Updating menu and information window
Introduction A quick introduction

13
Subject to change without notice
3 A quick introduction
The following chapter is intended to introduce you to the most
oscilloscope in order to allow you to use the instrument im-
mediately. The internal calibrator signal output is used as the
signal source, so you will not need any additional instruments
3.1 Setting up and turning the instrument on
Position the handle so the display will be inclined slightly up-
wards. (See chapter 1.2 for positioning of the handle.) Plug the
power cord into the rear panel connector. The instrument will
be turned on by pushing the red key On/Off
1
on the front panel.
After a few seconds the display appears, and the oscilloscope
is ready for measurements. Now press the key
15
for at least 3 seconds.
3
A
5
15 16
811 14
910
6712 13
4
17
Fig. 3.1: Control panel HMO
3.2 Connection of a probe and signal capture
detach the protective cap from the top. Apply the compensation
box to the BNC connector of channel 1 and turn the black knob
CW until it latches positively.
Passive probes be compensated prior to rst use.
Please refer to the probe manual for the proper
compensation procedure. Place the probe in the
appropriate position on the ADJ. output such that
the tip will be accepted by the hole of the right out-
put while the ground connection is made to the left
output, as shown in Fig. 4.3 in chapter 4.
On the right hand side of the screen you will see a short menu of
channel 1, the soft keys allow you to select frequently used settings.
Press the top soft key once to change the input coupling to DC.
The actual settings are marked by underlying blue
elds, repeated pressing of the keys will alternate
between the settings.
Fig. 3.3: Screen display after changing to DC coupling
Now press the
15
once shortly, after a few
seconds the oscilloscope will have automatically selected
appropriate vertical, horizontal time base and trigger settings.
You will see now a square wave signal.
Fig. 3.4: Screen display after Autosetup
3.3 Display of signal details
With the knob
43
you can change
the displayed time window: turning
it CCW will slow the time base. The
memory depth of 2MB per channel
allows you to capture wide time win-
dows with high resolution. Continue
to turn the knob CCW until you read
„TB:5ms“ in the top left corner. Now
press the ZOOM key
40
.
Fig. 3.2: Screen display after connection of the probe
Fig. 3.5: Area of the control panel
containing the ZOOM knob
37
D
38
37
41
39
42
43
44
40
A quick introduction

14 Subject to change without notice
You see now a two-window display: the display will show in
the top area the complete captured signal, below an enlarged
portion. Use the time base knob to select the zoom factor and
the small knob for horizontal positioning.
Fig. 3.6: ZOOM function
By pressing the ZOOM key
40
again the zoom mode be will be
deactivated.
3.4 Cursor measurements
After displaying the signal and its details we now proceed to
measuring it using the cursor functions. Press again shortly
15
8
. Now
the cursor menu will open up, and you can select the kind of
cursor. Press the top soft key in order to open the appropriate
-
tion by turning it CCW until the V-marker is underlined, press
the
to accept the selection. Now two cursors will be displayed
along with the signal, and the measurement results in the
right bottom area of the screen. Select the active cursor with
3
and position it with the knob.
The cursor measurement results will be displayed in the left
bottom corner of the screen. In this case the „V cursor“ has se-
lected the voltages at the two cursor positions, their difference,
and the time difference between the positions will be shown. The
key and the associated CURSORS OFF soft key.
3.5 Automatic measurements
In addition to cursor measurements the most important signal
these possibilities:
from different sources
– a quick view of all important parameters of one source using
the function.
Please change the time base now to 100µs/div. and press the
key
10
.
Fig. 3.8: Quick View parameter measurement
-
played:
– positive and negative – rise and fall times
peak voltages – mean voltage
In the right bottom corner of the screen 4 more parameters
are shown:
– rms value – peak-to-peak voltage
– frequency – period
Thus by simply pressing a key you see 9 parameters at a glance
which characterize the signal. This function applies always to
the acutal active channel.
You may also display two parameters of two different signals.
In order to achieve this deactivate the function by
pressing the key again, then activate channel 2 by pressing the
11
:
Fig. 3.9:
Auto Measure
menu
The two parameters are displayed in the right bottom corner of
this menu. After switching on MEASURE 1 and MEASURE 2 with
the appropriate softkey’s the parameter measurements are
Fig. 3.7: Cursor measurements
A quick introduction

15
Subject to change without notice
displayed in the right bottom corner of the screen. If you press
the softkey beside TYPE you can choose the parameter you want
from the list using the general knob. This procedure is used in
all menus where choices are available. Please press the key
TYPE and choose rise-time.
Fig. 3.10: Selection of parameters
Now use soft key next to Source 2 in order to select this menu
item and thus channel 2. Now the rise-time of channel 1 and
the mean value of channel 2 are shown. After the menu has
of the respective channels, (here yellow for channel 1 and
blue for channel 2.)
Fig. 3.11: Measuring the parameters of two sources
3.6 Mathematical functions
In
can also apply mathematical functions to the signals. By pres-
short menu will open which allows you to
setting of mathematical functions is possible by selecting the
menu item at the bottom. This mode allows you to select the
addition or subtraction of two activated sources. The formula
the key
21
.
Fig. 3.12: Formula editor
In order to change the settings use the soft keys and the universal
As mentioned earlier these formulae can be quickly switched on
26
and using the appropriate
short soft menue.
3.7 Storing data
– Instrument settings
– Reference signals
– Signals
– Screen displays
– Sets of formulae
Signals and screen displays can only be stored on USB sticks.
All other data can be stored either on a USB stick or in the
instrument’s non-volatile memories. In order to store data you
a
12
in order to call the respective menu.
Fig. 3.13: Save/Recall menu
Select the kind of data by pressing the respective soft key (in this
example SCREENShOTS) in order to access the settings menu.
A quick introduction A quick introduction

16 Subject to change without notice
Fig. 3.14: Menu SCREENShOTS
Please verify that the USB connector into which you plugged
the USB stick (front or rear) is written in the top soft menue
(You can change the destination by opening the respective menu
if you press the softkey next to STORAGE). You can now save
may name the destination memory with up to 8 characters; in
order to do this select the menu item FIlE NAME
name by using the universal knob and the
Fig. 3.15: Dening a le name
After the soft key next to Accept was pressed the oscilloscope
will have stored the name and return to the settings menu.
the soft key. Alternatively, you can return to a lower
menu level (by pressing the lowest Menu OFF key) and select
the menu item key
the soft menu key next to SCREENShOTS: this will assign the
function Screen Shot to the key
USB stick
by just pressing
17
at any time and in any menu.
A quick introduction

17
Subject to change without notice
4 Vertical system
For the vertical settings there are
the knobs for the vertical position
and the sensitivity, an always
visible short menu and an exten-
ded menu.
Fig. 4.1: Front panel area with
vertical system controls
By pushing the respective key the channel will be selected for
which these controls will be activated, this will be indicated by
the key lighting up in the color of the channel. Additionally, the
channel number on the screen will be framed and displayed
lighter than the channels not activated. The appropriate short
menu is always visible, the extended menu will be shown upon
pushing the key
21
.
Fig. 4.2: Short menu for the vertical settings
4.1 Coupling
Do not connect the 50 Ω inputs to effective voltage
higher than 5 volts!
input impedance should only be selected if the sig-
where the termination within the scope is to be used. In all
coupling
has to be selected: with DC coupling all components of the
signal will be displayed, with AC coupling the DC content will
be removed, the lower rms may
max. 400 Vp) supplied with the instrument will be used. They
-
dance at low frequencies.
The passive probes must be adjusted to the inputs
to which they are connected. See the probe manual
for the adjustment procedure. The PROBE ADJUST
output is only usable for 1:1 and 10:1 probes, for
100:1 or 1000:1 probes special external generators
with a perfect step response have to be used. Please
use the shortest possible ground connection.
HMO2524
250 MHz / 2,5 GSa / 4 MB DIGITAL OSCILLOSCOPE
LEVEL
VERTICAL HORIZONTALTRIGGER
CURSOR/MENU ANALYZE GENERAL
TRIG’dSLOPE
USB STICK LOGIC CHANNELS
REM
CH 1CH 2CH 3CH 4
1MΩ II 13pF
max.
200 Vp
1MΩ II 13pF
max.
200 Vp
VOLTS/DIV TIME/DIV
POSITION POSITION
SELECT WINDOW
COARSE/FINE
POD 2 (15..8) POD 1 (7
..0)
Use recommended probes only!
! !
50Ω
≤5V RMS
M
E
M
O
R
Y
Made in Germany
CAT I
!
ADJ.
Bus Signal
Source
S1 S2 S3
PASS/FAIL
6
2
-
K
3
0
4
-
1
1
9
0
-
1
.
0
MENU
CURSOR
SELECT
CURSOR
MODE
AUTO
MEASURE
SCROLL
BAR
CURSOR
MEASURE
FFT
QUICK
VIEW
DISPLAY
AUTO
SET
CH1
CH2
CH3
POD1
AUTO
NORM
X Y
MENU
TYPE
SOURCE
FILTER
SLOPE
ACQUIRE
SINGLE RUN
STOP
SET
CLR
SETUP HELP
SAVE
RECALL
INTENS
PERSIST
REF
BUS
FILE
PRINT
CH4
POD2
MATH
Fig. 4.3: Correct connection of the probe to
the probe adjust output
The coupling is selected in the short menu: by just pushing the
appropriate key the coupling is chosen, also the signal may be
inverted. The menu is valid for the activated channel as indicated
by the channel key light up. The channel number will be shown
in the top of the menu. By pushing the respective key of another
channel the menu will transfer to this channel.
4.2 Sensitivity, Y-Positioning, and Offset
The sensitivity of the analog inputs can be selected with the
large knob in the section of the front panel in 1-2-5
selection. The knob is associated with the channel selected by
pushing the respective key. The sensitivity can be changed to
continuous control by pushing the knob once. The smaller one
of the knobs is used for vertical positioning.
Fig. 4.4: Vertical offset in the extended menu
By pushing the key the extended menu is called. On page
2 of this menu a DC offset can be added to the signal. In order
to switch this offset in the respective soft key must be pushed.
The settings window will be backlit in blue, and the activity
indicator next to the general knob will light up; the offset can
now be adjusted with the knob. The offset voltage will be added
to the signal at the
amount from the zero position. The possible amount of offset
depends on the Volts/div setting chosen. The offset function
being activated will be indicated by two channel markers on
18
B
19
20
22
23
24
21
25
26
27
A quick introduction A quick introduction

18 Subject to change without notice
the left of the display, also visible if the menu was closed. One
marker indicates the position, the other the offset (refer to Fig.
4.4). The offset is individually adjustable for each channel.
analog channel may also be shifted in time by ±15 ns. This
adjustment is selected in the same menu and according to the
same method as the DC offset; it is used for compensating for
the different signal delays of voltage and current probes and
different cable lengths.
4.3 Bandwidth Limit and Signal Inversion
in either the short or extended menu. This will eliminate all
higher
short menu by pushing the respective soft key; the information
BW will be displayed in the channel
information window.
Signal inversion is available in the short and the extended me-
and there will be a bar above the channel number.
4.4 Probe attenuation selection
-
cognized by the instrument which automatically selects the
appropriate factor. If any other probe without automatic reco-
gnition of the attenuation ratio or just a cable is connected to
the instrument, the attenuation factor can be set manually in
the extended menu. This is possible for x 1, x 10, x 100 x 1000
5 Horizontal System (Time Base)
As well as time base settings, the
horizontal system comprises the
selection of the trigger position, the
zoom functions and the available
modes of signal capture and the
control for the marker function.
The knobs are used for the adjust-
ment of the time base speed and the
trigger position. The signal capture
modes are selected in the respec-
tive menus. There is a key provided
for activating the zoom function.
5.1 Capturing modes RUN and STOP
The capturing modes can be selected with the key RUN/STOP.
In RUN mode signals will be continuously captured; depending
on the trigger conditions selected, and displayed, erasing the
previously captured ones. If it is desired to store and further
analyze a signal and to prevent it being overwritten, capture
37
D
38
37
41
39
42
43
44
40
Fig. 5.1: Control panel of
the horizontal system
Horizontal System (Time Base)
must be stopped by pushing the RUN/STOP key. While in STOP
mode capture is disabled and the key will light up red.
5.2 Time base adjustments
The large knob in the section of the control
panel is used for the selection of the time base speed. The
time base speed is displayed in the upper left hand corner
above the graticule. (e.g. „TB:500 ns“) To the right there is
the display of the trigger time position with respect to the
normal position. The normal trigger position is in the center
of the graticule such that 50 % of the signal display is before
and 50 % is after this trigger position. The X POSITION knob
allows continuous adjustment of the X position. The available
maximum values depend on the time base setting. By pushing
reference posi-
tion. The arrow keys
37
allow you to change the X position
divisions in the respective direction. If
marker function is chosen the arrow keys together with the
marker. The key opens a menu which allows you to
set the X position to its minimum and maximum positions or
chose the marker function by just a key touch. In addition,
there is a submenu NUMER.INPUT which allows entry of an
arbitrary X position.
5.3 Capture modes
this opens a display menu which offers the 5 basic modes of
capture:
– Normal:
In this mode the signals are captured and displayed.
– Roll:
This is a mode especially useful for very slow signals: the
signal „rolls“ slowly untriggered from right to left over the
– Envelope:
In this mode the signal will be displayed as in NORMAL, but
its minimum and maximum excursions will also be displa-
yed such that, with time, an envelope of the signal will be
displayed.
– Average:
Functions only with repetitive signals. The universal knob in
the section of the front panel is used to set
the number of signal periods for averaging, this is possible
in powers of 2 from 2 to 256.
Please note: Averaging reduces the bandwidth.
– Smoothing:
In this mode continuous averaging is used which allows in-
crease of the vertical resolution at the expense of bandwidth
reduction.
The second menu page is accessed by pushing the soft key next
to the menu „Page 1/2“, here, extended functions are available:
– RANDOM SAMPL:
For very fast signals displayed with the fastest sweep speeds
it can be advantageous to switch the instrument to Random
Sampling mode; in this mode very many signal periods are
used to generate a high resolution picture, provided the
signal does not change its shape. This is equivalent to a
sampling rate of max. 25GSa/s. The oscilloscope will not
automatically enter this mode, however, it is possible to

19
Subject to change without notice
select automatic switching to Random sampling >20 ns/
div..The mode can be disabled by pushing the soft key.
– PEAK DETECT:
At very slow sweep speeds fast signal details will not be
visible. By selecting this mode peaks will be detected. This
function can be switched on or off in the menu, it is also
possible to select automatic switching in.
All the preceding functions are normally off. The lowest item in
the soft menu allows you to select the preferred signal capturing
repetition rate, there are 3 options:
– MAX. REP RATE:
In this mode an optimum combination of sampling rate and
memory length used will be selected automatically such that
the signal capturing rate will be maximized.
– MAX. SAMPL. RATE:
In this mode the maximum possible sampling rate will be
used.
– AUTOMATIC:
This mode is the standard mode: the instrument always
selects the optimum combination of capturing and sampling
rates (full memory length used).
5.4 ZOOM function
memory depth of 2 MB per
channel, this allows you to record long complex signals which
can be analyzed in detail with the ZOOM function. Push the ZOOM
key to activate this function. The screen will be partitioned into
two graticule areas: the top one displays the whole time base
window; the lower one displays the zoomed portion of it. The
zoomed portion will be indicated in the upper display by two
blue cursors. With multi channel displays all channels will be
zoomed by the same factor and on the same portion.
In Fig. 5.2 a signal was recorded for 12ms, the zoom window
is shown with a time scale of 100µs/div. The time base speed
display in the left upper corner is shown with a grey background,
the zoom time base display is shown in white. This means
that the large knob in the horizontal menu is now available
for changing the zoom factor. This knob also features a push
contact; if the knob is pushed, the time base display will change
to white, and the zoom time base display to grey: now the knob
is available for changing the time base setting. This allows you
to change time base settings without leaving the zoom mode.
By pressing the knob again, the cursors limiting the zoom area
will be shown pronounced in white, now the knob will also allow
to change the zoom area. The position of the zoomed area can
now be shifted with the small knob in the horizontal area of the
front panel over the whole signal. If pushing the large knob as
time base setting and not
the zoom factor, the small knob regains the function of shifting
the trigger position so the relationship of pre to post trigger
record can be changed.
5.5 Marker function
Fig. 5.3: Marker in zoom mode
menu
(if the menu is deactivated this will be the center of the grati-
Now the curve can be shifted with the position control knob, the
marker set will go along. If another interesting point is found,
another marker may be set after the point has been shifted to
the graticule center. By this method up to 8 interesting points
of a curve may be marked. By pressing one of the arrow buttons
the next marker left or right of the center will be shifted to the
center. In order to erase a marker, shift it to the center and
erased by pressing the respective soft menu key.
By centering the markers with the arrow buttons a comparison
of signal portions marked in the ZOOM mode is possible, simply
and very fast.
Horizontal System (Time Base)
Fig. 5.2: Zoom function

20 Subject to change without notice
6 Trigger System
easy to handle by just observing
operation.
Fig. 6.1: Front panel control area of
the trigger system
There are 4 keys destined for frequently used functions:
– TYPE: selects the type of trigger:
and the
– SLOPE: selects the slope polarity.
– SOURCE: opens the menu for the selection of the trigger
source.
– FILTER: opens the menu for the selected trigger type in
order to select the exact trigger conditions.
Additional keys are provided for the selection of the trigger
6.1 Trigger modes Auto, Normal, Single
The basic trigger modes are directly selectable with the key
AUTO NORM. In AUTO mode the key will not be lit. If the key is
pushed it will light up red indicating NORMAL mode.
The oscilloscope always presents a signal in AUTO mode and
trigger conditions.
trigger conditions, if it fails to do so the last stable triggered
display will remain on the screen.
trigger
light up white. This indicates that the single trigger mode
is active, the RUN/STOP key will blink. The next return of
the signal will cause a single capture, the oscilloscope then
goes into the STOP mode, indicated by the RUN/STOP key
lighting up in red.
6.2 Trigger sources
Trigger sources are the 2 or 4 analog channels and the ex-
or 16 logic channels is connected, also those up to 16 digital
channels can serve as trigger sources.
6.3 Slope trigger
The simplest and most used trigger type is slope trigger, this
trigger type to slope trigger. For the selection of the trigger
was not selected (blue background) pushing the respective soft
key will change to
through the options rising, falling, or both slopes. In the center
of the status line top center above the graticule the type selected
will open and offer the available options.
trigger signal coupling can be selected:
DC: The trigger signal is used with its dc content.
AC: The
HF: The
The trigger level is no longer adjustable. This mode
should only be used with very high frequency signals.
LOW PASS: The low pass
NOISE RED.: The low
frequency interference.
The coupling modes low pass and noise reduction can not be
simultaneously selected, but they can be used with DC or AC
coupling.
Fig. 6.3: The type B-Trigger
Fig. 6.2: Coupling modes with slope trigger
28
C
29
30
33
31
34
35
36
32
Trigger System
Other manuals for HMO Series
2
This manual suits for next models
3
Table of contents
Other Hameg Test Equipment manuals

Hameg
Hameg HM 604-2 User manual

Hameg
Hameg HMO Series User manual

Hameg
Hameg HM1507-3 User manual

Hameg
Hameg HM 204 User manual

Hameg
Hameg HM 303-4 User manual

Hameg
Hameg HM 203-6 User manual

Hameg
Hameg HM 203-7 User manual

Hameg
Hameg HM2005-2 User manual

Hameg
Hameg HZ65-3 User manual

Hameg
Hameg HM1507-3.02 User manual