manuals.online logo
Brands
  1. Home
  2. •
  3. Brands
  4. •
  5. Helvex
  6. •
  7. Bathroom Fixture
  8. •
  9. Helvex LAV MARCUS BC W User manual

Helvex LAV MARCUS BC W User manual

This manual suits for next models

1

Other Helvex Bathroom Fixture manuals

Helvex Alika E-920 User manual

Helvex

Helvex Alika E-920 User manual

Helvex WC Austral User manual

Helvex

Helvex WC Austral User manual

Helvex RMB-30 User manual

Helvex

Helvex RMB-30 User manual

Helvex AF-2 User manual

Helvex

Helvex AF-2 User manual

Helvex UIN-05 User manual

Helvex

Helvex UIN-05 User manual

Helvex H-3004 User manual

Helvex

Helvex H-3004 User manual

Helvex SS-1 User manual

Helvex

Helvex SS-1 User manual

Helvex TZF NAO P User manual

Helvex

Helvex TZF NAO P User manual

Helvex Magna Dx User manual

Helvex

Helvex Magna Dx User manual

Helvex MG MOJAVE TDS2 User manual

Helvex

Helvex MG MOJAVE TDS2 User manual

Helvex Piura PIU-200 User manual

Helvex

Helvex Piura PIU-200 User manual

Helvex Explora H-201 User manual

Helvex

Helvex Explora H-201 User manual

Helvex E-309 User manual

Helvex

Helvex E-309 User manual

Helvex 410-32 User manual

Helvex

Helvex 410-32 User manual

Helvex Piura PIU-201 User manual

Helvex

Helvex Piura PIU-201 User manual

Helvex RM-14 User manual

Helvex

Helvex RM-14 User manual

Helvex Forza TV-304 User manual

Helvex

Helvex Forza TV-304 User manual

Helvex E-922 User manual

Helvex

Helvex E-922 User manual

Helvex PIURA PIU-05 User manual

Helvex

Helvex PIURA PIU-05 User manual

Helvex EXPLORA UH-201-WA User manual

Helvex

Helvex EXPLORA UH-201-WA User manual

Helvex Futura II RM-17 User manual

Helvex

Helvex Futura II RM-17 User manual

Helvex TR-035 User manual

Helvex

Helvex TR-035 User manual

Helvex RM-12 User manual

Helvex

Helvex RM-12 User manual

Helvex H-3010 User manual

Helvex

Helvex H-3010 User manual

Popular Bathroom Fixture manuals by other brands

Kohler Mira Sport Max J03G Installation and user guide

Kohler

Kohler Mira Sport Max J03G Installation and user guide

Moen 186117 Series installation guide

Moen

Moen 186117 Series installation guide

Hans Grohe Raindance Showerpipe 27235000 Instructions for use/assembly instructions

Hans Grohe

Hans Grohe Raindance Showerpipe 27235000 Instructions for use/assembly instructions

Signature Hardware ROUND SWIVEL BODY SPRAY 948942 Install

Signature Hardware

Signature Hardware ROUND SWIVEL BODY SPRAY 948942 Install

fine fixtures AC3TH installation manual

fine fixtures

fine fixtures AC3TH installation manual

LIXIL HP50 Series quick start guide

LIXIL

LIXIL HP50 Series quick start guide

KOLO ATOL PLUS installation manual

KOLO

KOLO ATOL PLUS installation manual

Hans Grohe PuraVida 15073000 Instructions for use/assembly instructions

Hans Grohe

Hans Grohe PuraVida 15073000 Instructions for use/assembly instructions

Toto TS111B8 Installation and owner's manual

Toto

Toto TS111B8 Installation and owner's manual

Kohler K-1158-H2 Homeowner's guide

Kohler

Kohler K-1158-H2 Homeowner's guide

Coram Showers OFFSET QUADRANT manual

Coram Showers

Coram Showers OFFSET QUADRANT manual

baliv DU-2010 manual

baliv

baliv DU-2010 manual

odass OD-1710 instruction manual

odass

odass OD-1710 instruction manual

Oxygenics Evolution Easy installation instructions

Oxygenics

Oxygenics Evolution Easy installation instructions

Bradley Express SS Series installation instructions

Bradley

Bradley Express SS Series installation instructions

DURAVIT C.1 C15240 0090 Instructions for mounting and use

DURAVIT

DURAVIT C.1 C15240 0090 Instructions for mounting and use

Sunshower PURE SOLO manual

Sunshower

Sunshower PURE SOLO manual

Heatstore HSTRL500WTN Installation and operating instructions

Heatstore

Heatstore HSTRL500WTN Installation and operating instructions

manuals.online logo
manuals.online logoBrands
  • About & Mission
  • Contact us
  • Privacy Policy
  • Terms and Conditions

Copyright 2025 Manuals.Online. All Rights Reserved.

Hola soy Fluxy, te
ayudaré a instalar
tu producto.
Hi I'm Fluxy, I'll
help you to install
your product.
INSTALLATION GUIDE
GUÍA DE INSTALACIÓN
Dimensiones para la Instalación / Dimensions for Installation
3
Este instructivo aplica al producto en cualquier acabado. / This instructive applies
to the product in any finish.
ADVERTENCIA / WARNING
Para disminuir el riesgo de lesiones o daños a la propiedad, lea todas las instrucciones antes de instalar el
producto. Utilice gafas de seguridad. En obras de construcción, instalación, modificación, ampliación y
reparación deben cumplir con el reglamento de construcción y obras de su localidad. El producto ilustrado
puede sufrir cambios de aspecto como resultado de la mejora continua a la que está sujeto.
Agradecemos su elección por los productos HELVEX.
Estamos seguros de que su confiabilidad por el producto excederá sus más altas expectativas, cuya
funcionalidad, estética, durabilidad, respaldo integral y alta calidad le otorgarán plena satisfacción por años,
reflejando el compromiso con la calidad, innovación y el medio ambiente que forman parte de Helvex.
Thank you for choosing HELVEX products.
We are confident that the product reliability will exceed your maximum expectations, the functionality,
aesthetics, durability are at its highest quality! The comprehensive support will grant full satisfaction for years,
reflecting the commitment to quality, innovation and the environment.
To reduce the risk of injury or property damage, read all instructions. Before installing the product, please
remember to use safety glasses. In construction, installation, alteration, extension and repair, the rules of
constructions must be applied. As result of continuous improvement, the illustration product may change in
appearance as a result of continuos improvement to which it is subject.
Relación
Installation Requirements
Herramienta Requerida / Required Tools
flexómetro
tape rule pencil
lápizsierra
caladora
jig saw insert screws, lag screws
and anchorswrench
Accesorios Incluidos en su Producto
/ Accessories in your Product
insertos, tornillos,
pijas y anclas
*Medidas Recomendadas.
* Recommended Dimmensions.
1
cubierta / cover
Ø34,9 (Ø1 3/8")
abertura en la cubierta
/ opening cover
7 (3 1/8")
Vista Superior /
Top View
*500
*(19,68)
Nivel de Piso Terminado
/ Finished Floor Level
*850
*(33,46)
Vista Lateral del Producto
Instalado / Lateral View of
the Installed Product
Acot. mm (inches).
COLOR BLANCO / WHITE COLOR
LAV MARCUS BC W
LAVABO DE BAJO CUBIERTA CON REBOSADERO
UNDERMOUNT BATHROOM SINK WITH OVER FLOW
COLOR MARFIL / BONE COLOR
LAV MARCUS BC B
[email protected]
Original Spare Parts:
Consultancy and Technical
(52) 55 53 33 94 31
(52) 55 53 33 94 00
Refacciones Originales:
Asesoría y Servicio Técnico:
Ext. 5913, 5068 y 4815
Service:
(52) 55 53 33 94 21
[email protected]
www.refaccioneshelvex.com.mx
2 3
/ Drain Installation
Instalación General / General Installation
/ Drain Installation
Instalación General / General Installation
5
01 55 53 33 94 00
Ext. 5804, 5805 y 5806 (0133) 36 19 01 13
Comunícate:
Participa en nuestros
cursos gratuitos
de capacitación.
(0181) 83 33 57 67
(0181) 83 33 61 78
In Guadalajara:
Contact:
Enter our free
training courses.
In Monterrey:
En la Ciudad de México:
In Mexico City:
En Monterrey:
En Guadalajara:
HELVEX, S. A. DE C.V. Calzada Coltongo 293, Col. Industrial Vallejo 02300 Del. Azcapotzalco, México, D.F. Tel. (55) 53-33-94-00.
Es muy importante seguir las siguientes instrucciones para conservar los
acabados de los productos HELVEX, con brillo y en perfecto estado:
1. Utilice únicamente agua y un paño limpio.
2. No utilice fibras, polvos, abrasivos, ni productos químicos.
3. No utilice objetos punzo-cortantes para limpiar los acabados.
4. Se recomienda realizar la limpieza de su producto diariamente.
Nota: Vea nuestros tips en la pag. www.helvex.com.mx
It is very important to follow the instructions below to preserve HELVEX products
finishes, shiny and in perfect condition:
1. Use only water and a clean cloth.
2. Do not use fibers, powders, abrasives, or chemicals.
3. Do not use sharp objects to clean the finish.
4. It is recommended to clean your product daily.
Note: See our tips on: www.helvex.com.mx
Recomendaciones de Limpieza / Cleaning Recommendations
2
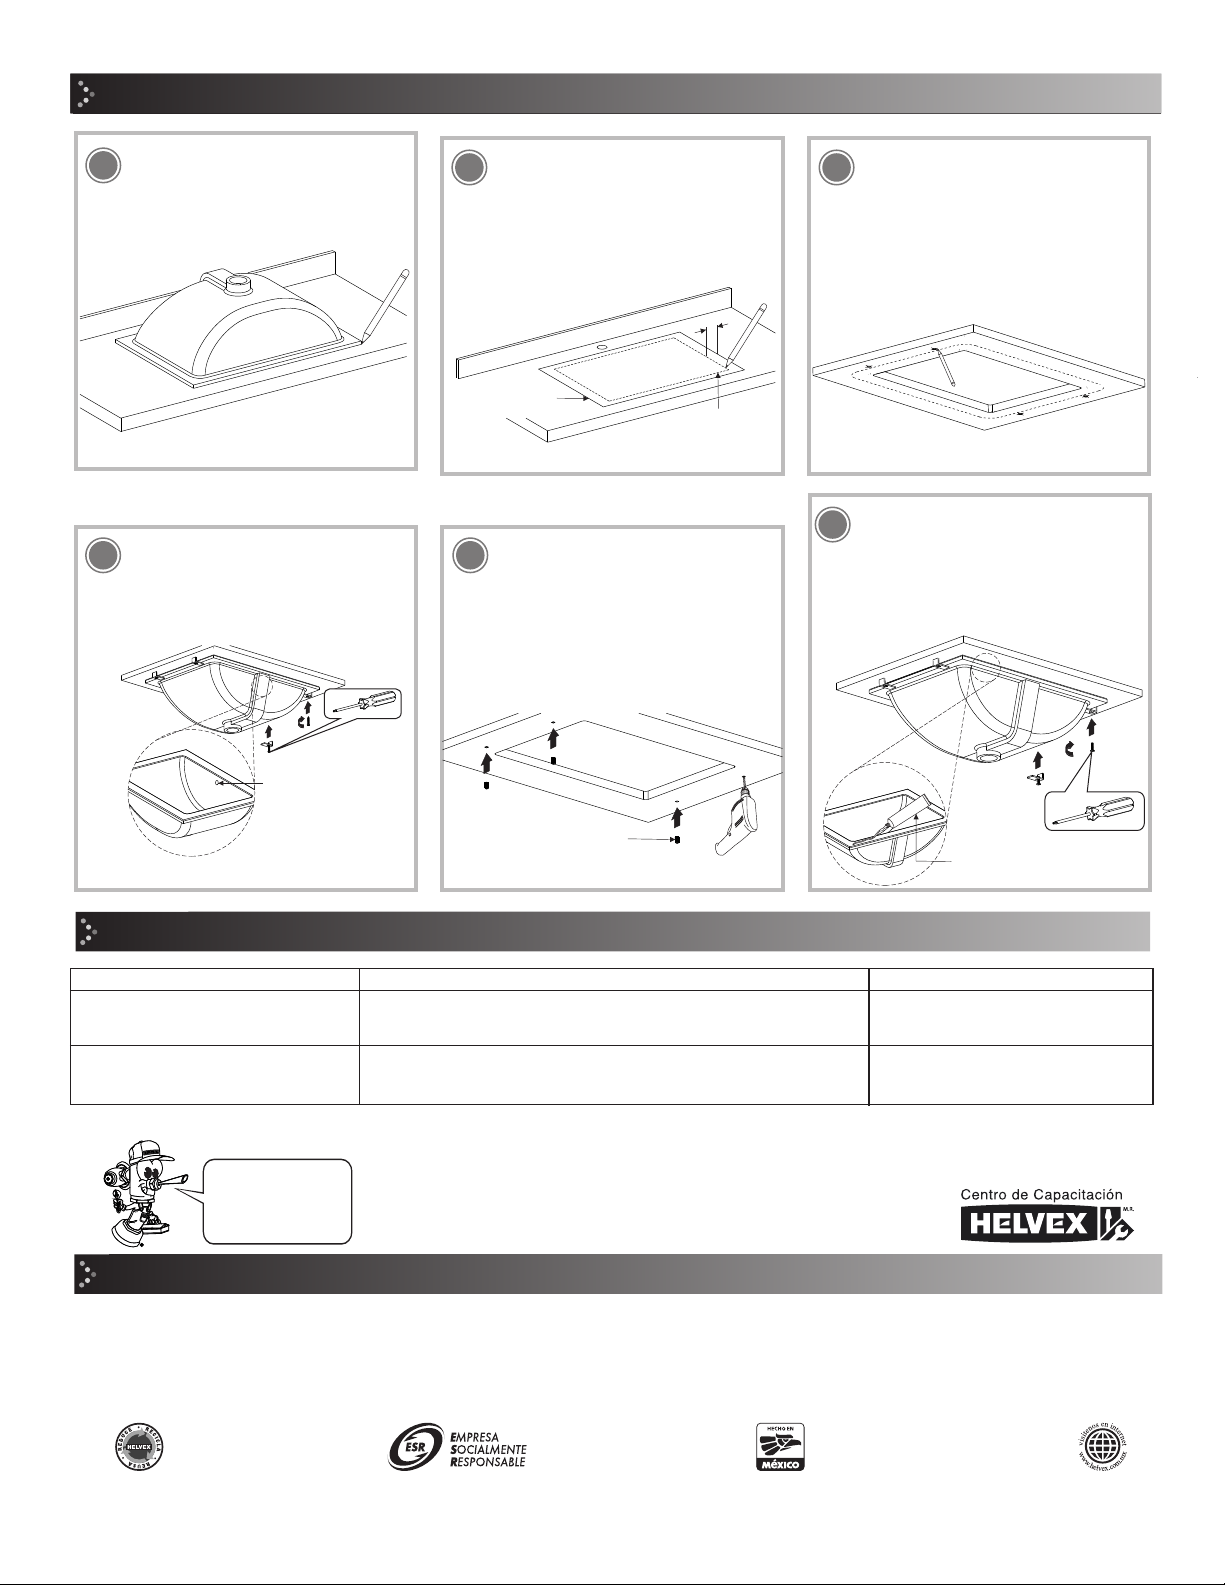
Instalación en Madera / Wood Installation
Coloque las anclas y enrosque las
pijas (incluidas) para fijar el labavo. /
Place the anchors and screw the lags
(included) to fix the sink.
Instalación en Mármol / Marmol Installation
6 Por la parte inferior de la placa o base
perfore con broca de 3/8” hasta ½”de
profundidad e introduzca el inserto de
latón colocando adhesivo epóxico (no
incluido) al fondo de la perforación./ On
the bottom of the base or plate drill with
3/8” drill bit up to ½" deep and insert the
brass screw insert adding epoxy
adhesive (not included) to the bottom of
the hole.
inserto de latón
/ brass insert
7 Aplique el sellador adhesivo a la ceja
del lavabo después coloque el lavabo
en posición con las anclas y enrosque
los tornillos (incluidos) para fijar el
labavo. / Apply adhesive sealant to the
flange basin, then place it with anchors
and and tighten the screws (included) to
fix the sink.
Posibles Causas y Soluciones / Troubleshooting
sellador adhesivo
/ adhesive sealant
rebosadero
/ overflow
Nota: Ubicar la posición del lavabo con el rebosadero opuesto a la
mezcladora o monomando.
Note: Place the basin with the overflow hole opposite to your faucet
positon.
Coloque el lavabo y marque el
contorno sobre la cubierta. / Place the
sink and mark the outline on the cover.
Trace una línea a 5,08 cm de
separación hacia el interior y realice el
corte en la placa o base. / Draw a line
2" apart inwards and make the cut on
the plate or base..
contorno exterior
del lavabo / outer
contour of the basin
5,08 cm
(2,0”)
línea de corte
cut line
Por la parte inferior de la placa o base,
marque los centros para las pijas o
insertos de latón. / On the bottom of
base or plate, mark the centers for the
lags or brass inserts.
4
Problema / Problem Causas / Causes Soluciones / Solutions
El agua no se por el rebosadero.
/ The water doesn´t go down the overflow.
Los líquidos se quedan estancados.
/ Liquids stay stagnant.
Se instaló una contra sin rebosadero.
/ A drain stopper without overflow was installed.
Algún objeto se encuantra obstruyendo el céspol o el rebosadero.
/ Some object is obstructing the trap or overflow.
Coloque una contra con rebosadero.
/ Install a drain stopper with overflow.
Retire el elemento obstructor.
/ Remove the obstructing object.