manuals.online logo
Brands
  1. Home
  2. •
  3. Brands
  4. •
  5. Helvex
  6. •
  7. Bathroom Fixture
  8. •
  9. Helvex Nuva E-32 User manual

Helvex Nuva E-32 User manual

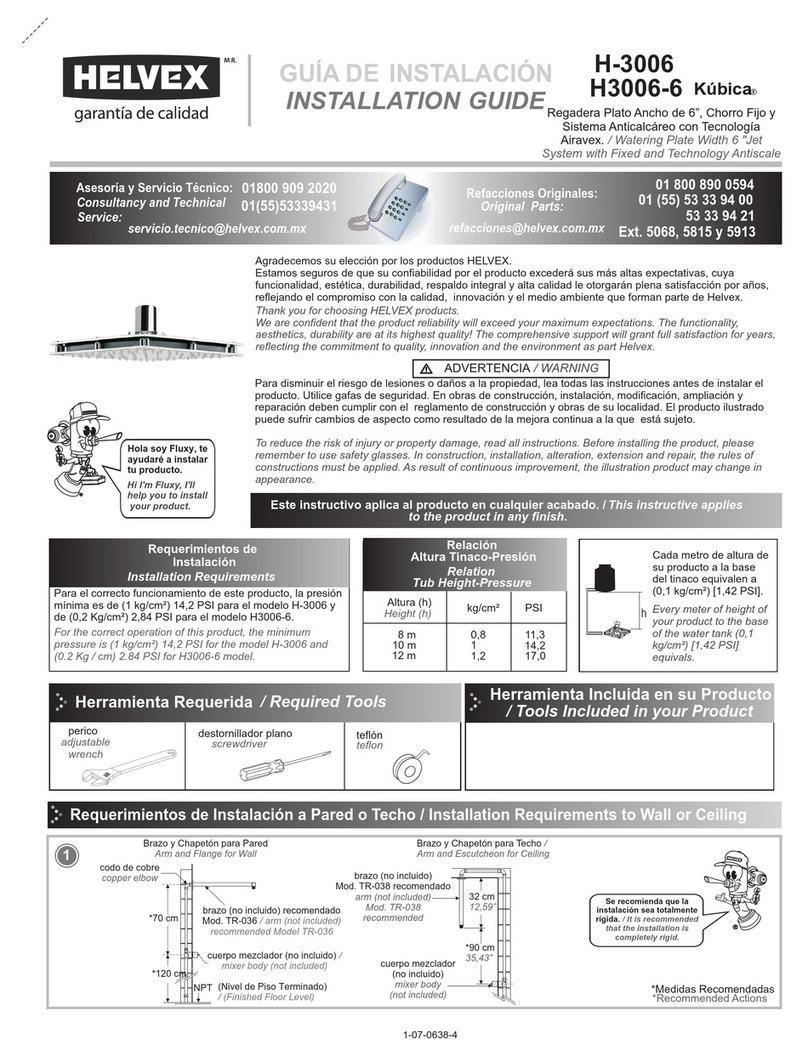
Herramienta Requerida
perico teflón
/ Required Tools
adjustable
wrench
Herramienta Incluida en su Producto / Tools Included
Hola soy Fluxy, te
ayudaré a instalar
tu producto.
Instalación General
INSTALLATION GUIDE
GUÍA DE INSTALACIÓN
1-02-1622-8
Hi I'm Fluxy, I'll
help you to install
your product.
/ General Installation
1Cierre el suministro de agua. / Close the water supply.
Ubique y cierre las válvulas de suministro de agua.
Generalmente se encuentran debajo de la tarja. Si se trata de un
reemplazo de grifo, quite el grifo viejo y limpie completamente la
superficie del lavabo.
Locate and close the water supply valve.
Usually found under the sink. If it is a replacement faucet, remove
the old faucet and clean the surface of the sink.
Monomando para Fregadero
/ Sink mixer
E-32
installation key for
mixing sink
llave de instalación
p/monomando de fregadero 2 mm allen wrench
llave allen 2 mm
in your Product
plumber
tape
[email protected]
Original Parts:
Consultancy and Technical
01(55)53339431
01800 909 2020 01 (55) 53 33 94 00
Refacciones Originales:
Asesoría y Servicio Técnico:
Ext. 5068, 5815 y 5913
Service:
53 33 94 21
01 800 890 0594
[email protected]
ADVERTENCIA / WARNING
Cada metro de altura de
su producto a la base
del tinaco equivalen a
(0,1 kg/cm²) [1,42 PSI].
Every meter of height of
your product to the
base of the water tank
(0,1 kg/cm²) [1,42 PSI]
equivals.
Para disminuir el riesgo de lesiones o daños a la propiedad, lea todas las instrucciones antes de instalar el
producto. Utilice gafas de seguridad. En obras de construcción, instalación, modificación, ampliación y
reparación deben cumplir con el reglamento de construcción y obras de su localidad. El producto ilustrado
puede sufrir cambios de aspecto como resultado de la mejora continua a la que está sujeto.
Agradecemos su elección por los productos HELVEX.
Estamos seguros de que su confiabilidad por el producto excederá sus más altas expectativas, cuya
funcionalidad, estética, durabilidad, respaldo integral y alta calidad le otorgarán plena satisfacción por años,
reflejando el compromiso con la calidad, innovación y el medio ambiente que forman parte de Helvex.
Thank you for choosing HELVEX products.
We are confident that the product reliability will exceed your maximum expectations. The functionality,
aesthetics, durability, quality and support will grant you full satisfaction for years, it is Helvex commitment to
the quality, innovation and the environment.
To reduce the risk of injury or property damage, read all instructions. Before installing the product, please
remember to use safety glasses. Apply building normative for any construction, installation, alteration,
extension or repair. As result of continuous improvement, the product illustration may change in appearance.
Esta guía de instalación aplica al producto en cualquier acabado. / This installation
guide applies to the product in any finish.
Requerimientos de Instalación
Installation Requirements
E-32 0,25 3,5 24,5
Requerimientos de Instalación
Installation Requirements
Modelo / Model
Mínima / Minimum Máxima / Maximum
kg/cm² PSI kPa kg/cm² PSI kPa
6,0 85,3 588,3
Para el correcto funcionamiento de éstos productos, se
recomiendan las siguientes presiones:
For the correct operation of these products, the following
pressures are recommended:
hot
cold
Caliente
Fría
*55 cm
(21,6”)
*20,3 cm
angle valves
(not included)
válvulas angulares
(no incluidas)
NPT
(8”)
*Recommended dimesions
*Medidas Recomendadas
(Nivel de Piso Terminado)
(Finished Floor Level) FFL
Nuva
Dimensiones Generales
6
2
3
4
La tarja debe cumplir las dimensiones que se muestran en la figura. / The sink must meet the dimensions shown in the figure.
Retire la tuerca tipo mariposa y ancla de sujeción. Colocar chapetón en la salida. /
Remove the wing nut and anchor bolt. Place escutcheon in the exit.
Revise que no existan fugas
encima y debajo de la tarja.
Check for leaks up and
down the lavatory.
5Coloque el monomando en la tarja, inserte el o´ring y enrosque
la tuerca con la llave de instalación (incluida). / Place the faucet
in the sink, insert the o´ring and screw the nut with the
installation key (included).
Centre la salida con la
apertura del maneral. /
Center the faucet with the
opening of the handle.
2
Espesor máximo de
placa 5 cm. / Maximum
plate thickness 2".
Ø 3,8 cm
1,5"
20,3 cm
8"
6,3 cm
2,4"
Tarja de Acero Inoxidable / Sink Stainless Steel
Instalación General / General Installation
Recommended dimesions
Medidas Recomendadas
Si la tarja cuenta con 3 barrenos (taladros) se recomienda instalar el chapetón para cubrirlos y con
un barreno no se recomienda colocar el chapetón. / If the sink has 3 holes (drills) it is
recommended to install the escutcheon to cover them and with a hole it is not recommended to
place the escutcheon.
/ General Dimensions
Apriete firmemente
la tuerca. / Tighten
firmly the nut.
tuerca mariposa
butterfly nut
ancla de sujeción
clamping anchor
chapetón
escutcheon
chapetón
escutcheon
ancla de sujeción
clamping anchor
tuerca mariposa
butterfly nut
Desenrosque la tuerca y retire el
empaque. / Unscrew the nut and
remove the gasket.
o´ring
o´ring
tuerca
nut
empaque
gasket
empaque
gasket
o´ring
tuerca
nut
líneas de
alimentación
feeding
lines
agua caliente
hot water
agua fría
cold water
Abra el suministro de agua y purgue la línea de alimentación.
/ Open the water supply and purge the feeding lines.
3
Mantenimiento del Aireador / Aerator Maintenance
Abrir el suministro de agua. Para abrir, levante la palanca del maneral y para regular la temperatura gire a la derecha para el agua fría o a la
izquierda para más caliente. / Open the water supply. To open, raise the lever of the handle and to regulate the temperature turn to the right
for cold water or to the left for hotter.
La salida es giratoria.
/ The output is rotating.
Operación
/ Operation
8
empaque
gasket
Apriete firmemente.
/ Tighten firmly.
9Desenrosque el barril y retire el aireador con su empaque,
limpie el aireador a chorro de agua. / Unscrew the barrel and
remove the aerator with its gasket, clean the aerator with a
water jet.
10 Arme nuevamente el aireador y colóquelo en la salida. /
Assemble the aerator again and place it in the outlet.
aireador
aerator
barril
barrel
aireador
aerator
barril
barrel
empaque
gasket
7
mangueras
(incluidas)
hoses
(included)
Enrosque las mangueras (incluidas) a la línea de alimentación. / Screw the hoses (included) to the power line.
líneas de alimentación
feeding lines
+ caliente
hot
+ fría
cold
abrir
open
Es muy importante seguir las siguientes instrucciones para conservar los
acabados de los productos HELVEX, con brillo y en perfecto estado:
1. Utilice únicamente agua y un paño limpio.
2. No utilice fibras, polvos, abrasivos, ni productos químicos.
3. No utilice objetos punzo-cortantes para limpiar los acabados.
4. Se recomienda realizar la limpieza de suproducto diariamente.
Nota: Vea nuestros tips en la pag. www.helvex.com.mx
It is very important to follow the instructions below to preserve HELVEX products
finishes, shiny and in perfect condition:
1. Use only water and a clean cloth.
2. Do not use fibers, powders, abrasives, or chemicals.
3. Do not use sharp objects to clean the finish.
4. It is recommended to clean your product daily.
Note: See our tips on: www.helvex.com.mx
Recomendaciones de Limpieza / Cleaning Recommendations
In Guadalajara:
Contact:
Enter our free
training courses.
In Monterrey:
En la Ciudad de México:
In Mexico City:
En Monterrey:
En Guadalajara:
01 55 53 33 94 00
Ext. 5804, 5805 y 5806 (0133) 36 19 01 13
Comunícate:
Participa en nuestros
cursos gratuitos
de capacitación.
(0181) 83 33 57 67
(0181) 83 33 61 78
4
HELVEX, S. A. DE C. V. Calzada Coltongo # 293, Col. Industrial Vallejo, Del. Azcapotzalco, C. P. 02300, Ciudad de México.
Posibles Causas y Soluciones / Troubleshooting
Problema / Problem Causa / Cause Solución / Solution
Existe poco flujo de agua. /
There is some water flow.
La presión de operación no es la adecuada.
/ The operating pressure is not adequate.
Verifique que la presión mínima de operación sea 0,25 kg/cm².
/ Verify that the minimum operating pressure is 3,5 PSI.
Las válvulas angulares no están totalmente abiertas.
/ The shutoff valves are not totally open
Abrir totalmente las válvulas angulares. (Pag. 2, paso 6)
Instalación general. / Fully open shutoff valves. (Page 2 step 6)
General installation.
Filtración en la parte inferior.
/ Filtration at the bottom.
Chapetón o salida no hace sello. /
Escutcheon or exit does not seal.
Verificar la sujeción (Pag. 2, paso 5).
/ Check the fixing (Pag. 2, step 5).
El monomando está flojo. /
The faucet is loose.
La tuerca espárrago no está apretada.
/ The shank nut is tight.
Apriete firmemente la tuerca espárrago (Pag. 2, paso 5).
/ Tighten the shank nut (Page 2, step 5).
11 Desenrosque el opresor del maneral con la llave allen (incluida), retire el maneral, desenrosque el chapetón y la tuerca de sujeción; cambie
el cartucho y arme nuevamente. / Unscrew the clamping of ratchet with the allen wrench (included) , remove the handle, unscrew the
escutcheon and lock nut; replace cartridge and assemble again.
Cambio del Cartucho / Cartridge Replacement
/ escutcheon
chapetón
/ set screw
opresor
/ handle
maneral
/ nut
tuerca
cartridge
cartucho Sh-370
Other Helvex Bathroom Fixture manuals

Helvex Forza TV-304 User manual

Helvex

Helvex Forza TV-304 User manual

Helvex Premier H-3005 User manual

Helvex

Helvex Premier H-3005 User manual

Helvex TV-201 User manual

Helvex

Helvex TV-201 User manual

Helvex UTV-203 User manual

Helvex

Helvex UTV-203 User manual

Helvex Kubica 14148 User manual

Helvex

Helvex Kubica 14148 User manual

Helvex E-305 User manual

Helvex

Helvex E-305 User manual

Helvex LV LUCERNA 1 User manual

Helvex

Helvex LV LUCERNA 1 User manual

Helvex RM-12 User manual

Helvex

Helvex RM-12 User manual

Helvex B-305-S User manual

Helvex

Helvex B-305-S User manual

Helvex Premier II E-941 User manual

Helvex

Helvex Premier II E-941 User manual

Helvex 110-32 User manual

Helvex

Helvex 110-32 User manual

Helvex H-3300 User manual

Helvex

Helvex H-3300 User manual

Helvex H-3002 User manual

Helvex

Helvex H-3002 User manual

Helvex Vertika E-3007 User manual

Helvex

Helvex Vertika E-3007 User manual

Helvex LV STALA User manual

Helvex

Helvex LV STALA User manual

Helvex FB-110-32 User manual

Helvex

Helvex FB-110-32 User manual

Helvex H-7190 User manual

Helvex

Helvex H-7190 User manual

Helvex 410-19-1 User manual

Helvex

Helvex 410-19-1 User manual

Helvex RM-13 User manual

Helvex

Helvex RM-13 User manual

Helvex Kubica 14104 User manual

Helvex

Helvex Kubica 14104 User manual

Helvex H-106-S User manual

Helvex

Helvex H-106-S User manual

Helvex H-500 User manual

Helvex

Helvex H-500 User manual

Helvex LV FUTURA1 User manual

Helvex

Helvex LV FUTURA1 User manual

Helvex THP-968 User manual

Helvex

Helvex THP-968 User manual

Popular Bathroom Fixture manuals by other brands

Toto Upton TS630F2 Installation and owner's manual

Toto

Toto Upton TS630F2 Installation and owner's manual

BELLOSTA Pascal 1011/5A Installation instruction

BELLOSTA

BELLOSTA Pascal 1011/5A Installation instruction

Fleurco ADQ3060 installation manual

Fleurco

Fleurco ADQ3060 installation manual

Hans Grohe Croma Select S 280 Showerpipe EcoSmart 26891... Instructions for use/assembly instructions

Hans Grohe

Hans Grohe Croma Select S 280 Showerpipe EcoSmart 26891... Instructions for use/assembly instructions

Coram TUBULAR SHOWER PANELS quick start guide

Coram

Coram TUBULAR SHOWER PANELS quick start guide

Sanela SLKN 09 Mounting instructions

Sanela

Sanela SLKN 09 Mounting instructions

VIGO VG04013 manual

VIGO

VIGO VG04013 manual

DURAVIT C14280 0080 10 Instructions for mounting and use

DURAVIT

DURAVIT C14280 0080 10 Instructions for mounting and use

Hans Grohe PHARO  Shower Temple 100 Series installation instructions

Hans Grohe

Hans Grohe PHARO Shower Temple 100 Series installation instructions

Balmani LIVO installation guide

Balmani

Balmani LIVO installation guide

Grohe Tectron 38 698 manual

Grohe

Grohe Tectron 38 698 manual

Signature Hardware CLASSIC 949085 quick start guide

Signature Hardware

Signature Hardware CLASSIC 949085 quick start guide

Lenoxx TR140 instruction manual

Lenoxx

Lenoxx TR140 instruction manual

ProFlo PF1030GCP quick start guide

ProFlo

ProFlo PF1030GCP quick start guide

Clou first CL/02.26010 installation instructions

Clou

Clou first CL/02.26010 installation instructions

CANTERBURY Z3460 quick start guide

CANTERBURY

CANTERBURY Z3460 quick start guide

Svedbergs 99286 quick start guide

Svedbergs

Svedbergs 99286 quick start guide

Ideal-Standard B9449 Series manual

Ideal-Standard

Ideal-Standard B9449 Series manual

manuals.online logo
manuals.online logoBrands
  • About & Mission
  • Contact us
  • Privacy Policy
  • Terms and Conditions

Copyright 2025 Manuals.Online. All Rights Reserved.