Helvex MB-1100 User manual

Instalación General / General Installation
drill with
Ø 5/16" drill bit concrete
phillips screwdriver
desarmador de cruz taladro con broca para
concreto de Ø 5/16”
Dimensiones de Instalación. / Installation dimensions
1
INSTALLATION GUIDE
GUÍA DE INSTALACIÓN
Dosificador Electrónico de Baterías
con Sensor para Jabón Líquido
Electronic Battery Dispenser with
Liquid Soap Sensor
fixing kit
kit de fijación
-Capacidad del depósito de jabón / 800 ml
-Baterías requeridas / 4 Baterías Alcalinas (1,5 V)
-Rango de detección / 3.8 cm a 6 cm, auto ajustable
-Temperatura del entorno / 5-40 ºC
-Tiempo de respuesta / 0,5-1 seg.
-Volumen por descarga / 1-1.5 ml
-Rango de viscosidad aplicable / 2000-5000 cP
-Modo de operación / -Activación automática del sensor
-Tipo de depósito (incluido) / 900 ml Reutilizable
Hola soy Fluxy, te
ayudaré a instalar
tu producto.
Hi I'm Fluxy, I'll
help you to install
your product.
Herramientas y Materiales Recomendados / Artículos incluidos en el Producto /
Item Included in the Product
pencil
lápiz
Datos Técnicos / Specifications
3
MB-1100
level
nivel
-Soap tank capacity / 800 ml
-Batteries required / 4 Alkaline Batteries (1.5 V)
-Range of detection / 1 3/8" to 2 3/8", self-adjusting
-Environment temperature / 41°-104° F
- Response time / 0.5-1 sec.
-Volume per discharge / 5 ml
-Applicable viscosity range / 2000-5000 cP
-Operation mode / -Automatic sensor activation
-Tank type (included) / 900 ml Reusable
cinta adhesiva
masking tape
security key
llave de seguridad
Medida
Superficie normal
(mármol, loseta etc.).
Normal surface
(marble, tile, etc.).
20 cm
(7,87”)
Superficie de acero
inoxidable.
Stainless steel
surface.
30 cm
(11,8”)
DescripciónAltura
h1
h2
27 cm
12,2 cm
(10,6”)
(4,8”)
10,6 cm
pared terminada
o espejo / finished
wall or mirror
h1 o h2
h1 or h2
(4,17”)
Measure
DescriptionHeight
Original Spare Parts:
Consultancy and Technical
(52) 55 53 33 94 31
800 909 2020 (52) 55 53 33 94 00
Refacciones Originales:
Asesoría y Servicio Técnico:
Ext. 5913, 5068 y 4815
Service:
(52) 55 53 33 94 21
800 890 0594
104 cm
(40,9”)
Nivel de Piso Terminado
Finish Floor Level
NPT
FFL
Para disminuir el riesgo de lesiones o daños a la propiedad, lea todas las instrucciones antes de instalar el
producto. Utilice gafas de seguridad. En obras de construcción, instalación, modificación, ampliación y
reparación deben cumplir con el reglamento de construcción y obras de su localidad. El producto ilustrado
puede sufrir cambios de aspecto como resultado de la mejora continua a la que está sujeto.
Agradecemos su elección por los productos HELVEX.
Estamos seguros de que su confiabilidad por el producto excederá sus más altas expectativas, cuya
funcionalidad, estética, durabilidad, respaldo integral y alta calidad le otorgarán plena satisfacción por años,
reflejando el compromiso con la calidad, innovación y el medio ambiente que forman parte de Helvex.
To reduce the risk of injury or property damage, read all instructions before installing the product. Please
remember to use safety glasses. In construction, installation, alteration, extension and repair, the rules of
constructions must be applied. As result of continuous improvement, the illustration product may change in
appearance.
ADVERTENCIA / WARNING
Esta Guía de Instalación Aplica al Producto en Cualquier Acabado.
This Installation Guide Applies to the Product in any Finishing.
Thank you for choosing HELVEX products.
We are confident that the product reliability will exceed your maximum expectations. The functionality,
aesthetics, durability, quality and support will grant you full satisfaction for years, it is Helvex commitment to
the quality, innovation and the environment.
Recommended Tools and Materials

plantilla
template
h1 o h2
h1 or h2
superficie
surface
Trace una línea horizontal en el muro, a la altura deseada (h1 o h2).
Coloque la plantilla, empatando la línea guía con la marcada en el
muro, marque y barrene con una broca de Ø 5/16”/ Draw a
horizontal line on the wall, at the desired height (h1 or h2). Place the
template, tying the guide line with the one marked on the wall, mark
and drill with a Ø 5/16” drill bit.
2
10 Llene y coloque el depósito. / Fill and place the tank.
2
Inserte los 4 taquetes y 2 tornillos, deje un espacio de 1/8” de la
pared a la cabeza del tornillo. / Insert the 4 anchors and 2 screws,
leave a 1/8 ”space from the wall to the screw head.
3
taquete
anchor
3,2 mm
1/8”
pared con
acabado final
wall finish
4Cuelgue el dosificador. / Hang the
dispenser. 5Abra el seguro con la llave (incluida). /
Open the lock with the key (included).
llave
(incluida)
key (included)
6Jale la cubierta para abrir el dosificador. /
Pull the cover to open the dispenser.
7Suba y gire la compuerta. / Raise and
rotate flap.
compuerta
flap
Retire el depósito de jabón. / Remove
the soap tank.
8
depósito de jabón
soap tank
9Inserte los tornillos restantes y apriete. /
Insert the remaining screws and tighten.
tornillo
screw
depósito de jabón
soap tank
Asegúrese que la pestaña quede por la parte de abajo de la base. /
Make sure the tab is at the base bottom.
11
pestaña
tab
base
base

3
Abra el compartimento de baterías. /
Open the battery compartment.
12
compartimento
de baterías
battery compartment
13 Desconecte y retire el porta baterías. /
Disconnect and remove the battery
holder.
porta baterías
battery holder
14 Coloque 4 baterías alcalinas AA (no
incluidas) nuevas. / Insert 4 new AA
alkaline batteries (not included).
15 Conecte e Inserte el porta baterías. /
Connect and insert the battery holder.
porta baterías
battery holder.
16 Cierre la tapa del compartimento de
baterías y la cubierta del dosificador. /
Close the battery compartment lid and
the dispenser cover.
Asegure con la llave y retire el tapón de la
boquilla. / Lock with the key and remove
the nozzle cap.
17
boquilla
nozzle
Instalación en Espejo / Installation on Mirror
18 Limpie con alcohol la superficie donde
se instalará. / Clean the surface where it
will be installed with alcohol.
19 Ubique y marque con masking tape el
contorno del dosificador. / Locate and
mark the contour of the dispenser with
masking tape.
cinta adhesiva
masking tape
22 Acerque la mano para activar el dosificador. / Bring your hand
over to activate the dispenser.
Coloque el dosificador en el espejo y mantenga presionado
durante 1 minuto. / Place the dispenser on the mirror and hold
it pushing for 1 minute.
Retire los protectores de las almohadillas
adhesivas. / Remove the protectors from
the adhesive pads.
20
21
protectores
protectors
Para una adhesión
correcta, llene el
depósito después de 10
horas. / For a proper
adhesion, fill the tank
after 10 hours.
Operación / Operation
Rango de detección ajuste
de fábrica 3.8 cm a 6 cm. /
Detection range factory
setting 1 3/8" to 2 3/8"

Es muy importante seguir las siguientes instrucciones para conservar los
acabados de los productos HELVEX, con brillo y en perfecto estado:
1. Utilice únicamente agua y un paño limpio.
2. No utilice fibras, polvos, abrasivos, ni productos químicos.
3. No utilice objetos punzo-cortantes para limpiar los acabados.
4. Se recomienda realizar la limpieza de su producto diariamente.
Visite nuestras páginas www.helvex.com.mx para México y www.helvex.com
para el mercado Internacional
It is very important to follow the instructions below to preserve HELVEX products
finishes, shiny and in perfect condition:
1. Use only water and a clean cloth.
2. Do not use fibers, powders, abrasives, or chemicals.
3. Do not use sharp objects to clean the finish.
4. It is recommended to clean your product daily.
Visit our pages www.helvex.com.mx for Mexico and www.helvex.com
for the International market.
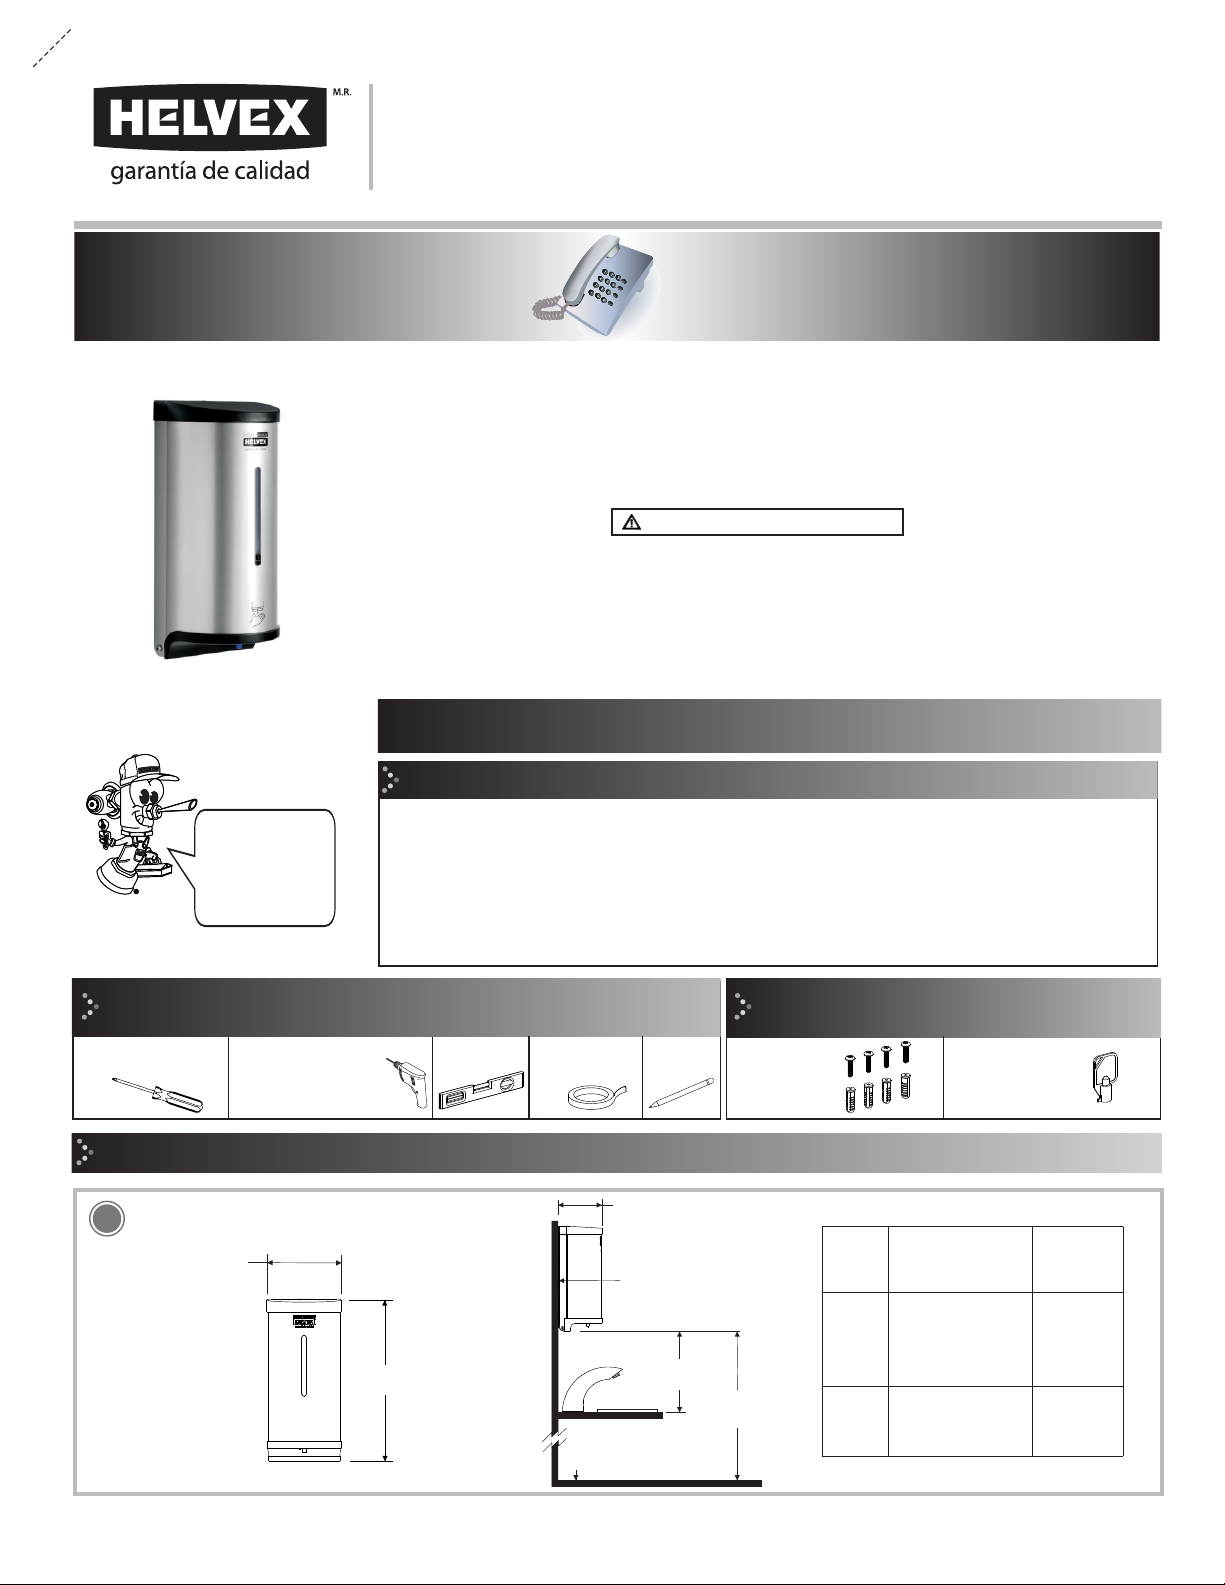
Recomendaciones de Limpieza / Cleaning Recommendations
In Guadalajara:
Contact:
Enter our free
training courses.
In Monterrey:
En la Ciudad de México:
In Mexico City:
En Monterrey: En Guadalajara:
(52) 55 53 33 94 00
Ext. 5806, 5805 y 5804
33 36 19 01 13
Comunícate:
Participa en nuestros
cursos gratuitos
de capacitación.
81 83 33 57 67
81 83 33 61 78
HELVEX, S. A. DE C. V. Calzada Coltongo # 293, Col. Industrial Vallejo, Alcaldía Azcapotzalco, C. P. 02300, Ciudad de México.
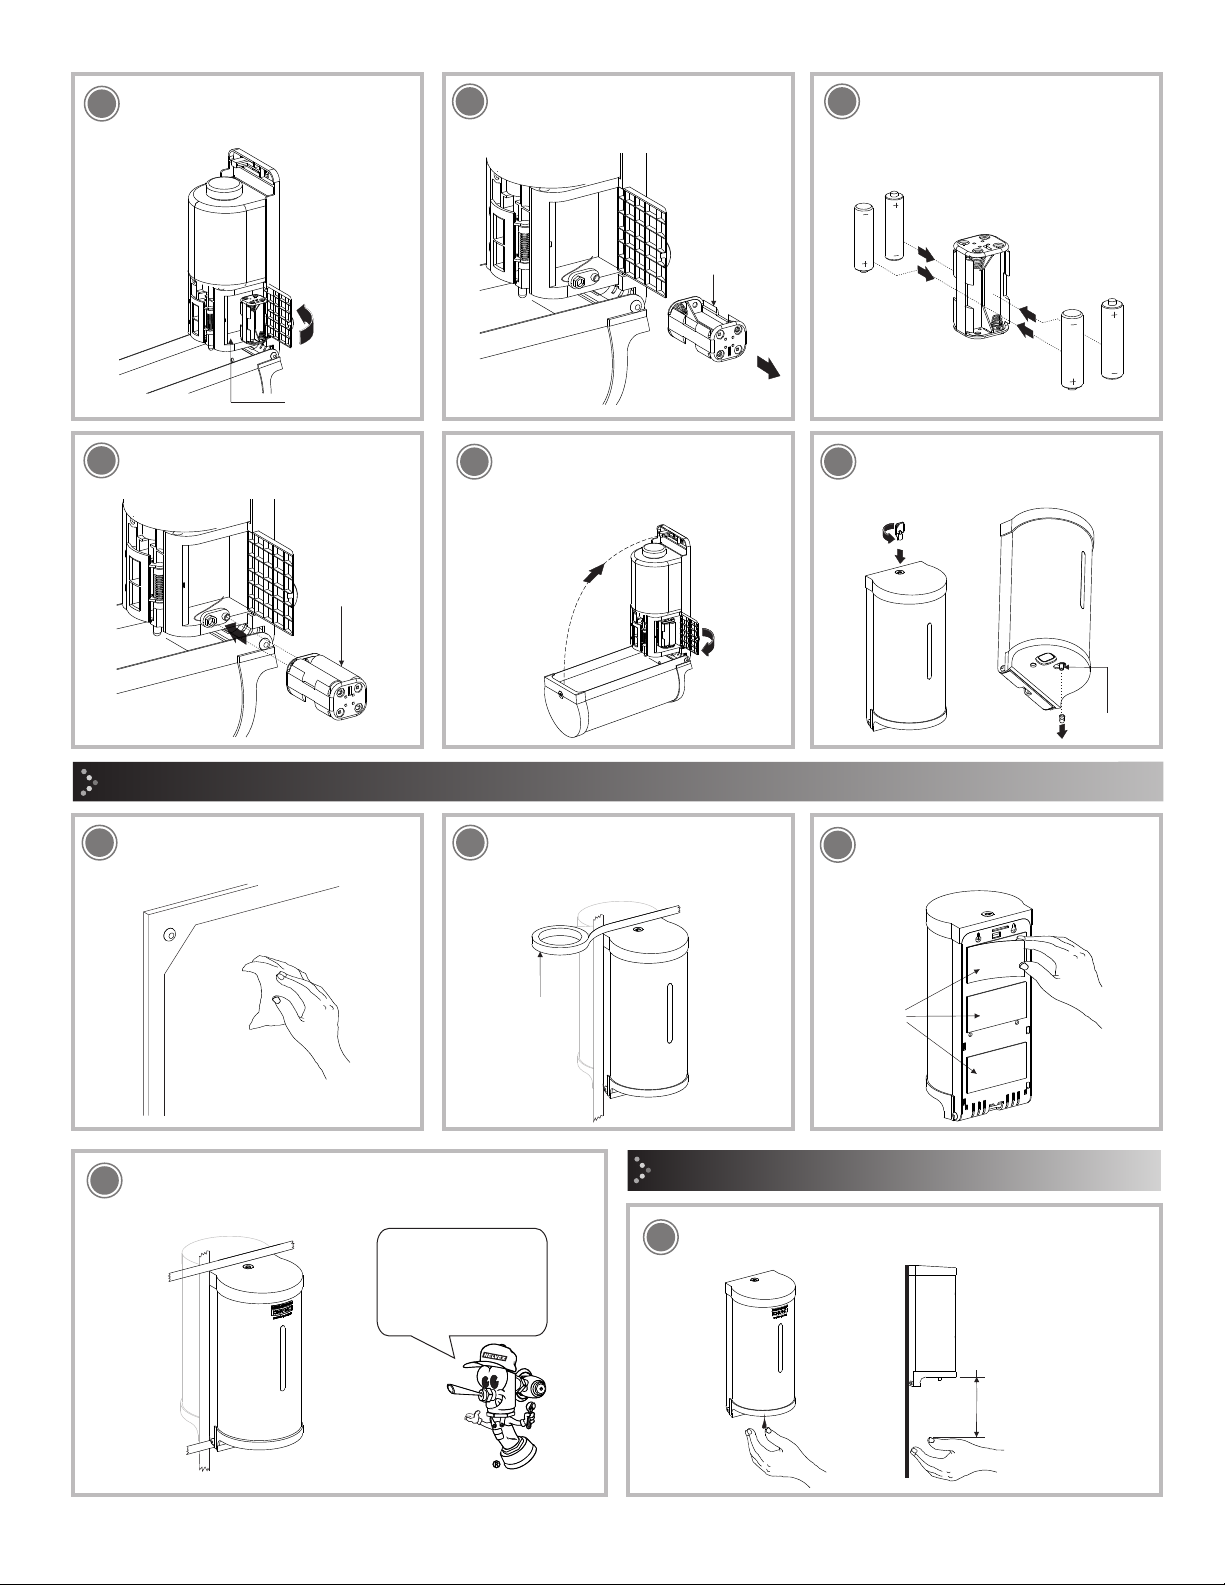
Llenado del Depósito de Jabón /
Soap Tank Filling
Problemas y Soluciones / Troubleshooting
Problema / Problem Causa / Cause Solución / Solution
No descarga el jabón /
Soap is not dispensed
Las baterías están descargadas.
/ The batteries are discharged.
Cambie las baterías. (Página 4, paso 25).
/ Change the batteries (Page 4, step 25).
La boquilla o el orificio de ventilación del depósito están
obstruidos. / The nozzle or the tank’s vent hole are clogged.
Realice el mantenimiento a la boquilla y asegúrese de que el
orificio de la tapa no esté obstruido. /
Perform maintenance on the nozzle and
make sure the lid hole is not clogged.
No hay jabón en el depósito. / There is no soap in the tank. Recargue el depósito de jabón. / Recharge the soap tank.
El dosificador se activa solo. /
The dispenser activates by itself.
Se encuentra muy cerca una superficie reflejante. /
A reflective surface is tool close.
Mueva el dosificador de acuerdo a las medidas de instalación
recomendadas. / Move the dispenser according to the recommended
installation dimensions.
Verificación de las Baterías /
Battery Verification
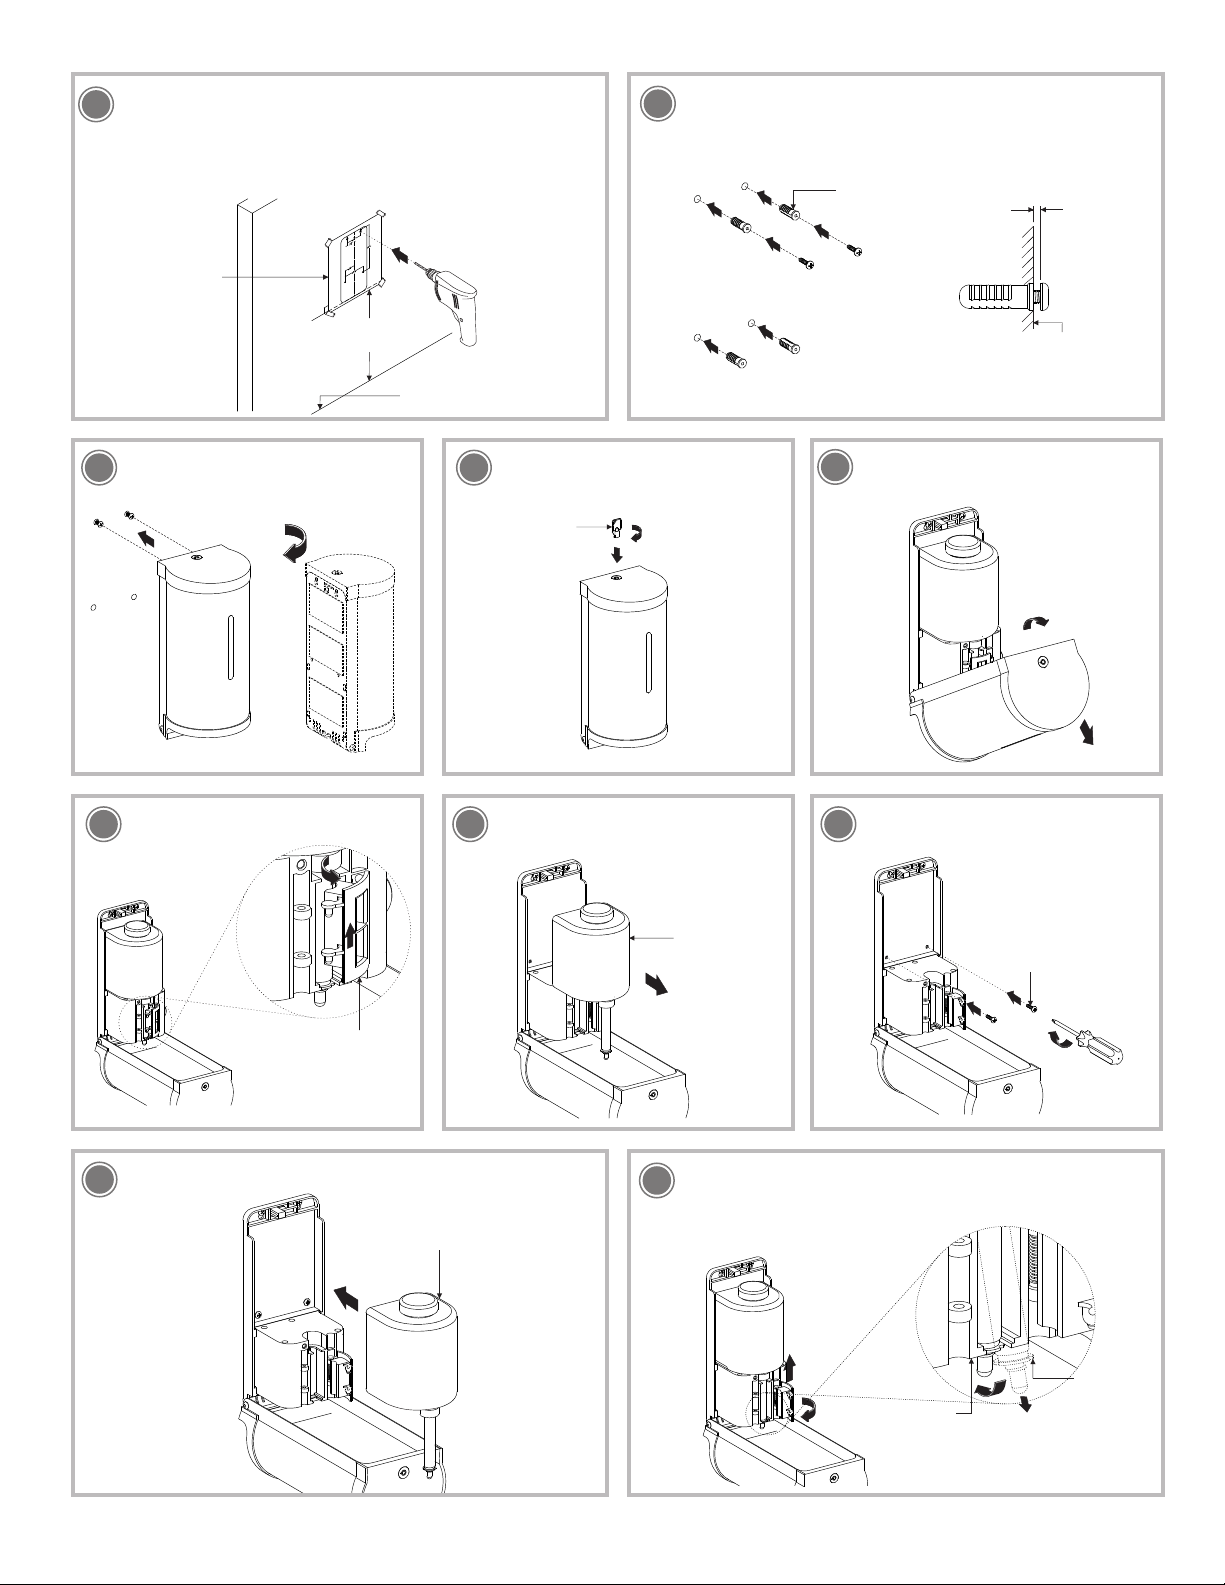
23 Para desmontar el depósito siga los pasos 5-8 de la pág. 2, llene
el depósito de jabón y colóquelo nuevamente siguiendo los pasos
10 y 11 de la pág. 2 . / To disassemble the tank follow steps 5-8
on page. 2, fill the soap tank and place it again following steps 10
and 11 on page. 2 .
orificio de ventilación
vent hole
boquilla
nozzle
Nota: Asegúrese de que el depósito
se cierre correctamente, y que el
orificio de ventilación y la boquilla no
estén obstruidos. / Note: Make sure
that the reservoir is closed correctly,
and that the vent hole and the nozzle
are not clogged.
24 Abra el dosificador, extraiga el depósito de jabón siguiendo
los pasos 5-8 de la pág. 2 y presione el botón azul para
verificar la vida de las baterías. / Open the dispenser, remove
the soap tank by following steps 5-8 on page. 2 and press the
blue button to verify battery function.
botón azul
blue button
luz azul
blue light
Nota: Sí la luz azul
parpadea tres veces; las
baterías están cargadas.
Sí la luz azul es continua;
debe cambiar las baterías.
Note: If the blue light
flashes three times; the
batteries are charged. If
the blue light remains lit;
you should change the
batteries.
Cambio de Baterías / Battery Replacement
25 Extraiga el porta baterías y cambie las beterías (siga los pasos 12-15 pág. 3). / Remove the batteries holder and change batteries (follow
steps 12-15 page 3)
Instale correctamente las 4 baterías
(AA alcalinas no incluidas).
Install the 4 batteries properly
(AA alkaline not included).
Table of contents
Other Helvex Bathroom Fixture manuals

Helvex
Helvex Novus E45 User manual

Helvex
Helvex H-106-S User manual

Helvex
Helvex TZF NAO P User manual

Helvex
Helvex LV CASSINI User manual

Helvex
Helvex TV-201 User manual

Helvex
Helvex 310-19-1 User manual

Helvex
Helvex Clasica 105 User manual

Helvex
Helvex H-3300 User manual

Helvex
Helvex FB-110-32 User manual

Helvex
Helvex 410-32 User manual

Helvex
Helvex 210-32 User manual

Helvex
Helvex H-900 User manual

Helvex
Helvex UIN-05 User manual

Helvex
Helvex AT-2 User manual

Helvex
Helvex Kubica TR-036 User manual

Helvex
Helvex TH-061 User manual

Helvex
Helvex Kubica 14148 User manual

Helvex
Helvex Magna Dx User manual

Helvex
Helvex H-3002 User manual

Helvex
Helvex 110-32 User manual