manuals.online logo
Brands
  1. Home
  2. •
  3. Brands
  4. •
  5. Helvex
  6. •
  7. Bathroom Fixture
  8. •
  9. Helvex RMB-30 User manual

Helvex RMB-30 User manual

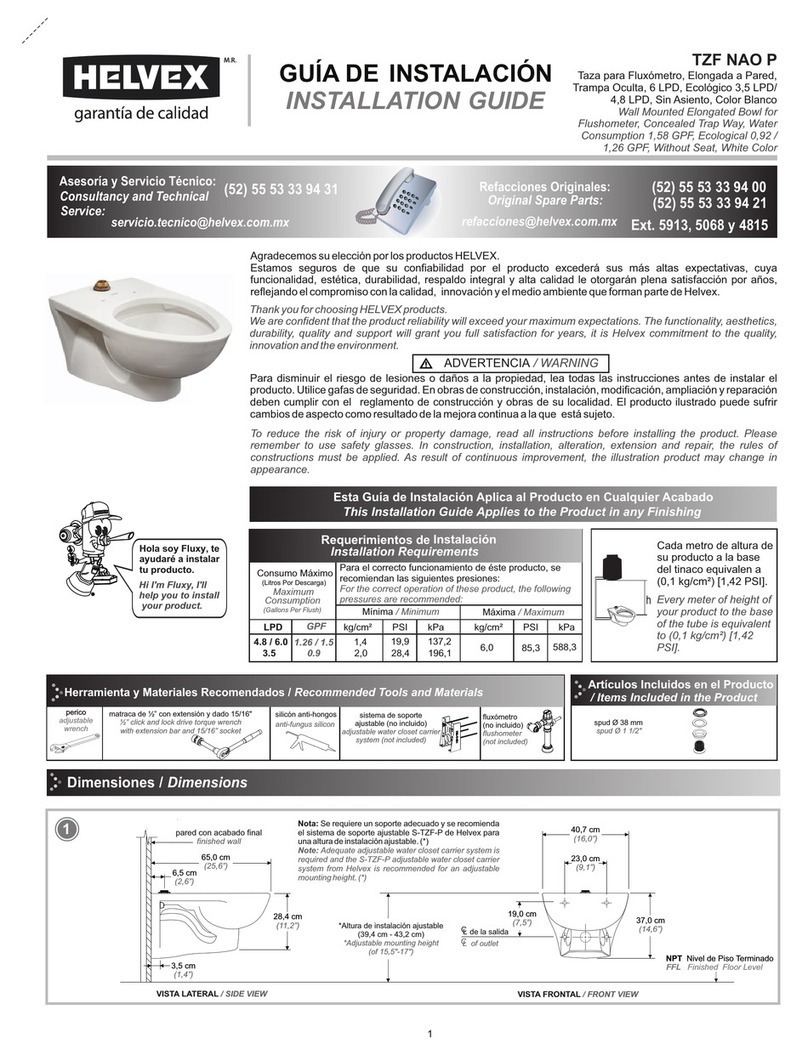
Requerimientos de
Instalación
Para el correcto funcionamiento de
este producto, la presión mínima
es de (1 kg/cm²) 14,2 PSI.
Relación
Altura Tinaco-Presión
10 m
20 m
30 m
PSI
Altura (h)
14,2
28,4
42,6
kg/cm²
1
2
3
Installation Requirements Relation
Tub Height-Pressure
Height (h)
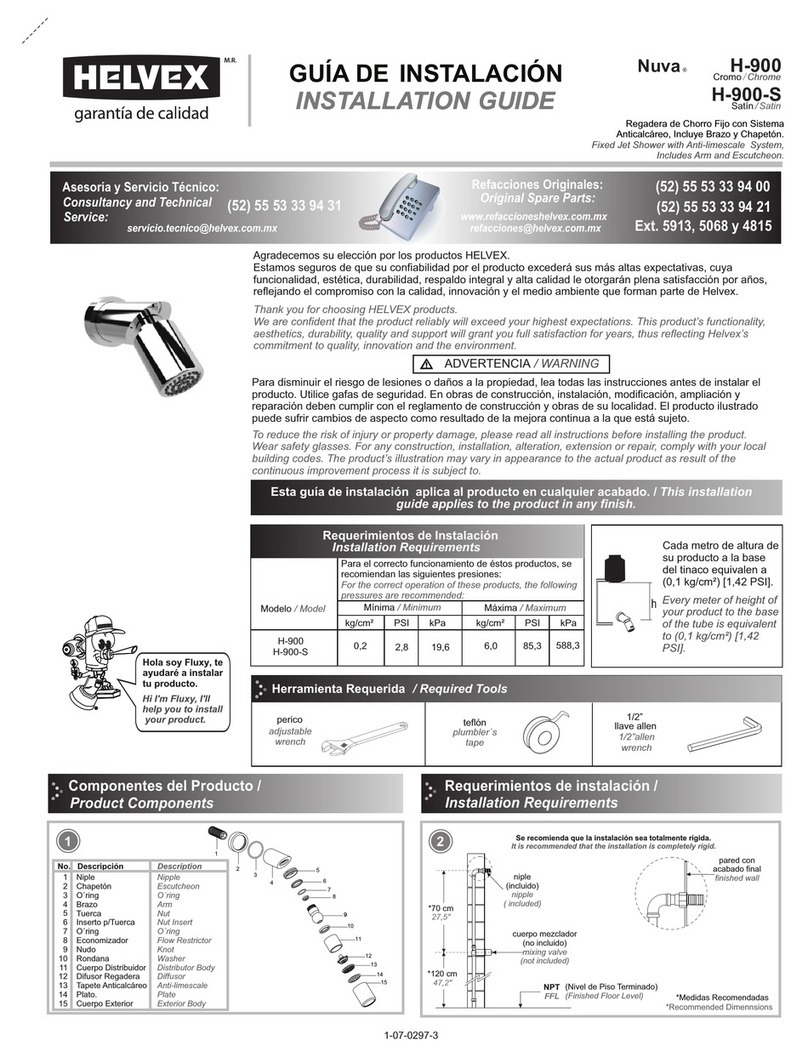
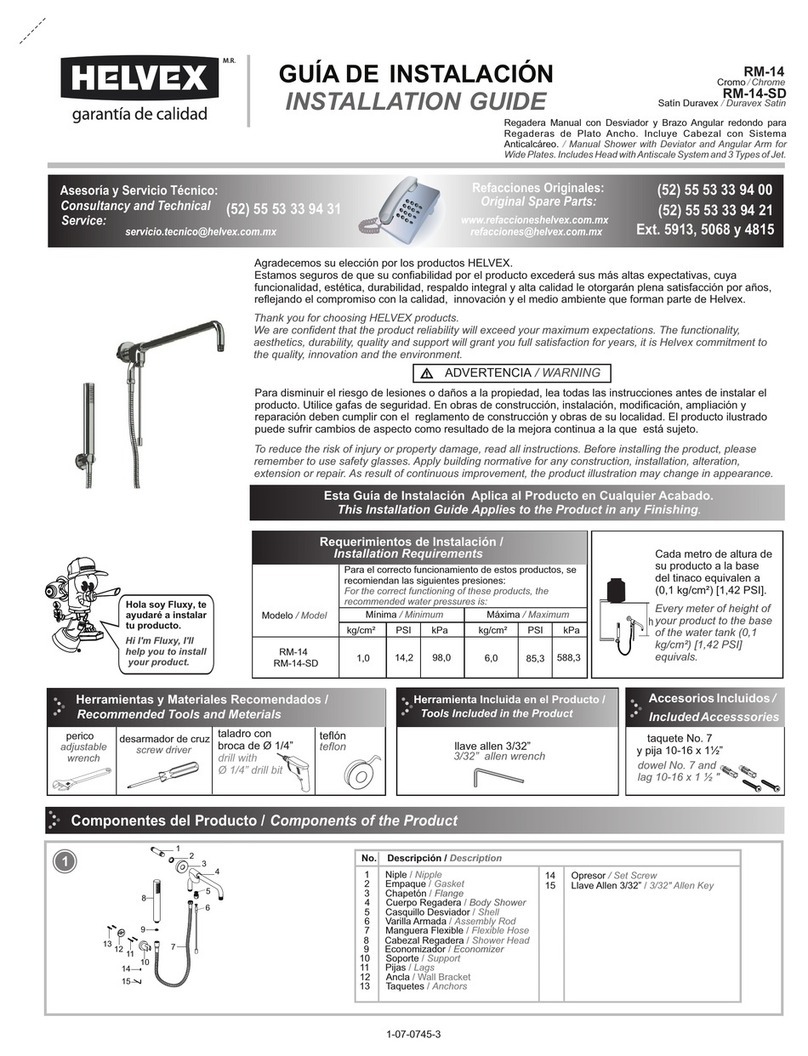
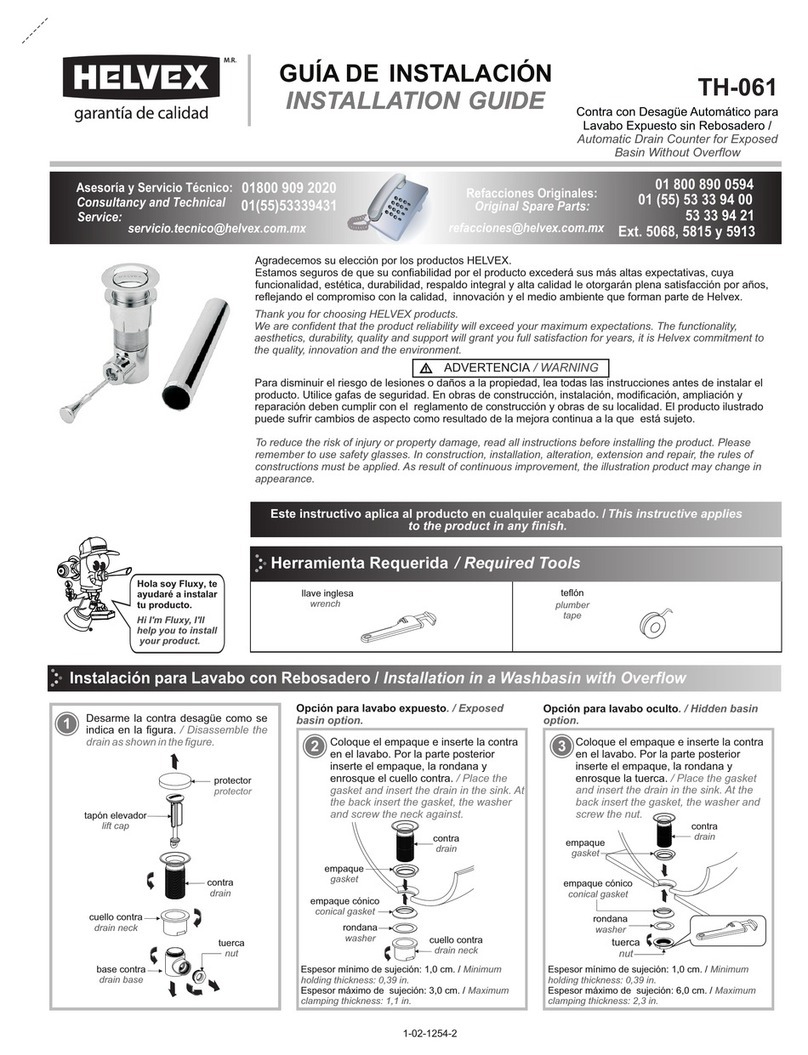
Cada metro de altura de
su producto a la base
del tinaco equivalen a
(0,1 kg/cm²) [1,42 PSI].
Every meter of height
from your product to the
base of the water tank
(0,1 kg/cm²) [1,42 PSI]
equivals.
1-07-0760-1
ADVERTENCIA / WARNING
Este instructivo aplica al producto en cualquier acabado. / This instructive applies
to the product in any finish.
Visite nuestra página
www.helvex.com.mx,
para visualizar los videos
de instalación.
Visit our website
www.helvex.com.mx,
to view the installation
videos.
Hola soy Fluxy, te
ayudaré a instalar
tu producto.
Instalación General
INSTALLATION GUIDE
GUÍA DE INSTALACIÓN
Hi I'm Fluxy, I'll
help you to install
your product.
/ General Installation
1
[email protected]
Original Parts:
Consultancy and Technical
01(55)53339431
01800 909 2020 01 (55) 53 33 94 00
Refacciones Originales:
Asesoría y Servicio Técnico:
Ext. 5068, 5815 y 5913
Service:
53 33 94 21
01 800 890 0594
Para disminuir el riesgo de lesiones o daños a la propiedad, lea todas las instrucciones antes de instalar el
producto. Utilice gafas de seguridad. En obras de construcción, instalación, modificación, ampliación y
reparación deben cumplir con el reglamento de construcción y obras de su localidad. El producto ilustrado
puede sufrir cambios de aspecto como resultado de la mejora continua a la que está sujeto.
Agradecemos su elección por los productos HELVEX.
Estamos seguros de que su confiabilidad por el producto excederá sus más altas expectativas, cuya
funcionalidad, estética, durabilidad, respaldo integral y alta calidad le otorgarán plena satisfacción por años,
reflejando el compromiso con la calidad, innovación y el medio ambiente que forman parte de Helvex.
Thank you for choosing HELVEX products.
We are confident that the product reliability will exceed your maximum expectations. The functionality,
aesthetics, durability are at its highest quality! The comprehensive support will grant full satisfaction for years,
reflecting the commitment to quality, innovation and the environment as part Helvex.
To reduce the risk of injury or property damage, read all instructions. Before installing the product, please
remember to use safety glasses. In construction, installation, alteration, extension and repair, the rules of
constructions must be applied. As result of continuous improvement, the illustration product may change in
appearance.
[email protected]
Artículos Incluidos en el Producto
/ Items included in the Product
fixing package
paquete de fijación
teflon
adjustable
wrench
perico teflón
drill
taladro
screwdriver
destornillador
Herramienta Requerida
/ Required Tools
NPT
*3,7cm
1,45” pared con
acabado final
wall finish
(Nivel de Piso Terminado)
(Finished Floor Level)
(Nivel de Piso Terminado)
(Finished Floor Level)
*Medidas recomendadas
* Recommended Measures
*120 cm
(47,2”)
RMB-30
NPT
*20cm
(7,87”)
Minimum work pressure (1 kg/cm ²)
14,2 PSI.
conector con cuerda
1/2”-14 NPT
(no incluido)
coupling
1/2 "-14 NPT
(not included)
Regadera con bocina, de altura
deslizable con cinco tipos de chorro
/Speaker shower, sliding height with
five spray modes
*110 cm
(43,24”)
120 cm
(47,2”)
2
Coloque el tubo guia y marque los
barrenos. / Place the guide tube and
mark the holes.
Ubique los centros de los barrenos y
marque con un punto de golpe. /
Locate the centers of the holes and
mark with a hit point.
tubo guía
guide tube
punto de
golpe
hit point
2 34Perfore las marcas con broca de
Ø7/32” para concreto (no incluida). /
Drill with drill marks Ø7/32 "concrete
(not included).
Inserte los taquetes (incluidos) en los
barrenos. / Insert anchors (provided)
into the holes.
5 Retire el tapón de el soporte de
sujeción (incluidos). / Remove the
cap from the cradle (included).
6 Inserte el soporte de sujeción (incluido)
y el porta bocina con inserto (incluido)
en el tubo guía. / Insert the support
clamp (included) and the speaker
holder with insert (included) into the
guide tube.
7
taquetes
anchors
tapón
cap
soporte
support
porta bocina
con inserto
speaker
holder insert
tubo
tube
soporte de
sujeción (incluido)
support clamp
(included)
90°
pija
(incluida)
dick
(included)
Fije el tubo guía con las pijas
(incluidas). / Attach the guide tube
with lag screws (included).
8 Inserte el tapón en el soporte. / Insert
the plug in to the holder.
.
9
tapón
cap
pija
(incluida)
dick
(included)
10
Colocar teflón en
las uniones
roscadas.
Place teflon
threaded joints.
codo
(incluido)
elbow
(included)
llave allen de ½”(no
incluida)
allen wrench ½ "(not
included)
1/2”-14 NPT
conector
1/2 "-14 NPT
connector
porta bocina
speaker holder
alimentación
water supply
Enrosque el conector a la
alimentación y enrosque el codo,
purgue la línea de alimentación antes
de conectar el codo. / Tighten the
connector and tighten the elbow,
flush the supply line before
connecting the elbow.
vele e el la oNi n p n
verti l.
ca / evel ih
L n t e
t cal p an
ver i l e.
3
rcón e deaOpe a i R ga r
Opertion her
/ a S ow
11
cabezal
regadera
(incluido)
shower head
(included)
manguera
(incluida)
hose
(included)
codo
elbow
12
cabezal
regadera
(incluido)
shower head
(included)
13 Inserte la bocina en el porta bocina. /
Insert the speaker into the speaker
holder.
porta bocina
speaker
holder
bocina
speaker
9
Los tipos de chorro son:
1. Rocío
2. Lluvia fina
3. Lluvia Gruesa
4. Champagne
5. Masaje
Jet types are:
1.-Dew
2.-Fine Rain
3.- Thick rain
4.-Champagne
5.-Massage
1 2 3 4 5
14 Para deslizar el soporte de la regadera oprima el botón y
deslice hacia arriba o hacia abajo. Oriente el soporte en el
ángulo que desee. / To slide the bracket Sprinkler press the
button and slide up or down. Orient bracket in the desired
angle.
15
9
14
pi zaC eninLim e / l a g
Pase el dedo por encima de los anticalcáreos para eliminar el
sarro. / Swipe your finger over the limescale to remove tartar.
9
16
Nota: Esta regadera es de libre
mantenimiento. Note: This
shower is maintenance free.
17
Enrosque un extremo de la manguera
(incluida) al codo y el otro extremo al
cabezal regadera (incluido). / Tighten
one end of the hose (included) to the
elbow and the other to the shower
head (included).
Coloque el cabezal regadera sobre el
soporte. / Place the shower head on
the bracket.
La regadera tiene la opción de 5 chorros diferentes, seleccione
el chorro deseado mediante el giro del plato en cualquier
sentido. / The shower has 5 different jets, select the desired plate
by rotating the jet in any direction.
Desenrosque la regadera de la manguera y limpie el
economizador a chorro de agua, vuelva a enroscar la regadera
a la manguera. / Unscrew the shower hose and clean the
economizer (flow reductor) with water, screw the shower head to
the hose.
soporte
support
HELVEX, S. A. DE C.V. Calzada Coltongo 293, Col. Industrial Vallejo 02300 Del. Azcapotzalco, México, D.F. Tel. (55) 53-33-94-00.
Es muy importante seguir las siguientes instrucciones para conservar los
acabados de los
1. Utilice únicamente agua y un paño limpio.
2. No utilice fibras, polvos, abrasivos, ni productos químicos.
3. No utilice objetos punzo-cortantes para limpiar los acabados.
4. Se recomienda realizar la limpieza de suproducto diariamente.
Nota: Vea nuestros tips en la pag. www.helvex.com.mx
productos HELVEX, con brillo y en perfecto estado:
It is very important to follow the instructions below to preserve HELVEX products
finishes, shiny and in perfect condition:
1. Use only water and a clean cloth.
2. Do not use fibers, powders, abrasives, or chemicals.
3. Do not use sharp objects to clean the finish.
4. It is recommended to clean your product daily.
Note: See our tips on: www.helvex.com.mx
Recomendaciones de Limpieza / Cleaning Recommendations
In Guadalajara:
Contact:
Enter our free
training courses.
In Monterrey:
En la Ciudad de México:
In Mexico City:
En Monterrey:
En Guadalajara:
01 55 53 33 94 00
Ext. 5804, 5805 y 5806 (0133) 36 19 01 13
Comunícate:
Participa en nuestros
cursos gratuitos
de capacitación.
(0181) 83 33 57 67
(0181) 83 33 61 78
4
Posibles Causas y Soluciones / Possible Causes and Solutions
Problema Causa Solución
Fuga en el codo. Leak in
the elbow.
No se colocó cinta teflón en las uniones. / Teflon tape is
not placed on the joints.
Colocar cinta teflón en cada unión, máximo 3 vueltas (pag. 2,
paso 10). / Place Teflon tape at each joint, maximum 3 laps
(page 2, step 10).
El economizador está obstruído. / The economizer is
blocked.
Limpie el economizador a chorro de agua (pag. 3, limpieza). /
Clean running water economizer (p. 3, cleaning)
Los anticalcáreos están sucios. / The limescale are dirty. Limpie los anticalcáreos (pag. 3, limpieza). / Clean limescale (p.
3, cleaning).
Fuga en las conexiones de
la manguera. / Leak at
hose connections.
Las conexiones no están apretadas. / The connections
are not tight. Apriete firmemente las conexiones. / Tighten connections.
Disminución del chorro de
agua. / Decreased water
jet.

Other Helvex Bathroom Fixture manuals

Helvex E-710 User manual

Helvex

Helvex E-710 User manual

Helvex AC10-TR011 User manual

Helvex

Helvex AC10-TR011 User manual

Helvex H-7190 User manual

Helvex

Helvex H-7190 User manual

Helvex E-305 User manual

Helvex

Helvex E-305 User manual

Helvex 210-32 User manual

Helvex

Helvex 210-32 User manual

Helvex E-919 User manual

Helvex

Helvex E-919 User manual

Helvex Vertika E-910-DX User manual

Helvex

Helvex Vertika E-910-DX User manual

Helvex LV FUTURA1 User manual

Helvex

Helvex LV FUTURA1 User manual

Helvex 210-WC-4,8 User manual

Helvex

Helvex 210-WC-4,8 User manual

Helvex PIURA PIU-05 User manual

Helvex

Helvex PIURA PIU-05 User manual

Helvex 285-19-1 User manual

Helvex

Helvex 285-19-1 User manual

Helvex TR-012-S User manual

Helvex

Helvex TR-012-S User manual

Helvex LAV MOREA1 User manual

Helvex

Helvex LAV MOREA1 User manual

Helvex AT-2 User manual

Helvex

Helvex AT-2 User manual

Helvex Clasica 105 User manual

Helvex

Helvex Clasica 105 User manual

Helvex 310-19-1 User manual

Helvex

Helvex 310-19-1 User manual

Helvex MG MOJAVE User manual

Helvex

Helvex MG MOJAVE User manual

Helvex Clásica II 206 User manual

Helvex

Helvex Clásica II 206 User manual

Helvex Konos 2107 User manual

Helvex

Helvex Konos 2107 User manual

Helvex IGUAZU H-202 User manual

Helvex

Helvex IGUAZU H-202 User manual

Helvex Nuva 9104 User manual

Helvex

Helvex Nuva 9104 User manual

Helvex H-600 User manual

Helvex

Helvex H-600 User manual

Helvex Forza TV-304 User manual

Helvex

Helvex Forza TV-304 User manual

Helvex Nuva E-32 User manual

Helvex

Helvex Nuva E-32 User manual

Popular Bathroom Fixture manuals by other brands

ABI INTERIORS AZUL installation guide

ABI INTERIORS

ABI INTERIORS AZUL installation guide

newform 67620E instructions

newform

newform 67620E instructions

Booth & Co AXBRIDGE BC-AXB-183-CP installation guide

Booth & Co

Booth & Co AXBRIDGE BC-AXB-183-CP installation guide

Milli Pure Twin Rail installation instructions

Milli

Milli Pure Twin Rail installation instructions

GATTONI RT010 Installation and assembly

GATTONI

GATTONI RT010 Installation and assembly

URIDAN ADMIRAL KH-10 installation instructions

URIDAN

URIDAN ADMIRAL KH-10 installation instructions

Novellini DIVINA W Instructions for installation, use and maintenance manual

Novellini

Novellini DIVINA W Instructions for installation, use and maintenance manual

Voda ECOMIX VECM040 manual

Voda

Voda ECOMIX VECM040 manual

Better Bathrooms Gobi BeBa 25374 user manual

Better Bathrooms

Better Bathrooms Gobi BeBa 25374 user manual

Hewi 950.50.06490 Mounting instructions

Hewi

Hewi 950.50.06490 Mounting instructions

Lefroy Brooks TEN TEN TT 4973 installation guide

Lefroy Brooks

Lefroy Brooks TEN TEN TT 4973 installation guide

Moen T3291 installation guide

Moen

Moen T3291 installation guide

STEIN GEORGIA installation instructions

STEIN

STEIN GEORGIA installation instructions

DURAVIT D-NEO DE4210 0100 Instructions for mounting and use

DURAVIT

DURAVIT D-NEO DE4210 0100 Instructions for mounting and use

Allen + Roth Davidson-60GP-CH installation manual

Allen + Roth

Allen + Roth Davidson-60GP-CH installation manual

OVE SYDNEY 60 installation manual

OVE

OVE SYDNEY 60 installation manual

Delabie 2200 manual

Delabie

Delabie 2200 manual

Kohler Englefield K-5627X Installation and care guide

Kohler

Kohler Englefield K-5627X Installation and care guide

manuals.online logo
manuals.online logoBrands
  • About & Mission
  • Contact us
  • Privacy Policy
  • Terms and Conditions

Copyright 2025 Manuals.Online. All Rights Reserved.