manuals.online logo
Brands
  1. Home
  2. •
  3. Brands
  4. •
  5. Helvex
  6. •
  7. Bathroom Fixture
  8. •
  9. Helvex Vertika E-3007 User manual

Helvex Vertika E-3007 User manual

ADVERTENCIA / WARNING
Este instructivo aplica al producto en cualquier acabado. / This instructive applies
to the product in any finish.
Cada metro de altura de
su producto a la base
del tinaco equivalen a
(0,1 kg/cm²) [1,42 PSI].
Every meter of height of
your product to the base
of the water tank (0,1
kg/cm²) [1,42 PSI]
equivals.
Requerimientos de
Instalación
Para el correcto funcionamiento de
este producto, la presión mínima
es de (1 kg/cm²) 14,3 PSI.
Relación
Altura Tinaco-Presión
2,5 m
3 m
4 m
PSI
Altura (h)
3,55
4,2
5,6
kg/cm²
0,25
0,3
0,4
Hola soy Fluxy, te
ayudaré a instalar
tu producto.
INSTALLATION GUIDE
GUÍA DE INSTALACIÓN
1-02-1516-6
For the correct operation of this
product, the minimum pressure is
(1 kg/cm ²) 14,3 PSI.
Hi I'm Fluxy, I'll
help you to install
your product.
Installation Requirements Relation
Tub Height-Pressure
Height (h)
1
Monomando a Pared con Desagüe tipo
hongo sin Rebosadero / Wall
Mounted, Single Control Faucet with
Mushroom Style Drain without overflow
E-3007 Vertika
Para disminuir el riesgo de lesiones o daños a la propiedad, lea todas las instrucciones antes de instalar el
producto. Utilice gafas de seguridad. En obras de construcción, instalación, modificación, ampliación y
reparación deben cumplir con el reglamento de construcción y obras de su localidad. El producto ilustrado
puede sufrir cambios de aspecto como resultado de la mejora continua a la que está sujeto.
Agradecemos su elección por los productos HELVEX.
Estamos seguros de que su confiabilidad por el producto excederá sus más altas expectativas, cuya
funcionalidad, estética, durabilidad, respaldo integral y alta calidad le otorgarán plena satisfacción por años,
reflejando el compromiso con la calidad, innovación y el medio ambiente que forman parte de Helvex.
Thank you for choosing HELVEX products.
We are confident that the product reliability will exceed your maximum expectations. The functionality,
aesthetics, durability are at its highest quality! The comprehensive support will grant full satisfaction for years,
reflecting the commitment to quality, innovation and the environment as part Helvex.
To reduce the risk of injury or property damage, read all instructions. Before installing the product, please
remember to use safety glasses. In construction, installation, alteration, extension and repair, the rules of
constructions must be applied. As result of continuous improvement, the illustration product may change in
appearance.
llave allen 1/16”
allen wrench 1/16”
llave para
aireador
aerator wrench
llave para tuerca monomando
tap wrench nut
Herramienta Incluida en su Producto
/ Tools Included in your Product
Herramienta Requerida
perico
/ Required Tools
adjustable
wrench
llave de plomero teflón
plumber´s wrench teflon llave allen 2 mm
allen wrench 2mm
Dimensiones Instalación en Muro / Dimensions in Wall Installation
Vista Frontal
Front View
muro sin
acabado final
drywall finishing
6,5 cm
19,0 cm
9,5 cm
ranura en
muro
wall slot
8,4 cm min.
*8,9 cm
9,4 cm max.
4,0 cm
pared con acabado final
wall finish
indicador del nivel
de profundidad
indicator of depth
pared con
acabado final
wall finish
Vista Superior
Top View
Verifique el rango de
profundidad indicada en la
guía de instalación, para
evitar problemas posteriores.
Check the depth range
specified in the installation
guide, to avoid problems later.
[email protected]
Original Spare Parts:
Consultancy and Technical
01(55)53339431
01800 909 2020 01 (55) 53 33 94 00
Refacciones Originales:
Asesoría y Servicio Técnico:
Ext. 5068, 5815 y 5913
Service:
53 33 94 21
01 800 890 0594
[email protected]
2
Retire el capuchón con guía, desenrosque el tornillo y retire el porta cartucho. Posteriormente enrosque los conectores con su tubo
previamente soldado. / Remove cap with a guide, unscrew the screw and remove the cartridge holder. Then screw the connectors with your
previously welded pipe.
2
3Coloque el porta cartucho y enrosque el tornillo a tope para
sujetarlo, posteriormente inserte el capuchón el cuerpo de
empotrar. / Place the cartridge holder and screw to hold it, then
insert the cap to the body.
4
Instalación a Muro / Installing into the Wall
Conexión del cuerpo monomando / Connecting the Mixer Body
porta cartucho
cartridge holder
capuchón con
guía de instalación
cap with installation guide
Vista Frontal
Front View
línea de
agua caliente
hot water line
línea de
agua fría
cold water line
conector Ø ½”NPT
(no Incluido)
connector Ø ½ "NPT
(not included)
Empotre el cuerpo monomando al muro. / Embed the mixer body
into wall.
tornillo
screw
porta cartucho
cartridge holder
Purgue las líneas de
alimentación, antes de
conectar al cuerpo.
Flush supply lines before
connecting to the body.
capuchón con
guía de instalación
cap with
installation guide
5
muro sin
acabadofinal
drywall finishing
Es importante que el acabado final se
considere dentro del rango indicado. / It
is important that the final finish is
considered within the indicated range.
Nivele como se indica en las figuras considerando que el acabado final quede dentro del rango indicado. / Level as shown in the figures
take care that the finish is within the indicated range.
muro sin acabado
drywall finishing
3
6
Dimensión de Instalación a Tablacemento / Dimension for Installing in Cement Panels
Construya una estructura, para fijar el cuerpo con su placa de sujeción (incluida). / Construct to fix the body with its plate (included).
Perfore la tablacemento, considerando que pase libre la guía
de instalación. / Cut the cement panel, considering the free
pass of the instalation guide cap.
9Fije el cuerpo con su placa de sujeción a la estructura,
conecte a la tubería de alimentación y coloque las placas de
tablacemento. / Secure the body with its clamping plate to the
structure, connect to feeding lines, then place the cement
panels.
10
Verifique, el paso libre de la
guía de instalación. / Verify
the free passage of the
installation guide.
canal estructural
horizontal
canal estructural
vertical
pared con
acabado final
*4,0 cm
*1,5 plg
tablacemento
vista superior
tablacemento
cement panels
guía de
instalación
installation
guide
tablacemento
cement panels
tablacemento
cement panels
Realice el paso 2 de la página 2, purgue las líneas de
alimentación y aplique el paso 4 de la página 2, posteriormente
fije el cuerpo monomando a la placa. / Follow Step 2 on page
2, purge supply lines and apply step 4 on page 2, then set the
mixer body to the plate.
7Nivele como se indica en el paso 5 de la página 2 y fije la placa
como se indica en la imágen. / Level as indicated in step 3 on
page 4 and set the plate as shown in the image.
8
tornillo auto roscante para
metal (no incluido)
self-tapping sheet
metal screw (not included)
vertical structural channel
wall finish
table
top view
horizontal structural
4
Coloque la tapa deslizante e inserte el
maneral. / Place the slide and insert the
handle.
Instalación General / General Installation
Vista Lateral
Side View
porta
cartucho
cartridge holder
Coloque el acabado final y retire la guía de instalación. / Place the
finish and remove the installation guide.
11 Para asegurar la profundidad óptima del porta cartucho utilice
la llave incluida como escantillón y apriete o afloje el tornillo
según sea el caso. / To ensure the optimum depth of the
cartridge holder and use the included key fixture and tighten or
loosen the screw as appropriate.
12
Es importante que el acabado final quede
dentro del rango indicado. / It is important that
the final finish is within the indicated range.
Ya colocado su acabado final proceda
a insertar el chapetón con la salida,
asegurando la fijación con la tuerca. /
Insert the faucet with escutcheon and
tighten with nut.
llave incluida
wrench included
acabado
final
wall finish
13 14 Apriete el maneral con el opresor. /
Tighten the handle with the set screw.
15
retire antes
de instalar
remove before
installing
llave (incluida)
wrench (included)
tornillo
screw
chapetón
escutcheon
turca
nut
tapa deslizante
slide
maneral
handle
Desarme la contra desagüe. /
Disassemble drain.
16
/ Installing Drain
Instalación Contra Desagüe Instalación Contra Desagüe
protector
tuerca
protector
nut
contra de
push
push drain
tubo
tailpiece
empaque
cónico
fiber washer
rondana de fibra
conical
gasket
opresor
set screw
maneral
handle
17 Aplique silicón antihongos e inserte
la contra./ Place the gasket then
insert the drain.
Alinear la insignia
con el lavabo.
Align Logo with sink.
18 Inserte el empaque cónico, rondana
de fibra y apriete la tuerca. / Insert
the conical gasket, fiber washer and
tighten the nut.
contra
drain
rondana de fibra
fiber washer
empaque cónico
conical gasket
nut
tuerca
Thighten to prevent
leaks.
Apriete para evitar
filtraciones.
5
21
24 25
22
Cambio de Cartucho
Mantenimiento del Aireador
/ Cartridge Replacement
/ Aerator Maintenance
Mantenimiento del Restrictor
/ Flow Regulator Maintenance
19
tubo unión
céspol
tailpiece
céspol
(no incluido)
Mod. TV-016 ó TV-017
drain
(not included)
Colocar teflón
en las uniones
roscadas.
Enrosque el tubo unión céspol y
posteriormente el desagüe (no
incluido). Screw the tailpiece and
then to trap (not included).
Instalación Contra Desagüe
20
Operación / Operation
abrir
+ fría
+ caliente
llave para tuercas
monomando
(incluida)
nut wrench
(included)
cartucho (Sh-1242)
cartridge (Sh-1242)
llave allen
2 mm (incluida)
allen wrench
2 mm (included)
restrictor
flow ragulator
opresor
set screw
llave allen
allen key
Desatornille el opresor. / Unscrew the set screw Retire el aireador con ayuda de la llave. / Remove the
aerator using the wrench (included) .
aireador
aerator
llave
wrench
(included)
Place plumber
tape to threaded
joints.
Abra la línea de alimentación principal, para abrir el flujo de agua, levante el maneral y para
cerrar bájelo. Para ajustar la temperatura, gire el maneral hacia la izquierda para más
caliente y hacia la derecha para más fría. / Open water supply, lift up the handle to open and
down to close. To regulate the temperature, turn left to heat and right to cool.
Desarme como en el paso “Cambio
de Cartucho” y retire el restrictor. /
Disassemble as in step “Cartridge
Replacement” and remove the flow
regulator.
Para reemplazar el cartucho, desenrosque
el opresor del maneral y el maneral,
procediendo a desenroscar las tuercas,
como se muestra en la imagen. / To
replace the cartridge, unscrew the set
screw and proceed to unscrew the nuts, as
shown in the picture.
23
restrictor
flow regulator
Limpie a chorro de agua y arme
nuevamente. / Clean with water jet
and reassemble.
HELVEX, S. A. DE C.V. Calzada Coltongo 293, Col. Industrial Vallejo 02300 Del. Azcapotzalco, México, D.F. Tel. (55) 53-33-94-00.
Es muy importante seguir las siguientes instrucciones para conservar los
acabados de los productos HELVEX, con brillo y en perfecto estado:
1. Utilice únicamente agua y un paño limpio.
2. No utilice fibras, polvos, abrasivos, ni productos químicos.
3. No utilice objetos punzo-cortantes para limpiar los acabados.
4. Se recomienda realizar la limpieza de su producto diariamente.
Nota: Vea nuestros tips en la pag. www.helvex.com.mx
It is very important to follow the instructions below to preserve HELVEX products
finishes, shiny and in perfect condition:
1. Use only water and a clean cloth.
2. Do not use fibers, powders, abrasives, or chemicals.
3. Do not use sharp objects to clean the finish.
4. It is recommended to clean your product daily.
Note: See our tips on: www.helvex.com.mx
Recomendaciones de Limpieza / Cleaning Recommendations
Posibles Causas y Soluciones / Troubleshooting
In Guadalajara:
Contact:
Enter our free
training courses.
In Monterrey:
En la Ciudad de México:
In Mexico City:
En Monterrey:
En Guadalajara:
01 55 53 33 94 00
Ext. 5804, 5805 y 5806 (0133) 36 19 01 13
Participa en nuestros
cursos gratuitos
de capacitación.
(0181) 83 33 57 67
(0181) 83 33 61 78
6
26 27
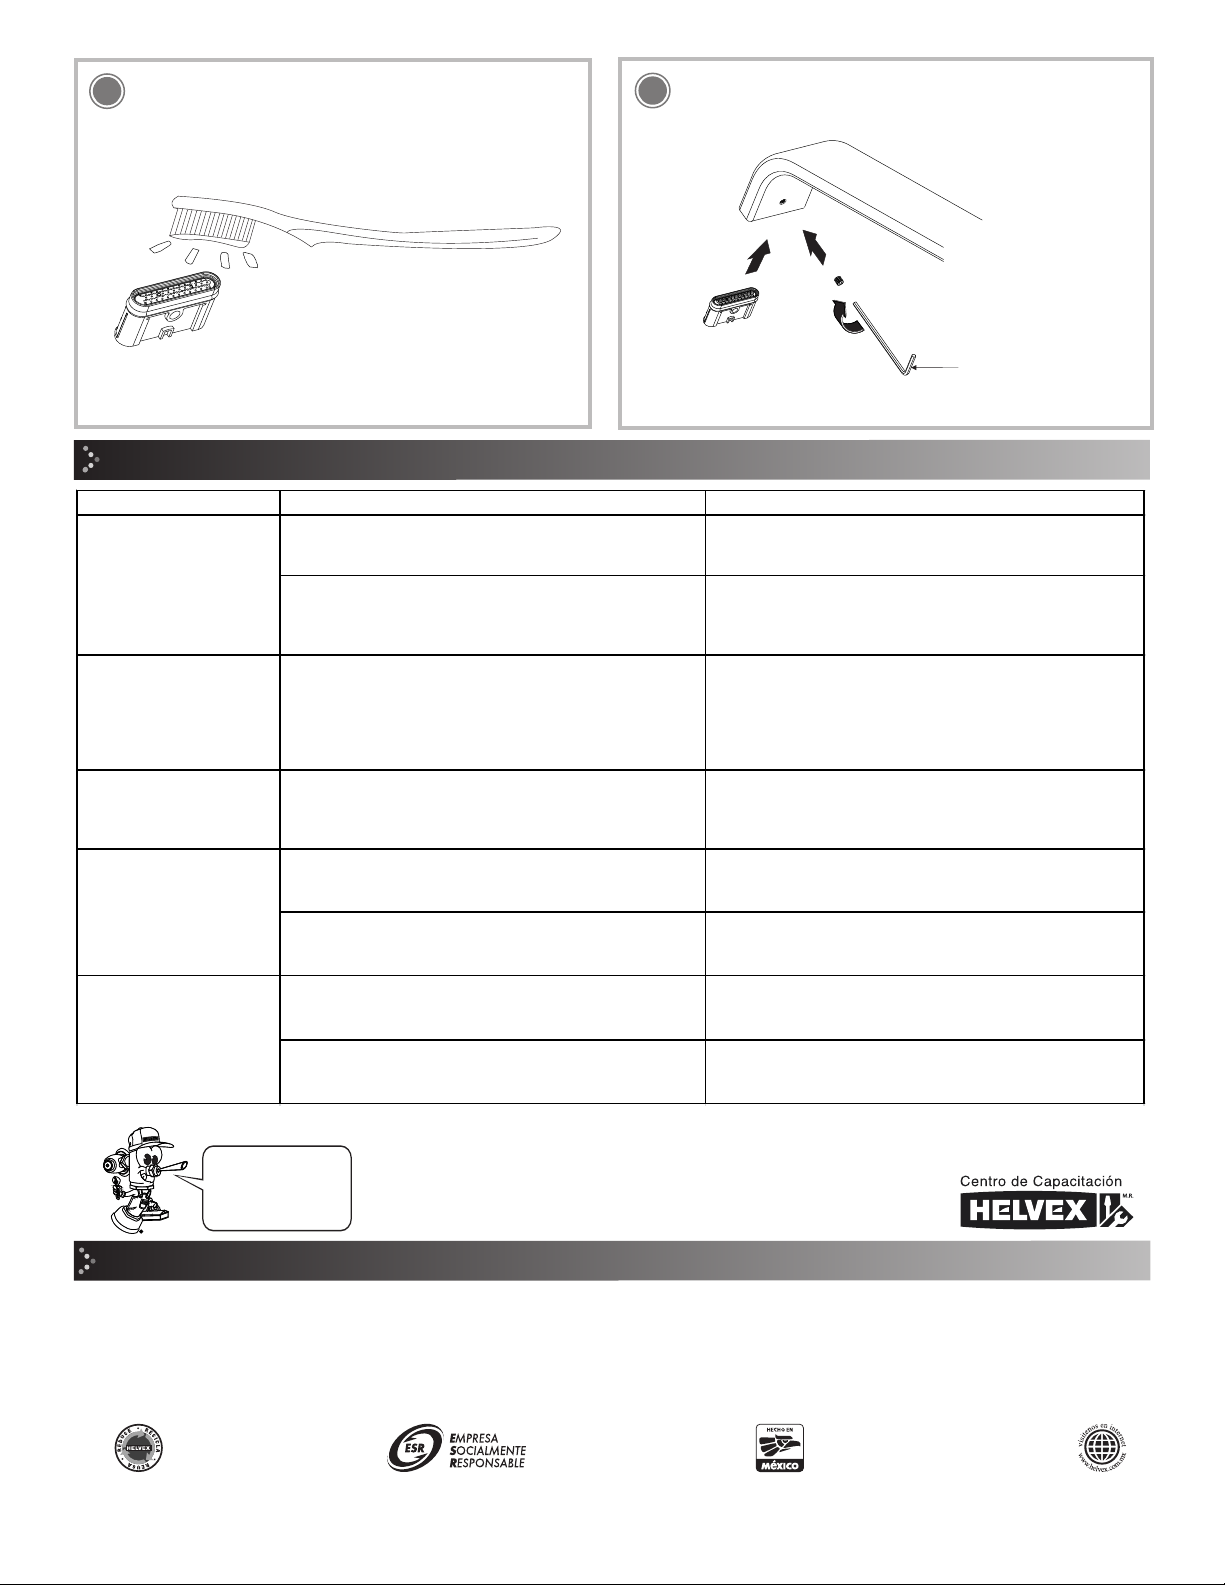
Láve el aireador con chorro de agua. /Clean the aerator with
water jet.
Inserte el aireador y atornille el opresor. / Insert the aerator
and screw the set screw.
llave allen
2 mm
allen wrench
2 mm
Problema Causa Solución
El cartucho se encuentra cerrado / The cartridge is
closed
Abra el cartucho levantando la palanca según la operación
del producto (pag. 5, operación). / Open cartridge by lifting
the lever product operation (p. 5 operation).
La válvula principal de agua se encuentra cerrada. / The
main water valve is closed. Abra la valvula principal. / Open the main valve.
Hay fuga entre el cuerpo
armado y el porta cartucho.
/ There is leakage
between the armed body
and cartridge holder.
Posiblemente no esté asentado bien el porta cartucho con
el fondo del cuerpo armado./ Possibly the cartridge
holder is not sitting well into its body.
Apriete firmemente la tuerca (Pag. 4, paso 13). / Tighten the
nut (p. 4, step 13).
El maneral esta flojo. / The
handle is loose. El opresor no está apretado. / The set screw is not tight. Utilice la llave allen y apriete firmemente (pag. 4, paso 15)./
Use the allen wrench and tighten (p. 4, step 15).
La presión de operación no es la adecuada. / The
operating pressure is not the adequate it.
Verifique que la presión mínima de operación sea 1 kg/cm².
Verify that the minimum operating pressure is 14,3 PSI.
Existe basura obstruyendo las líneas de alimentación.
/There is debris blocking the supply lines.
Retire el cartucho y purge las líneas de alimentación.
/ Remove the cartridge and purge supply lines
El porta cartucho no es a nivel de la pared. / The cartridge
holder is not at the level of the wall.
Apriete o afloje el tornillo para desplazar el porta cartucho
(pag. 4, paso 12). / Tighten or loosen the screw to move the
cartridge (p. 4, step 12) carries.
Sobrepasó la medida máxima de empotramiento. / Far
exceeds the maximum embedment.
Retire el acabado final del muro y repita la instalación. /
Remove the finish of the wall and repeat the installation.
No sale agua. / No water
comes out.
Existe poco flujo de agua. /
There is slow water flow.
La tuerca no fija al
chapetón correctamente. /
Nut not correctly fixed to
escutcheon.

Other Helvex Bathroom Fixture manuals

Helvex Nuva 9104 User manual

Helvex

Helvex Nuva 9104 User manual

Helvex LV MARCUS BC User manual

Helvex

Helvex LV MARCUS BC User manual

Helvex TH-061 User manual

Helvex

Helvex TH-061 User manual

Helvex RM-13 User manual

Helvex

Helvex RM-13 User manual

Helvex E-919 User manual

Helvex

Helvex E-919 User manual

Helvex REJ-01-AI User manual

Helvex

Helvex REJ-01-AI User manual

Helvex IGUAZU H-202 User manual

Helvex

Helvex IGUAZU H-202 User manual

Helvex Europeo MEP-2001-S/L User manual

Helvex

Helvex Europeo MEP-2001-S/L User manual

Helvex SS-1 User manual

Helvex

Helvex SS-1 User manual

Helvex RMM-27-CR/AI User manual

Helvex

Helvex RMM-27-CR/AI User manual

Helvex 410-32 User manual

Helvex

Helvex 410-32 User manual

Helvex E-309 User manual

Helvex

Helvex E-309 User manual

Helvex BR-470 User manual

Helvex

Helvex BR-470 User manual

Helvex RMB-30 User manual

Helvex

Helvex RMB-30 User manual

Helvex H-3012 User manual

Helvex

Helvex H-3012 User manual

Helvex H-105 User manual

Helvex

Helvex H-105 User manual

Helvex Cibeles MEP-2009 User manual

Helvex

Helvex Cibeles MEP-2009 User manual

Helvex FB-110-38-3.5 User manual

Helvex

Helvex FB-110-38-3.5 User manual

Helvex MG MOJAVE User manual

Helvex

Helvex MG MOJAVE User manual

Helvex Maxima E-712 User manual

Helvex

Helvex Maxima E-712 User manual

Helvex TAZF NAO I PARED S-TZF-P User manual

Helvex

Helvex TAZF NAO I PARED S-TZF-P User manual

Helvex KFP-1 User manual

Helvex

Helvex KFP-1 User manual

Helvex H-201 User manual

Helvex

Helvex H-201 User manual

Helvex Piura PIU-201 User manual

Helvex

Helvex Piura PIU-201 User manual

Popular Bathroom Fixture manuals by other brands

ABI INTERIORS AZUL installation guide

ABI INTERIORS

ABI INTERIORS AZUL installation guide

newform 67620E instructions

newform

newform 67620E instructions

Booth & Co AXBRIDGE BC-AXB-183-CP installation guide

Booth & Co

Booth & Co AXBRIDGE BC-AXB-183-CP installation guide

Milli Pure Twin Rail installation instructions

Milli

Milli Pure Twin Rail installation instructions

GATTONI RT010 Installation and assembly

GATTONI

GATTONI RT010 Installation and assembly

URIDAN ADMIRAL KH-10 installation instructions

URIDAN

URIDAN ADMIRAL KH-10 installation instructions

Novellini DIVINA W Instructions for installation, use and maintenance manual

Novellini

Novellini DIVINA W Instructions for installation, use and maintenance manual

Voda ECOMIX VECM040 manual

Voda

Voda ECOMIX VECM040 manual

Better Bathrooms Gobi BeBa 25374 user manual

Better Bathrooms

Better Bathrooms Gobi BeBa 25374 user manual

Hewi 950.50.06490 Mounting instructions

Hewi

Hewi 950.50.06490 Mounting instructions

Lefroy Brooks TEN TEN TT 4973 installation guide

Lefroy Brooks

Lefroy Brooks TEN TEN TT 4973 installation guide

Moen T3291 installation guide

Moen

Moen T3291 installation guide

STEIN GEORGIA installation instructions

STEIN

STEIN GEORGIA installation instructions

DURAVIT D-NEO DE4210 0100 Instructions for mounting and use

DURAVIT

DURAVIT D-NEO DE4210 0100 Instructions for mounting and use

Allen + Roth Davidson-60GP-CH installation manual

Allen + Roth

Allen + Roth Davidson-60GP-CH installation manual

OVE SYDNEY 60 installation manual

OVE

OVE SYDNEY 60 installation manual

Delabie 2200 manual

Delabie

Delabie 2200 manual

Kohler Englefield K-5627X Installation and care guide

Kohler

Kohler Englefield K-5627X Installation and care guide

manuals.online logo
manuals.online logoBrands
  • About & Mission
  • Contact us
  • Privacy Policy
  • Terms and Conditions

Copyright 2025 Manuals.Online. All Rights Reserved.