manuals.online logo
Brands
  1. Home
  2. •
  3. Brands
  4. •
  5. Helvex
  6. •
  7. Bathroom Fixture
  8. •
  9. Helvex PIAZZA PIA-105 User manual

Helvex PIAZZA PIA-105 User manual

This manual suits for next models

3

Other Helvex Bathroom Fixture manuals

Helvex Clasica 105 User manual

Helvex

Helvex Clasica 105 User manual

Helvex Nuva 9104 User manual

Helvex

Helvex Nuva 9104 User manual

Helvex FB-110-32 User manual

Helvex

Helvex FB-110-32 User manual

Helvex H-106-S User manual

Helvex

Helvex H-106-S User manual

Helvex WC Austral User manual

Helvex

Helvex WC Austral User manual

Helvex E-309 User manual

Helvex

Helvex E-309 User manual

Helvex Kubica 14148 User manual

Helvex

Helvex Kubica 14148 User manual

Helvex H-3010 User manual

Helvex

Helvex H-3010 User manual

Helvex Piura PIU-100 User manual

Helvex

Helvex Piura PIU-100 User manual

Helvex VPH-1 User manual

Helvex

Helvex VPH-1 User manual

Helvex UIN-05 User manual

Helvex

Helvex UIN-05 User manual

Helvex 310-38-3.5 User manual

Helvex

Helvex 310-38-3.5 User manual

Helvex Piura PIU-200 User manual

Helvex

Helvex Piura PIU-200 User manual

Helvex REJ-01-AI User manual

Helvex

Helvex REJ-01-AI User manual

Helvex RMB-30 User manual

Helvex

Helvex RMB-30 User manual

Helvex H-500 User manual

Helvex

Helvex H-500 User manual

Helvex Piazza PIA105-61CM User manual

Helvex

Helvex Piazza PIA105-61CM User manual

Helvex 312-32 User manual

Helvex

Helvex 312-32 User manual

Helvex Elite DX ME-2121 User manual

Helvex

Helvex Elite DX ME-2121 User manual

Helvex H-105 User manual

Helvex

Helvex H-105 User manual

Helvex H-3006 User manual

Helvex

Helvex H-3006 User manual

Helvex 210-32 User manual

Helvex

Helvex 210-32 User manual

Helvex Futura RM-7 User manual

Helvex

Helvex Futura RM-7 User manual

Helvex Maxima U20105 User manual

Helvex

Helvex Maxima U20105 User manual

Popular Bathroom Fixture manuals by other brands

Kohler Mira Sport Max J03G Installation and user guide

Kohler

Kohler Mira Sport Max J03G Installation and user guide

Moen 186117 Series installation guide

Moen

Moen 186117 Series installation guide

Hans Grohe Raindance Showerpipe 27235000 Instructions for use/assembly instructions

Hans Grohe

Hans Grohe Raindance Showerpipe 27235000 Instructions for use/assembly instructions

Signature Hardware ROUND SWIVEL BODY SPRAY 948942 Install

Signature Hardware

Signature Hardware ROUND SWIVEL BODY SPRAY 948942 Install

fine fixtures AC3TH installation manual

fine fixtures

fine fixtures AC3TH installation manual

LIXIL HP50 Series quick start guide

LIXIL

LIXIL HP50 Series quick start guide

KOLO ATOL PLUS installation manual

KOLO

KOLO ATOL PLUS installation manual

Hans Grohe PuraVida 15073000 Instructions for use/assembly instructions

Hans Grohe

Hans Grohe PuraVida 15073000 Instructions for use/assembly instructions

Toto TS111B8 Installation and owner's manual

Toto

Toto TS111B8 Installation and owner's manual

Kohler K-1158-H2 Homeowner's guide

Kohler

Kohler K-1158-H2 Homeowner's guide

Coram Showers OFFSET QUADRANT manual

Coram Showers

Coram Showers OFFSET QUADRANT manual

baliv DU-2010 manual

baliv

baliv DU-2010 manual

odass OD-1710 instruction manual

odass

odass OD-1710 instruction manual

Oxygenics Evolution Easy installation instructions

Oxygenics

Oxygenics Evolution Easy installation instructions

Bradley Express SS Series installation instructions

Bradley

Bradley Express SS Series installation instructions

DURAVIT C.1 C15240 0090 Instructions for mounting and use

DURAVIT

DURAVIT C.1 C15240 0090 Instructions for mounting and use

Sunshower PURE SOLO manual

Sunshower

Sunshower PURE SOLO manual

Heatstore HSTRL500WTN Installation and operating instructions

Heatstore

Heatstore HSTRL500WTN Installation and operating instructions

manuals.online logo
manuals.online logoBrands
  • About & Mission
  • Contact us
  • Privacy Policy
  • Terms and Conditions

Copyright 2025 Manuals.Online. All Rights Reserved.

Línea de Accesorios /
Accessories
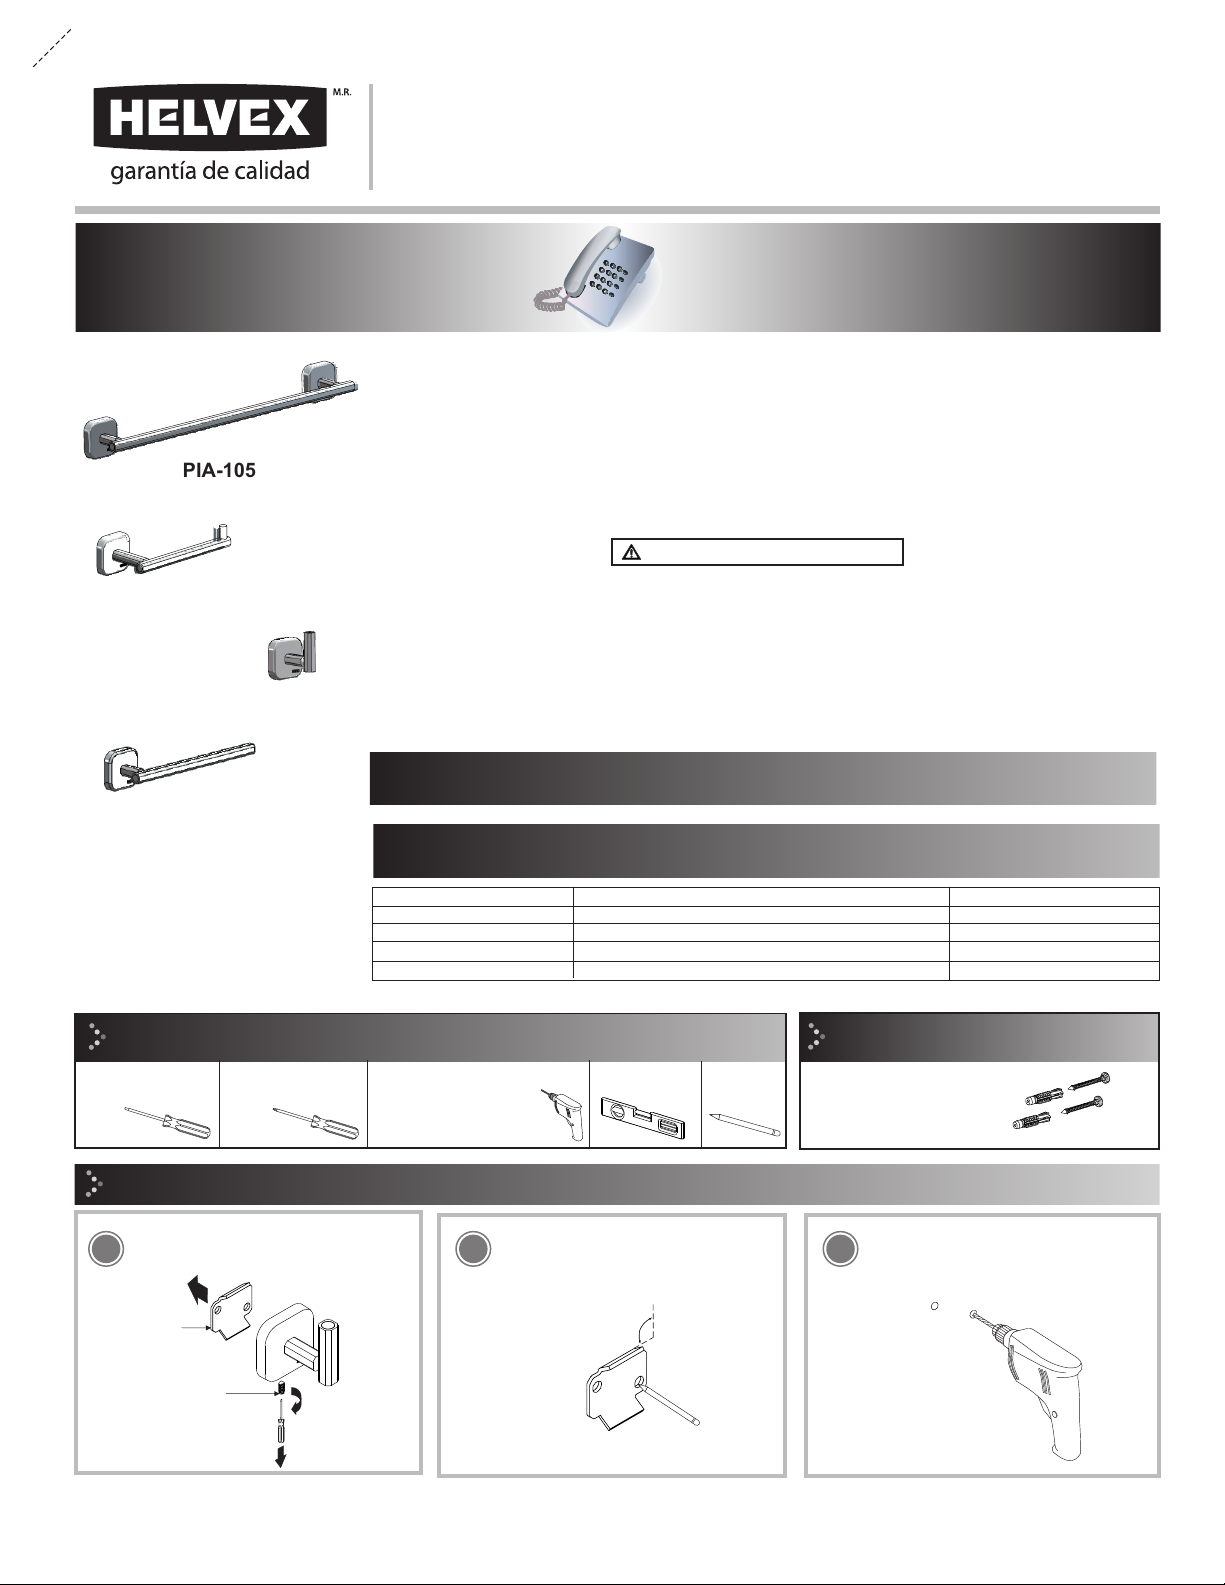
Instalación General / General Installation
MODELO / MODEL
PIA-117
Toallero de Barra / Towel Bar 120 / 47,2
DESCRIPCIÓN / DESCRIPTION ALTURA (cm) / HEIGHT (”)
PIA-105
Gancho Sencillo / Single Hook
PIA-106
PIA-109 Toallero Corto / Short Towel Bar
50 / 19,6
Porta papel / Paper Holder
1-03-1532-1
*Alturas recomendadas en base a NPT (Nivel de Piso Terminado). /* Recommended installation height based on FFL (Finished Floor Level).
taladro con broca para
concreto de Ø ¼”
drill with Ø ¼" concrete bit
Barrene con broca para concreto de Ø 1/4”. /
Drill with a Ø 1/4" concrete drill bit.
lápiz
Herramienta Requerida / Required Tools
pencil
flat-head screwdriver
desarmador plano
Artículos Incluidos en su Producto /
Items Included in your Product
165 / 64,9
PIAZZA
INSTALLATION GUIDE
GUÍA DE INSTALACIÓN
level
nivel kit de sujeción para
muro falso y muro
sólido
fixing kit for fake and solid wall
Alturas recomendadas para instalación de accesorios. / Recommended heights for
accessories installation.
PIA-105
PIA-117
PIA-106
PIA-109
1Desenrosque el opresor y retire el ancla. /
Unscrew the set screw and remove the wall
bracket.
2
90°
3
120 / 47,2
Coloque el ancla sobre la pared, nivele y
marque los barrenos. / Place the wall bracket
over the wall, level and mark the holes.
opresor
set screw
ancla
wall bracket
[email protected]
Original Spare Parts:
Consultancy and Technical
(52) 55 53 33 94 31
(52) 55 53 33 94 00
Refacciones Originales:
Asesoría y Servicio Técnico:
Ext. 5913, 5068 y 4815
Service:
(52) 55 53 33 94 21
[email protected]
www.refaccioneshelvex.com.mx
Para disminuir el riesgo de lesiones o daños a la propiedad, lea todas las instrucciones antes de instalar el
producto. Utilice gafas de seguridad. En obras de construcción, instalación, modificación, ampliación y
reparación deben cumplir con el reglamento de construcción y obras de su localidad. El producto ilustrado
puede sufrir cambios de aspecto como resultado de la mejora continua a la que está sujeto.
Agradecemos su elección por los productos HELVEX.
Estamos seguros de que su confiabilidad por el producto excederá sus más altas expectativas, cuya
funcionalidad, estética, durabilidad, respaldo integral y alta calidad le otorgarán plena satisfacción por años,
reflejando el compromiso con la calidad, innovación y el medio ambiente que forman parte de Helvex.
To reduce the risk of injury or property damage, read all instructions before installing the product. Please
remember to use safety glasses. In construction, installation, alteration, extension and repair, the rules of
constructions must be applied. As result of continuous improvement, the illustration product may change in
appearance.
ADVERTENCIA / WARNING
Thank you for choosing HELVEX products.
We are confident that the product reliability will exceed your maximum expectations. The functionality,
aesthetics, durability, quality and support will grant you full satisfaction for years, it is Helvex commitment to
the quality, innovation and the environment.
Esta guía de instalación aplica al producto en cualquier acabado. / This installation
guide applies to the product in any finish.
phillips screwdriver
desarmador de cruz
Inserte los taquetes (incluidos) y fije el ancla enroscando las pijas (incluidas). / Insert the anchors
(included) and fix the wall bracket screwing the lag screws (included).
Desenrosque los opresores y retire las anclas de los dos chapetones. Coloque las anclas en la pared, nivele y marque los agujeros. Barrene con una broca de
concreto de Ø 1/4". Inserte los taquetes (incluidos) y fije las anclas atornillando las pijas. Finalmente coloque el accesorio en el ancla y atornille el opresor para
fijar. / Unscrew the set screws and remove the two wall brackets from the two escutcheons. Place the wall bracket over the wall, level and mark the holes. Drill
with a Ø 1/4" concrete drill bit. Insert the anchors (included) and fix the wall brackets screwing the lag screws. Finally attach the accsesory on wall brackets and
screw the set screws to fix.
Toallero de Barra PIA-105 / Towel Bar PIA-105
taquete
anchor
Nota: Se debe de insertar completamente el taquete.
No cortar los taquetes.
Note: The anchors must be inserted completely.
Do not cut the anchors.
5Coloque el accesorio en el ancla y enrosque
el tornillo opresor para fijar. / Attach the
accsesory on the wall bracket and screw the
set screw to fix.
4
6
pija
lag screw
opresor
set screw
90°
opresor
set screw
Barrene con broca para concreto de Ø 1/4”. /
Drill with a Ø 1/4" concrete drill bit.
38,5 cm
(15,16")
In Guadalajara:
Contact:
Enter our free
training courses.
In Monterrey:
En la Ciudad de México:
In Mexico City:
En Monterrey:
En Guadalajara:
01 55 53 33 94 00
Ext. 5804, 5805 y 5806 (0133) 36 19 01 13
Comunícate:
Participa en nuestros
cursos gratuitos
de capacitación.
(0181) 83 33 57 67
(0181) 83 33 61 78
Recomendaciones de Limpieza / Cleaning Recommendations
HELVEX, S. A. DE C. V. Calzada Coltongo # 293, Col. Industrial Vallejo, Alcaldía Azcapotzalco, C. P. 02300, Ciudad de México.
Es muy importante seguir las siguientes instrucciones para conservar los
acabados de los productos HELVEX, con brillo y en perfecto estado:
1. Utilice únicamente agua y un paño limpio.
2. No utilice fibras, polvos, abrasivos, ni productos químicos.
3. No utilice objetos punzo-cortantes para limpiar los acabados.
4. Se recomienda realizar la limpieza de su producto diariamente.
Visite nuestras páginas www.helvex.com.mx para México y www.helvex.com
para el mercado Internacional
It is very important to follow the instructions below to preserve HELVEX products
finishes, shiny and in perfect condition:
1. Use only water and a clean cloth.
2. Do not use fibers, powders, abrasives, or chemicals.
3. Do not use sharp objects to clean the finish.
4. It is recommended to clean your product daily.
Visit our pages www.helvex.com.mx for Mexico and www.helvex.com
for the International market.