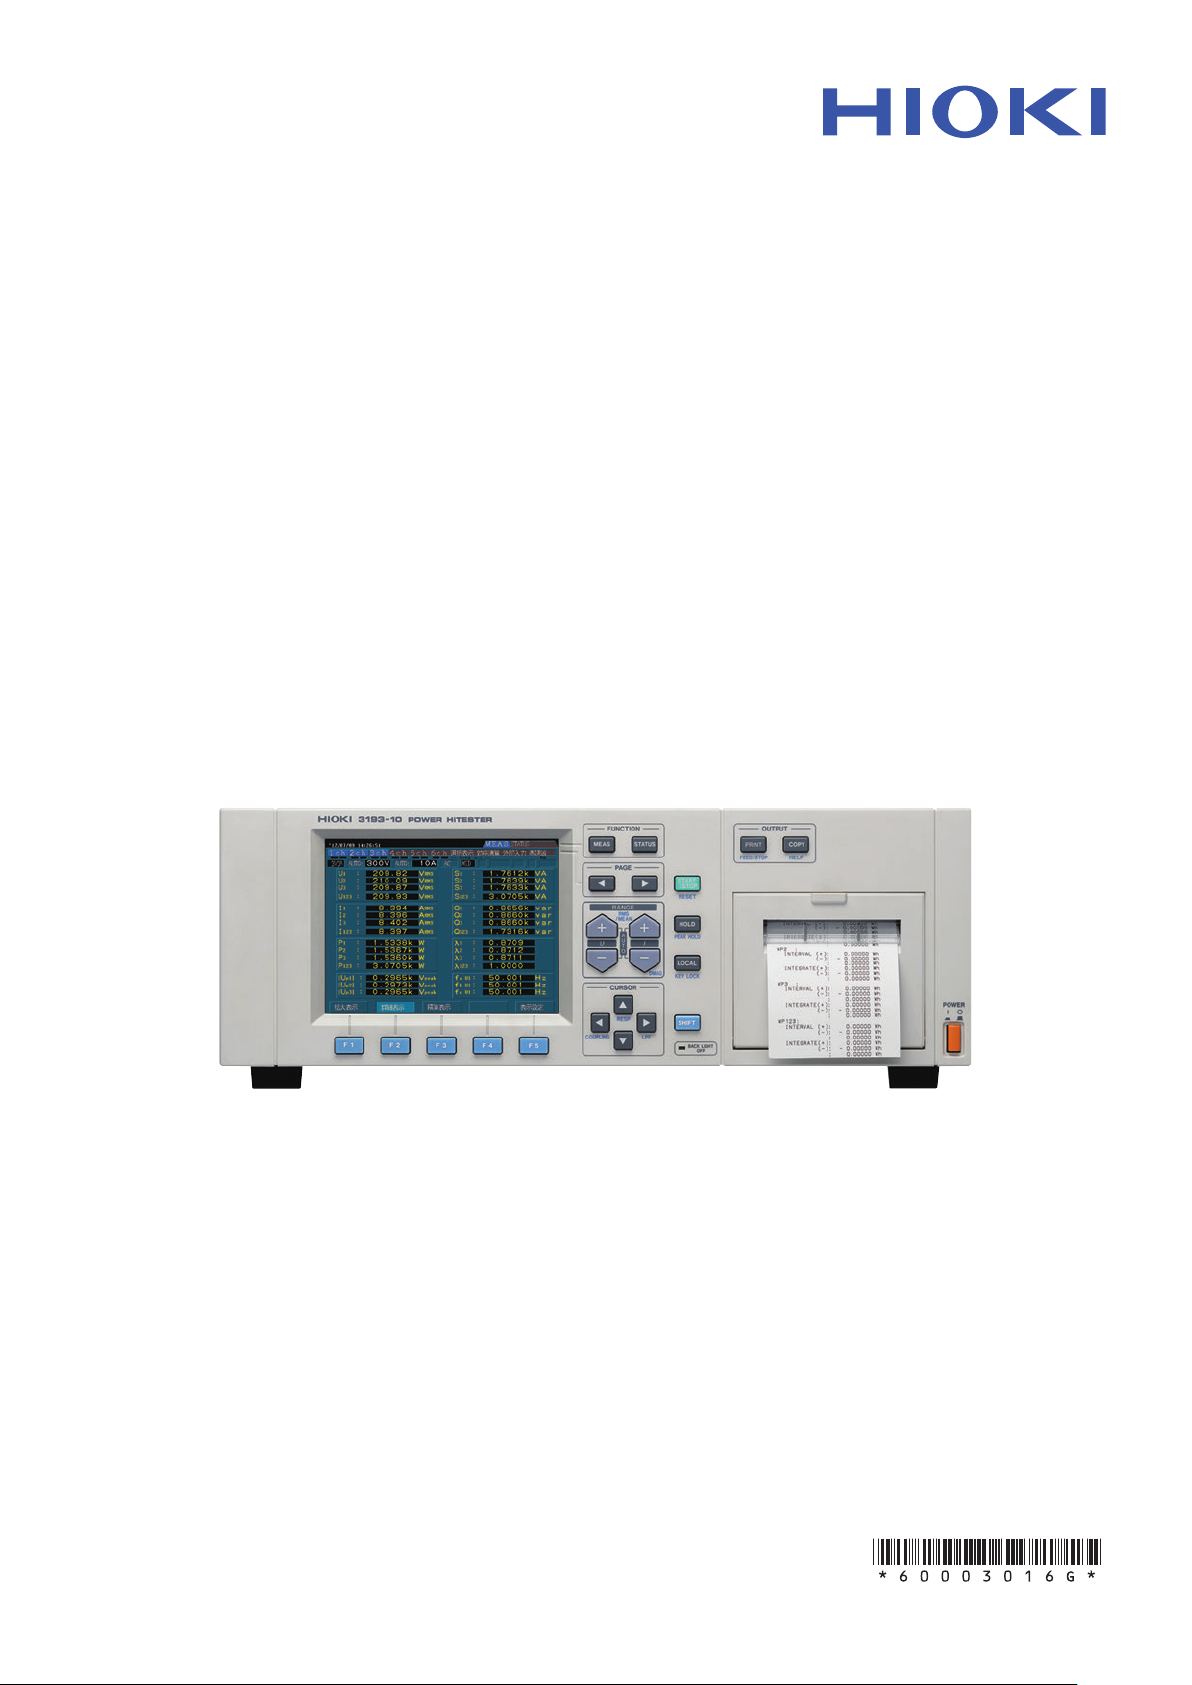
Hioki Power HiTester 3193 User manual

3193
3193-10
Instruction Manual
POWER HiTESTER
EN
Feb. 2019 Revised edition 16
3193A981-16 19-02H
31933193-10 POWER HiTESTER Instruction Manual


Contents
Introduction i
Inspection i
Safety Notes iii
Notes on Use vi
Chapter 1 Overview 1
1.1 Product Overview 1
1.2 Features 2
Chapter 2 Names and Functions of Parts 5
2.1 Panels and Key Operation 5
2.2 Names and Configuration of Screen 8
2.2.1 Screen Configuration 8
2.2.2 MEAS Screen (Measurement Screen) 9
2.2.3 STATUS Screen (Setting Screen) 13
2.2.4 FDD Screen 16
2.3 Indicators 17
2.4 Peak Over Indication 18
Chapter 3 Preparation for Measurement 19
3.1 Notes on Use 19
3.2 Basic Operating Procedure 22
3.3 Powering On 23
3.4 Connecting the Direct Input Unit 24
3.5 Connecting the Clamp Input Unit 26
3.6 Measurement Losses 27
3.7 Error Messages 28
3.8 System Reset 29
3.9 Operations During Power Failure 30
Chapter 4 Setting and Using the Basic Functions 33
4.1 Setting the Wiring Mode (1P2W to 3P4W) 33
4.2 Setting the Coupling Mode (DC/AC+DC/AC) 36
4.3 Switching the Voltage Range and Current Range 37
4.4 Effective Value (RMS) or Mean Rectified Value
(MEAN) Selection 39
4.5 Setting the Scaling (PT/CT/SC Ratios) 40
4.6 Setting the Low-pass Filter (LPF) 42
3193A981-16

4.7 Setting the Phase Polarity Discrimination Filter 43
4.8 Switching the Waveform Peak Value 44
4.9 Setting the Response (FAST/MID/SLOW) 45
4.10 Setting the Averaging 46
4.11 Setting on the MEAS Screen 50
4.11.1 Setting the Display Items (for 1 to 6 channels) 50
4.11.2 Setting the SELECT screen 51
4.12 Setting on the SYSTEM screen 52
4.12.1 Switching the Interface (GP-IB/RS-232C) 52
4.12.2 Setting the Display Color 53
4.12.3 Setting the Back Light 53
4.12.4 Setting the Equation for Reactive Power (Q) and
Apparent Power (S) 54
4.12.5 Setting the Beep Sound 55
4.12.6 Setting Indications for Out-of-Range Inputs 55
4.12.7 Setting the Display Language (English/Japanese) 56
4.12.8 Setting the Real-time Clock 56
4.13 Degaussing 57
Chapter 5 Frequency Measurement 59
5.1 Setting the Frequency Measurement Source (fa) 60
5.2 Setting the Frequency Range(fa) 61
Chapter 6 Hold/Peak Hold Function 63
6.1 Hold Function 63
6.2 Peak Hold Function 65
6.2.1 Combination with Control Times 66
Chapter 7 Integration Function 67
7.1 Overview 67
7.2 Setting the Control Time 69
7.2.1 Setting the Interval Time 69
7.2.2 Setting the Timer 70
7.2.3 Setting the Real Time Control 71
7.3 Integration Screen 72
7.4 Starting, Stopping, and Resetting the Integration 73
7.5 Manual Integration (Controlled by Panel Keys) 74
7.6 Integration Using Time Settings
(Controlled by Panel Keys) 75
7.6.1 Timer Integration 75

7.6.2 Real-Time Control Integration 76
7.6.3 Interval Integration 76
7.7 Measuring the Load Factor 77
7.8 Zero suppress function 78
Chapter 8 Efficiency Measurement 79
8.1 Overview 79
8.2 Efficiency Screen 80
8.3 Setting the Calculation Formula 81
8.4 Example Measurement 82
8.4.1 Efficiency Measurement of a Switching Power
Supply (1φ2W) 82
8.4.2 Efficiency Measurement of a Switching Power
Supply (3φ3W) 82
8.4.3 Efficiency Measurement of a Light Fitting
(Two-Lamp) 83
8.4.4 Efficiency Measurement of an Inverter (1φ2W) 83
8.4.5 Efficiency Measurement of an Inverter (3φ3W)
and Motor 84
Chapter 9 External Output/ External Control Terminals 85
9.1 Connector Pin Arrangement 86
9.2 Internal Circuit for Analog, Monitor, D/A Outputs 87
9.3 Internal Circuit for the External Control and Timing 88
9.3.1 INTEG.EXT.CONT and INTEG.RESET Terminals 88
9.3.2 FDD/PRINTER.START Terminal 89
9.3.3 EXT.A/D START Terminal 89
Chapter 10 D/A Output 91
10.1 Overview 91
10.2 Selecting Output Item 92
10.3 Output Rate 93
Chapter 11 Using the Floppy Disk Drive (Only 3193) 95
11.1 Overview 95
11.2 Operation Procedure 96
11.3 Using the Floppy Disk 97
11.4 Formatting a Floppy Disk 98
11.5 Switching the FDD/Printer 99
11.6 Setting File Names for Saved Measurement Data 100

11.7 Setting the Measurement Items for Saving 101
11.8 Saving the Data on FDD 102
11.8.1 Automatic Saving Using Time Settings 102
11.8.2 Manual Saving 103
11.8.3 Screen Hard Copy 103
11.8.4 Saving the Settings 103
11.8.5 Saving and Loading Settings 104
11.9 Information Which Can Be Saved 105
11.10 Deleting and Confirming Files 106
11.11 Format for Data Output to Floppy Disk 107
11.12 Message and Error Displays 108
Chapter 12 GP-IB and RS-232C Interface 109
12.1 Overview 109
12.2 Specifications 110
12.2.1 GP-IB Interface 110
12.2.2 RS-232C Interface 111
12.3 Interface Outline 114
12.3.1 Messages 114
12.3.2 Command Syntax 115
12.3.3 Headers 115
12.3.4 Message Terminators 116
12.3.5 Separators 116
12.3.6 Data Formats 117
12.3.7 Abbreviation of Compound Commands 118
12.3.8 Output Queue 119
12.3.9 Input Buffer 119
12.3.10 Note on Commands Initiating Events 119
12.3.11 Status Model 120
12.3.12 Status Byte Register 121
12.3.13 Event Registers 122
12.3.14 GP-IB Commands 129
12.4 Command Reference 130
12.4.1 Standard Command 131
12.4.2 Specific Commands 141
12.5 Command Summary 197
12.5.1 Standard Commands 197
12.5.2 Commands Specific to the 3193 198
12.5.3 Valid Command According to Condition
(Standard Command) 204

12.5.4 Valid Command According to Condition
(Specific Command) 205
12.5.5 Execution Time of GP-IB Interface Command 210
12.5.6 Initialization 211
12.5.7 Specific Command Tree 212
12.6 Sample Programs 215
12.6.1 GP-IB 215
12.6.2 RS-232C 216
12.7 Device Compliance Statement 217
12.8 Notes on Interface 219
12.8.1 GPーIB Troubleshooting 219
12.8.2 RS-232C Troubleshooting 220
Chapter 13 Using the Printer (Option) 221
13.1 Overview 221
13.2 Specifications 222
13.3 Operating Procedure 223
13.4 Loading Recording Paper 224
13.5 Switching the FDD/Printer 225
13.6 Setting the Measurement Items to Print 226
13.7 Printing Out 227
13.7.1 Manual Printing 227
13.7.2 Automatic Printing by Time Settings 227
13.7.3 Screen Hard Copy 229
13.7.4 Help Printing Mode 229
13.7.5 External Control Printing 229
13.8 Setting the Printing Direction 230
13.9 Error and Overflow Displays 231
Chapter 14 9600 AC/DC DIRECT INPUT UNIT (Option) 233
14.1 Overview 233
14.2 Notes on Use 234
14.3 Specifications (using with the 3193) 235
14.4 Internal Block Diagram 238
14.4.1 RMS Value (root-mean-square value) 238
14.4.2 MEAN Value
(MEAN rectification effective value for display) 239
14.4.3 Active Power 239
14.4.4 Waveform Peak Value Measurement Circuit 240
14.4.5 Crest Factor 240

Chapter 15 9601 AC DIRECT INPUT UNIT (Option) 241
15.1 Overview 241
15.2 Notes on Use 242
15.3 Specifications (using with the 3193) 243
15.4 Internal Block Diagram 246
Chapter 16 9602 AC/DC CLAMP INPUT UNIT (Option) 247
16.1 Overview 247
16.2 Notes on Use 248
16.3 Specifications (using with the 3193) 249
16.4 Internal Block Diagram 252
Chapter 17 9603 EXTERNAL SIGNAL INPUT UNIT (Option) 253
17.1 Overview 253
17.2 Display Screen 254
17.3 Setting Method 255
17.3.1 Changing the Voltage 255
17.3.2 Setting the Scaling 256
17.3.3 Setting the Units 256
17.3.4 Setting the Pulse 257
17.3.5 Calculating Motor Power (Pm) 257
17.4 Specifications 258
17.5 Internal Block Diagram 259
Chapter 18 Maintenance and Service 261
18.1 Cautions 261
18.2 Disposing of the Unit 262
Chapter 19 Rack Mounting 263
19.1 Rack Mounting Fittings 263
19.2 Installation Procedures 265
Chapter 20 Specifications (unit only) 267
20.1 General Specifications 267
20.2 Function Specifications 270
20.3 Calculations 276
20.4 Internal Block Diagram of the 3193 281
Appendix APPENDIX 1
Index INDEX 1

i
────────────────────────────────────────────────────
Introduction
────────────────────────────────────────────────────
Introduction
Inspection
Thank you for purchasing this HIOKI "3193, 3193-10 POWER HiTESTER."
To get the maximum performance from the unit, please read this manual
first, and keep this at hand.
・The HIOKI 3193, 3193-10 POWER HiTESTER will be referred to as the
HIOKI 3193in this manual.
・The HIOKI 3193 comes with a floppy disk drive (FDD) but the HIOKI
3193-10 does not. The respective specifications will be referred to when a
specific product name is mentioned in this manual.
・When the FDD is mentioned in the instruction manual, even if there is no
special indication, the corresponding specification will not be supported
by the 3193-10.
When the unit is delivered, check and make sure that it has not been
damaged in transit. In particular, check the accessories, panel switches, and
connectors. If the unit is damaged, or fails to operate according to the
specifications, contact your dealer or HIOKI representative.
■ Standard accessories
Instruction Manual 1
Power cord 1
Connector 1
■Options
9600 AC/DC DIRECT INPUT UNIT
9601 AC DIRECT INPUT UNIT
9602 AC/DC CLAMP INPUT UNIT
9603 EXTERNAL SIGNAL INPUT UNIT
9604 PRINTER UNIT
9605 HARMONIC/FLICKER MEASURMENTS UNIT

ii
────────────────────────────────────────────────────
Inspection
────────────────────────────────────────────────────
ACDC UNIT 9600 is installed.
AC UNIT 9601 is installed.
CLAMP UNIT ACDC 20 A 9602 is installed and 9277 is inserted.
CLAMP UNIT ACDC 200 A 9602 is installed and 9278 or CT6863 is inserted.
CLAMP UNIT ACDC 500 A 9602 is installed and 9279 or 9709 or CT6865 is
inserted.
CLAMP UNIT ACDC 50 A 9602 is installed and CT6862 is inserted.
CLAMP UNIT 20 A AC CLAMP 9602 is installed and 9270 or 9272 (20 A) or 9272-10
(20 A) is inserted.
CLAMP UNIT 200 A AC CLAMP 9602 is installed and 9271 or 9272 (200 A) or 9272-10
(200 A) is inserted.
Ex UNIT:ON 9603 is installed.
Printer ON 9604 is installed.
9605 ON 9605 is installed.
■ Shipment
If reshipping the unit, preferably use the original packing.
Before shipping the 3193, always remove the floppy disk.

iii
────────────────────────────────────────────────────
Safety Notes
────────────────────────────────────────────────────
DANGER This instrument is designed to comply with IEC 61010 Safety
Standards, and has been thoroughly tested for safety prior to
shipment. However, mishandling during use could result in injury or
death, as well as damage to the instrument. Be certain that you
understand the instructions and precautions in the manual before
use. We disclaim any responsibility for accidents or injuries not
resulting directly from instrument defects.
Safety symbols
・ This symbol is affixed to locations on the equipment where the
operator should consult corresponding topics in this manual
(which are also marked with the symbol) before using relevant
functions of the equipment.
・ In the manual, this mark indicates explanations which it is
particularly important that the user read before using the
equipment.
Indicates AC (Alternating Current).
Indicates both DC (Direct Current) and AC (Alternating Current).
Indicates a grounding terminal.
Indicates the ON side of the power switch.
Indicates the OFF side of the power switch.
DANGER Indicates that incorrect operation presents extreme danger of
accident resulting in death or serious injury to the user.
WARNING Indicates that incorrect operation presents significant danger of
accident resulting in death or serious injury to the user.
CAUTION Indicates that incorrect operation presents possibility of injury to
the user or damage to the equipment.
NOTE Denotes items of advice related to performance of the equipment
or to its correct operation.
Safety Notes
This Instruction Manual provides information and warnings essential for
operating this equipment in a safe manner and for maintaining it in safe
operating condition. Before using this equipment, be sure to carefully read
the following safety notes.
The following symbols are used in this Instruction Manual to indicate the
relative importance of cautions and warnings.

iv
────────────────────────────────────────────────────
Safety Notes
────────────────────────────────────────────────────
Display items Display items FDD (header) Printer GP-IB/RS-232C
Voltage U U U U
Voltage peak |Up|/Pk (enlarged
display) PEAK PEAK (Vpeak) Pk
Current I I I I
Current peak |Ip|/Pk (enlarged
display) PEAK PEAK (Apeak) Pk
Active power P P P P
Reactive power Q Q Q Q
Apparent power S S S S
Power factor λ PF PF PF
Phase angle φ DEG DEG DEG
Frequency f f f f
Integration
active current
(+) +Ih PIh Ih (+) PIH
(-) -Ih MIh Ih (-) MIH
(total) Ih Ih Ih IH
Integration
power
(+) +WP PWP WP (+) PWP
(-) -WP MWP WP (-) MWP
(total) WP WP WP WP
Load factor LF LF LF LF
Maximum averaging
power no display Wmax Wmax none
Efficiency η EFFI EFFI EFF
Channel A of 9603 chA CHA CHA EXTA
Channel B of 9603 chB CHB CHB EXTB
Motor power of 9603 Pm PM PM PM
Accuracy
The specifications in this manual include figures for "measurement accuracy"
when referring to digital measuring instruments, and for "measurement
tolerance" when referring to analog instruments.
・f.s. (maximum display or scale value, or length of scale)
Signifies the maximum display (scale) value or the length of the scale (in
cases where the scale consists of unequal increments or where the maximum
value cannot be defined).
In general, this is the range value (the value written on the range selector or
equivalent) currently in use.
・rdg. (displayed or indicated value)
This signifies the value actually being measured, i.e., the value that is
currently indicated or displayed by the measuring instrument.
・dgt. (resolution)
Signifies the smallest display unit on a digital measuring instrument, i.e., the
value displayed when the last digit on the digital display is "1".

v
────────────────────────────────────────────────────
Safety Notes
────────────────────────────────────────────────────
CATⅡ Primary electrical circuits in equipment connected to an AC electrical outlet by a
power cord (portable tools, household appliances, etc.)
CAT II covers directly measuring electrical outlet receptacles.
CATⅢ Primary electrical circuits of heavy equipment (fixed installations) connected
directly to the distribution panel, and feeders from the distribution panel to outlets.
CATⅣ The circuit from the service drop to the service entrance, and to the power meter
and primary overcurrent protection device (distribution panel).
Measurement categories
9600, 9601 and 9602 instrument comply with CAT III (600 V or less)/ CAT
II (600 to 1000 V) safety requirements.
To ensure safe operation of measurement instruments, IEC 61010 establishes
safety standards for various electrical environments, categorized as CAT Ⅱ
to CAT IV, and called measurement categories.
Using a measurement instrument in an environment designated with a
higher-numbered category than that for which the instrument is rated could
result in a severe accident, and must be carefully avoided.
Use of a measurement instrument that is not CAT-rated in CAT II to CAT
IV measurement applications could result in a severe accident, and must be
carefully avoided.

vi
────────────────────────────────────────────────────
Notes on Use
────────────────────────────────────────────────────
DANGER Always connect the powermeter input (including clamp) to the
secondary side of the breaker. On the secondary side of a breaker,
even if the lines are shorted the breaker can trip and prevent an
accident. On the primary side, however, the current capacity may be
large, and in the event of a short-circuit there may be a serious
accident.
The maximum input voltage and current for this unit depend on the
input unit being used. Do not apply an input exceeding the maximum
input voltage and current specified for the input unit. Exceeding the
maximum input voltage or current could damage the unit or cause a
serious accident.
WARNING Before turning on the power, make sure that the voltage of the power
supply being used matches the supply voltage indicated on the rear
panel of the unit. If an attempt is made to use an improper supply
voltage, there is danger of damage to this unit and of life-threatening
risk to the operator.
The power switch has a microgap construction, and it is therefore
essential to use it close to a power outlet. When the unit is not in
use, and while making connections to the circuit being tested, isolate
the unit electrically from the power supply, for example by removing
the power cord plug from the outlet.
To avoid electrical accidents and to maintain the safety
specifications of this instrument, connect the power cord provided
only to a 3-contact (two-conductor + ground) outlet.
Do not remove the case of the unit. There are components inside
carrying high voltages or becoming hot, and this could cause an
electric shock accident.
Do not use the unit where it may be exposed to corrosive or
explosive gases. The unit may be damaged, or explosion may occur.
Notes on Use
In order to ensure safe operation and to obtain maximum performance from
the unit, observe the cautions listed below.

vii
────────────────────────────────────────────────────
Notes on Use
────────────────────────────────────────────────────
CAUTION ・ Should the unit emit smoke, or a strange smell or strange sound,
immediately stop testing operations, power the unit off, and remove
the power cord from the outlet, shut off the circuit being tested,
disconnect the unit, and consult your HIOKI representative.
Continued use of the unit could lead to fire or electric shock
accidents.
・ Do not insert foreign objects through the ventilation holes in the top
and bottom of the case. Particularly if metallic, liquid, or combustible
substances get inside the case, this may lead to fire or electric
shock, or to malfunction. When using several devices at the same
time, do not stack them.
・ Never allow the ventilation holes in the top and bottom covers to
become blocked while using this unit. Blocking the ventilation will
cause internal temperature to rise, possibly resulting in fire or
damage to the equipment.
・ To prevent electric shock, do not allow the unit to become wet and
do not use the unit when your hands are wet.
・ This unit is designed for indoor use and can be safely used at
temperatures ranging from 0℃ to 40℃ and should be operated at
80% RH or less.
・ This unit is not constructed to be waterproof or dustproof, so do
not use it in a very dusty environment or in one where it will get
wet.
・ Do not store or use the unit where it will be exposed to direct
sunlight, high temperatures, high humidity, or condensation. If
exposed to such conditions, the unit may be damaged, the insulation
may deteriorate, and the unit may no longer satisfy its
specifications.
・ To avoid damage to the unit, do not subject the equipment to
vibrations or shocks during transport or handling. Be especially
careful to avoid dropping the equipment.
・ Do not place the unit on an unstable stand, or in an uneven
location. It may fall to the ground, or fall over, and either of these
events may lead to malfunction or accident.
・ Do not use the unit near any device which generates strong
electromagnetic radiation or near a static electrical charge, as these
may cause errors.
・ Avoid treading on or pinching the cable so as not to damage the
cable sheaths.
・ When unplugging the power cord from the power receptacle or from
the unit, grasp the plug, not the cord, in order to avoid damaging the
cable.
・ To avoid damaging the sensor cables or probes, do not bend or pull
them, especially where they connect to the sensor.

viii
────────────────────────────────────────────────────
Notes on Use
────────────────────────────────────────────────────
CAUTION ・ Use caution when taking measurements in circuits where the
power line are hot.
・ Keep the cables well away from heat, to prevent the possibility of
melting the insulation.
・ For long-term storage, remove the power cord.
・ In order to prevent temperature rising, place the device away
from other things so that the vents are not blocked.
・ The instrument should be operated only with the bottom or rear
side downwards.
・ Do not stack up the device.
・ Do not obstruct the ventilation holes. (Do not place anything on
the device as it may block the ventilation holes.)

ix
────────────────────────────────────────────────────
Notes on Use
────────────────────────────────────────────────────
NOTE ・All options for this unit are factory-fitted, but it is also possible to add
options at a later date after purchase. In this case, however, it is necessary
for the unit to be returned to HIOKI headquarters.
・With the appropriate combination of direct connection input units, this unit
can function as either an AC power meter or dual AC/DC power meter.
When used together with clamp input units, depending on whether the clamp
sensor used is for AC or DC, this unit can function as either an AC power
meter or dual AC/DC power meter. When used as an AC power meter, it is
not possible to measure a DC component superimposed on the AC signal
(half-wave rectification, or full-wave rectification upper and lower excluded
waveform).
・Note that limits are specified for the range in which voltage and current level
accuracies are guaranteed.
・In order to assure accurate measurements, allow this unit to warm up for at
least 1 hour before using it.
・This power meter uses the calculations indicated in the specifications in
order to determine apparent power (S), power factor (
λ
), and reactive power
(Q) on the basis of the measured voltage (U), current (I), and active power
(P). The values displayed by this power meter may differ from those
produced by other testers that are based on different principles of operation
or testers that use different calculations.
・Display of a polarity symbol (-) together with reactive power (Q), power
factor (λ) or phase angle (φ) occurs only when TYPE1 is selected as the
calculation type, and indicates that current is delayed with respect to
voltage. For reasons related to circuit design, the polarity symbol is
displayed even when input is "0".
・Due to measuring error or a disproportionate load, the effective power may
exceed the apparent power, resulting in a power factor of 1 or more. In such
a case, this system is designed to make the apparent power equal to the
effective power.
・There are two sorts of measurement: using analog calculation by the input
unit or by digital calculation using the harmonic analysis/flicker
measurement function, and since these have entirely different principles of
measurement, frequency range, and accuracy, and as a result the final
measured values may be different.
・Accurate measurement may be impossible in locations subject to strong
external magnetic fields, such as transformers and high-current conductors,
or in locations subject to strong external electric fields, such as radio
transmission equipment.
・For the current measurement of the 9600 AC/DC DIRECT INPUT UNIT, the
DC-CT (current transformer) method is used, so after measuring a large
current, there may be a very slight residual offset signal. The offset signal
produces the largest error effect in the minimum ranges; in this case, shut
off the current input, and carry out degaussing (DMAG).
・The 9600, 9601, and 9602 active power measurement units operate with an
auto-zero circuit at 2.442 kHz. For this reason, an input signal with a
frequency of 2.442 kHz will result in a periodically fluctuating display
indication.

x
────────────────────────────────────────────────────
Notes on Use
────────────────────────────────────────────────────
NOTE ・When the input is less than a certain level of measurement range, depending
on using the input unit, the display value is forced to zero. See the
specifications of the input unit to be used.
・When measuring a high frequency voltage to earth (for example the
secondary side of an inverter), errors may occur in the measurement values.
・To maintain the measurement accuracy of the unit, bear the following
cooling measures in mind:
Do not obstruct the ventilation holes
Keep away from sources of heat
If rack mounted, install a cooling fan
Do not stack up the device.
Do not place anything on the device.
・This unit switches the power supply voltage automatically. Voltage
fluctuations of 10% from the rated supply voltage are taken into account.
・This unit has no external fuse. Thus if the unit does not operate when the
power switch is turned on and power is supplied, there is a fault. Disconnect
the power cord and measurement lines, and contact your dealer or HIOKI
representative.
・This instruments may cause interference if used in residential areas.Such use
must be avoided unless the user takes special measures to reduce
electromagnetic emissions to prevent interference to the reception of radio
and television broadcasts.

1
────────────────────────────────────────────────────
1.1 Product Overview
────────────────────────────────────────────────────
1
2
3
4
5
6
7
8
9
10
11
12
13
14
A
Chapter 1
Overview
1.1 Product Overview
The 3193 POWER HiTESTER is a power meter that can test any type of
line ranging from single-phase lines to three-phase four-wire lines.
Based on the voltage, current, and active power measurements, this unit
calculates and displays reactive power, apparent power, power factor, phase
angle, and efficiency. It further has a wide range of measurement functions
including frequency measurement function, peak measurement function,
current integration, active power integration, analog outputs, monitor outputs,
and harmonic analysis/flicker function (option).

2
────────────────────────────────────────────────────
1.2 Features
────────────────────────────────────────────────────
1.2 Features
(1) Safe design
The 3193 POWER HiTESTER features a safe design that complies with the
IEC61010-1 safety standard.
(2) Capable of measuring power on all types of power lines
This single power meter is capable of measuring power on all types of power
lines, ranging from single-phase lines to three-phase four-wire lines by
installing the input units.
(3) Simultaneous measurement of multiple systems
Up to six input channels can be installed, so that for example, a single unit
can simultaneously measure the input power and output power of a three-
phase inverter.
By combinations with the optional external input units, the input power and
output power of an inverter and the output of a motor can be measured and
calculated with a single unit. Further, by using the efficiency calculation
function, the efficiency and overall efficiency of up to three points can be
measured simultaneously with one unit.
(4) Wide current measurement range
With a direct connection input unit, and no external current transformer, it is
possible to measure a maximum of 50 A rms. The internal current
transformer design keeps the losses in the current measurement meter
extremely low. Using a current sensor input unit, existing current sensors can
be used to measure up to 500 A.
(5) High accuracy
The basic accuracy of±0.1% rdg.±0.1%f.s. is high.
(6) Wide frequency range: DC and 0.5 Hz to 1 MHz (using optional
9600 AC/DC DIRECT INPUT UNIT)
The wide frequency response supports the evaluation of inverter-motor
systems, inverter fluorescent lighting systems, ultrasound motors, switching
power supplies, and so on.
(7) Built-in low pass filter
The cut-off frequency can be selected from three values. This function allows
an inverter fundamental frequency to be extracted, and also supports data
exchange with conventional devices.
(8) Three types of calculation expression selectable
Three types of calculation for apparent power and reactive power can be
selected, to support compatibility with conventional devices.
Other manuals for Power HiTester 3193
1
This manual suits for next models
1
Table of contents
Other Hioki Test Equipment manuals
Popular Test Equipment manuals by other brands

Klein Tools
Klein Tools VDV Scout Pro 3 instruction manual

Elcometer
Elcometer 510 S user guide

Elbro AG
Elbro AG DETECTOR 3000 manual

Agilent Technologies
Agilent Technologies InfiniiVision 6000 Series Service guide

ML Accessories
ML Accessories TE1 Installation & maintenance manual

TestSafe
TestSafe miniPAT user manual

Buckleys
Buckleys DCCT PRO2 user manual

Keysight Technologies
Keysight Technologies 85053B User's and service guide

PCB Piezotronics
PCB Piezotronics 8159-0012A Installation and operating manual

Benning
Benning IT 130 Short instructions

Facom
Facom BAT.TEST Original instructions

Meriam
Meriam PIT5000 user manual