Inax SATIS Series User manual
Thank you for purchasing this product. After reading this manual, keep it in a place where you can refer to it easily.
Be sure to follow the safety precautions.
Failure to follow the warning and cautions described on pages 1 - 5 may result in serious accidents under some circumstances.
Each of these items is extremely important for safety, and should be strictly observed.
In the event that an accident occurs as a result of improper usage, our company will assume no responsibility for damages.
When moving to another home, make sure to provide this document to the new tenant/owner.
This product is designed so that people such as
elderly persons, persons with limited mobility,
persons with illnesses, and children can use it
without assistance.
To ensure proper usage of this product,
please read this “User’s Manual”
before using this product.
User’s Manual
SATIS S DV-S618 type, DV-S618P type
■
Be Sure To Read This
Safety Precautions …………………………………………………………………………… 1
■
Precautions To Prevent Failure
Handling Precautions………………………………………………………………………… 6
■
Please Read This First
SATIS Features ……………………………………………………………………………… 7
Preparation and Checks Before Use
①Open the Water Shutoff Valve ………………
②Connect the Power ……………………………
③
Press the
【Flush Full】
Button or Press the Flush Button on the Toilet Body
…
④Operate the Shower……………………………
⑤Adjust the Seat Temperature …………………
⑥Adjust the Clock ………………………………
8
8
10
10
11
12
Functions ……………………………………………………………………………………… 13
■
Operation
General Operation ①
Standing in front of the toilet bowl automatically opens the toilet lid
…
②Auto Deodorizing Function ……………………
③Front and Rear Washing………………………
④Warm Air Dryer …………………………………
⑤Flushing the Toilet ……………………………
⑥Auto Close Function …………………………
15
15
16
18
19
20
Useful Functions Plasmacluster Function …………………………
Power Save ………………………………………
Illuminating the Base of the Toilet/Warming the Room
…
Listening to Music with the
【Music】
Function …
Comfort Features …………………………………
21
23
24
25
27
■
Useful Information
Other References ……………………………………………………………………………
If You Have These Problems ………………………………………………………………
Flushing the Toilet Manually …………………………………………………………………
If the Water in the Tank is Frozen …………………………………………………………
Preparing the Toilet for Long-term Disuse …………………………………………………
29
31
32
33
35
■
Cleaning and Maintenance ……………………………………………………………… 37
■
Troubleshooting
Troubleshooting ……………………………………………………………………………… 48
■
Specifications ……………………………………………………………………………… 60

1
Be Sure To Read This
Be Sure To Read This
WARNING
Please read these Safety Precautions
thoroughly before use in order to ensure
correct use of the toilet.
Depending on conditions, the points of
caution in this document may have a
signicant impact.
These are all important safety issues;
therefore, ensure that you observe all
safety precautions.
CAUTION
Indicates a potentially hazardous
situation which, if not avoided,
could result in minor or moderate
injury or in damage to product or
other property.
WARNING
Indicates a potentially hazardous
situation which, if not avoided,
could result in death or serious
injury.
Do not remove or insert the
power plug with wet hands.
* Failure to do so may cause electric
shock or re.
Hold the plug when connecting
or disconnecting the power
plug.
* If the plug is connected or disconnected
by holding the cord, the plug or cord
may be damaged, which may result in
re or electric shock.
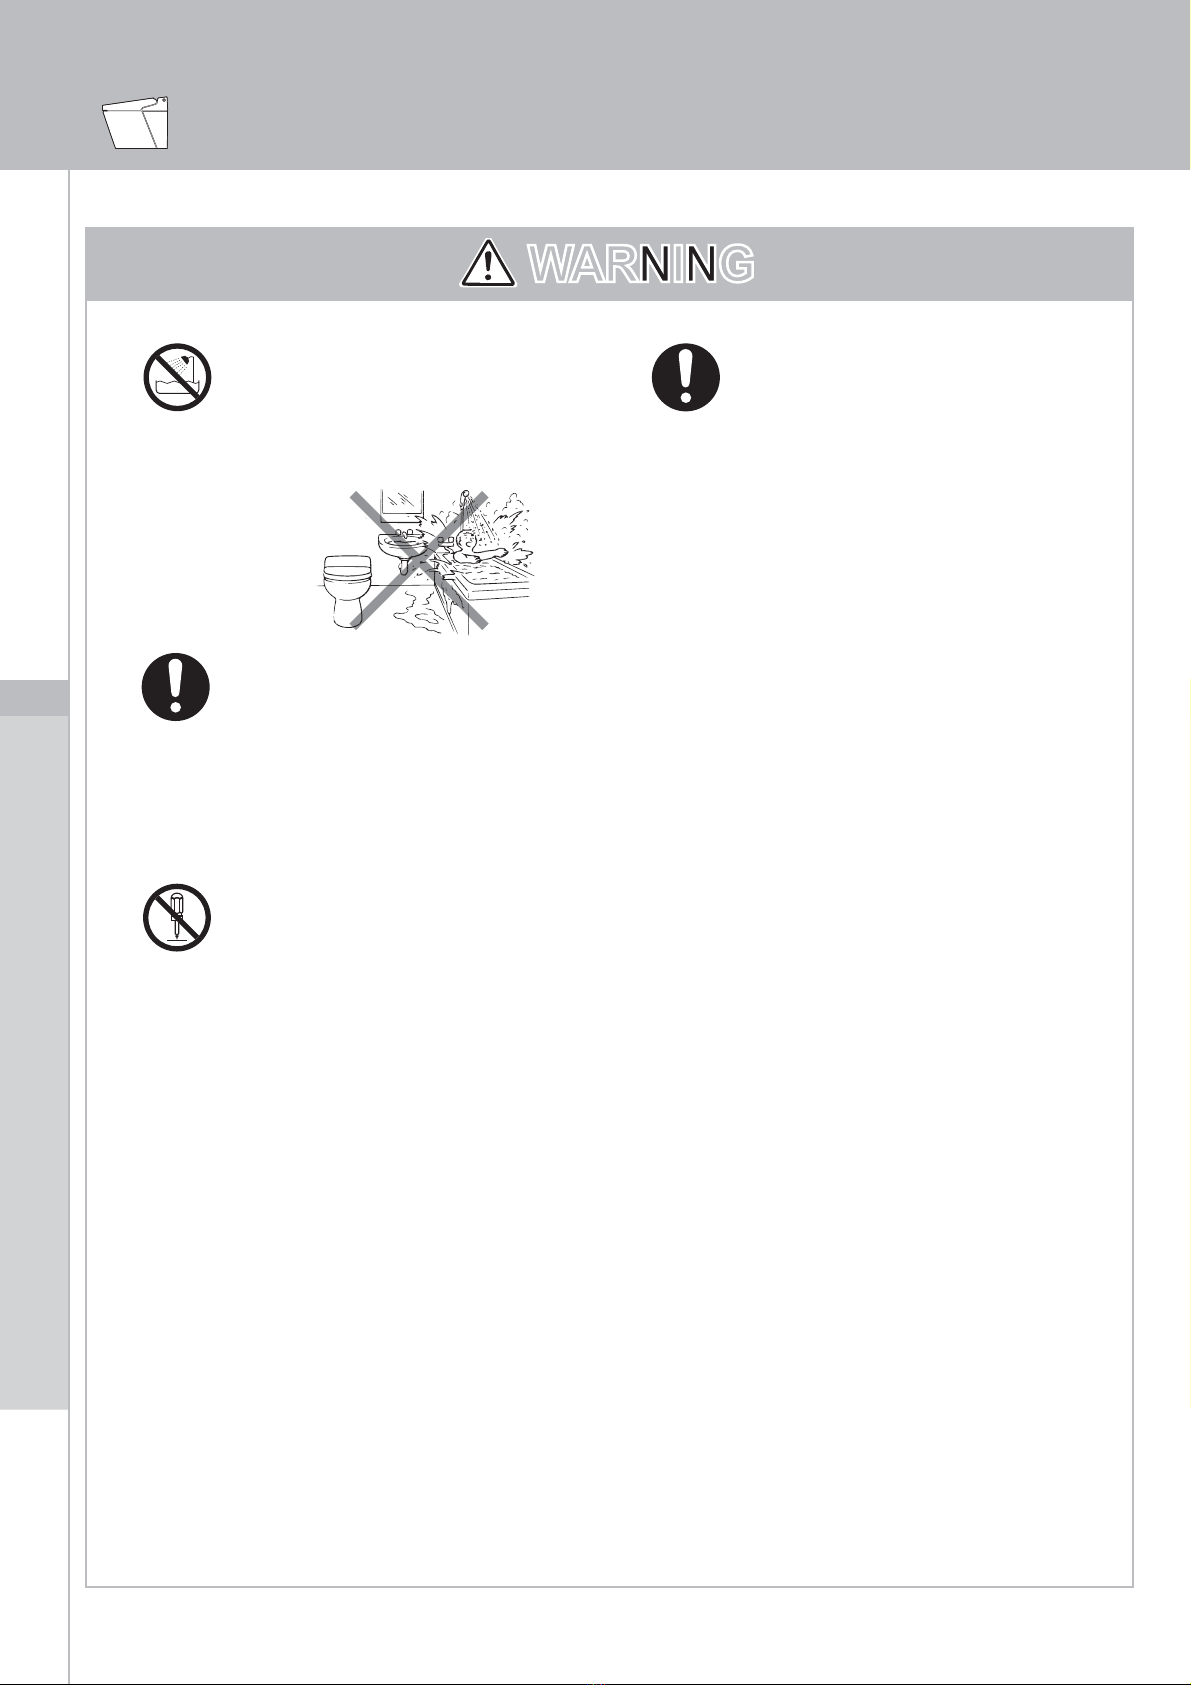
Do not pour water or cleaning
chemicals directly onto the toilet
body or the power plug.
* Doing so may cause electric shock or
re.
Periodically disconnect the
power plug from the outlet and
wipe with a dry cloth.
* Dust that has accumulated on the power
plug may cause a re.
This product should only be
connected to a 220-240 VAC
power supply.
Do not connect too many
cords to a single electrical
outlet.
* Doing so may cause re.
Do not damage, break, modify,
forcefully bend, pull, twist,
bundle, place heavy items on, or
pinch the power cord.
* Doing so may cause electric shock or
re.
Make sure the power plug is
completely connected.
* Failure to do so cause electric shock or
re.
Do not use a loose or
ungrounded outlet.
* Doing so may cause electric shock or
re.
Ensure the electrical outlet to
which the power cord is
connected is properly grounded,
as failure to do so may cause
electric shock, etc.
If the seat unit, power plug,
or power cord are damaged
(abnormal noise, odor, smoke,
high temperatures, cracking,
or water leakage occurs),
disconnect the power plug from
the outlet immediately, close the
water shutoff valve, and contact
the distributor to avoid a hazard.
Never use any defective devices.
* Doing so may result in leaks, electric
shock, or re.
NO WET HANDS
OBSERVE
Spraying with
water prohibited
OBSERVE
PROHIBITED
PROHIBITED
OBSERVE
PROHIBITED
GROUND
OBSERVE
Safety Precautions
2
Be Sure To Read This
WARNING
This symbol indicates that you must exercise
caution. This symbol is used in conjunction
with the "WARNING" and "CAUTION"
symbols to draw user attention. Ensure you
read these and observe these precautions.
OBSERVE
This symbol indicates that
the described action must be
performed.
PROHIBITED
This symbol indicates the described
action is prohibited.
Those who are receiving
chemotherapy or otherwise
have severe immune deciency
should consult with a doctor
before using this product.
* Failure to do so may lead to severe
physical injury.
Be sure to set the seat temperature
to the "OFF" setting when the toilet
will not be used for an extended
period of time or when used by the
following types of users.
• Children
• Elderly persons
• Persons with illness
• Persons with limited mobility
• Persons with sensitive skin
•
Persons who are taking medication
that causes drowsiness
• Persons who are under the
inuence of alcohol
• Persons who are suffering from
exhaustion
*
Using the toilet for an extended period of
time without turning off the seat heater
may result in low-temperature burns.
Be sure to set the dryer to the
"Low" setting when the toilet
will not be used for an extended
period of time or when used by
the following types of users.
• Children
• Elderly persons
• Persons with illness
• Persons with limited mobility
• Persons with sensitive skin
•
Persons who are taking medication
that causes drowsiness
• Persons who are under the
inuence of alcohol
• Persons who are suffering from
exhaustion
* Using the dryer for an extended period of time
at some other setting may result in burns.
Observe the following
precautions when inserting
batteries into the remote control.
• Place the batteries in the correct
orientation of polarity.
• Remove the batteries when the
toilet will not be used for an
extended period of time.
• Immediately remove dead
batteries from the remote control.
• Insulate batteries with tape when
discarding batteries.
* Battery uid leaks may cause re.
• Keep batteries out of reach of
children.
* Seek medical attention immediately if
accidentally swallowed.
• Thoroughly rinse any battery uid
that has made contact with the
skin.
• Do not rub your eyes if any battery
uid makes contact with the eyes.
Rinse thoroughly with clean water.
* Rubbing eyes under such circumstances
could cause loss of eyesight. Seek
medical attention.
Never perform the following
actions while handling batteries.
• Do not allow batteries to make
contact with metal objects such as
necklaces or hairpins.
• Do not use old and new batteries
or different types of batteries
together.
• Do not heat, disassemble, or place
batteries in water or re.
* Battery uid leaks may cause re.
OBSERVE
OBSERVE
OBSERVE
OBSERVE
PROHIBITED
3
Be Sure To Read This
WARNING
Do not install this product in a
wet or damp location such as
inside a shower room or steam
room.
* Doing so may cause electric shock or
re.
Make sure to perform anti-
freezing procedures when there
is possibility for freezing to
occur. ( ☞Page 33)
* Damage from freezing may cause re or
ooding.
Never disassemble or modify
this product.
* Doing so may cause electric shock, re,
or injury.
Make sure to bleed any air in
pipes after new installation,
repair work, or restoration of
water supply.
* Using water appliances while water
pipes contain air may damage the
appliance, pipes, property damage due
to leaks, and even injury.
Use in wet
areas prohibited
OBSERVE
Disassembly
prohibited
OBSERVE
Safety Precautions
4
Be Sure To Read This
CAUTION
Use a mild cleaner suitable for
plastic to clean plastic parts
including the toilet seat.
* Avoid using toilet cleansers, home
cleansers, bleach, benzene, thinner,
scouring powder, cresol, or other
abrasive products as such products
may damage plastic parts or cause re,
electric shock, and even injury.
Toilet
cleanser
Home
cleanser
Do not use chlorinated
cleansers, acidic cleansers, or
disinfectants to clean the toilet
bowl.
* Vaporized gas from such products may
cause damage.
Make sure that the clip is rmly
attached to the water supply
hose.
* If the clip is not rmly attached, the
water supply hose may detach resulting
in a water leak.
Do not bend or atten the water
supply hose.
* Doing so may result in leaks and
ooding on the oor.
Connect the toilet to tap water
only.
* Failure to do so may corrode the inside
of this product, which could cause
electric shock, re, or skin inammation.
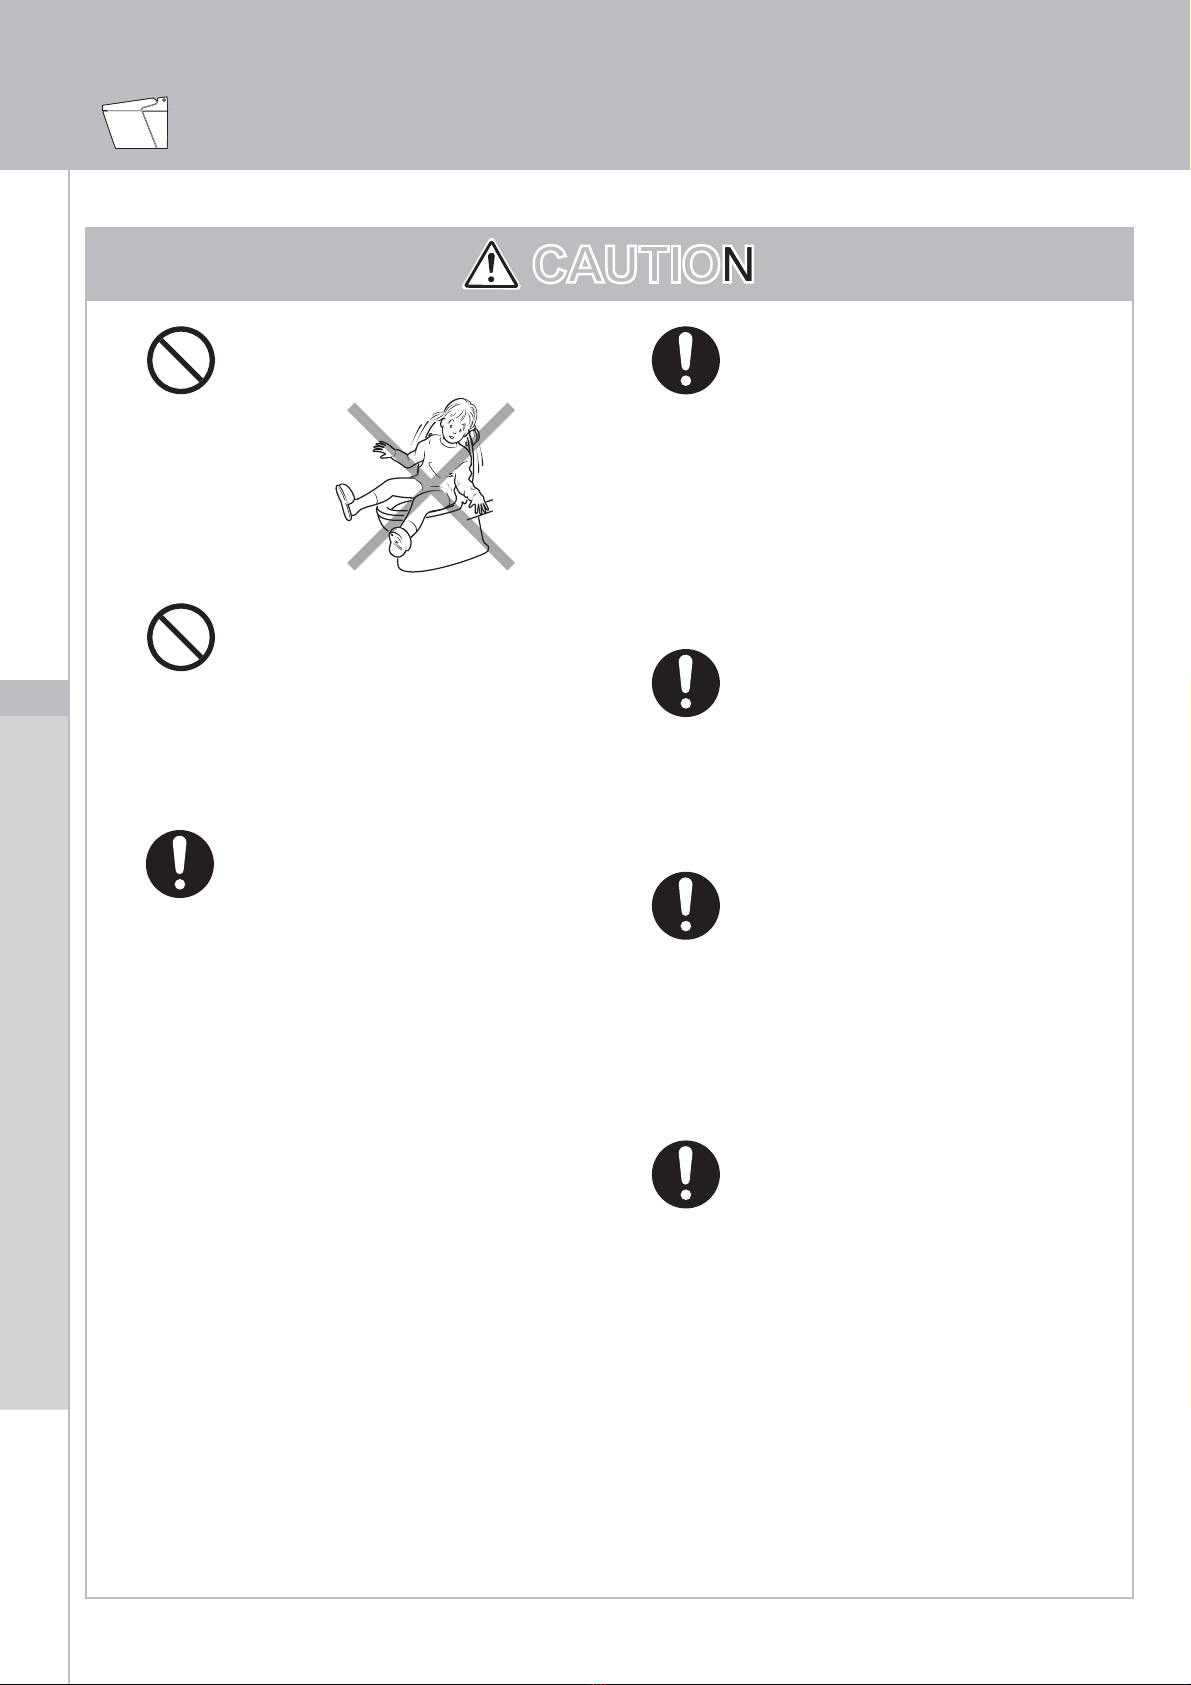
Do not climb on top of the toilet
lid or toilet body.
* Doing so may damage the toilet and/or
cause injury.
Do not place weight or step on
the water shutoff valve.
* Doing so may result in leaks and
ooding on the oor.
Do not subject the clip to any
impact such as when cleaning
the toilet.
* Doing so may cause the clip to break,
which could cause water supply hose to
disconnect and water to leak.
Do not smoke while using or
being near the toilet.
* Doing so may cause re.
Do not touch any cracks that
appear anywhere on the toilet
bowl.
* Doing so may cause injury. Replace the
toilet immediately.
OBSERVE
PROHIBITED
OBSERVE
PROHIBITED
PROHIBITED
PROHIBITED
PROHIBITED
PROHIBITED
SOURCES OF
FIRE PROHIBITED
CONTACT
PROHIBITED
5
Be Sure To Read This
CAUTION
Do not lean back against the
toilet lid.
* Doing so may result in damage or injury.
Do not use a hot water supply
line.
Do not subject the toilet to
impact.
* Doing so may damage the toilet, which
could cause water leaks or injury if used
under such circumstances.
Regularly check pipes and
surrounding areas for water
leaks.
* Failure to quickly notice water leaks due
to part deterioration or wear may result
in signicant property damage.
When the toilet will not be used
for an extended period of time,
close the water shutoff valve,
drain the water from the tank,
and disconnect the power plug
from the outlet. ( ☞Page 35)
* Failure to so may result in damage in
the event of water freezing, which could
cause re or ooding.
* Water may also become contaminated,
which could cause skin inammation.
Make sure to disconnect the
power plug from the outlet
before cleaning the toilet.
* Failure to do so may cause electric
shock or re. Make sure the power is
turned on to use the nozzle cleaning
function.
Others should monitor use by
the following persons in case of
falls or other accidents.
• Children
• Elderly persons
• Persons with limited mobility
* Failure to do so may result in damage or
injury.
Make sure to close the water
shutoff valve when removing
the strainer inside the water
shutoff valve.
Make sure that the water
shutoff valve is tightened
completely when installing the
strainer.
Check that there is no debris
remaining on the O-ring before
installing the strainer.
* Check that the O-ring is free from
foreign materials as failure to do so may
result in water leakage and ooding.
PROHIBITED
PROHIBITED
OBSERVE
OBSERVE
OBSERVE
OBSERVE
OBSERVE
Safety Precautions
6
Precautions To Prevent Failure
Handling Precautions
Precautions To Prevent Failure
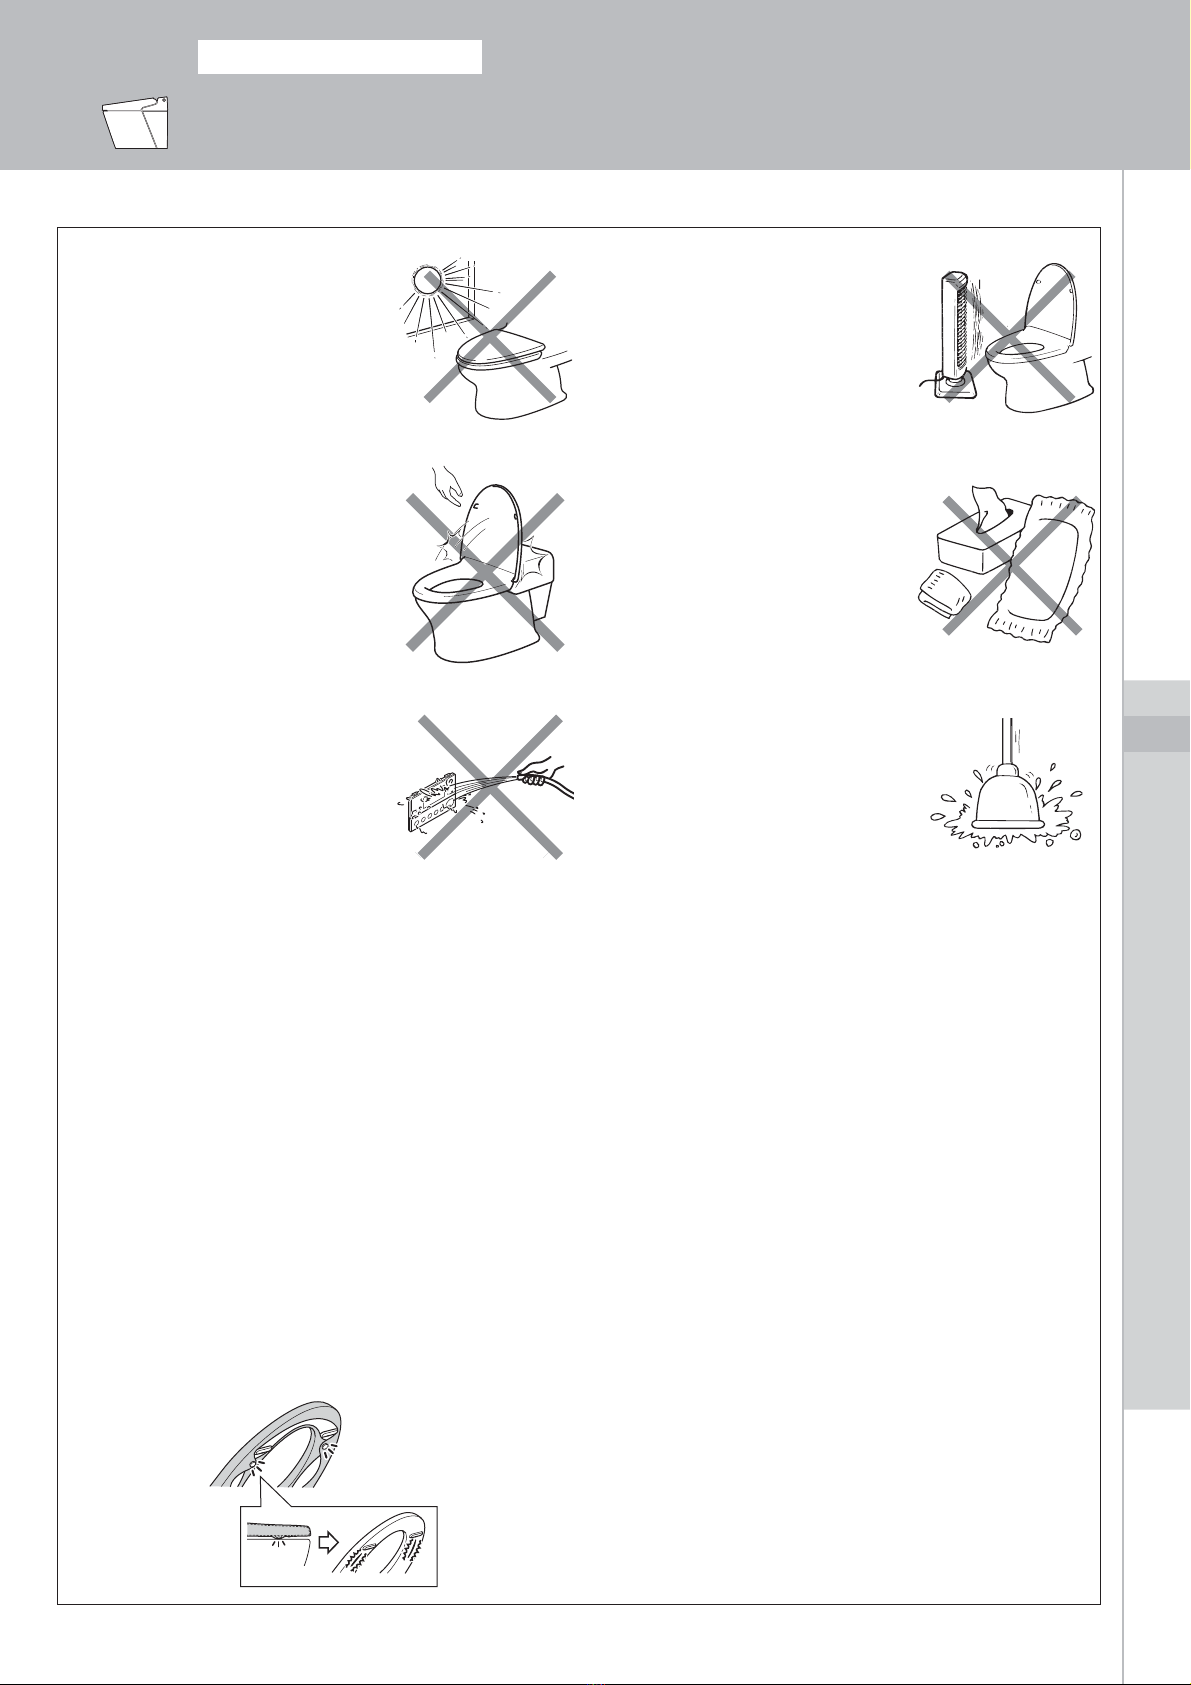
Do not expose the toilet to
direct sunlight.
* Doing so may cause discoloration
of plastic parts or malfunction of the
remote control and motion sensors.
Do not place a heater near
the toilet body.
* Doing so may cause discoloration or
damage.
Do not use excessive force to
open or close the toilet seat
and toilet lid.
* Doing so could cause damage or
malfunction.
Do not use any paper other
than toilet paper.
Do not drop
any objects that could cause
clogging into the toilet bowl.
Remove any accidentally
dropped objects from the
toilet before ushing.
Do not expose the remote
control to water or cleaners.
* Doing so may cause malfunction.
If the toilet becomes clogged,
use a
plunger
to remove the
clog.
Do not ush the toilet while
clogged.
* Contaminated water could overow
from the toilet bowl and stain the oor.
Do not use toilet deodorizer on plastic parts.
Immediately wipe off any toilet deodorizer that
makes contact with plastic parts.
Use hair spray or similar products in well-
ventilated areas to ensure residue does not
remain in the area.
* Failure to so may cause malfunction or plastic parts to lose
their gloss.
Do not wipe the toilet body, toilet seat, or other
plastic parts with a dry cloth or toilet paper.
Refer to page 37 for details on maintenance.
* Doing so may cause scratching or the parts to lose their
gloss.
Do not operate the remote control with wet hands.
* Doing so may cause malfunction.
Do not use unsuitable toilet seat covers.
* The company shall not be responsible for any loss or
damage as the result of using third-party products. The
customer assumes all responsibility in such circumstances.
* Buttons of unsuitable covers could make forceful contact
with and damage the toilet seat.
* Unsuitable covers could block the seat sensor causing the
seat sensor to remain triggered indenitely. This could cause
the deodorizer fan to run constantly and cool the toilet seat.
* Unsuitable covers could roll up and prevent the toilet lid from
opening or cause it to close unexpectedly.
A single ush may not be sufcient depending
on the size, amount, or weight of the waste
and the amount and type of toilet paper.
A full ush corresponds to approximately 5 m
of toilet paper.
Refer to JIS standards for more information on
toilet paper amounts.
A single ush may not be sufcient for barium
and other heavy substances that are not water
soluble.
In such situations, break down barium or other
debris remaining in the toilet bowl with a toilet
brush and ush several times.
Please Read This First
7
Please Read This First
Please Read This First
SATIS Features
Water shutoff valve
Open/close knob
* The open/close knob
of the water shutoff
valve shuts off the
ow of washing
water to the toilet
bowl. Make sure this
valve is fully open
when using the toilet.
* Operation can only be performed with the remote control.
* The DV-S618-VH-W model is illustrated in the gure.
Overview
Water shutoff valve
Container body
Open/close knob
Side cover
Water supply hose
Power plug
Large nozzle guard
Toilet bowl
Nozzle (front washing)
Nozzle (rear washing)
Toilet bowl
Toilet seat
Toilet lid
Flush button (indicator/receiver)
Strainer
<Left view with the side
cover removed>
Strainer
* The strainer removes material
in the tap water.
* Make sure to close the water
shutoff valve before removing
the strainer.
Place a towel underneath the
strainer as a small amount of
water will spill when removed.
(☞Page 46)
<Right side as seen when facing the toilet body>
Power indicator
Power save indicator
Plasmacluster
indicator
(Green)
(Green)
(Blue and white)
Flush button indicator
Upper body sensor
Lower body sensor
8
Please Read This FirstPlease Read This First
Only 220-240 VAC
outlets must be used.
Do not connect too
many cords to a single
electrical outlet.
* Doing so may cause re.
PROHIBITED
WARNING
Deodorizing lter
<Inside the nozzle shutter>
(☞Page 44)
Deodorizing lter
* The gure illustrates an open nozzle shutter.
(☞Page 43)
Vacuum breaker
Vacuum breaker
* The vacuum breaker is located in the toilet
body. Check the vacuum breaker on a regular
basis.
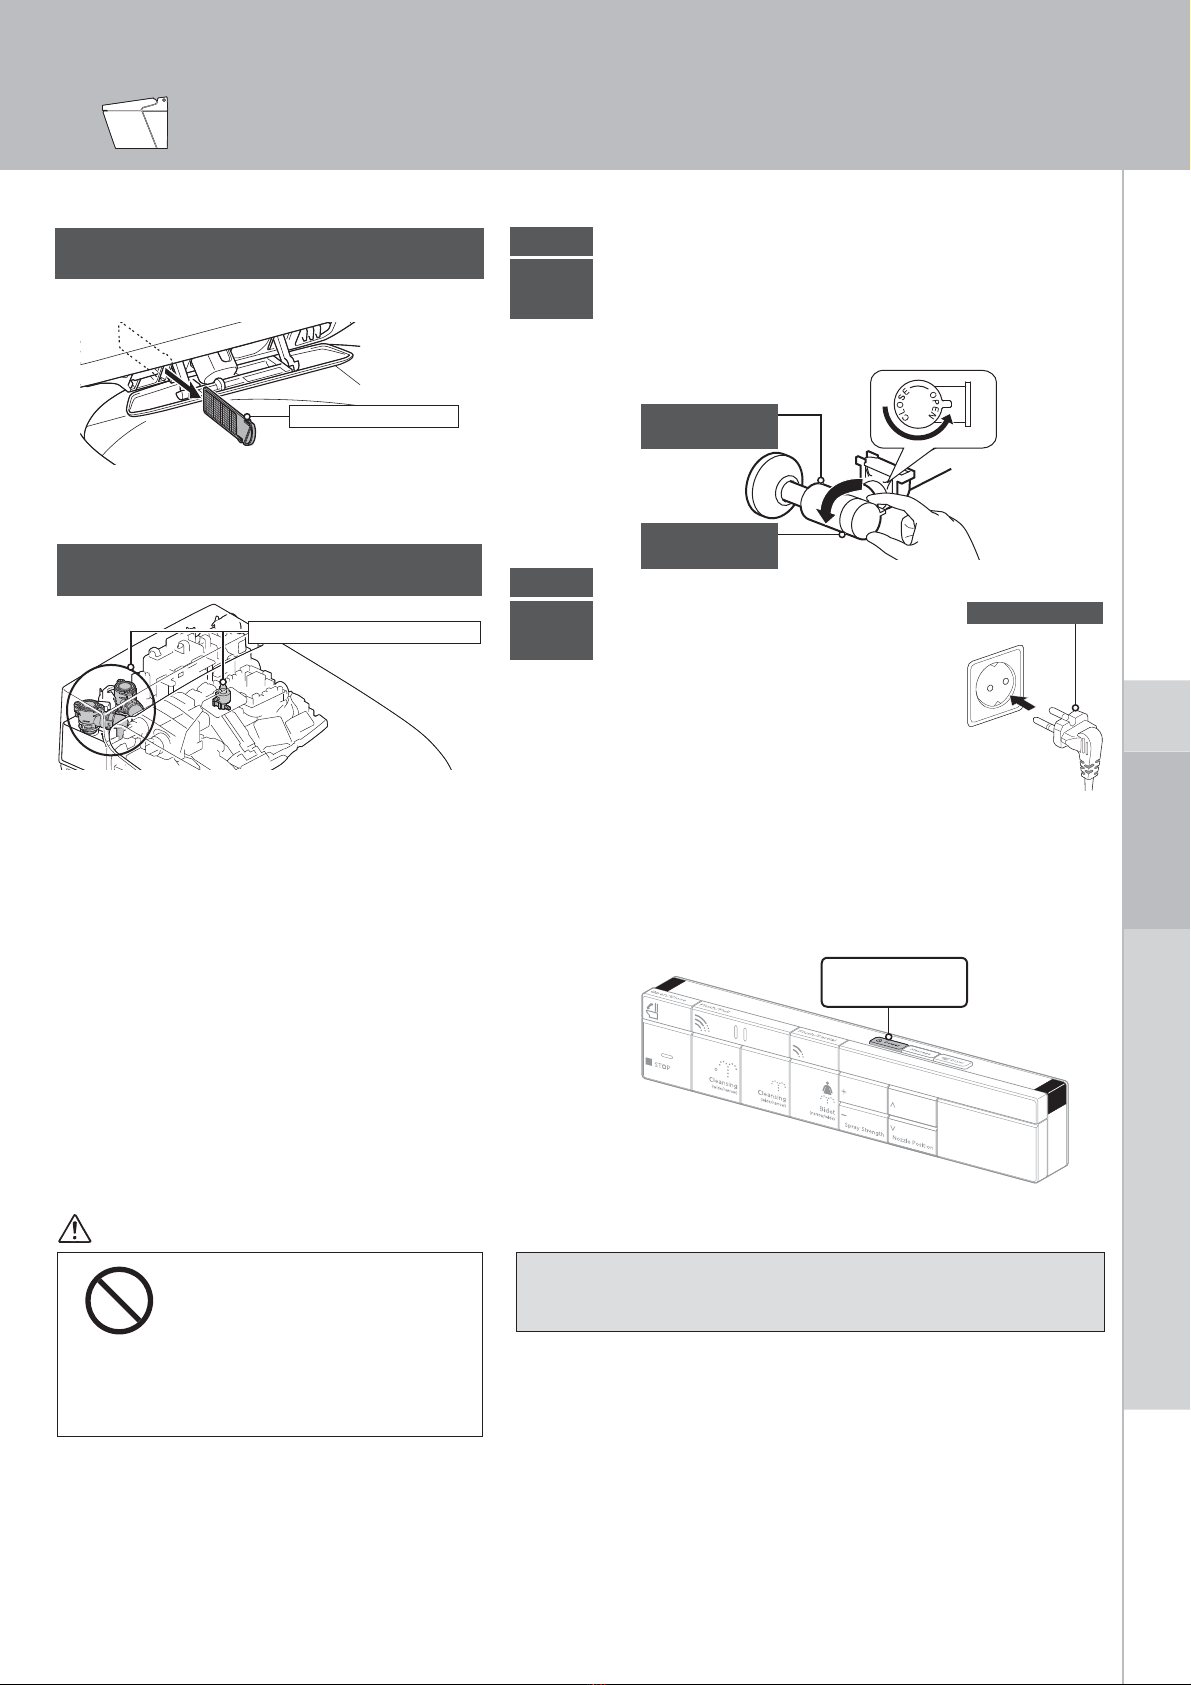
Open the Water Shutoff Valve
* If the water shutoff valve is closed, turn it
counterclockwise to open.
* If the open/close knob is difcult to turn, grasp it with
a dry cloth and turn.
STEP
1
Connect the Power
Insert the power plug
into a 220-240 VAC
outlet.
* Check that the power indicator LED on the power
indicator is green.
If the power indicator is not green, press the
【Powerbutton on the remote control.
STEP
2
[CAUTION]
Wait about 10 seconds before reconnecting the power plug.
Preparation and Checks Before Use
* Make sure to perform the
following checks before using the
shower toilet for the rst time.
Open
Water shutoff
valve
Open/close
knob
Power
Power plug

9
Please Read This First
Preparation and Checks Before Use
(Reference)
When power is turned off with the remote control
power button, "OFF" is displayed on the LCD.
Flush Full/Partial
Play Music
Seat Temp.
Vol.
STOP
Cleansing (Full)
Cleansing (Partial)
Bidet
Nozzle Cleansing
Dryer Temp.
Power
Hr./Min.
Battery LED
Dry Temp. Indicator
Power Save
Water Temp. Indicator
Plasmacluster ion
Seat Temp. Indicator
Light
Auto Seat Open
Massage
Dryer
Transmitter
Nozzle Position
Spray Strength
Open/Close
Transmitter
Water Temp.
Auto Seat Open Indicator
Stop Music
Auto Clean Indicator
Auto Clean
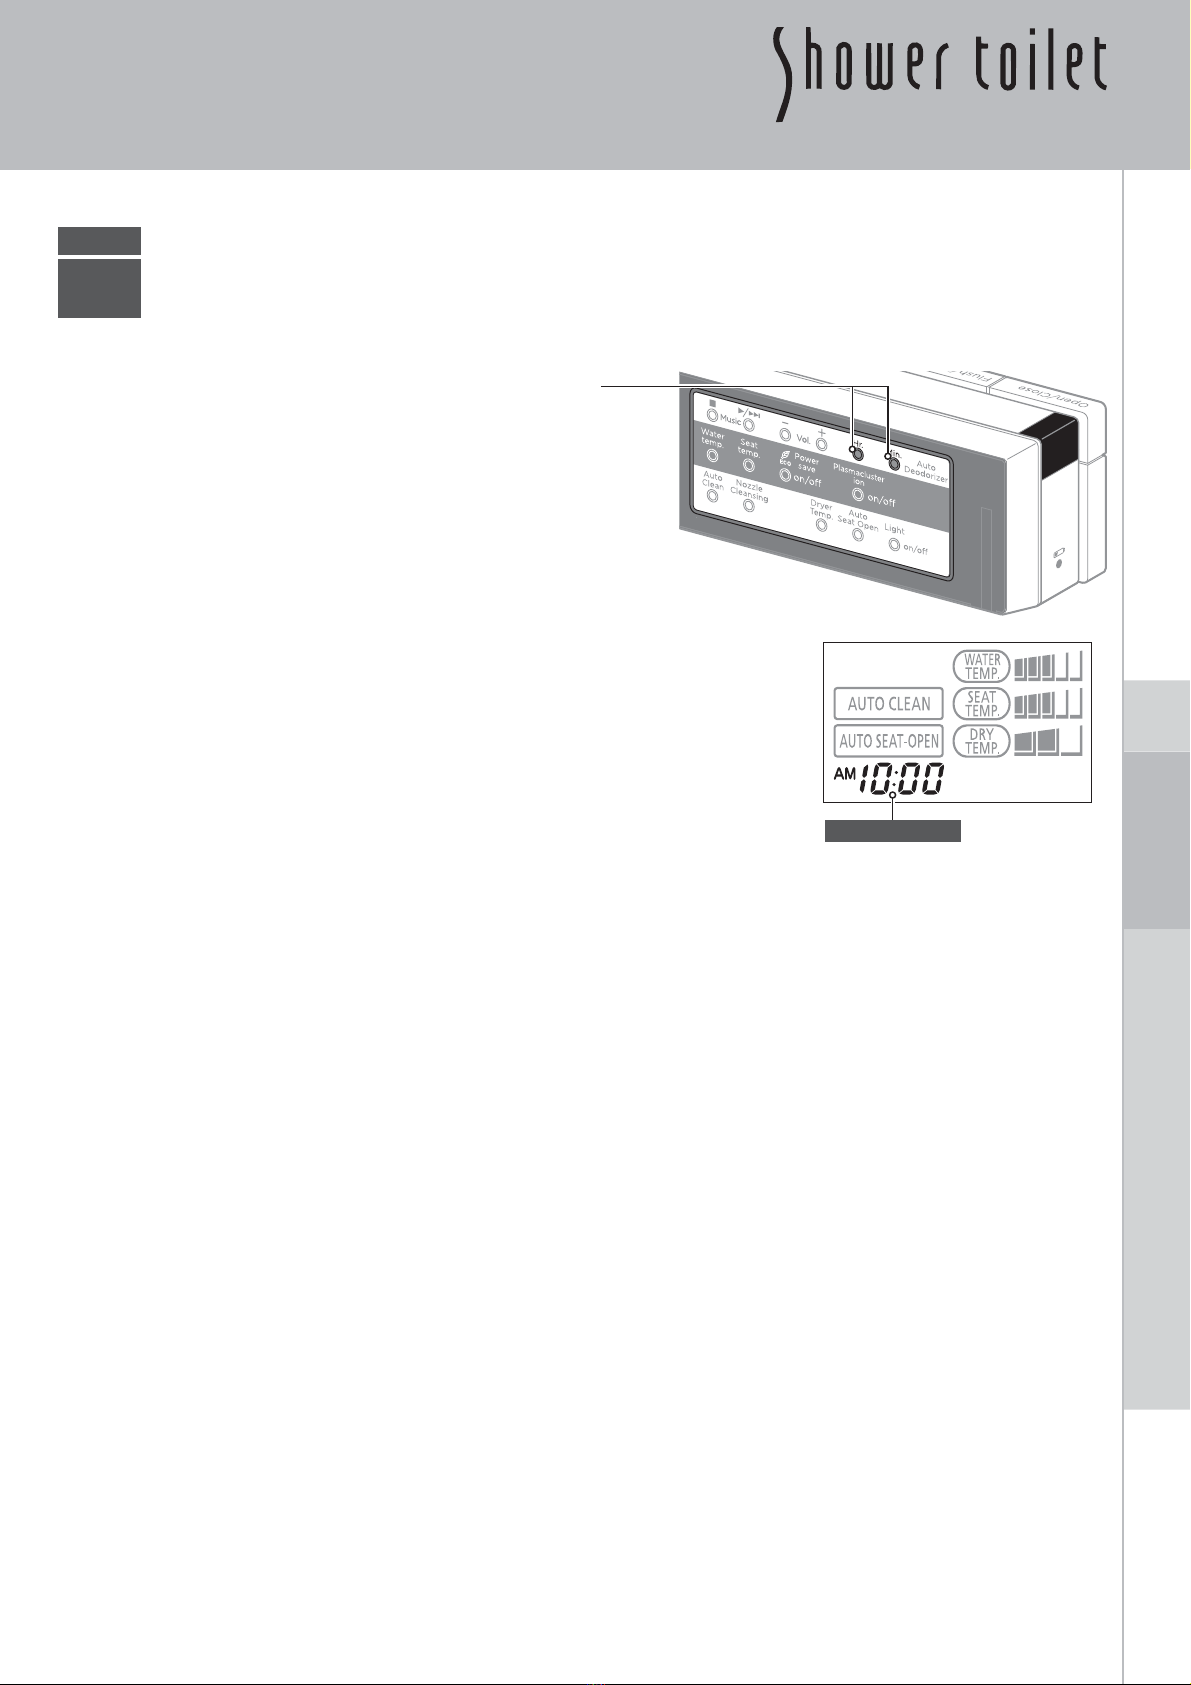
Time display
Remote Control
*Depending on the model, functions indicated by a star symbol may not be available.
1. Main Control Panel
3. LCD
2. Secondary Control Panel
[CAUTION]
Control panel switches other than
【STOP】
cannot
be used when the control panel is removed from the
holder. Use the toilet with the control panel set into
the holder.
Do not operate the remote control with wet hands.
* Doing so may cause malfunction.
To use the secondary panel, face the transmitter
towards the upper body sensor. ( ☞Page 7)
* Operation sometimes may not occur as expected
due to unreceived signals.

10
Please Read This First
Press the
【Flush Full】
Button or Press the Flush
Button on the Toilet Body
* Check that water is ushed out of the toilet bowl.
STEP
3
Operate the Shower
* The shower will not function while the toilet is ushing. Operate the shower after the toiled has nished
ushing.
STEP
4
Roll up your sleeve and set
your arm on the toilet seat.
* The toilet is equipped with a seat sensor that
detects the presence of someone sitting on the
toilet seat.
The shower and dryer will not function if the
sensor is not triggered.
* Allow the shower to operate for approximately 30
seconds to bleed air in the water line during initial
use.
Press the
【Cleansing (Full)】
button.
* At this time, water will discharge from around the
nozzle as a preliminary operation.
Place a hand above the
nozzle tip to block the
sprayed water.
Press the
【STOP】
button to
stop the shower.

11
Please Read This First
Preparation and Checks Before Use
Change the temperature
* Press the corresponding switch to change the
different temperatures.
Adjust the Seat Temperature
STEP
5
(Reference)
The toilet seat does not warm immediately. The seat
heater should be turned on 10 to 15 minutes before
use to ensure the desired temperature is reached
for comfortable use.
This toilet is equipped with a seat heater auto off
function that automatically turns off the seat heater
when the toilet is in use to prevent low-temperature
burns. ( ☞Page 27)
The maximum seat temperature is 36°C for energy-
saving purposes. The seat may feel cool depending
on the usage environment.
Be sure to set the seat
temperature to the "OFF" setting
when the toilet will be used by the
following types of users.
• Children
• Elderly persons
• Persons with illness
• Persons with limited mobility
• Persons with sensitive skin
• Persons who are taking medication
that causes drowsiness
• Persons who are under the
inuence of alcohol
• Persons who are suffering from exhaustion
* Using the toilet for an extended period of
time without turning off the seat heater
may result in low-temperature burns.
OBSERVE
WARNING
Water Temp.
* There are 6 levels of water temperature available including
"Off", "Low (approximately 32°C)", "High (approximately
40°C)", and the other levels between low and high. Select
your temperature preference in accordance with the season.
Seat Temp.
* There are 6 levels of seat temperature available including
"Off", "Low (approximately 28°C)", "High (approximately
(36°C)", and the other levels between low and high. Select
your temperature preference in accordance with the season.
Dryer Temp.
* There are 3 levels of drying temperature available including
"Low", "Medium", and "High". ( ☞Page 18)
Water Temp. Indicator
Seat Temp. Indicator
Dryer Temp. Indicator
12
Please Read This First
Adjust the Clock
STEP
6
Press the
【Hr.】
and
【Min.】
buttons to adjust the time.
* Make sure that time is congured correctly with
regards to AM and PM.
Time display
13
Please Read This First
Functions
Washing DV-S618
Aqua ceramic
(ISO Anti-microbial)
☞
37
New material optimal for sanitary ceramic applications
due to non-stick properties ○
Bowl sterilization ☞
21
Kills bacteria using plasmacluster ions. Also reduces odors.
○
Power stream washing
ー
Provides a strong water stream for powerful washing. ○
Nozzle shutter ☞
44
Stores the nozzle when not in use. Removable for easy
cleaning.
○
Clean nozzle shutter
Nozzle cleaning mode
☞
43
Ejects the nozzle for easy cleaning. ○
Nozzle cleaning ☞
42
Clean the nozzle with just the touch of a button. ○
Easy-cleanable seat
ー
No gaps at joints on the toilet seat allows for easy easy cleaning.
○
Ladies nozzle
ー
Bidet nozzle for women. ○
Self-cleaning
nozzle ☞
17
Thoroughly rinses the nozzle with warm water before
and after use. ○
One-touch toilet
lid removal ☞
40
The toilet lid is easily removed for cleaning. ○
Anti-bacterial resin
(ISO Anti-microbial)
☞
39
Antibacterial effects from silver ion power. ○
Washing functions DV-S618
Rear washing ☞
16
to
17
Provides rear washing with warm water. ○
Powerful/Mild
Oscillating rear
washing ☞
16
to
17
Moves the nozzle back and forth to wash at a wider range. ○
Super oscillating
rear washing ☞
16
to
17
Moves the nozzle back and forth rapidly to provide a
massaging effect. ○
Rear massage
cleaning ☞
17
Alternates the water pressure between two levels to provide a
massaging effect. ○
Front washing ☞
16
to
17
Provides a low-pressure stream of water for gentle washing. ○
Wide front
washing ☞
16
to
17
Moves the nozzle back and forth to provide a gentle wash at
a wider range.
○
Oscillating spray - super
Nozzle position
adjustment ☞
17
Moves the nozzle to the desired position. ○
Power-saving functions DV-S618
Improved energy-
conserving toilet seat
ー
Retains toilet seat heat to save energy. ○
Advanced power
save ☞
23
Seat temperature is automatically lowered when the
toilet is not in use to save energy. ○
One-touch power
save ☞
23
Turn off the heater for a specied time to save energy
with just the touch of a button.
○
(8 hours)
Power button
ー
Toilet can be manually powered down to save energy. ○

14
Please Read This First
Comfort functions DV-S618
Music ☞
25
Plays music to create a more relaxing space. ○
Room Refresh ☞
22
Removes odors via synergistic effects of plasmacluster
ions and deodorizer. ○
Change the open/
close mode for
auto seat open
☞
15
,
20
Standing in front of the toilet bowl causes the toilet lid to
automatically open. Stepping away causes the toilet lid
to automatically close.
○
Night Light ☞
24
Illuminates the area at the base of the toilet and the
inside of the toilet bowl. Useful when using the toilet at
night.
○
Full auto washing
(remote control
ushing)
☞
19
Automatically ushes the toilet when standing up from
the toilet seat.
○
Function provided for urinal use
by males
Warm Air Drying ☞
18
Dries off your rear with warm air. ○
Air shield
deodorizer ☞
15
Uses air to provide power deodorizing effects for the
entire toilet bowl. ○
Seat heating ☞
11
Provides seating comfort on cold days. ○
Damping toilet
seat
ー
Closes the toilet seat slowly and reduces the volume of
the closing operation complete tone. ○
Seat heater auto
off ☞
27
Turns off the heater once someone is sitting on the
toilet seat. Prevents low-temperature burns. ○
Seat sensor ☞
29
Prevents inadvertent operation when there is no one on
the toilet seat. ○
Remote Control
ー
Remote control with a metal look. ○
Power outage
support ☞
32
Provides security during power outages. ○
○: Available ー: Not available

15
Operation
General Operation
Operation
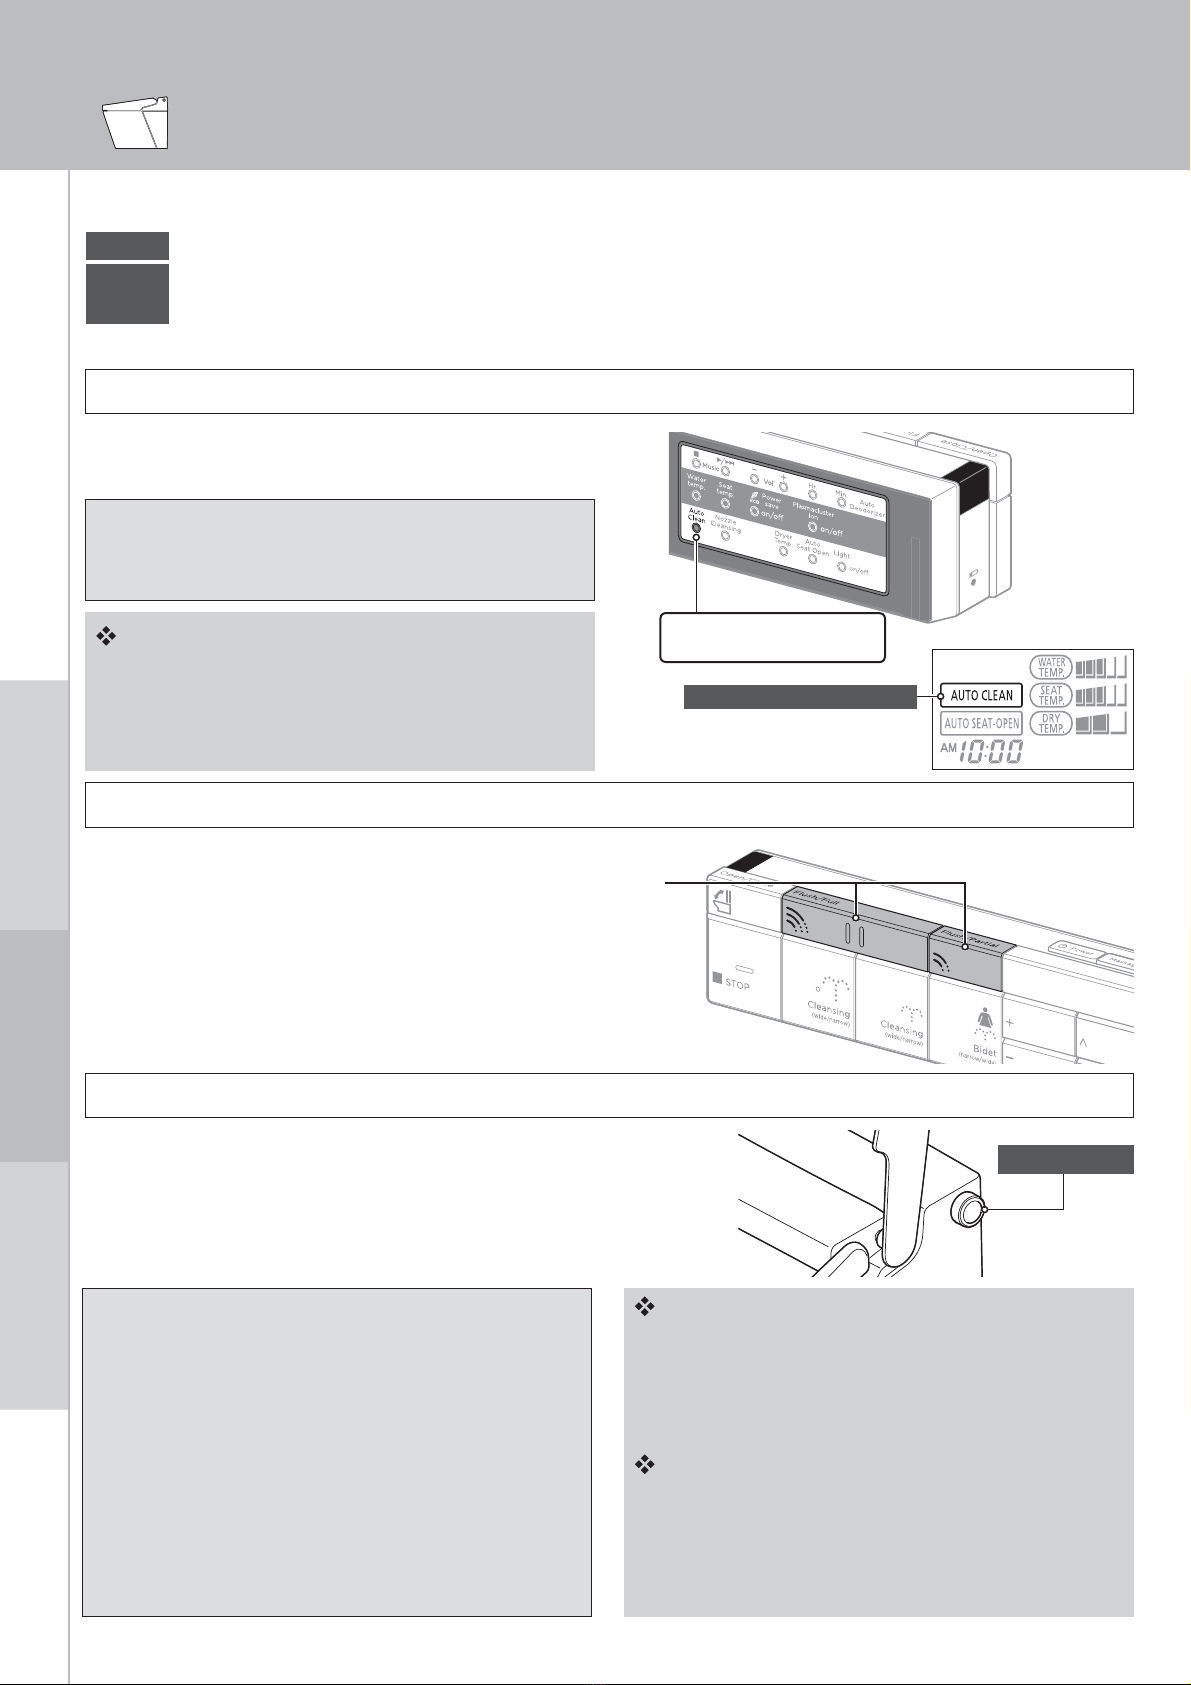
Auto Deodorizing Function
STEP
2
(Reference)
The automatic deodorizing function can be turned off. ( ☞Page 27)
[CAUTION]
If direct sunlight reaches the sensor, or heaters or
lighting equipment that emit strong heat are installed in
the toilet room, the sensor may detect incorrectly due to
the heat, and the toilet lid may open automatically. Make
sure that direct sunlight does not reach the sensor, or try
changing the orientation of heaters or lighting equipment.
Gently move the toilet lid without applying excessive
force to open or close it manually.
* Applying excessive force may cause damage.
Using unsuitable cloth covers may cause the toilet
seat or toilet lid not to open automatically or some
other malfunction.
(Reference)
If the room temperature exceeds 30°C, such as in
summer, the sensor may have difculty detecting
people. Make sure that there is adequate ventilation
in the toilet room, or try moving your body.
Auto Seat Open can be turned off. ( ☞Page 20)
* Turn off
【Auto Seat Open】
before allowing small
children to use the toilet. In very rare occasions,
the seat sensor may not trigger causing the toilet
lit to close during use.
This toilet is equipped with a function to open both
the toilet seat and toilet lid together at the same
time. ( ☞Page 27)
STEP
1Standing in front of the toilet bowl automatically
opens the toilet lid
* This is turned on by default.
* If the seat sensor does not trigger after the toilet lid
opens independently, the toilet lid closes automatically
after approximately 3 minutes.
* The upper body sensor detects changes in heat (person's
movement) and automatically opens the toilet lid.
Leaving the toilet lid open may cause the toilet to
detect people passing in front of the toilet.
* The toilet lid will not open automatically for
approximately 1 minute after plugging the power plug
into an outlet. This is to prevent sudden operation due
to incorrect sensor detection.
* The toilet lid will not open for 10 seconds after having
been closed manually.
The deodorizing process starts when a user sits
down on the toilet.
The deodorizer fan activates to clear odor from inside the toilet bowl.
The deodorizing process stops once a user stands up.
The deodorizer fan stops automatically 1 minute after standing up.
Using the remote control to open and
close the toilet seat
Press the
【Open/Close】
button.
* The toilet seat will open or close each time the
【Open/
Close】
button is pressed.

16
Operation
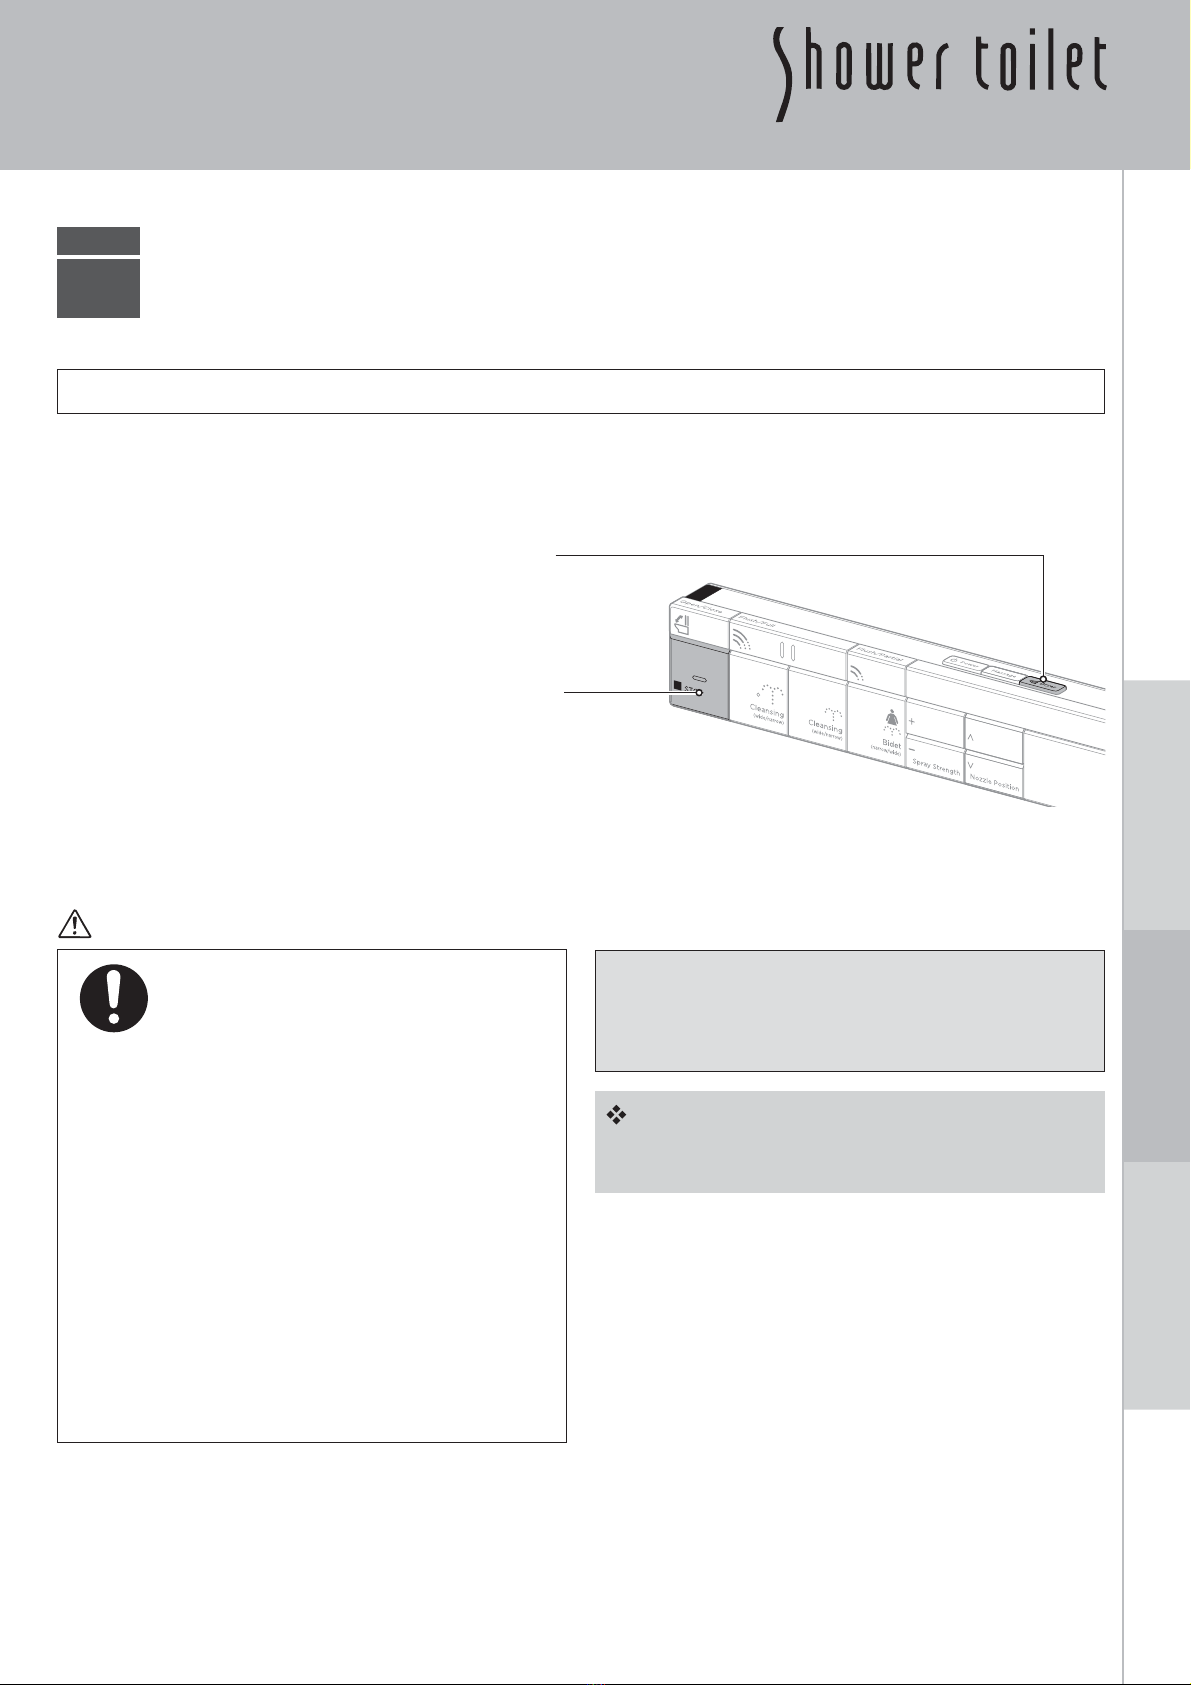
Front and Rear Washing
STEP
3
Rear Washing - Mild Oscillating Spray Super Oscillating Spray
Front Washing Wide Washing Oscillating Spray - Super
Press the
【
Cleansing (Full)
】
button,
【
Cleansing (Partial)
】
,
or
【Bidet】
button.
Rear washing functions wash any waste still remaining after a bowel movement.
Rear washing : Sprays water to wash
Rear washing - mild : Sprays water with less pressure for a more gentle wash
Front washing functions wash any waste remaining during menstrual cycles or other circumstances.
Keep washing times between 10 to 20 seconds.
Press the
【+】
or
【−】
sides of
the Spray Strength button to
adjust the spray strength.
* There are 6 levels of spray strength available.
Start with a low setting and then gradually
increase the strength until the desired pressure is
reached.
* To increase pressure: Press the [+] side of the button.
To decrease pressure: Press the [-] side of the button.
Press the
【STOP】
button to
stop operation.
* This toilet is equipped with an auto-stop function so that
rear washing and rear washing - mild operation stops
automatically after 2 minutes. Note that operation can
be extended by an additional 2 minutes when other
operations are performed while washing operations are
ongoing, such as the massage and oscillating spray
functions, for a total of 6 minutes maximum of washing
before automatically stopping.
The shower spray will
discharge from the nozzle
tip to wash your rear.
The nozzle will move
back and forth to clean
over a wider range.
The nozzle will move back and forth
rapidly to wash more thoroughly.
Rear washing/Rear washing - mild
(Press once)
Wide washing
(Press twice)
* Press 4 times to cycle back to Rear
washing/Rear washing - mild.
Super oscillating rear washing
(Press three times)
The shower spray will discharge
from the nozzle tip to wash the
delicate areas of women.
The nozzle will move
back and forth to clean
over a wider range.
The nozzle will move back and forth
to clean over an even wider range.
Front washing
(Press once)
Wide washing
(Press twice)
* Press 4 times to cycle back
to Front washing.
Oscillating spray - super
(Press three times)

Press the
【
Massage
】
button
during rear washing or rear
washing - mild operation.
Press the
【
Massage
】
button again
to stop the massage operation.
Press the
" " or " " sides of the
Nozzle Position button.
* There are 5 nozzle positions available.
* These positions include the default position, two front
positions, and two rear positions.
* The position resets to the default position when standing up
from the toilet seat.
* To move the nozzle position forward: " "
To move the nozzle position rearward: " "
[CAUTION]
The shower spray may weaken during winter
or other times when the water temperature is
signicantly low.
Sit further back on the toilet seat.
Less water will splash if you sit further back on the seat.
Rear washing and rear washing - mild operation
will stop if the toilet is ushed during this operation.
Rear washing and rear washing - mild functions
are not available while the toilet is ushing.
Do not wash or rinse for extended periods of
time. Do not wash internal parts of the body.
* Doing so may rinse away normally present
bacteria and cause an internal imbalance.
Follow your doctor's instructions on use if you
are receiving treatment or medical care for areas
affected by use of this product.
Self-cleaning nozzle
This toilet is equipped with a self-cleaning nozzle
function that automatically washes the nozzle before
and after shower use.
Water discharges from a point near the nozzle tip
When sitting on the toilet or pressing any shower button,
water discharges from a point near the nozzle tip in
preparation to spray warm water. It may take some time
for the water to warm in cold regions or during winter.
Water discharges from a point near the nozzle tip
immediately after a user sits down on the toilet as
well as before and after washing. This is required for
the function and is not indicative of a failure.
(☞Page 31)
Default
position
Massage Washing
Water pressure varies between a stronger and weaker pressure during rear washing or rear washing - mild
operation to provide a massaging effect during the wash.
* The massage function does not operate during front washing operation.
* The massaging effect will be felt differently by each person.
The nozzle position can be adjusted back and forth during rear washing or rear washing - mild operation.
Nozzle Position
17
General Operation
Operation
18
Operation
Warm Air Dryer
Warm Air Drying
Warm air is blown to dry the area washed by the shower spray.
* The front washing nozzle protrudes and pushes the nozzle
shutter down during the warm air drying operation.
STEP
4
Be sure to set the drying
temperature to the "Low" setting
when the toilet will be used by the
following types of users.
• Children
• Elderly persons
• Persons with illness
• Persons with limited mobility
• Persons with sensitive skin
• Persons who are taking medication that
causes drowsiness
• Persons who are under the
inuence of alcohol
• Persons who are suffering from
exhaustion
* Using the dryer for an extended period of
time at some other setting may result in
burns.
OBSERVE
WARNING
(Reference)
After washing, you can dry faster by wiping gently
with toilet paper to remove water drops before
pressing the
【Dryer】
button.
Warm air drying
This toilet is equipped with an auto-stop function so that
operation stops automatically after 4 minutes.
Press the
【Dryer】
button.
* There are three levels of air temperature available.
* The deodorizer function stops temporarily during
the drying operation.
Press the
【STOP】
button
to stop operation.
19
General Operation
Operation
[CAUTION]
In the event of a power outage or suspended water
supply, ush the toilet as described in "Flushing the
Toilet Manually." ( ☞Page 32)
When too much toilet paper is used, paper may not be
ushed completely when the [FLUSH/PARTIAL] button
is used. Use the [FLUSH/FULL] button on the remote
control or use the ush lever to perform a full ush.
Conrm the "Troubleshooting" section if the ow of
water is poor or sewage often remains.
(☞Page 52)
Male urinations
If a male stands in front of the toilet with the toilet
seat open for at least 6 seconds and the auto seat
open function is turned on, a partial ush will be
automatically performed 1 minute after stepping away
from the toilet. Note that if the user closes the toilet
seat before leaving, full auto washing is not performed.
Differentiation between full ushing and partial ushing
The full auto washing function performs a full ush if the user
sat on the toilet for at least 50 seconds and performs a partial
ush if the user sat on the toilet for less than 50 seconds.
Note that if the rear washing or rear washing - mild
function was used, a full ush will be performed
regardless of the seated time.
Flush button
Press the
【Flush Full】
button
to perform a full ush or press
the
【Flush Partial】
button to
perform a partial ush.
* Pressing the
【Flush Partial】
button after a bowel
movement may result in some of the waste
remaining in the toilet bowl.
Flushing the Toilet
STEP
5
The toilet automatically ushes when standing up from the toilet.
* This is set to "ON" by default.
Full Auto Washing
Remote Control Flushing
(Reference)
The full auto washing function can be turned off.
(☞Page 19)
Timing of ushing
The full auto washing function will operate
approximately 6 seconds after standing up from the
toilet if the user sat down on the toilet for at least
10 seconds. This 6-second time can be changed to
approximately 2, 10, or 15 seconds. ( ☞Page 27)
Manual Full Flushing
Press the ush button on the
toilet body.
【Auto Clean】
Auto Clean Indicator
This manual suits for next models
3
Table of contents
Other Inax Toilet manuals

Inax
Inax AC-959VAN User manual

Inax
Inax AC-22PVN User manual

Inax
Inax AC-1035VN User manual

Inax
Inax SpaLet Series Instruction Manual

Inax
Inax RS Series Guide

Inax
Inax U Series Operating instructions

Inax
Inax AC-902VN User manual

Inax
Inax AC-969VN-2 Instructions for use

Inax
Inax AC-900VRN Instructions for use

Inax
Inax AC-1008VRN User manual

Inax
Inax ACT-902VN User manual

Inax
Inax AC-969VN User manual

Inax
Inax AC-939VN User manual

Inax
Inax DV300G User manual

Inax
Inax AC-1052VN Instructions for use

Inax
Inax CW-RS3-WJ User manual

Inax
Inax AC-602VN User manual

Inax
Inax Shower Toilet User manual

Inax
Inax Regio DV-R115-VL-US User manual

Inax
Inax ACT-602VN User manual


