manuals.online logo
Brands
  1. Home
  2. •
  3. Brands
  4. •
  5. FV
  6. •
  7. Toilet
  8. •
  9. FV Victoria E170 User manual

FV Victoria E170 User manual

FV se reserva el derecho de modificar,
cambiar, mejorar y/o anular materiales,
productos y/o diseños sin previo aviso.
MEDIDAS SUGERIDAS PARA LA INSTALACIÓN (en cm):
Código:
Asegúrese que la persona que vaya a instalar el
producto
sea un profesional en la materia, para
prevenir
errores que afecten las instalaciones o
el correcto funcionamiento del producto
.
Realice
los ajuste del sanitario UTILIZANDO
una
herramienta adecuada para que la
s
uperficie y el acabado del producto no se raye
o lastime.
Recuerde
que todos los productos tienen un
mecanismo
de control que debe ser revisado y
cambiado
de ser necesario, ya que este puede
deteriorarse debido a la frecuencia de uso.
To
prevent any error that may affect the facilities
or
the correct functioning of the product, make
sure
that the person who is going to install the
p
roduct is a professional. Install the product
u
sing suitable tools, so that it is not scratched.
Remember
that all products have a control
mechanism that must be reviewed and changed
if
necessary, since it can deteriorate due to the
frequency of use.
RECOMENDACIONES:
RECOMMENDA
TIONS:
MEDIDAS / MEASURES:
Dimensiones en milímetros / Dimensions in millimeters
Dimensiones en pulgadas / Dimensions in inches
E172.1-COLOR
E101.10-COLOR
E172.2-COLOR
E172.2.2
E172.2.1
E102.10
490
19” 9/32
695
27” 3/8
365
150
14” 3/8
5” 7/8
368
733
14” 1/2
28” 7/8
305
12”
490
19” 9/32
695
27” 3/8
365
150
14” 3/8
5” 7/8
368
733
14” 1/2
28” 7/8
305
12”
1. Ubicar el inodoro en la posición que irá, verificar la alineación del inodoro respecto
a la pared y posicionar de acuerdo a las dimensiones (gráfico # 1).
Verify the alignment of toilet regarding the wall and place from agreement to the
dimensions
(graphic # 1).
LEA LAS INSTRUCCIONES COMPLETAMENTE ANTES DE INSTALAR / READ ALL INSTRUCTIONS BEFORE INSTALLING
3. Perforar y colocar los tacos de fijación #10 (no incluidos) (gráfico # 3).
Drill and place the fixation bolts #10 (not included) (graphic # 3).
4- Voltear hacia abajo el inodoro y colocar el anillo de cera alrededor del
desagüe
(gráfico # 4).
Turn down the toilet and place the waxing rings around the drain
(graphic # 4).
2. Marcar (gráfico # 2).
Mark (graphic # 2).
INSTRUCCIONES DE INSTALACIÓN / INSTALLATION INSTRUCTIONS:
COLORES DISPONIBLES /
COLORS AVAILABLE:
• Blanco / White : BL
• Bone / Bone : BO
30.5 cm
15 cm
15 cm
Llave angular F.V.
F. V. Angle stop set
Empaque espumoso
F. V. Angle stop set
Agujeros
para fijación
Fixation holes
Abra el tanque e instale el herraje, conrme que los
pernos y empaque estén como se indica en el
gráco. Ubique el tanque sobre el inodoro
alineando ambas piezas.
Open the tank and install the tank tting, rewiew
that the gaskets and the screws has been installed
propperly, like the graphique. Place the tank over
the toilet bowl alained both pieces.
Open the tank and install the tank tting, check
that gaskets and screws have been installed
properly as shown in the drawing. Place the tank
over the toilet bowl alaigning both pieces.
E170
Inodoro / Toilet Victoria
Fecha: 2019 - 10 - 07
FV - ÁREA ANDINA S.A. se reserva el derecho de modificar, cambiar, mejorar y/o anular materiales, productos y/o diseños sin previo aviso.
FV Responde
Centro de atención al usuario
ECUADOR
1-800 FV FV FV (1-800 38 38 38)
fvresponde@fvecuador.com
info.colombia@grupofv.comCOLOMBIA
info.peru@grupofv.com
PERÚ
info.cea@grupofv.com
CENTROAMÉRICA
Encuentre
Repuestos Legítimos FV y
la Garantía Total FV en:
www.fvandina.com
Encuentre
Repuestos Legítimos FV y
la Garantía Total FV en:
www.fvandina.com
NTE INEN 3123
Sello de Calidad
Instituto Ecuatoriano de Normalización
NTE INEN 3082
Sello de Calidad
Sanitarios
Instituto Ecuatoriano de Normalización
30.5 cm
15 cm
15 cm
Llave angular F.V.
F. V. Angle stop set
Empaque espumoso
F. V. Angle stop set
Agujeros
para fijación
Fixation holes
Abra el tanque e instale el herraje, conrme que los
pernos y empaque estén como se indica en el
gráco. Ubique el tanque sobre el inodoro
alineando ambas piezas.
Open the tank and install the tank tting, rewiew
that the gaskets and the screws has been installed
propperly, like the graphique. Place the tank over
the toilet bowl alained both pieces.
Open the tank and install the tank tting, check
that gaskets and screws have been installed
properly as shown in the drawing. Place the tank
over the toilet bowl alaigning both pieces.
1 Ref.: E266.02 DH CR
1
30.5 cm
15 cm
15 cm
Llave angular F.V.
F. V. Angle stop set
Empaque espumoso
F. V. Angle stop set
Agujeros
para fijación
Fixation holes
Abra el tanque e instale el herraje, conrme que los
pernos y empaque estén como se indica en el
gráco. Ubique el tanque sobre el inodoro
alineando ambas piezas.
Open the tank and install the tank tting, rewiew
that the gaskets and the screws has been installed
propperly, like the graphique. Place the tank over
the toilet bowl alained both pieces.
Open the tank and install the tank tting, check
that gaskets and screws have been installed
properly as shown in the drawing. Place the tank
over the toilet bowl alaigning both pieces.
Código: HT- 1018F
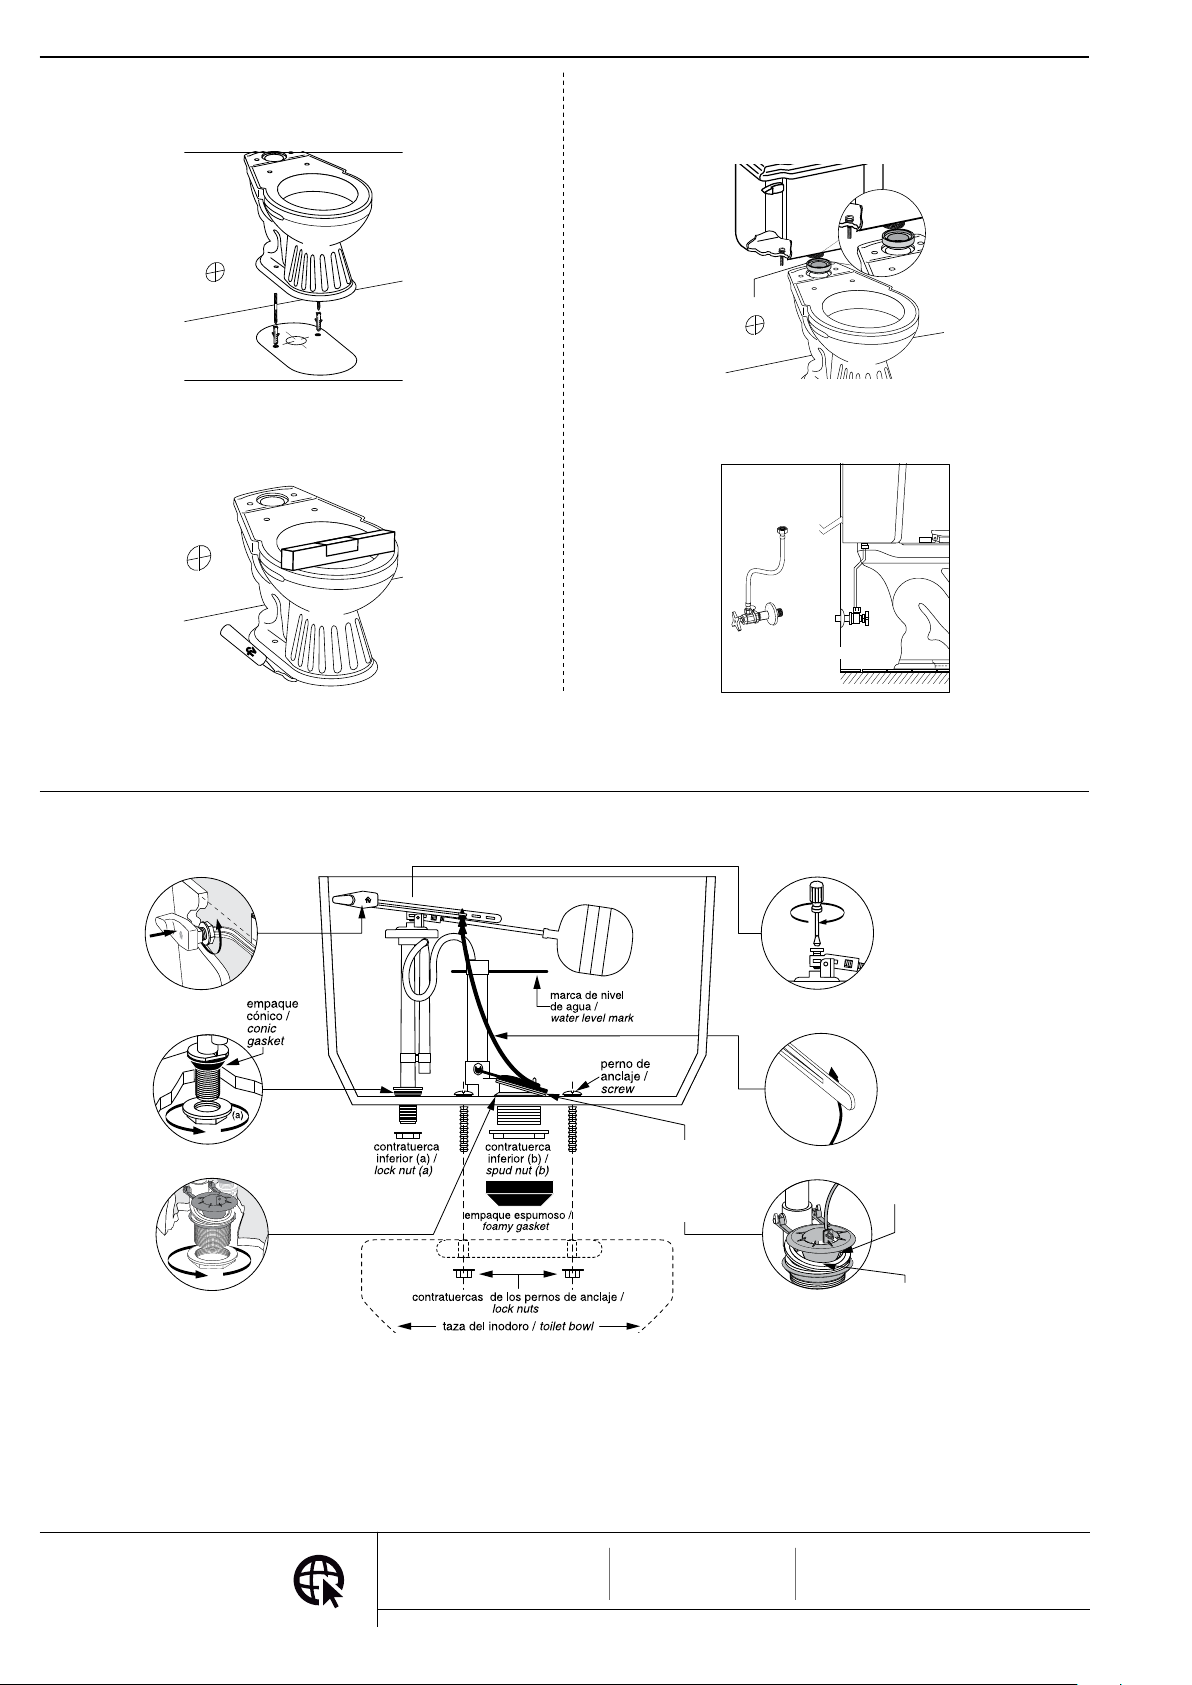
5. Fijar el inodoro al piso con pernos (gráfico # 5).
Fix the toilet to the floor (graphic # 5).
7. Colocar el tanque con el herraje armado, retire su tapa invítatelo y coloque el
empaque espumoso, Ubicar el tanque sobre el inodoro alineando las dos piezas
(gráfico # 7).
Remove the cover of the tank cover. Place the tank on the toilet aligning the holes
in order to join both pieces
(graphic # 7).
8. Para la conexión a la acometida de agua usted puede usar: llave angular F.V. -
Franz Viegener (gráfico # 8).
To connect the toilet you can use: F.V. angle stop set (graphic # 8).
6. Nivelar el inodoro y fijar al piso con un cordón de silicona (gráfico # 6).
Level the toilet and fix it to the floor with a silicone cord (graphic # 6).
CONSEJOS DE MANTENIMIENTO / ADVICES MAINTAINANCE:
Ajuste /
Tight up
Ajuste /
Tight up
2
Ajuste
/
Tight up
1
3
(b)
6
Limpie el borde /
Clean the rim
flapper /
flapper
válvula de descarga /
flush valve
4
5
Calibre-Verifique el nivel
del agua / Calibrate-Verify
the water level
verifique que el cordel
de caucho no este
muy tenso / Verify that th
e
rubber string is not tight
Verifique que la base
del flapper este en
buenas condiciones /
Verify that the base of
the flapper is in good
conditions
Los sanitarios F.V. son fabricados con porcelana sanitaria vitrificada, cumpliendo normas
internacionales, garantizando así su larga vida útil. Por las características propias de los
materiales utilizados y la tecnología empleada en su desarrollo, se limpian fácilmente evi-
tando el desarrollo de gérmenes y hongos.
Realice la limpieza utilizando productos limpiadores y desinfectantes para baños de marcas
reconocidas. Ayúdese de una esponja o un paño húmedo. En lo posible evite productos de
limpieza fuertemente abrasivos. la porcelana sanitaria vitrificada no permite adherencias y
las grasas se eliminan con facilidad.
La porcelana sanitaria mantiene el brillo propio de su esmalte sin necesidad de pulimentos.
F.V. bathroom sets are made of vitrified porcelain according to international regulations,
giving to the products a long lifetime warranty. Because fo the characteristics of vitrified
porcelain, these products can be cleaned easily, avoiding the growing of germs and mold.
For cleaning use bathrooms cleaners and desinfectants of well-known trade-marks and
sponge or humid cloth. Avoid, it possible, abrasive clening products. The vitrified porcelaine
does not allow adherences and grease and oil are eliminated easily.
Porcelaine enamel maintains its own brightneed without the need of polishing.
En caso de tener algún problema con el herraje verifique los siguientes puntos:
If you have any problem with the fitting, please verify the following points:
Nota: No es recomendable usar cemento mortero en la base del inodoro. La
Garantía FV no cubre inodoros instalados con mortero.
Antes de instalar el tanque verifique que la tubería de alimentación este limpia y libre
de impurezas y residuos de construcción.
Note: It is not advisable to use cement in the base of the toilet. The warranty doesn't
cover toilets installed with cement.
To fix it Before installing the tank, verify that the feeding pipe is clean and free of sludge
and construction residuals.

Other FV Toilet manuals

FV A115-S User manual

FV

FV A115-S User manual

FV E192 User manual

FV

FV E192 User manual

FV Ginebra E149 User manual

FV

FV Ginebra E149 User manual

FV E113 User manual

FV

FV E113 User manual

FV Milan E116-E User manual

FV

FV Milan E116-E User manual

FV Ischia Plus E181 User manual

FV

FV Ischia Plus E181 User manual

FV E470 User manual

FV

FV E470 User manual

FV Liber E168 User manual

FV

FV Liber E168 User manual

FV Ischia Elongado E187 User manual

FV

FV Ischia Elongado E187 User manual

FV PARMA E157 User manual

FV

FV PARMA E157 User manual

FV E112-E User manual

FV

FV E112-E User manual

FV New Greco 4.8 LPF User manual

FV

FV New Greco 4.8 LPF User manual

FV E122 User manual

FV

FV E122 User manual

FV Ischia Plus User manual

FV

FV Ischia Plus User manual

FV E181-S User manual

FV

FV E181-S User manual

FV E193 User manual

FV

FV E193 User manual

FV Trento E176 User manual

FV

FV Trento E176 User manual

FV Ginebra E152 User manual

FV

FV Ginebra E152 User manual

FV Apolo E182 User manual

FV

FV Apolo E182 User manual

FV E183 User manual

FV

FV E183 User manual

FV E181 User manual

FV

FV E181 User manual

FV Catania E194 User manual

FV

FV Catania E194 User manual

FV Parma E157 User manual

FV

FV Parma E157 User manual

FV Greco Touchless 4.8 L User manual

FV

FV Greco Touchless 4.8 L User manual

Popular Toilet manuals by other brands

Toto DuoFit WT171M Installation and owner's manual

Toto

Toto DuoFit WT171M Installation and owner's manual

Separett VILLA 9020 quick start guide

Separett

Separett VILLA 9020 quick start guide

Wabtec Microphor LF-210 Installation & service manual

Wabtec

Wabtec Microphor LF-210 Installation & service manual

DURAVIT SensoWash Starck f Mounting instructions

DURAVIT

DURAVIT SensoWash Starck f Mounting instructions

Kohler K-25044-SSL-47 manual

Kohler

Kohler K-25044-SSL-47 manual

AXA GLOMP manual

AXA

AXA GLOMP manual

VITRA Falcon D59000-002 manual

VITRA

VITRA Falcon D59000-002 manual

Raita MINI manual

Raita

Raita MINI manual

Arcisan Neion Plus instruction manual

Arcisan

Arcisan Neion Plus instruction manual

SFA SANIMARIN MAXLITE+S installation instructions

SFA

SFA SANIMARIN MAXLITE+S installation instructions

Kohler K-3484 Homeowner's guide

Kohler

Kohler K-3484 Homeowner's guide

Dometic CT 4050 operating manual

Dometic

Dometic CT 4050 operating manual

Cersanit AQUA 40 MECH Installation and operating instructions

Cersanit

Cersanit AQUA 40 MECH Installation and operating instructions

TopToilet NAIA2 instruction manual

TopToilet

TopToilet NAIA2 instruction manual

Toto NEOREST TCF996RWG/RWSW instruction manual

Toto

Toto NEOREST TCF996RWG/RWSW instruction manual

Coway BA16-CR manual

Coway

Coway BA16-CR manual

Swiss Madison Carre SM-WT455 installation instructions

Swiss Madison

Swiss Madison Carre SM-WT455 installation instructions

IFO 96963 Installation

IFO

IFO 96963 Installation

manuals.online logo
manuals.online logoBrands
  • About & Mission
  • Contact us
  • Privacy Policy
  • Terms and Conditions

Copyright 2025 Manuals.Online. All Rights Reserved.