Made in Czech Republic
Programming /
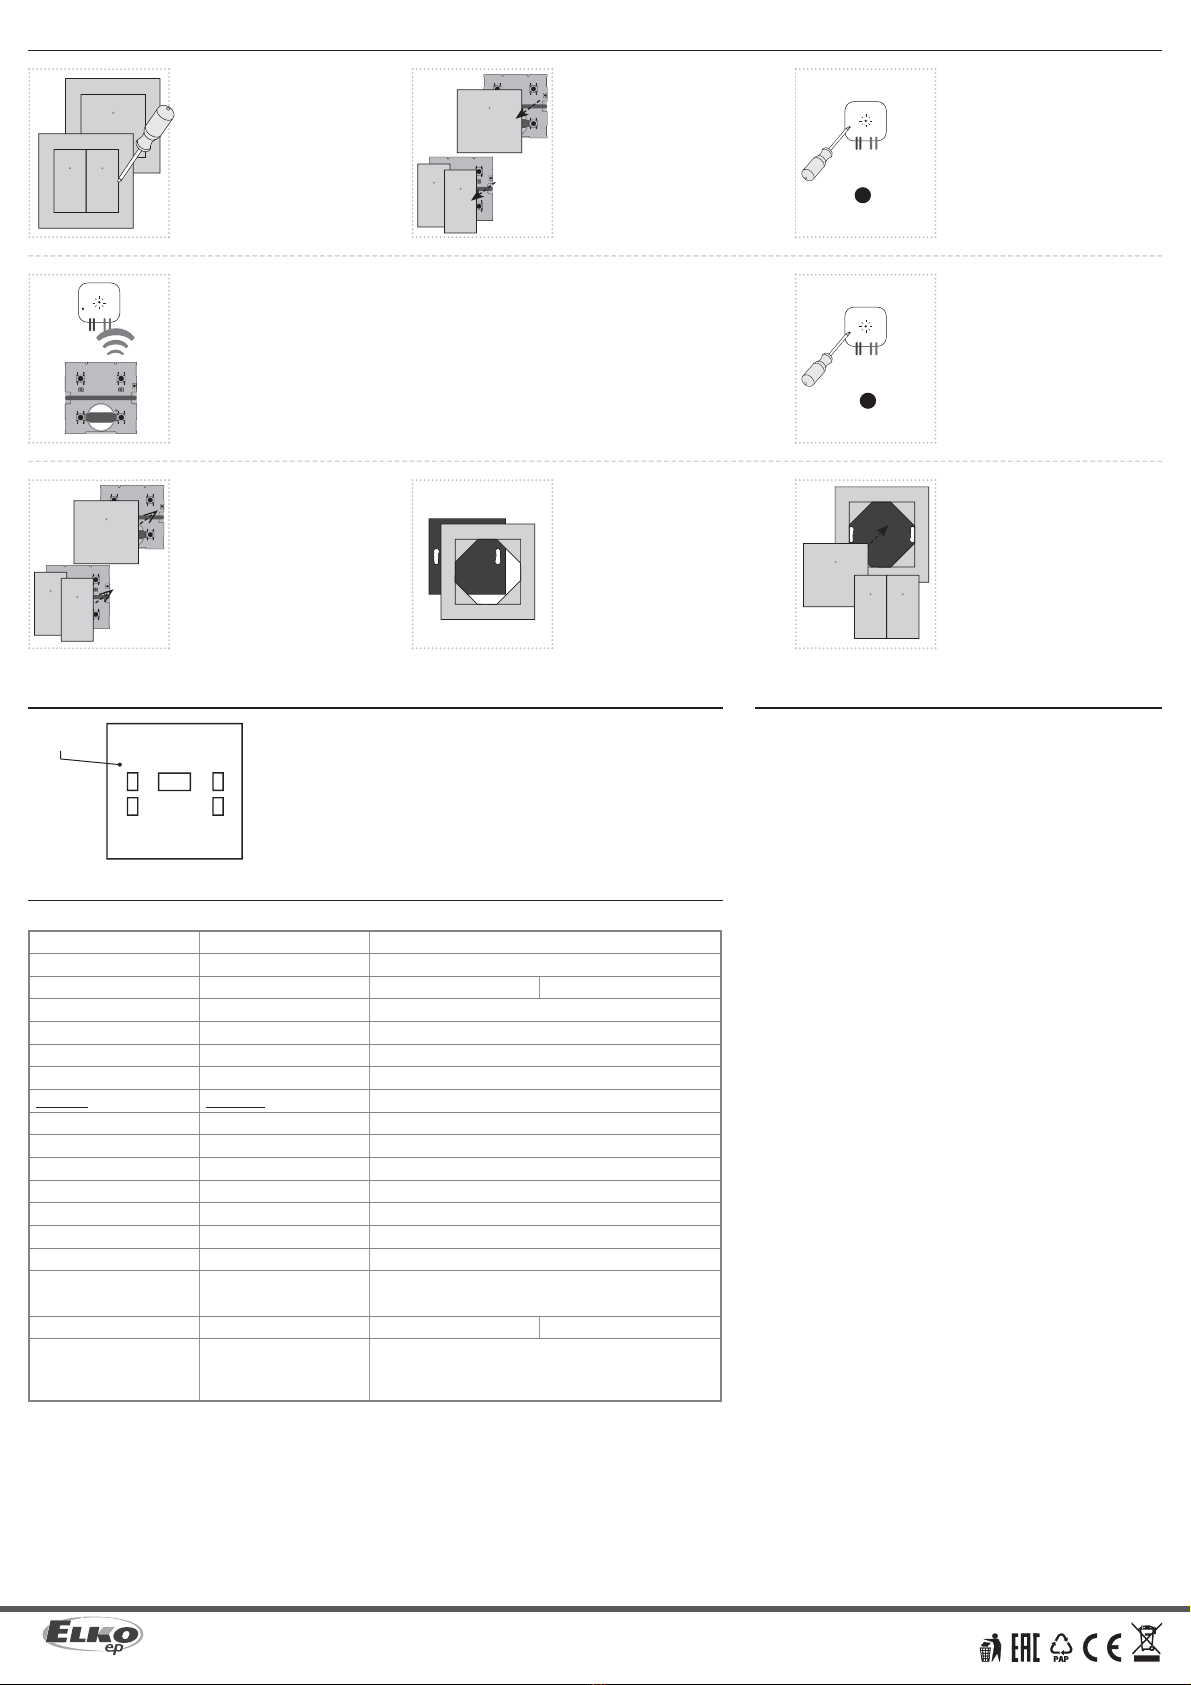
Snap the device with the cover into
the prepared frame.
2 3
PROG > 1s
1 x
4
5
PROG < 1s
1 x
1RFWB-20/G
RFWB-40/G
6 7 8
xxxxxx
Assignment of system components /
address / The address on the back of the controller is used for assignment to the system
components.
Press of programming button on ac-
tuator for 1 second will activate actua-
tor RF into programming mode. LED
is flashing in 1s interval.
Gently pull to remove the cover.Using a screwdriver, carefully pry off
the device from the frame.
Press of programming button on
actuator shorter then 1 second will
finish programming mode.
Snap on the cover. The LED opening
must be located in the upper part (for
the RFWB-40, observe the positioning
of the left and right cover).
Hold the programming button on the RFWB. Press the selected control button on the RFWB according
to the desired function (for more information on individual functions and programming, see the manual
of the specific component). There must be a lapse of 1 second between individual presses. Then release
the programming button.
Place the frame on the rear part.
RFWB-20/G RFWB-40/G
Supply voltage:
Transmission indication:
Number of control buttons:
Programming button:
Transmitter frequency:
Signal transmission method:
Range in free space:
Other data
Operating temperature:
Operating position:
Mounting:
Protection:
Contamination degree:
Dimensions:
LOGUS90 frame - plastic:
LOGUS90 frame
- metal, glass, wood, granite:
Weight:
Related standards:
Technical parameters /
* Comes with plastic frame, without battery.
Attention:
No installation into multi-frames.
When you instal iNELS RF Control system, you have to keep
minimal distance 1 cm between each units.
Between the individual commands must be an interval of
at least 1s.
Instruction manual is designated for mounting and also for user of the device. It is
always a part of its packing. Installation and connection can be carried out only by a
person with adequate professional qualification upon understanding this instruction
manual and functions of the device, and while observing all valid regulations. Trouble-
free function of the device also depends on transportation, storing and handling. In
case you notice any sign of damage, deformation, malfunction or missing part, do
not install this device and return it to its seller. It is necessary to treat this product and
its parts as electronic waste after its lifetime is terminated. Before starting installa-
tion, make sure that all wires, connected parts or terminals are de-energized. While
mounting and servicing observe safety regulations, norms, directives and professional,
and export regulations for working with electrical devices. Do not touch parts of the
device that are energized – life threat. Due to transmissivity of RF signal, observe cor-
rect location of RF components in a building where the installation is taking place.
RF Control is designated only for mounting in interiors. Devices are not designated
for installation into exteriors and humid spaces. The must not be installed into metal
switchboards and into plastic switchboards with metal door – transmissivity of RF
signal is then impossible. RF Control is not recommended for pulleys etc. – radiofre-
quency signal can be shielded by an obstruction, interfered, battery of the transceiver
can get flat etc. and thus disable remote control.
The company ELKO EP, as the manufacturer, is entitled to make technical modificati-
ons to the product, in the technical specification and product manual, without prior
notification.
Warning /
ELKO
EP
,
s.r
.o.
|
Palackého
493
|
769
01
Holešov
,
V
šetuly
|
Czech
Republic
|
e-mail:
[email protected] |
Support:
+420
778
427
36
6ELKO EP SLOVAKIA, s.r.o. | Fraňa Mojtu 18, 949 01 Nitra | Telefón: +421 37 6586 731 | E-mail: elkoep@elkoep.sk
www.elkoep.com / www.elkoep.sk
Napájacie napätie:
Indikácia prenosu:
Počet ovládacích tlačidiel:
Programovacie tlačidlo:
Frekvencia:
Spôsob prenosu signálu:
Dosah na voľnom priestr.:
Ďalšie údaje
Pracovná teplota:
Pracovná poloha:
Upevnenie:
Krytie:
Stupeň znečistenia:
Rozmery:
LOGUS90 rámček - plast:
LOGUS90 rámček
- kov, sklo, drevo, žula:
Hmotnosť:
Súvisiace normy:
3Vbattery / batéria CR 2032
red / červená LED
2 4
1
866 MHz, 868 MHz, 916 MHz
unidirectionally addressed message / jednosmerne adresovaná správa
up to / až 200 m
-10 ... +50 °C
any / ľubovoľná
glue, screws / lepením, skrutkovaním
IP20
2
85 x 85 x 16 mm
94 x 94 x 16 mm
55 g* 55 g*
EN 60669, EN 300220, EN 301489 R&TTE Directive, Order. No 426/2000 Coll.
(Directive 1999/EC) / EN 60669, EN 300 220, EN 301 489 smernice RTTE,
NVč.426/2000Sb (smernice 1999/ES)
Technické parametre
* So štandardne dodávaným plastovým rámčekom, bez
batérie.
Upozornenie:
Neinštalujte do viacrámčekov.
Pri inštalácii systému iNELS RF Control musí byť dodržaná
minimálna vzdialenosť medzi jednotlivými prvkami 1 cm.
Medzi jednotlivými povelmi musí byť rozostup minimálne 1s.
Návod na použitie je určený pre montáž a pre užívateľa zariadenia. Návod je vždy
súčasťou balenia. Inštaláciu a pripojenie môžu vykonávať iba pracovníci s príslušnou
odbornou kvalifikáciou, pri dodržaní všetkých platných predpisov, ktorí sa dokonale
zoznámili s týmto návodom a funkciou prvku. Bezproblémová funkcia prvku je tiež
závislá na predchádzajúcom spôsobe transportu, skladovania a zaobchádzania. Pokiaľ
objavíte akékoľvek známky poškodenia, deformácie, nefunkčnosti alebo chýbajúci
diel, tento prvok neinštalujte a reklamujte ho u predajcu. S prvkom či jeho časťami
sa musí po ukončení životnosti zaobchádzať ako s elektronickým odpadom. Pred
začatím inštalácie sa uistite, že všetky vodiče, pripojené diely či svorky sú bez napätia.
Pri montáži a údržbe je nutné dodržiavať bezpečnostné predpisy, normy, smernice a
odborné ustanovenia pre prácu s elektrickými zariadeniami. Nedotýkajte sa častí prvku,
ktoré sú pod napätím - nebezpečenstvo ohrozenia života. Z dôvodu priepustnosti RF
signálu dbajte na správne umiestnenie RF prvkov v budove, kde sa bude inštalácia
prevádzať. RF Control je určený iba pre montáž do vnútorných priestorov. Prvky nie
sú určené pre inštaláciu do vonkajších a vlhkých priestorov, nesmú byť inštalované
do kovových rozvádzačov a do plastových rozvádzačov s kovovými dverami -
znemožní sa tak priepustnosť rádiofrekvenčného signálu. RF Control sa neodporúča
pre ovládanie prístrojov zaisťujúcich životné funkcie alebo pre ovládanie rizikových
zariadení ako sú napr. čerpadlá, el. ohrievače bez termostatu, výťahy, kladkostroje a
pod. - rádiofrekvenčný prenos môže byť tienený prekážkou, rušený, batéria vysielača
môže byť vybitá a pod., a tým môže byť diaľkové ovládanie znemožnené.
Firma ELKO EP ako výrobca má právo vykonávať technické zmeny na výrobku, v
technickej špecifikácii a manuáli k výrobku bez predchádzajúceho upozornenia.
VarovaniePriradenie k systémovým prvkom
Pre priradenie k systémovým prvkom slúži adresa, uvedená na zadnej strane
ovládača.
adresa
Na RFWB pridržte programovacie tlačidlo. Zvolené ovládacie tlačidlo na RFWB stlačte podľa požadovanej
funkcie (podrobnejšie informácie k jednotlivým funkciám a programovaniu nájdete v návode konkrét-
neho prvku). Medzi jednotlivými stlačeniami musí byť oneskorenie 1 sekunda. Potom programovacie
tlačidlo uvoľnite.
Pomocou skrutkovača opatrne vy-
cvaknite prístroj z rámčeka.
Ľahkým ťahom zložte kryt.
Nacvaknite kryt. Otvor pre LED musí
byť umiestnený v hornej časti (u
RFWB-40 pozor na umiestnenie ľavé-
ho a pravého krytu).
Rámček umiestnite na zadný diel.
Prístroj s krytom nacvaknite do pripra-
veného rámiku.
Stlačením programovacieho tlačidla
na prvku RF na dobu dlhšie než 1
sekunda sa prvok uvedie do progra-
movacieho režimu. LED začne blikať v
intervale 1 sekundy.
Stlačením programovacieho tlačidla
na prvku RF na dobu kratšiu ako 1 se-
kunda sa ukončí programovací režim.
Programovanie


