manuals.online logo
Brands
  1. Home
  2. •
  3. Brands
  4. •
  5. Insignia
  6. •
  7. Bathroom Fixture
  8. •
  9. Insignia INS8719 User manual

Insignia INS8719 User manual

Other Insignia Bathroom Fixture manuals

Insignia GT4000 User manual

Insignia

Insignia GT4000 User manual

Insignia Diamond Series User manual

Insignia

Insignia Diamond Series User manual

Insignia Diamond Series User manual

Insignia

Insignia Diamond Series User manual

Insignia Premium Series User manual

Insignia

Insignia Premium Series User manual

Insignia Premium Series User manual

Insignia

Insignia Premium Series User manual

Insignia ECO Series User manual

Insignia

Insignia ECO Series User manual

Insignia MY810L User manual

Insignia

Insignia MY810L User manual

Insignia 900 User manual

Insignia

Insignia 900 User manual

Insignia MC115RT User manual

Insignia

Insignia MC115RT User manual

Insignia Monochrome Series User manual

Insignia

Insignia Monochrome Series User manual

Insignia ES001 User manual

Insignia

Insignia ES001 User manual

Insignia ES009 User manual

Insignia

Insignia ES009 User manual

Insignia 1800 Series User manual

Insignia

Insignia 1800 Series User manual

Insignia Premium Series User manual

Insignia

Insignia Premium Series User manual

Insignia 1500 Series User manual

Insignia

Insignia 1500 Series User manual

Insignia S7804 User manual

Insignia

Insignia S7804 User manual

Insignia GT6000 User manual

Insignia

Insignia GT6000 User manual

Insignia GT9014 User manual

Insignia

Insignia GT9014 User manual

Insignia MX Series User manual

Insignia

Insignia MX Series User manual

Insignia INS8058.1R User manual

Insignia

Insignia INS8058.1R User manual

Insignia INS8059.1L User manual

Insignia

Insignia INS8059.1L User manual

Insignia Platinum Series User manual

Insignia

Insignia Platinum Series User manual

Insignia KSY1450 Series User manual

Insignia

Insignia KSY1450 Series User manual

Insignia Platinum Series User manual

Insignia

Insignia Platinum Series User manual

Popular Bathroom Fixture manuals by other brands

Kohler Mira Sport Max J03G Installation and user guide

Kohler

Kohler Mira Sport Max J03G Installation and user guide

Moen 186117 Series installation guide

Moen

Moen 186117 Series installation guide

Hans Grohe Raindance Showerpipe 27235000 Instructions for use/assembly instructions

Hans Grohe

Hans Grohe Raindance Showerpipe 27235000 Instructions for use/assembly instructions

Signature Hardware ROUND SWIVEL BODY SPRAY 948942 Install

Signature Hardware

Signature Hardware ROUND SWIVEL BODY SPRAY 948942 Install

fine fixtures AC3TH installation manual

fine fixtures

fine fixtures AC3TH installation manual

LIXIL HP50 Series quick start guide

LIXIL

LIXIL HP50 Series quick start guide

KOLO ATOL PLUS installation manual

KOLO

KOLO ATOL PLUS installation manual

Hans Grohe PuraVida 15073000 Instructions for use/assembly instructions

Hans Grohe

Hans Grohe PuraVida 15073000 Instructions for use/assembly instructions

Toto TS111B8 Installation and owner's manual

Toto

Toto TS111B8 Installation and owner's manual

Kohler K-1158-H2 Homeowner's guide

Kohler

Kohler K-1158-H2 Homeowner's guide

Coram Showers OFFSET QUADRANT manual

Coram Showers

Coram Showers OFFSET QUADRANT manual

baliv DU-2010 manual

baliv

baliv DU-2010 manual

odass OD-1710 instruction manual

odass

odass OD-1710 instruction manual

Oxygenics Evolution Easy installation instructions

Oxygenics

Oxygenics Evolution Easy installation instructions

Bradley Express SS Series installation instructions

Bradley

Bradley Express SS Series installation instructions

Helvex TH-974 installation guide

Helvex

Helvex TH-974 installation guide

DURAVIT C.1 C15240 0090 Instructions for mounting and use

DURAVIT

DURAVIT C.1 C15240 0090 Instructions for mounting and use

Sunshower PURE SOLO manual

Sunshower

Sunshower PURE SOLO manual

manuals.online logo
manuals.online logoBrands
  • About & Mission
  • Contact us
  • Privacy Policy
  • Terms and Conditions

Copyright 2025 Manuals.Online. All Rights Reserved.

www.insigniarange.com Last Modied: 20/06/2018
INSTALLATION MANUAL
INS8719
ATTENTION INSTALLERS:
These instrucons must be
le with the customer
30 Day Technical Support: 01908 226545
(NOTE: This service is only available to customers from the day of delivery,
please have your supplier’s details and your postcode to hand before calling)
Replacements Parts: inside of your warranty contact:
www.insigniarange.co.uk/customerService.aspx
Spares/Replacements Parts: outside of your warranty
contact 0844 800 3069
www.insigniarange.co.uk
WARRANTY REG NO: __________________________
To claim your full 5 year warranty, register your shower within 90 days of delivery at: www.insigniarange.co.uk/
warrantyreg.aspx. Standard 12 month warranty applies if outside this me period.
CHECK ALL CONTENTS BEFORE BUILD COMMENCES. NO RETURNS CAN BE MADE
ONCE THE BUILD HAS STARTED AS IT IS DEEMED ACCEPTANCE OF PRODUCT!
www.insigniarange.com Last Modied: 20/06/2018
02
Contents
Introduction
Electrical Requirements
What’s In The Boxes?
Screw Pack Contents
Plumbing Requirements
Schematics
Starting The Installation
Control Panel Connections
Sealing and Water Testing
Control Panel Instructions
Help Book Information
Part list
3
5
7
8
9
10
11
22
23
24
25
26
www.insigniarange.com Last Modied: 20/06/2018
03
Thank you for your recent purchase of an Insignia shower. Please read this booklet with great care to ensure you get the best out of your build and have a shower that
will last for many years to come!
Like everything, in order to obtain a first class product that will serve you well for many years, the effort and correctness put into the assembly will reflect in the quality of
your finish.
OUR BADGE RATING IN TERMS OF DIFFICULTY OF ASSEMBLY IS BASED ON CLIENT FEEDBACK
1 Badge = Very easy
2 Badges = Easy
3 Badges = Moderate
4 Badges = Harder than average
5 Badges = Professional skills required
This shower is rated 3 Badges
www.insigniarange.com Last Modied: 20/06/2018
04
ASSEMBLY AND PLUMBING
THIS PRODUCT BUILD IS RATED SUITABLE FOR DIY PURPOSES PROVIDING THE CUSTOMER IS OF ABOVE AVERAGE SKILL AND FEELS CONFIDENT IN
THEIR ABILITY. ONLY YOU THE CUSTOMER WILL KNOW THIS SO BEFORE ANY ATTEMPT IS MADE TO ASSEMBLE, READ THROUGH THE FOLLOWING
PAGES IN DETAIL THEN DECIDE. IF YOU HAVE ANY DOUBT USE THE SERVICES OF A PROFESSIONAL. IN PICKING SUCH, ALLOW THEM TO DECIDE IF
THEY ARE CAPABLE OF BUILD BY FIRST SHOWING THESE INSTRUCTIONS TO THEM. ALWAYS GET THREE QUOTES.
REMEMBER THE BEST IS NOT ALWAYS THE CHEAPEST!
REMEMBER PLUMBERS PLUMB! 90% OF THIS JOB IS NOT PLUMBING!
DUE TO THE NATURE OF THIS PRODUCT WE HIGHLY ADVISE THE PURCHASE AND FITTING OF A WATER SOFTENER
(PLEASE NOTE LIMESCALE BUILD UP MAY CAUSE DAMAGE TO YOUR SHOWER AND WILL NOT BE COVERED UNDER WARRANTY)
ELECTRICAL CONNECTION TO HOUSE MAINS
WHEN YOUR ITEM IS ASSEMBLED ALWAYS USE THE SERVICES OF A FULLY QUALIFIED ELECTRICAN COMPANY TO COMPLETE THE CONNECTION FROM
SHOWER TO THE HOUSE SUPPLY. LAWS DEMAND IN MANY CASES YOU DO THIS AND YOUR WARRANTY IS VOID IN REGARDS TO THE ELECTRICAL
ITEMS IF THIS IS NOT UNDERTAKEN.
YOURS AND OTHERS SAFETY IS PARAMOUNT. NEVER ATTEMPT THIS YOURSELF!
REMEMBER:
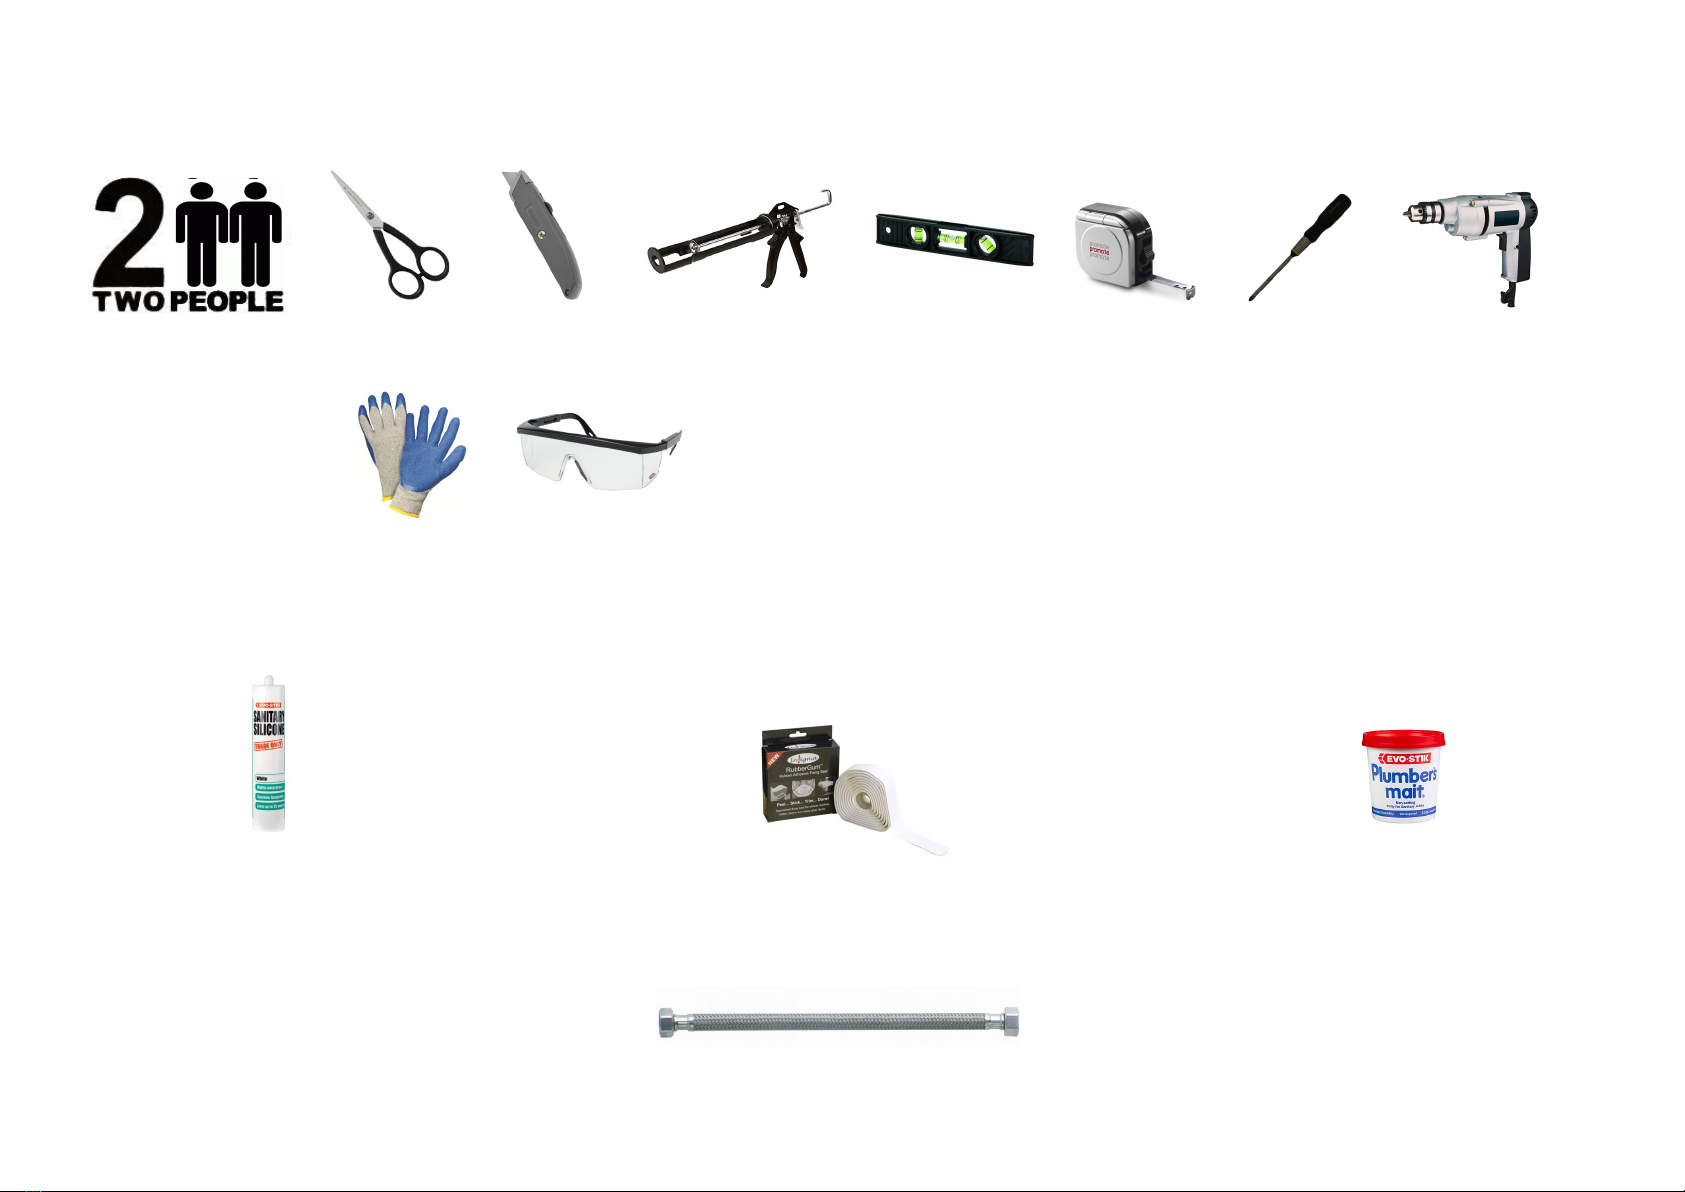
These showers are designed to be free standing and movable from their location should you have the need to replace anything. ALWAYS USE Flexible braided water
inlet pipes (not supplied) at least a metre long (not central heating plastic type!)
Always use a flexible waste pipe from your house supply to the shower .
NEVER FIX with rigid pipes, NEVER FIX the unit to the wall.
DURING BUILD, LIKE ALL SHOWERS CORRECT SEALING IS IMPERATIVE.
If you are using Insignia’s RubberGum, please ensure the product does not come in contact with your silicone as this will cause the RubberGum to fail and
will not adhere as intended.
ATTENTION
ALWAYS FIT EASY TO GET TO ISOLATION TAPS ON BOTH THE HOT AND COLD WATER SUPPLY (NOT SUPPLIED). JUST LIKE A
DISHWASHER OR WASHING MACHINE, THIS PRODUCT MUST BE ISOLATED WHEN NOT IN USE.
FLEXIBLE SUPPLY HOSES (NOT SUPPLIED) COUPLE HERE AS ORIGIN OF SUPPLY
www.insigniarange.com Last Modied: 20/06/2018
05
TOTAL ELECTRICAL REQUIREMENTS
Voltage Rating 220 -240AC
Frequency Rating 50HZ
Power Rating 25W
Your electrical contractor should understand ALL legal requirements of connection before undertaking any work or installation.
UNDER NO CIRCUMSTANCES UNDERTAKE THIS YOURSELF!!!
Note for electrician. This product comes with 3 amp plug. We leave it this way for you to connect this your own way due to continued additions
to current regulations.
1) Connect within current laws and IP directives.
2) (Preferred) Wire into isolated fused feed connecting directly to the house consumer/service box.
Always use protection against electrical surge. Your shower should be treated the same as a home computer. A surge protector should
eradicate the possibility of either the transformer or control panel being burnt out.
www.insigniarange.com Last Modied: 20/06/2018
06
Tool Requirements
None Supplied
Scissors Stanley Blade Silicone Gun Spirit Level Tape Measure Philips Screwdriver Electric Drill
Adhesive Requirements
Bacteria Resistant Sanitary Silicone - (for vertical joints) RubberGum Plumbers Mait (for waste joints)
Not Supplied Supplied Not Supplied
Hardware Requirements
A Shower Cabin requires 2 x 1 Metre Braided Hose
Not Supplied
Safety Gloves Safety Glasses
PREVENT INJURIES!
This product may contain sharp edges. Assemble using gloves.
Use safety glasses when handling glass or drilling.
www.insigniarange.com Last Modied: 20/06/2018
07
Whilst the next steps show you how to assemble your shower we want to make sure you have a correct build to ensure you get a trouble free shower. Therefore our advice
is to follow the instructions and perform a dry run to ensure you are confident with the build and you understand fully how the unit is assembled. When we use the word
“DRY RUN” this means you do not silicone anything, just simply construct the shower, align, drill and screw everything together. Once you are happy with the build take the
unit apart and carry out the final fix.
Column
1x Complete Column
Uprights (Inner + Outer)
Top + Bottom Seal (not attached)
Backwalls
1x Left Panel Backwall
1x Right Panel Backwall
Tray Box
1x Tray
1x Roof
2x Curved Rails
Accessories
Glass Room
2x Door seals
2x Glass doors
2x fixed glass
What’s In The Boxes?
In addition to above you will have all the required internal accessories to complete the shower.
VERY IMPORTANT
Have you got everything? If not please contact the Insignia Support Line on 01908 226545. Remember NEVER book your
tradesman until everything has arrived, been checked and is present. No replacement/missing parts can be obtained free
of charge during or after the build. Any claims can only be within the timescale permitted (48 hours after delivery) and
always BEFORE build.
www.insigniarange.com Last Modied: 20/06/2018
08
Insignia Screw Pack
Product Code Descripon Quanty
SP097 Door Handles 2
SP276
SP276A
Twin Wheels Non Push (Black/
Chrome)
Twin Wheels — Push Buon (Black/
Chrome)
4
4
ST12 12mm Screws 8
ST14 14mm Screws 12
ST16 16mm Screws 12
ST18 18mm Screws 2
ST20 20mm Nuts and Bolts 12
ST25 (3.5) 25mm Screws (with a 3.5mm thread) 8
ST25 (4) 25mm Screws (with a 4mm thread) 3
SW9 Small Washers 38
DB9 Drill Piece 1
Note: In some cases you may have more screws than needed, this is done so you have spares!
www.insigniarange.com Last Modied: 20/06/2018
09
Pressure Requirements from your house supply
We recommend a bar pressure between 2.5 and 3.4 BAR. If you have a combi boiler system no problem should be experienced. If you have a gravity feed older type
installation (hot water tank type usually less than 1 bar) you will almost certainly need a pump. We cannot advise on which type of pump is used, location or design because
all house plumbing layouts vary. This is a job for your installer/plumber. The end delivery however must fall within the scope above.
Important Note Do not exceed 3.4 BAR pressure under any circumstances. Warranty is void if so as damage will occur. If you have a combi supply, please use a pressure
reducing valve if required to lower the BAR pressure to the shower.
Please Remember that this product is free standing and is designed to be pulled away from the wall.
The waste hose must be of a flexible type (1m flexible waste supplied).
The water supply pipes need to be at least 1 metre in length and must be that of a flexible braided type (not supplied).
DO NOT OVERTIGHTEN THE BRAIDED HOSES AS IT CAN CAUSE THE CONNECTION TO POP AFTER A FEW WEEKS OF USE
www.insigniarange.com Last Modied: 20/06/2018
10