iScooter i9MAX User manual

1. Package Contents 01
2. Product Overview 02
3. Charging 04
4. First Riding 04
5. Riding Basics 05
6. Riding Notice 06
7. Folding and Carrying 06
8. Disc Brake Adjustment 07
9. Daily Care and Maintenance 08
10. Specifications 09
Contents
11. Question & Answer 10
12. Contact Us 10
UK

1 x Allen Wrench4 x Screws
1 x Charger
When unboxing your i9MAX electric scooter, please verify that
the below items are included in the package. If anything is missing
or damaged, please contact iscooter customer service for support.
Package Contents
01

Product Overview
Handlebar
Brake
Folding Clip
Display
Folding Latch
Kickstand
Platform
Taillight
Disc Brake
Headlight
Honeycomb tire
02

Click to turn on. Long press to turn off.
The power level is indicated by five battery bar on the
control panel.
Turn on your scooter, one-click to turn on/off the
front light.
Double-click to switch power mode.
Keep same speed for 3 seconds, and it will beep and
active the cruise control
The scooter can be locked and unlocked by
MiniRobot app.
Power Button
Battery Indicator
Light
Mode
Cruise Control
Lock Indicator
When the scooter starts to coast, put both feet on the deck and press the
accelerator (the accelerator initiates once the coasting speed
exceeds 3 mph). Or you can connect the "MiniRobot" APP, then, turn on the
zero start.
Tips
Control Panel

When the scooter starts to coast, put both feet on the deck and press
the accelerator (the accelerator initiates once the coasting speed
exceeds 3 mph). Or you can connect the "MiniRobot" APP, then, turn on the
zero start.
Download the "MiniRobot" app from the App Store(iPhone)
or Google Play (Android phone) for more information and
functions.
Charging
First Ride
Your scooter will be fully charged when the LED light on the charger
changes to green from red.
The scooter has charging protection and charging will cut off
automatically after fully charge.
Even so, we still don't recommend charging your scooter for a long
time more than 24 hours at one time.
Do not connect the charger if the charging port is wet.
Keep the charging port closed when not charging.

S
1. Turn the power on, and check the electricity
indicator.
2. Stand on the base with one foot and propel
yourself with the other foot.
3. When the scooter starts to coast, put both
feet on the deck and press the accelerator
(the accelerator initiates once the coasting
speed exceeds 3mph)
4. Release the accelerator and the kinetic energy
recovery system (KERS) initiates automatically to
brake slowly; And squeeze the brake lever for a
sudden brake.
Wear helmets and knee pads in case of falls
and injuries when you learn to ride the scooter,
as shown in the figure.
5. Tilt your body to the steering direction as you
turn, and slowly turn the handlebar.

Make sure that the scooter's turned off. To fold, unlock the folding mechanism, and bend the handlebar
stem to hook the buckle on the rear fender. To open, press the bell trigger to remove from the buckle,
erect the handlebar and lock the folding structure.
Folding and Carrying
Riding Notice
The iscooter i9MAX electric scooter is a leisure device. But once they're in a public area, they'll be
seen as vehicles, subject ing to any risks faced by vehicles. For your safety, please follow
instructions in the manual and traffic laws and regulations set forth by government and regulatory
agencies.
●Respect pedestrians' Right of Way. Try not to startle them while driving, especially children. When
you ride from behind pedestrians, ring your bell to give them a heads-up and slow your scooter to
pass from their left (applicable to countries where vehicles drive on the right). When you ride
across pedestrians, keep to the right at a low speed. When you drive across pedestrians, keep the
lowest speed or getting off the vehicle.
●Closely follow the safety instructions in the manual. iscooter shall not be liable for any financial
losses, physical injuries, accidents, legal disputes and other interest conflicts resulted from
actions that violate user instructions.
●Check the scooter before every use. When you note loosen parts, low battery alerts, excessive
wear, strange sounds, malfunctions and other abnormal conditions, stop riding.
●WARNING – Risk of Fire – No User Serviceable Parts.

To adjust the disc brake sensitivity:
You need the Allen wrench to loosen the screw on the rocker.
• When the disc brake is too sensitive, rotate the disc brake rocker down a bit. Then, reinstall
the screw back to the brake cable core to tighten.
• When the disc brake cannot stop, rotate the disc brake rocker up a bit. Then, reinstall the
screw back to the brake cable core to tighten.
Notice: The disc brake may squeak when in use until it is broken in. This is normal and does
not affect the brake's function or performance.
To remove the disc brake noise,
First make sure the scooter is turned off. For easier operating, we suggest
you put the scooter on the desk.
• Loosen two screws on the pump (not the screw on the rocker).
• Adjust the position of the disc brake pump to ensure that the brake disc is in the middle of
the two brake pads.
• Keep the brake disc and brake pad not touching each other.
• Hold the disk brake pump in the desired position, then retighten the screws to the pump.
Disc Brake Adjustment

Cleaning and storage
Battery maintenance
Storage and Disposal
If you see stains on the scooter's body, wipe them off with a damp cloth. If the stains won't scrub off,
put on some toothpaste, and brush them with a toothbrush, then wipe them off with a damp cloth.
Notes:
• Do not clean the scooter with alcohol, gasoline, kerosene or other corrosive and volatile
chemical solvents to prevent dire damage.
• Do not wash the board with a high-pressure water spray. During cleaning, make sure that the
scooter's turned off, the charging cable is unplugged, and the rubber flap is closed as water
leakage may result in electric shock or other major problems. When the scooter not in use,
keep it indoors where it is dry and cool.
• Do not put it outdoors for a long time. Excessive sunlight, overheating and overcooling
accelerate the battery pack's lifespan.
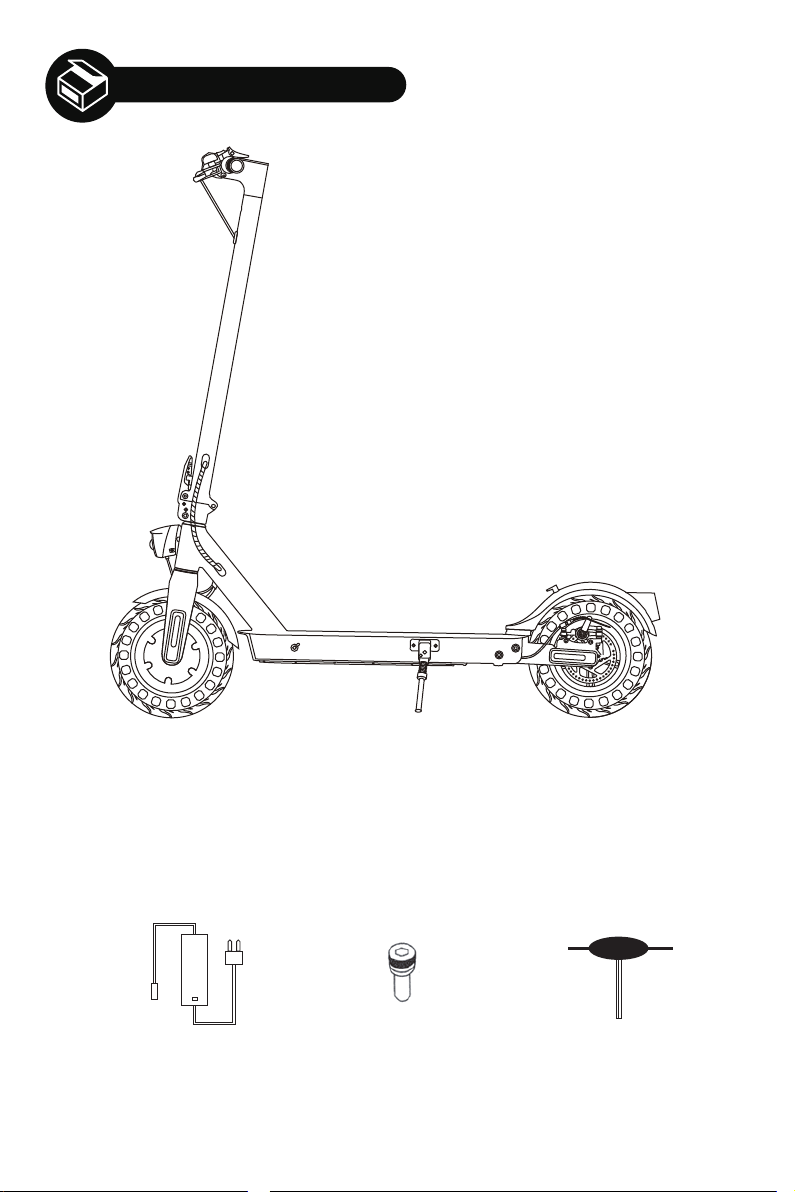
1. Use original battery packs, use of other models or brands may bring about safety issues;
2. Do not touch the contacts. Do not dismantle or puncture the casing. Keep the contacts
away from metal objects to prevent short circuit which may result in battery damage or
even injuries and deaths;
3. Use original power adapter to avoid potential damage or fire;
4. Mishandling of used batteries may do tremendous harm to the environment. To protect
natural environment, please follow local regulations to properly dispose used batteries.
5. After every use, fully charge the battery to prolong its lifespan.
1. Please try to store the scooter in a cool and dry place between 14℉ and 104℉. In
extremely humid environments the interior of the scooter may suffer condensation or
even water accumulation, which may damage the battery rapidly.Devices are not
intended for use at elevations greater than 2000 m above sea level Prolonged Exposure
to UV Rays, Rain and the Elements May Damage the Enclosure Materials, Store
Indoors When Not in Use.
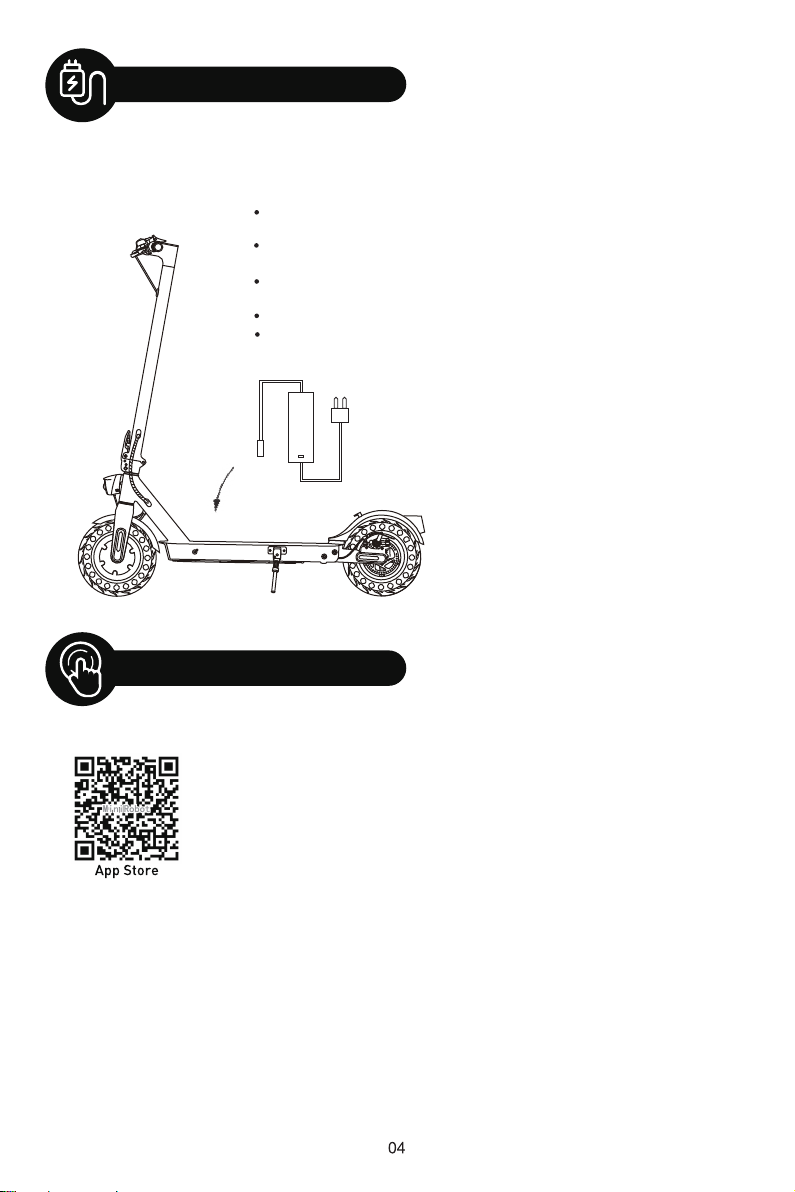
2. In daily use, try to avoid recharging the scooter after completely exhausting the battery.
If the battery is low, charge it as soon as possible.
3. Please charge the scooter every other month to preserve the battery.
Daily Care and Maintenance

i9MAX
45*17*45 inch/115*43*115 cm
45*17*19 inch/115*43*49 cm
35 lbs/16 kg
264 lbs/120 kg
14+
15 mph/25 km/h
18-22mile/30-35km
15%
32-104°F(0-40°C)
IP54
36 V
42 V
10 AH
500 W
100-240 V
42 V
2 A
4-6 h
S
Unfolded (Length. x Width x Height)
Folded (Length. x Width x Height)
Net Weight
Load
Recommended Age
Max.Speed
Max.Range
Max. Slope
Operating Temperature
lP Rating
Voltage
Max.Charging Voltage
Capacity
Nominal Power
Input Voltage
Output Voltage
Output Current
Charging Time
Dimensions
Weight
User
Scooter
Battery
Motor
Charger
ltem Electric Scooter
(1) The height of the body: Distance from the ground to the highest end of the body.
(2) Description of the battery life: It is measured under the condition of full charge, a load of
150 lb (68kg), at 77°F(24°C), on a flat road without wind, and at a speed of 9.3 mph.
The real battery life will differ with different factors of the load, humidity, wind speed and
operation habits.
(3) The maximum allowable weight shall be kept within 264 lb (120kg) (driver and objects
included) in any case. Consider an extra weight of the clothes or other accessories
with us during the trip and the gravity generated by speed, the scooter will not support
it if this load limit is exceeded.
Specifications

Question & Answer
Contact Us
E04 Short Circuit Failure E13 Motor Phase C Current Sensor Failure
E10 Controller/Instrument Communication Failure E14 Accelerator Failure
E11 Motor Phase A Current Sensor Failure E15 Brake Failure
E12 Motor Phase B Current Sensor Failure E16 Motor Hall Failure
1. What if the E-Scooter arrived missing accessory or broken part?
A: Please take a photo and send to iscooter Support Team.And iscooter
Support Team will reply you soon and send correct accessory or part
replacement.
2. Is the tire replaceable and how to replace the tire?
A: Yes, the tire is replaceable. Please contact iscooter support team for more
information or search the video “How to replace the solid tire in YouTube
instead.
3. What if the rear disc brake of the scooter doesn't work well?
A: You may please contact us for instructions of brake adjusting, or search
"How to adjust rear brake of scooter" in YouTube for tutorial video as well.
4. What should I do when I hear an unusual noise coming from the rear wheel?
A: It usually means your disc brake tilt and cause friction noise. Please see
Disc Brake Adjustment page. If you still have problem, please contact us
for help.
5. Why the screen returns an error code?
A: If you see any error code below, Please contact iscooter Support Team
to remove the error code.
Contact us if you experience issues relating to riding, maintenance and safety,
or errors/faults with your iscooter i9MAX electric scooter.
www.iscooterglobal.com
1010

1. Contenu du paquet 11
2. Aperçu du produit 12
3. Chargement 14
4. Premier tour 14
5. Bases de l'équitation 15
6. Avis d'équitation 16
7. Pliage et transport 16
8. Réglage des freins à disque 17
9. Soins et entretien quotidiens 18
10. Spécifications 19
Sommaire
11. Questions et réponses 20
12. Nous contacter 20
FR

1 x Clé Allen4 x Vis
1 x Charger
Lors du déballage de votre scooter électrique i9MAX, veuillez vérifier
que les articles ci-dessous sont inclus dans le paquet. Si un élément
est manquant ou endommagé, veuillez contacter le service clientèle
d'iscooter pour obtenir de l'aide.
Contenu du paquet
11

Aperçu du produit
Guidon
Frein
Pince pliable
Affichage
Loquet pliable
béquille
plateforme
frein à disque
Feu arrière
Phare avant
Pneu en
nid d'abeille
12

Astuce
Lorsque la trottinette commence à rouler en roue libre, posez les deux pieds sur le
plancher et appuyez sur l'accélérateur (l'accélérateur se déclenche lorsque la vitesse
en roue libre dépasse 3 mph). Ou vous pouvez connecter l'APP "MiniRobot", puis
activer le démarrage à zéro
Cliquez pour allumer. Appuyez longuement pour éteindre.
Le niveau de puissance est indiqué par cinq barres de batterie
sur le panneau de commande
Allumez votre scooter, un seul clic pour allumer/éteindre la
lumière avant.
Double-cliquez pour changer de mode d'alimentation.
Maintenez la même vitesse pendant 3 secondes, et il émettra
un bip et activera le régulateur de vitesse
Le scooter peut être verrouillé et déverrouillé par l'application
MiniRobot.
Bouton d'alimentation
Indicateur de batterie
Lumière
Mode
Régulateur de
vitesse
Indicateur de
verrouillage
Panneau de contrôle
13

Lorsque le scooter commence à rouler en roue libre, posez les deux pieds sur la
plate-forme et appuyez sur l'accélérateur (l'accélérateur se met en marche
lorsque la vitesse en roue libre dépasse 3 mph). dépasse 3 mph). Ou vous
pouvez connecter l'APP "MiniRobot", puis activer le démarrage à zéro.
Téléchargez l'application "MiniRobot" depuis l'App Store
(iPhone) ou Google Play (téléphone Android) pour plus
d'informations et de fonctions.
Votre scooter sera complètement chargé lorsque le voyant LED du
chargeur passera du rouge au vert.
Le scooter est équipé d'une protection de charge et la charge s'arrête
automatiquement après une charge complète.
Malgré cela, nous vous déconseillons de charger votre scooter
pendant plus de 24 heures d'affilée.
Ne connectez pas le chargeur si le port de charge est humide.
Gardez le port de charge fermé lorsque vous ne chargez pas.
Chargement
Premier tour
14

1. Mettez l'appareil sous tension et vérifiez
l'indicateur d'électricité.
2. Tenez-vous debout sur la base avec un pied
et propulsez-vous avec l'autre pied.
3. Lorsque le scooter commence à rouler en
roue libre, posez les deux pieds sur le plancher
et appuyez sur l'accélérateur (l'accélérateur se
déclenche lorsque la vitesse en roue libre
dépasse 3 mph).
4. Relâchez l'accélérateur et le système de
récupération de l'énergie cinétique (KERS)
s'enclenche automatiquement pour freiner
lentement ; et serrez le levier de frein pour
une pour un freinage brusque.
5. Inclinez votre corps dans le sens de la direction
lorsque vous tournez, et tournez lentement le guidon.
Portez un casque et des genouillères en cas de
chute et de blessure lorsque vous apprenez à
conduire le scooter, comme indiqué sur la figure
Bases de l'équitation
15

● Respectez le droit de passage des piétons. Essayez de ne pas les faire sursauter en conduisant,
en particulier les enfants. Lorsque vous roulez derrière des piétons, faites sonner votre sonnette
pour les avertir et ralentissez votre scooter pour les dépasser par la gauche (applicable aux pays
où les véhicules roulent à droite). Lorsque vous traversez un piéton , restez sur la droite à faible
vitesse. Lorsque vous traversez des piétons, gardez la vitesse la plus faible ou descendez du
véhicule.
● Suivez scrupuleusement les instructions de sécurité du manuel. iscooter ne peut être tenu
responsable des pertes financières, des blessures physiques, des accidents, des litiges
juridiques et autres conflits d'intérêts résultant d'actions qui violent les instructions de l'utilisateur.
● Vérifiez le scooter avant chaque utilisation. Lorsque vous constatez des pièces desserrées, des
alertes de batterie faible, une usure, des sons étranges, des dysfonctionnements et d'autres
conditions anormales, arrêtez de rouler.
● AVERTISSEMENT - Risque d'incendie - Aucune pièce réparable par l'utilisateur.
Assurez-vous que le scooter est éteint. Pour plier, déverrouillez le mécanisme de pliage, et pliez
la tige du guidon pour accrocher la boucle sur le garde-boue arrière. Pour ouvrir, appuyez sur la
gâchette de la cloche pour la retirer de la boucle, redressez le guidon et verrouillez la structure
de pliage.
16
Avis d'équitation
Pliage et transport
Le scooter électrique iscooter i9MAX est un appareil de loisir. Mais une fois dans une zone publique,
ils seront considérés comme des véhicules, ce qui les soumet aux risques encourus par les
véhicules. Pour votre sécurité, veuillez suivre les instructions du manuel ainsi que les lois et
règlements de la circulation établis par les agences gouvernementales et réglementaires.

Pour régler la sensibilité du frein à disque :
Vous avez besoin de la clé Allen pour desserrer la vis sur le basculeur.
• Lorsque le frein à disque est trop sensible, tournez un peu la bascule du frein à disque vers le
bas. Puis, réinstallez la vis sur l'âme du câble de frein pour la resserrer.
• Lorsque le frein à disque ne peut pas s'arrêter, tournez un peu le culbuteur du frein à disque
vers le haut. Puis, réinstallez la vis sur l'âme du câble de frein pour la serrer.
Remarque : Le frein à disque peut grincer lors de son utilisation jusqu'à ce qu'il soit rodé.
Ceci est normal et n'affecte pas la fonction ou les performances du frein.
Pour enlever le bruit du frein à disque,
Assurez-vous d'abord que le scooter est éteint. Pour une utilisation plus facile,
nous vous suggérons de poser le scooter sur un bureau..
• Desserrez deux vis sur la pompe (pas la vis sur le basculeur).
• Réglez la position de la pompe du frein à disque pour que le disque de frein se trouve au milieu
des deux plaquettes de frein.
• Veillez à ce que le disque de frein et la plaquette de frein ne se touchent pas.
• Maintenez la pompe de frein à disque dans la position souhaitée, puis resserrez les vis de la pompe.
Réglage des freins à disque
Table of contents
Languages:
Other iScooter Scooter manuals

iScooter
iScooter i9 User manual

iScooter
iScooter iX5 User manual

iScooter
iScooter i8 User manual

iScooter
iScooter iK2 User manual

iScooter
iScooter iX4 User manual

iScooter
iScooter 1S User manual

iScooter
iScooter iX4 User manual

iScooter
iScooter iX6 User manual

iScooter
iScooter iX5 User manual

iScooter
iScooter i9 User manual