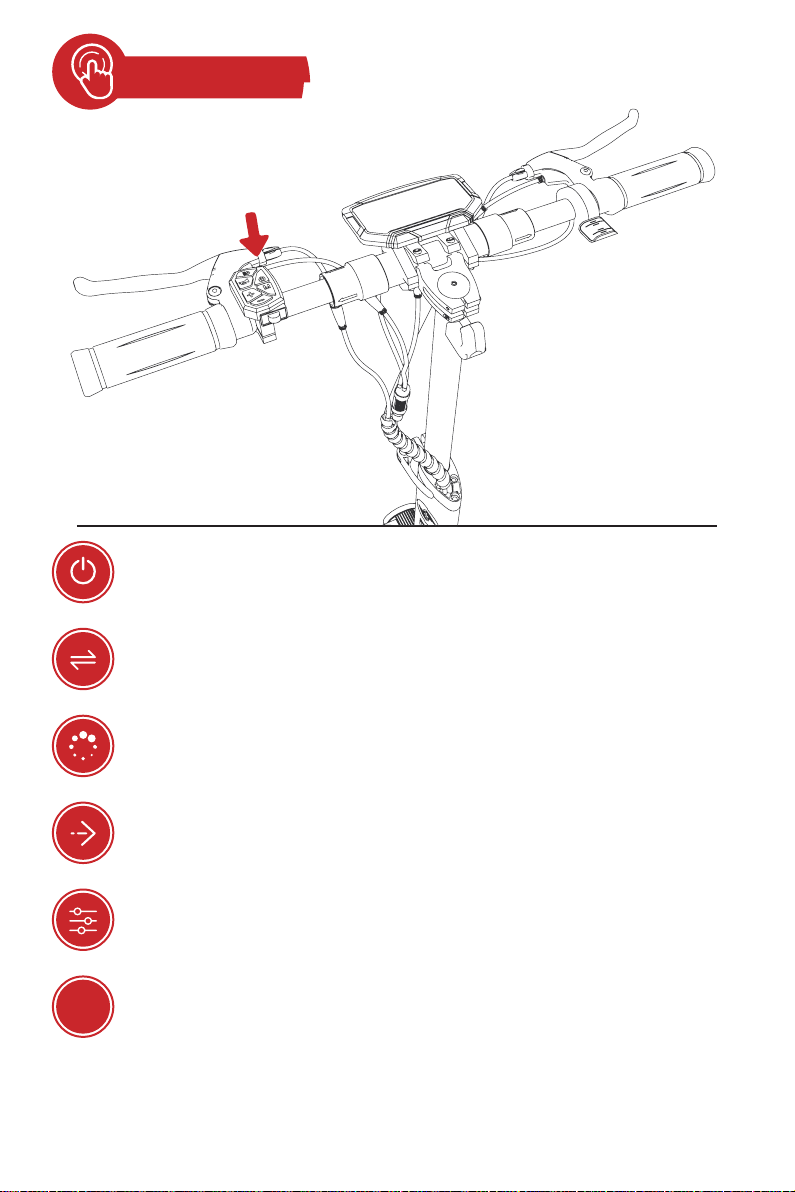
iScooter iX6 User manual

1. Package Contents 01
2. Product Overview 02
3. Control Panel 03
4. Assembly 05
5. Riding Notice 06
6. Charging 06
7. First Ride 07
8. Riding Basics 08
9. Safety Instructions 09
10. Dangerous Actions (No Attempting!) 10
Contents
11. Disc Brake Adjustment 12
12. Daily Care and Maintenance 13
13. Specifications 14
14. Limited Warranty Statement 15
15. Question & Answer 17
16. Contact Us 18
EN

Package Contents
When unboxing your iX6 electric scooter, please verify that
the below items are included in the package. If anything is missing or
damaged, please contact iscooter customer service for support:
Keep the package box to ship back the scooter when necessary.
01
1 x Car Bag 2 x NFC1 x Charger 3 x Tool 6 x Tool

02
Product Overview
Headlight
Front
Suspensions Rear Suspensions
Brake
Adjustable Lock
Rear Fender
Motor
Deck
Charging Port
Ambient Lights
Turn Signal
Tire

03
Control Panel
Speed Distance riding per hour.
Three riding modes,after power on, press +/- key to switch between ECO,
STD, and TURBO modes.
5-bar battery level.
Battery Level
Riding Mode ECO: First gear STD: Second gear TURBO: Third gear
Displayed Content
Gear value Turn left Locking
Fault Cruise
Headlights Dual drive
Single drive
Turn right
Battery voltage
Battery power
Total mileage
Single mileage
Controller current
indicator bar
Real time speed
Third gear
Second gear
First gear MPH
Km/h
Maximum speed
Average speed
Error
Error

04
Mode settings:
After turning on the scooter, press and hold 'M' and 'Light' buttons for about 10 seconds.
Release the 'Light' button first, then release 'M' button to enter setting mode.
P01: Kilometer/mile selection setting
P02: Voltage level setting: 36V/48V/60V/72V; the default is 48V, and the undervoltage
value is automatically adjusted when the voltage is selected (this item is not recommend-
ed to be adjusted)
P03: Wheel diameter: unit, inch; 8.0-12.0, default 10, increases by 0.5 for each change
(this item is not recommended to be adjusted)
P04: Number of magnetic poles for speed measurement: range: 1-100, default 30
(default value is ideal ) (this item is not recommended to be adjusted)
P05: Cruise selection: 0 means cruise off, 1 means cruise on; after the cruise is turned
on, the cruise icon appears on the display
P06: Zero start/non-zero start setting, 0: zero start; 1: non-zero start
P07: Top speed setting 10%-100%; 00 means 100%
P08: Sleep time setting: 0, sleep off; other numbers are sleep time, range: 1-30; default 5
minutes
P09: Backlight brightness adjustment: Level 1 is the darkest, Level 3 is the brightest
P99: Restore factory default parameters; press and hold the + button for 5 seconds
during P99
ODO: Travel distance reset; long press the + button for 5 seconds at ODO
NFC key

05
Assembly
1. Open the package, take out the E-scooter
and its accessories. 2. Press the folding mechanism and lift the T-bar
upright. Push down the kickstand.
3. Cut the tapes on the handlebar.Lift the
handlebars on both sides up and slide
in to secure.(Tips: Don't tighten only
one side one time, visit www.iscooter.com for
additional help with assembly, including a
step-by-step video.)
4. Open the adjustable lock, adjust the handlebar
to the height you needed, then close the lock.

06
Riding Notice
The iscooter iX6 electric scooter is a leisure device. But once they're in a public area, they'll be
seen as vehicles, subjecting to any risks faced by vehicles. For your safety, please follow
instructions in the manual and traffic laws and regulations set forth by government and regulatory
agencies.
● At the same time, you should understand that risks cannot be entirely avoided as others may
violate traffic regulations and drive incautiously, and you're exposed to road accidents just as
when you're walking or biking. The faster the scooter is, the longer it takes to stop. On a smooth
surface, the scooter may slip, lose balance, and even result in a fall. Thus it is crucial that you use
caution, keep proper speed and distance, especially so when you're unfamiliar with the place.
● Respect pedestrians' Right of Way. Try not to startle them while driving, especially children.
When you ride from behind pedestrians, ring your bell to give them a heads-up and slow your
scooter to pass from their left (applicable to countries where vehicles drive on the right). When
you ride across pedestrians, keep to the right at a low speed. When you drive across pedestrians,
keep the lowest speed or getting off the vehicle.
● Closely follow the safety instructions in the manual. iscooter shall not be liable for any financial
losses, physical injuries, accidents, legal disputes and other interest conflicts resulted from
actions that violate user instructions.
● Do not lend your scooter to whoever doesn't know the operations. And when you do lend it to
your friends, please take the responsibility to ensure he/she knows the operation and wears the
safety gear.
● Check the scooter before every use. When you note loosen parts, low battery alerts, excessive
wear, strange sounds, malfunctions and other abnormal conditions, stop riding.
● WARNING – Risk of Fire – No User Serviceable Parts.
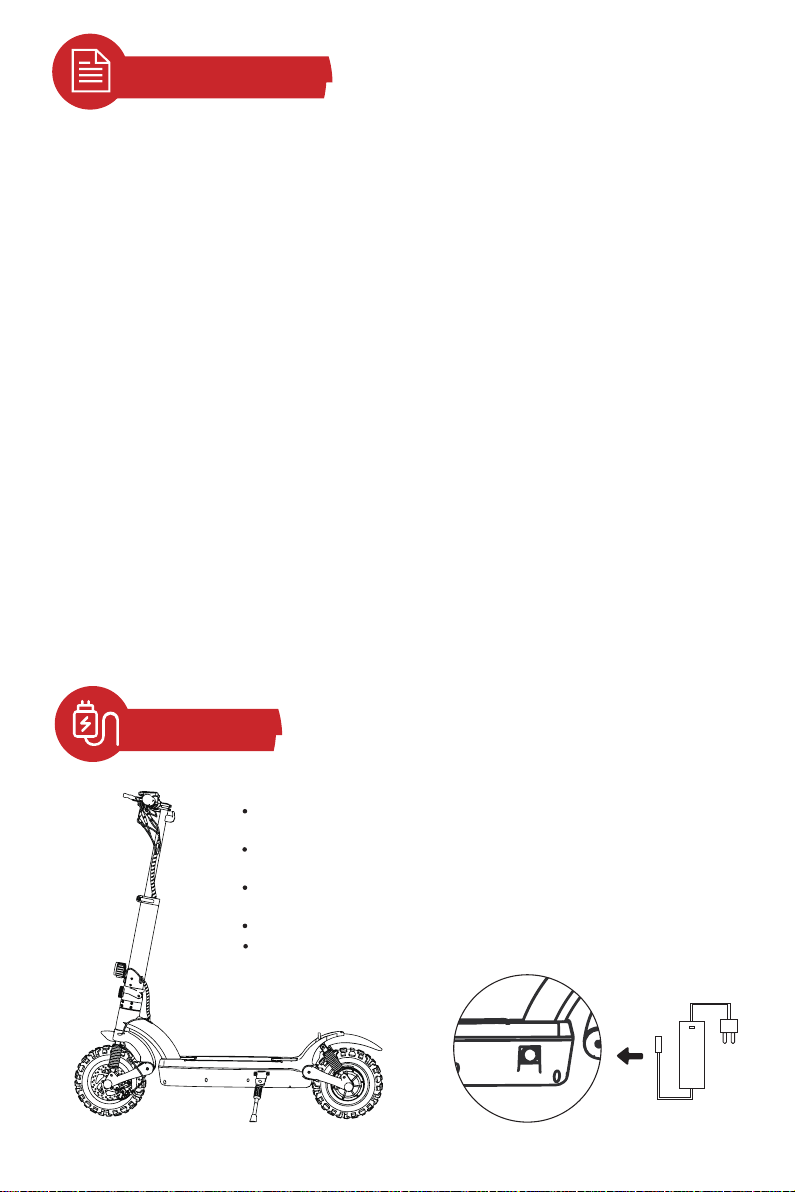
Charging
Your scooter will be fully charged when the LED indicator on the
charger changes to green from red.
With charging protection, it will cut off charging automatically
after fully charge.
Even so, we still don't recommend charging your scooter for a long
time more than 24 hours at one time.
Do not connect the charger if the charging port is wet.
Keep the charging port closed when not charging.

07
First Ride
1. Press the power switch for 1-3 seconds and then release, LCD display is on — it
means the electric scooter is successful turned on.
2. Press the headlight button after power on to turn on the headlight and
the ambient light on the deck.
3. Zero start: after power-on, press the accelerator and the motor of the scooter
will rotate, and the scooter will go forward. (The throttle works even when the
E-scooter is not in motion.)
4. Non-zero/Kick-and-go start: With kick-and-go start mode on, scoot the E-scooter
for the throttle to operate.
5. Riding mode: After power on, press +/- key to switch between ECO, STD, and
TURBO modes. (The default mode is low-speed ECO at first power-on.)
6.1 Comfort mode: the speed is 10km/h in 1st gear,15km/h in 2nd gear,25km/h in 3rd gear
6.2 Off-road mode: the speed is 15km/h in 1st gear,30km/h in 2nd gear,45km/h in 3rd gear
Mode switching: Short press the m key five times continuously after power on, the
meter displays 45km/h, indicating that the setting is successful. Switch comfort mode:
After restarting the scooter again, short press the M button five times in a row, and the
meter displays 25km/h, indicating that the setting is successful.
Power Switch
M

08
Riding Basics
Wear a helmet, elbow pads, and knee pads in
case of falls and injuries either you are a
beginner learning to ride or you are a
seasoned rider.
1.Turn the power on, and check the battery
level indicator.
2.Stand with one foot on the deck and one
foot on the ground. Scoot yourself with the
foot on the ground.
3.When the scooter starts to move forward,
put both feet on the deck and press the
accelerator. (The accelerator initiates once
the speed exceeds 3 mph.)
4.Release the accelerator and the kinetic
energy recovery system (KERS) initiates
automatically to brake slowly; And squeeze
the brake lever for a sudden brake.
5.Tilt your body to the steering direction as
you turn, and slowly turn the handlebar.

Safety Instructions
Do not ride in the rain. Please keep a medium or low speed (5mph)
when you ride across speed bumps, elevator
door sills, bumpy roads or other uneven
surfaces. Slightly bend your knee to better
adjust mentioned surfaces.
Look out for doors, elevators and other
overhead obstacles. Do not accelerate when you go downhill.
Do not press the accelerator when you're
walking alongside the scooter.
09
Always steer clear of obstacles.

10
Dangerous Actions (No Attempting!)
Do not hang bags or other heavy stuff on the
handlebar. Keep both feet on the deck all time.
Do not ride in traffic lanes or residential areas
where vehicles and pedestrians are both
allowed.
Do not turn the handlebar violently during
high-speed riding.
Do not ride in a ponding that is higher than
20mm. Do not ride with anyone else, including
children.

11
Keep your feet off the rear mudguard. Always keep your hands on the handlebar.
Do not touch the disc brake. Do not try riding up or down stairs, and
jumping over obstacles.

12
You need a hex wrench to remove the screws on the rocker.
• When the disc brake is too sensitive, rotate the disc brake rocker down a bit. Then, reinstall the
screws back to the brake cable core to tighten.
• When the disc brake cannot stop, rotate the disc brake rocker up a bit. Then, reinstall the screw
back to the brake cable core to tighten.
Notice: The disc brake may squeak when in use until it is broken in. This is normal and does not
affect the brake's function or performance.
• Loosen two screws on the pump (not the screw on the rocker).
• Adjust the position of the disc brake pump to ensure that the brake disc is in the middle of the
two brake pads.
• Keep the brake disc and brake pad not touching each other.
• Hold the disk brake pump in the desired position, then re-tighten the screws to the pump.
First make sure the scooter is turned off. For easier operating, we suggest you put the scooter on
the desk.
To remove the disc brake noise:
To adjust the disc brake sensitivity:
Disc Brake Adjustment

13
Daily Care and Maintenance
If you see stains on the scooter's body, wipe them off with a damp cloth. If you cannot
scrub off the stain, put on some toothpaste, and brush them with a toothbrush, then wipe
them off with a damp cloth.
Notes:
• Do not clean the scooter with alcohol, gasoline, kerosene, or other corrosive and volatile
chemical solvents to prevent dire damage.
• Do not wash the deck with a high-pressure water spray. During cleaning, make sure that
the scooter's turned off, the charging cable is unplugged, and the rubber flap is closed as
water leakage may result in electric shock or other major problems. When the scooter is
not in use, keep it indoors where it is dry and cool.
• Do not put it outdoors for a long time. Excessive sunlight, overheating, and over-cooling
will shorten the battery pack's lifespan.
1. Use original battery packs. Use of batteries of other models or brands may bring about
safety issues,
2. Do not touch the contacts. Do not dismantle or puncture the casing. Keep the contacts
away from metal objects to prevent short circuit which may result in battery damage or
even injuries and deaths,
3. Use original power adapter to avoid potential damage or fire,
4. Mishandling of used batteries may do tremendous harm to the environment. To protect
natural environment, please follow local regulations to properly dispose used batteries.
5. After every use, fully charge the battery to prolong its lifespan.
1. Please try to store the scooter in a cool and dry place between 14℉and 104℉. In
extremely humid environments the interior of the scooter may suffer condensation or
even water accumulation, which may damage the battery rapidly. Devices are not
intended for use at elevations greater than 2000 m above sea level. Prolonged Exposure
to UV Rays, Rain and the Elements May Damage the Enclosure Materials, Store Indoors
When Not in Use.
2. In daily use, try to recharge the scooter after completely exhausting the battery. If the
battery level is low, charge it as soon as possible.
3. Please charge the scooter every other month to preserve the battery.
Cleaning and Storage
Battery Maintenance
Storage and Disposal

Specifications
iX6
Dimensions
Weight
User
Scooter
Battery
Motor
Charger
ltem
Unfolded (Length. x Width x Height)
Folded (Length. x Width x Height)
Net Weight
Load
Recommended Age
Recommended Height
Speed
Long Range
Max. Slope
Operating Temperature
Protection level
Voltage
Max.Charging Voltage
Capacity
Power
Input Voltage
Output Voltage
Output Current
Charging Time
Electric Scooter
122*63*125 cm
122*22*57 cm
53LB / 24.3KG
150 kg
14+
120~200cm
25-45 km/h
40-45 km
35%
-15°C~40°C
IPX4
48 V
54.6 V
17.5 AH
1000 W
110-240 V
54.6 V
2A
7-9 h
S
(1) The height of the body: Distance from the ground to the highest end of the body.
(2) Description of the battery life: It is measured under the condition of full charge, a load of
70KG, at 25°C, on a flat road without wind, and at a speed of 15KM/H. The real battery life
will differ with different factors of the load, humidity, wind speed and operation habits.
(3) The maximum allowable weight shall be kept within 150KG (driver and objects included)
in any case. Consider an extra weight of the clothes or other accessories with us during the
trip and the gravity generated by speed, the scooter will not support it if this load limit is
exceeded.
14

15
Limited Warranty Statement
30 DAY SATISFACTION GUARANTEED RETURN POLICY
LIMITED PRODUCT WARRANTY
LIMITED WARRANTY DOES NOT COVER
TO QUALIFY FOR A REFUND, ALL THE FOLLOWING CONDITIONS MUST BE MET
1. A Return Merchandise Authorization (RMA) must be requested from iscooter within 30 days from the date
of receipt of shipment.
2. The cost of return shipping will be borne by the customer.
3. For warranty service, please keep your receipt and/or invoice to validate proof of purchase.
4. Returned product must be in good physical condition (not physically broken or damaged).
5. All accessories originally included with your purchase must be included with your return.
6. If you return a product to iscooter, (a) without an RMA from iscooter(b) without all parts included in the
original package, iscooter retains the right to refuse delivery of such return.
If you are unsatisfied with your purchase, iscooter’s return policy allows you to return the product
purchased on the Authorization channel within 30 days counting from the date of receipt of shipment,
and request a refund from the Authorization channel for any reason.
For the return request, iscooter is not responsible for lost packages due to the carrier, or products
received that cannot be verified. Received products that have damage determined to have been caused
by the end-user may be subject to denial of the return request.
1. iscooter warrants the original purchaser that your iscooter product shall be free from defects in materials
and workmanship under normal use for a period aforementioned.
2. iscooter does not warrant the operation of the product will be uninterrupted or error-free.
iscooter is not responsible for damage arising from failure to follow instructions relating to the product's
usage.
3. Within 180 days after purchasing the scooter, if the battery is defective, it can be replaced free of charge.
After exceeding this time limit, it needs to be replaced at a charge.
4. Only the original owner of an scooter purchased from iscooter online store is covered by this Limited
Warranty. The Warranty Period begins upon your receipt of the scooter and shall end immediately upon the
earlier of the end of the Warranty Period or any sale or transfer of the scooter to another person, and under
no circumstances shall the Limited Warranty apply to any subsequent owner or other transferees of the
scooter.
1. Normal wear and tear of any Covered Component.
2. Consumables or normal wear and tear parts (including without limitation tires, tubes, brake pads, cables,
housing, grips).
3. Any damage or defects to Covered Components resulting from failure to follow instructions in the scooter
owner’s manual, acts of God, accident, misuse, neglect, abuse, commercial use, alterations, modification,
improper assembly, installation of parts or accessories not originally intended or compatible with the scooter
as sold, operator error, water damage, extreme riding, stunt riding, or improper follow-up maintenance.
4. For the avoidance of doubt, iscooter will not be liable and/or responsible for any damage, failure or loss
caused by any unauthorized service or use of unauthorized parts.
5. The Battery is not warranted from damage resulting from power surges, the use of an improper charger,
improper maintenance or other such misuses, normal wear or water damage.

16
HOW TO OBTAIN WARRANTY SERVICE
LIMITATION OF DAMAGES
REMEDIES
• If a hardware defect is found and a valid claim is received by iscooter within the Warranty Period, iscooter
will, at its option and to the extent permitted by law, either (1) repair the product at no charge, using new or
refurbished replacement parts or, (2) replace the product with a new or refurbished product. In the event of
a defect, to the extent permitted by law, these are your sole and exclusive remedies. Shipping and handling
charges may apply except where prohibited by applicable law. This Limited Warranty is valid only in the
jurisdictions where the products are sold by www.iscooter.com, and is valid to the extent permitted by the
applicable laws of such jurisdictions.
• Any replacement hardware product will be warranted for the remainder of the original warranty period or
thirty (30) days, whichever is longer, or for any additional period of time that may be applicable in your
jurisdiction.
• A Warranty Service Order must be requested from iscooter within Warranty Period from the date of
receipt of shipment. To request a Warranty Service Order, contact iScooter Service Team vip.sup-
• To obtain warranty service, you must deliver the product, in either its original packaging or packaging
providing an equal degree of protection, to the address specified by iscooter. In accordance with
applicable law, iscooter may require the customer to furnish proof of purchase details and/or comply with
registration requirements before receiving warranty service.period or thirty (30) days, whichever is
longer, or for any additional period of time that may be applicable in your jurisdiction.
• Except to the extent prohibited by applicable law, iscooter shall not be liable for any incidental, indirect,
special, or consequential damages, including but not limited to loss of, even when iscooter has been
advised of the profits, revenue or data, resulting from any breach of express or implied warranty or
condition, or under any other legal theory possibility of such damages.
• Some jurisdictions do not allow the exclusion or limitation of special, indirect, incidental or consequen-
tial damages, so the above limitation or exclusion may not apply to you.

17
Error code Definition
03
04
Check whether the 3-phase wire terminals and the Hall signal connector are in poor
contact, or the system startup time exceeds 2S due to heavy load, such as climbing or
the wheels are stuck. If this state still occurs after reconnecting the terminals, the
controller or motor is damaged.
Low battery voltage protection, under voltage protection
06 Detect whether the Hall commutation signal of the motor is faulty, and check whether
the connector of the Hall signal is in poor contact. If the state still occurs after
reconnecting the terminals, the Hall of the motor is damaged.
07 When the system is powered on, detect whether the handlebar is out of control, or
the handlebar signal is less than 0.75V. Or the handlebar is twisted before the
system works, in this case the fault can be removed after resetting.
08 Controller failure
10 The controller cannot receive the dashboard signal
15 The controller cannot receive the dashboard signal
Question & Answer
1. What if the E-Scooter arrived with missing accessories or broken parts?
A: Please take a photo and send to iscooter Support Team by sending email: And iscooter
Support Team will reply you soon and send correct accessory or part replacement.
2. Is the tire replaceable and how to replace the tire?
Yes, the tire is replaceable. Please contact iscooter support team for more information or
search the video “How to replace the offroad tire”
in YouTube instead.
3. What if the rear disc brake of the scooter doesn't work well?
A: You may please contact us for instructions of brake adjusting, or search "How to adjust rear
brake of scooter" in YouTube for tutorial video as well.
4. What should I do when I hear an unusual noise coming from the rear wheel? A: It usually
means your disc brake tilts to cause friction noise. Please see Disc Brake Adjustment page. If
you still have problem, please contact us for help.
5. Why does the screen display an error code?
A: If you see any error code below, Please contact iscooter Support Team to remove the error
code.

www.iscooterglobal.com
18
Contact us if you experience issues relating to riding, maintenance and safety,
or errors/faults with your iscooter iX6 electric scooter.
If the 5-core wire connecting the dashboard and the controller fails, the specific reasons
may be as follows:
(1) If the dashboard cannot be turned on, the screen is black. Possible reasons: The main
power line between the controller and the battery is not properly connected, or there is a
problem with any one of the red, black, and blue wires connecting the dashboard and the
controller.
(2) If the dashboard can be turned on, but it will stop working after working for 3s.
Possible reasons: Any one of the green-yellow signal wires connecting the dashboard and
the controller is in open state.
Contact Us
Table of contents
Other iScooter Scooter manuals

iScooter
iScooter i9MAX User manual

iScooter
iScooter 1S User manual

iScooter
iScooter iX4 User manual

iScooter
iScooter iX5 User manual

iScooter
iScooter i9 User manual

iScooter
iScooter i8 User manual

iScooter
iScooter iX4 User manual

iScooter
iScooter iX5 User manual

iScooter
iScooter iK2 User manual

iScooter
iScooter i9 User manual