2
DE
Achtung!
Vor dem Betrieb:
Erst den Sender und dann das Modell einschalten.
Bei Beendigung:
Erst das Modell und dann den Sender ausschalten.
●Betreiben Sie Ihr Modell niemals in Distanzen die außer-
halb Ihrer Sichtweite liegen. Sowohl die maximale Sicht-
weite als auch die max. Reichweite Ihres Modells hängen
von vielen Faktoren wie Witterung, Einsatzort und vor.
handenen Störfrequenzen ab. Führen Sie deshalb vor
jedem Einsatz mit einer zweiten Person, die das Modell
während des Tests sicher xiert hält, einen Reichweiten-
test durch und prüfen Sie auch wie sich das Modell wäh-
rend des Betriebs bei einem Signalausfall wie z.B. bei
leeren Senderbatterien oder ausgeschaltetem bzw. aus-
gefallenem Sender verhält.
GB
Attention!
Before operating:
Switch the transmitter on rst then the model.
When nished:
First switch off the model then the transmitter.
● Never operate your model beyond sight. Both the maxi-
mum visibility as well as the max. range of your model
will depend on many factors such as weather, location
and interfering frequencies. Therefore, before each use
perform a range test with a second person securely
holding the model and also check how the model reacts if
there is a signal failure e.g. when empty transmitter
batteries are installed.
FR
Attention!
Avant l’utilisation:
Allumez en premier radiocommande puis seulement votre
l’modèle.
Après l’utilisation:
Eteignez en premier le modèle réduit puis votre radiocom-
mande.
●N’utilisez jamais le modèle à une distance hors de votre
visibilité. La visibilité maximale ainsi que la portée maxi-
male dépendent de plusieurs facteurs tels que le temps,
le lieu d’utilisation et les présentes fréquences
perturbatrices. Pour cela, avant chaque usage, veuillez
effectuer un test de visibilité et de portée avec une
deuxième personne qui tient le modèle xé et véri ez les
réactions du modèle en usage en cas de pertes de signal
due par exemple à des piles usées ou à un émetteur
éteint.
IT
Attenzione!
Prima dell‘uso:
Accendete prima la trasmittente e poi il modello.
Dopo l‘uso:
Spegnere prima il modello e poi la trasmittente.
●Non utilizzare il suo modello fuori della distanzia di vista.
Sia la visibilità come la portata massima del vostro
modello dipendono da molti fattori, come il tempo,
disturbo di frequenza e il luogo di utilizzo. Eseguire un
test prima di ogni utilizzo del modello con una seconda
persona che tiene ssato il modello. Con questa
procedura potete testare come reagisce il modello
durante la perdita del segnale causato per esempio da
una batterie scarica oppure la radio spenta.
ES
¡Atención!
Antes del uso:
Encender primero la emisora, y después el modelo.
Después del uso:
Apagar primero el modelo, y después la emisora.
● No utilizar su modelo fuera de la distancias de visibilidad.
Tanto la visibilidad como la capacidad máxima de su
modelo depende de muchos factores, tales como el
tiempo, frecuencia de interferencia y el lugar de
utilización. Realice una prueba antes de cada uso del
modelo con una segunda persona que ja el modelo. Con
este procedimiento se puede comprobar cómo el modelo
reacciona durante la pérdida de señal causada por
ejemplo por una batería descargada o la emisora
apagada.
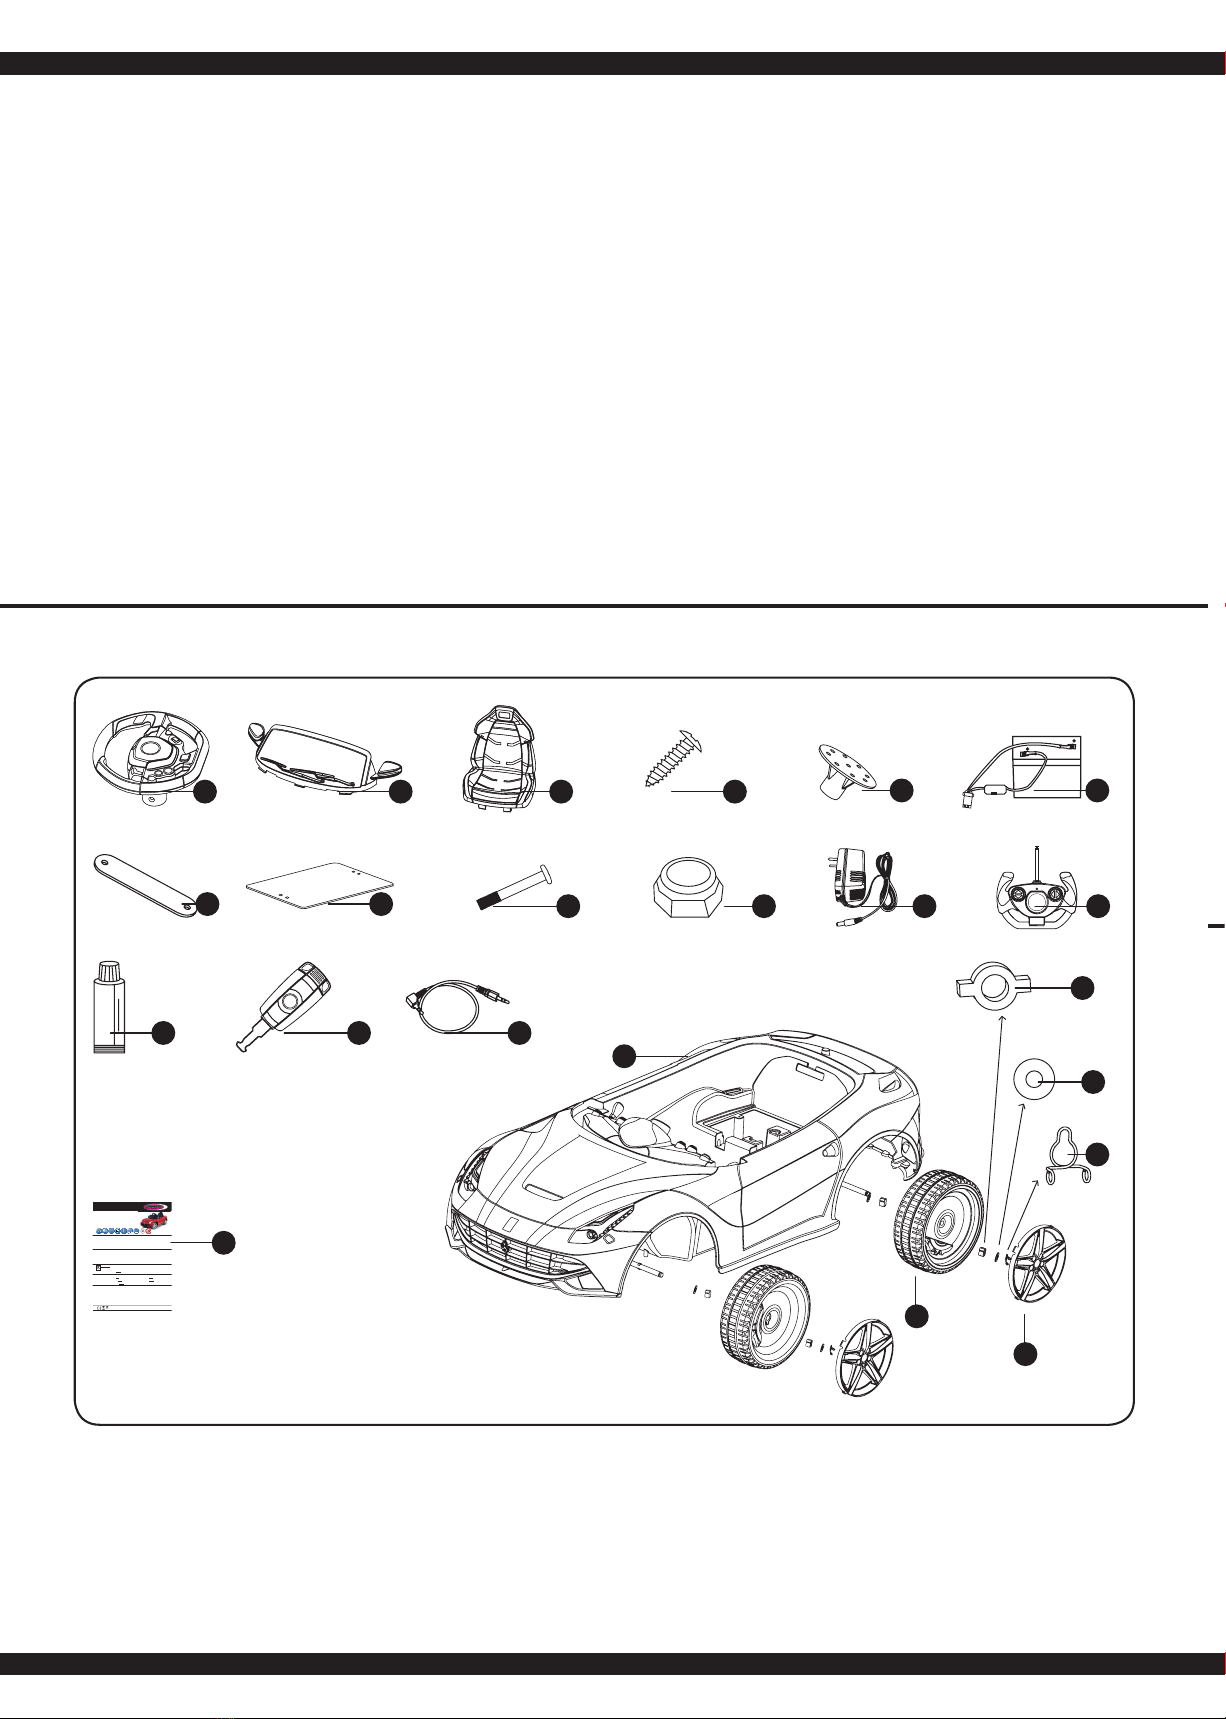
DE - Teile
GB - Parts
FR - Pièces
IT - Parti
ES - Partes
12346
5
8
71211109
14 1513
16
17
18
19
21
20
22
DE-Allgemeine Hinweise
Jamarae.K.übernimmt keine Haftung für Schäden, die an dem Produkt selbst oder durch dieses entstehen, sofern die-
seauffalsche Bedienung oder Handhabungsfehler zurückzuführen sind. Der Kunde allein trägt die volle Verantwortung
fürdierichtige Bedienung und Handhabung; dies umfasst insbesondere die Montage, den Ladevorgang, die Verwen-
dungbishin zur Wahl des Einsatzbereiches. Bitte beachten Sie hierzu die Bedienungs- und Gebrauchsanleitung, diese
enthältwichtigeInformationen und Warnhinweise.
GB-General information
Jamarae.K.is not liable for any damage caused to the product itself or through this, provided this is due to improper
operationorhandling errors. The Customer alone bears the full responsibility for the proper use and handling, including
withoutlimitation,the assembly, the charging process, the use and choice of the operation area. Please refer to the
operatinganduser instructions, it contains important information and warnings.
FR-Remarques générales
LasociétéJamara e. K. n’est pas responsable de dommages, que ce soit au niveau du modèle ou causé par celui-ci,
résultantd’uneutilisationnon appropriée. Seul le client est responsable concernant la mise en oeuvre et l’utilisation con-
formedumatériel; cela va de l’assemblage, en passant par la charge des accus et allant jusqu’au domaine d’utilisation.
Pourcela,veillez lire attentivement la notice d’assemblage et d’utilisation, celle-ci contient d’importantes informations
ainsiqueles consignes de sécurités.
IT-Informazioni generali
Jamarae.K. non e´responsabile per danni, sostenute al prodotto stesso o attraverso questo, dovuti ad una gestione
noncorrettadel articolo. Solo il cliente si assume la piena responsabilità per la manutenzione e l´utilizzo corretto dello
stesso; questo include il montaggio, la ricarica, l´utilizzo, no alla scelta della aerea di applicazione. Si prega di notare e
rispettareleistruzioni d´uso, questi contengono informazioni e avvertimenti molto importanti.
ES-Información general
JamaraK.no se hace responsable de los daños causados al producto en sí o por medio de esto, a menos que esto
sedebeal mal funcionamiento o errores de manejo. El cliente solo tiene la responsabilidad completa para el uso y
manejoadecuado,incluyendo, sin limitaciones, el montaje, el proceso de carga, el uso de hasta la elección de la zona
deaplicación.Porfavor, consulte las instrucciones de uso y funcionamiento, contiene información y avisos importantes.
DE-Konformitätserklärung
HiermiterklärtJAMARA e.K.,dass das Modell‚ „Ferrari F12 Berlinetta, No. 404765“ in Übereinstimmung mit den grund-
legendenAnforderungenundden anderen relevanten Vorschriften der Richtlinien 1999/5/EG, 2011/65/EU und 2009/48/
EG bendet.
Weitere Informationen nden Sie auch unter: www.jamara-shop.com/Konformitaet
GB - Certicate of Conformity
JAMARAe.K.hereby declares that the model „Ferrari F12 Berlinetta, No. 404765“ follow the regulations and require-
mentsaswell as any ther relivant directives of the EEC directive 1999/5/EC,
2011/65/EUand2009/48/EC.
Further information can also be found at: www.jamara-shop.com/Conformity
FR-Déclaration de conformité
Parlaprésente,la société Jamara e.K. déclare que ce modèle „Ferrari F12 Berlinetta, No. 404765“ est conforme en tous
pointsavecles textes de la directive de l’union européenne sous les directives 1999/5/CE, 2011/65/EU et 2009/48/CE.
Vos pourrez également trouver des informations sur notre site Internet: www.jamara-shop.com/Conformite
IT-Dichiarazione di conformita’
Jamarae.K. dichiara qui di seguito che il modello „Ferrari F12 Berlinetta, No. 404765“ è in linea con le norme ed altre
rilevantidisposizionicomunitarie 1999/5/CE, 2011/65/EU e 2009/48/CE.
Piu informazioni: www.jamara-shop.com/Conformita
ES-Declaración de conformidad
Pormedio de la presente, la empresa Jamara e. K. declara que el modelo „Ferrari F12 Berlinetta, No. 404765“ de
conformidadconlos requisitos esenciales y otras disposiciones pertinentes de la Directiva 1999/5/CE, 2011/65/EU y
2009/48/CEseencuentra.
Encontrará más información en: www.jamara-shop.com/Conformidad
DE-Entsorgungshinweise
Bittesorgen Sie für eine fachgerechte, den gesetzlichen Vorschriftenentsprechende Entsorgung der
Batterienund/oderder Akkus. Bitte werfen Sie nur entladene Akkus in die Sammelboxen beim Handel
oderdenKommunen.
GB-Disposal restrictions
Pleasecarefor a environmental correct and legal way of disposing the batteries and/or accus. Please,
onlythrowaway empty battery packs into the collect-boxes in your local shops or commune.
FR - Consignes de recyclage
Veuillezrespecterles consignes de recyclage des accus et/ou piles. Veuillez ne jeter que des piles/
accusvidesdans les bacs de ramassages que vous trouverez dans différents commerces ou au centre
derecyclagedevotrecommune.
IT-Disposizioni per l‘eliminazione nel Rispetto dell‘ ambiente
Nondisperdetele batterie nell‘ ambiente ma gettatele, una volta scaricate, negli appositi contenitori. Possono consi-
derarsiscariche quando il motore smette di girare. Se dovete eliminare dei componenti elettronici, eliminateli. Nelle
appositediscariche.
ES-Notas sobre el reciclado
Respetelanormativa vigente sobre la eliminación de residuos, especialmente sobre baterías y pilas. Lleve a reciclar
lasbateríassolo si están descargadas
DE
GeeignetfürKinder von 3 - 6 Jahren.
Achtung: FürKinderunter 36 Monaten nicht geeignet. ERSTICKUNGSGEFAHR.
EnthältverschluckbareKleinteile.VonKleinkindernunbedingt fernhalten.
GB
Suitable for children from 3 - 6 years.
Warning: Notsuitablefor children under 36 months. RISK OF SUFFOCATION.
Containssmallpartswhichcanbe swallowed. Keep away necessarily from children
FR
Adaptépourdes enfants entre 3 - 6 ans.
Attention: Neconvientpas aux enfants de moins de 36 mois. DANGER D’ÉTOUFFEMENT.
Contientdepetitespiècesfacilementavalables. Garder loin nécessairement enfants.
IT
Consigliatoperbambini dai 3 - 6 anni!
Attenzione: Nonadattatoai bambini inferioti ai 36 mesi. PERICOLO DI AFFOGAMENTO.
Contienepezzipiccoli.Tenerelontanoassolutamente dei bambini.
ES
Aptoparaniños de 3 - 6 años.
Atención: Noesrecomendable para los niños menores de 36 meses. ASFIXIA.
Contienepiezaspequeñas.Mantenganecesariamentelejos de los niños.
No.404765, 27 MHz, red
Ferrari F12
Berlinetta
DE - Gebrauchsanleitung
GB - Instruction
FR - Notice
IT - Istruzione
ES - Instrucciones
18/15
13
4
5
R
2
DE
Achtung!
VordemBetrieb:
ErstSenderund dann das Modell
einschalten.
BeiBeendigung:
ErstdasModell und dann den Sender
ausschalten.
GB
Attention!
Beforeoperating:
Switch the transmitter on rst then
themodel.
When nisished:
Firstswitchoff the model then the
transmitter.
FR
Attention!
Avantl’utilisation:
Allumezenpremier l’émetteur puis
seulementvotremodèle.
Aprèsutilisation:
Arrêtezlemodèle en premier puis votre
radiocommande.
IT
Attenzione!
Primadell‘uso:
Accendeteprimala trasmittente e poi
ilmodello.
Dopol‘uso:
Spegnereprimail modello e poi
latrasmittente.
ES
¡Atención!
Antesdeluso:
Encender primero la emisora, y después
elmodelo.
Despuésdeluso:
Apagar primero el modelo, y después
laemisora.


