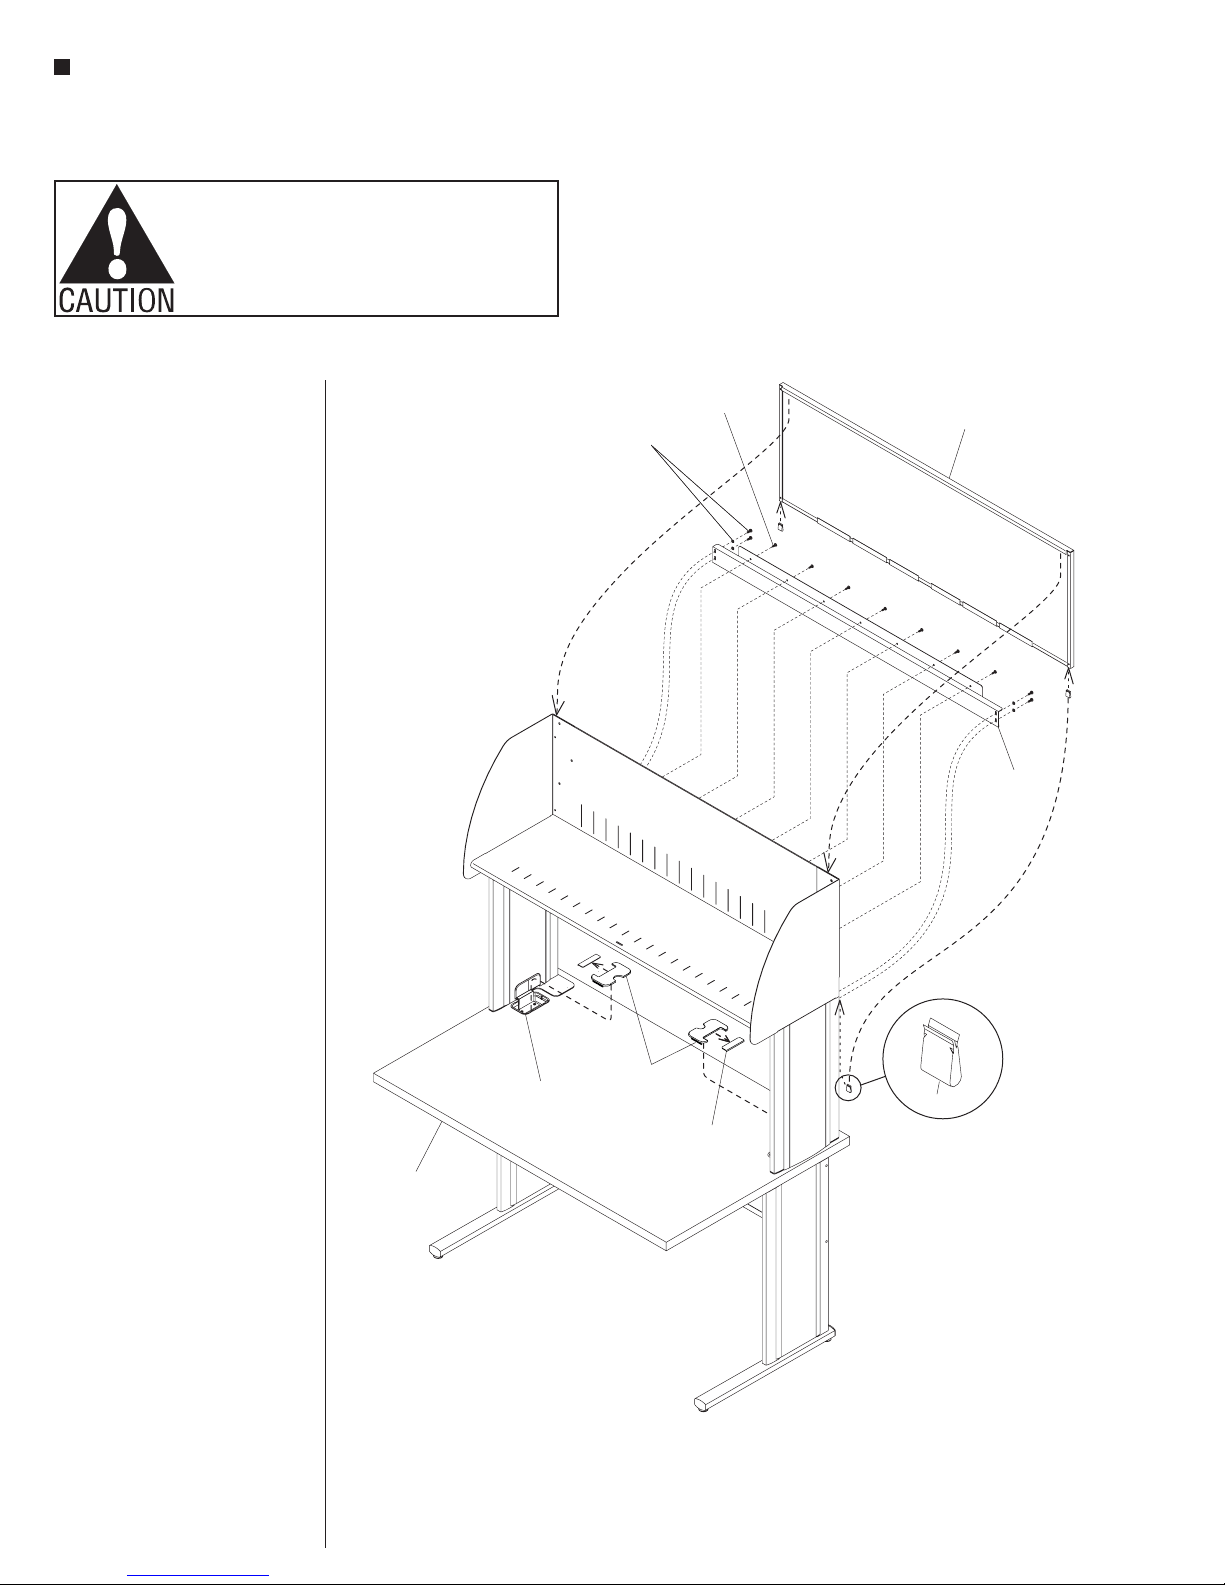
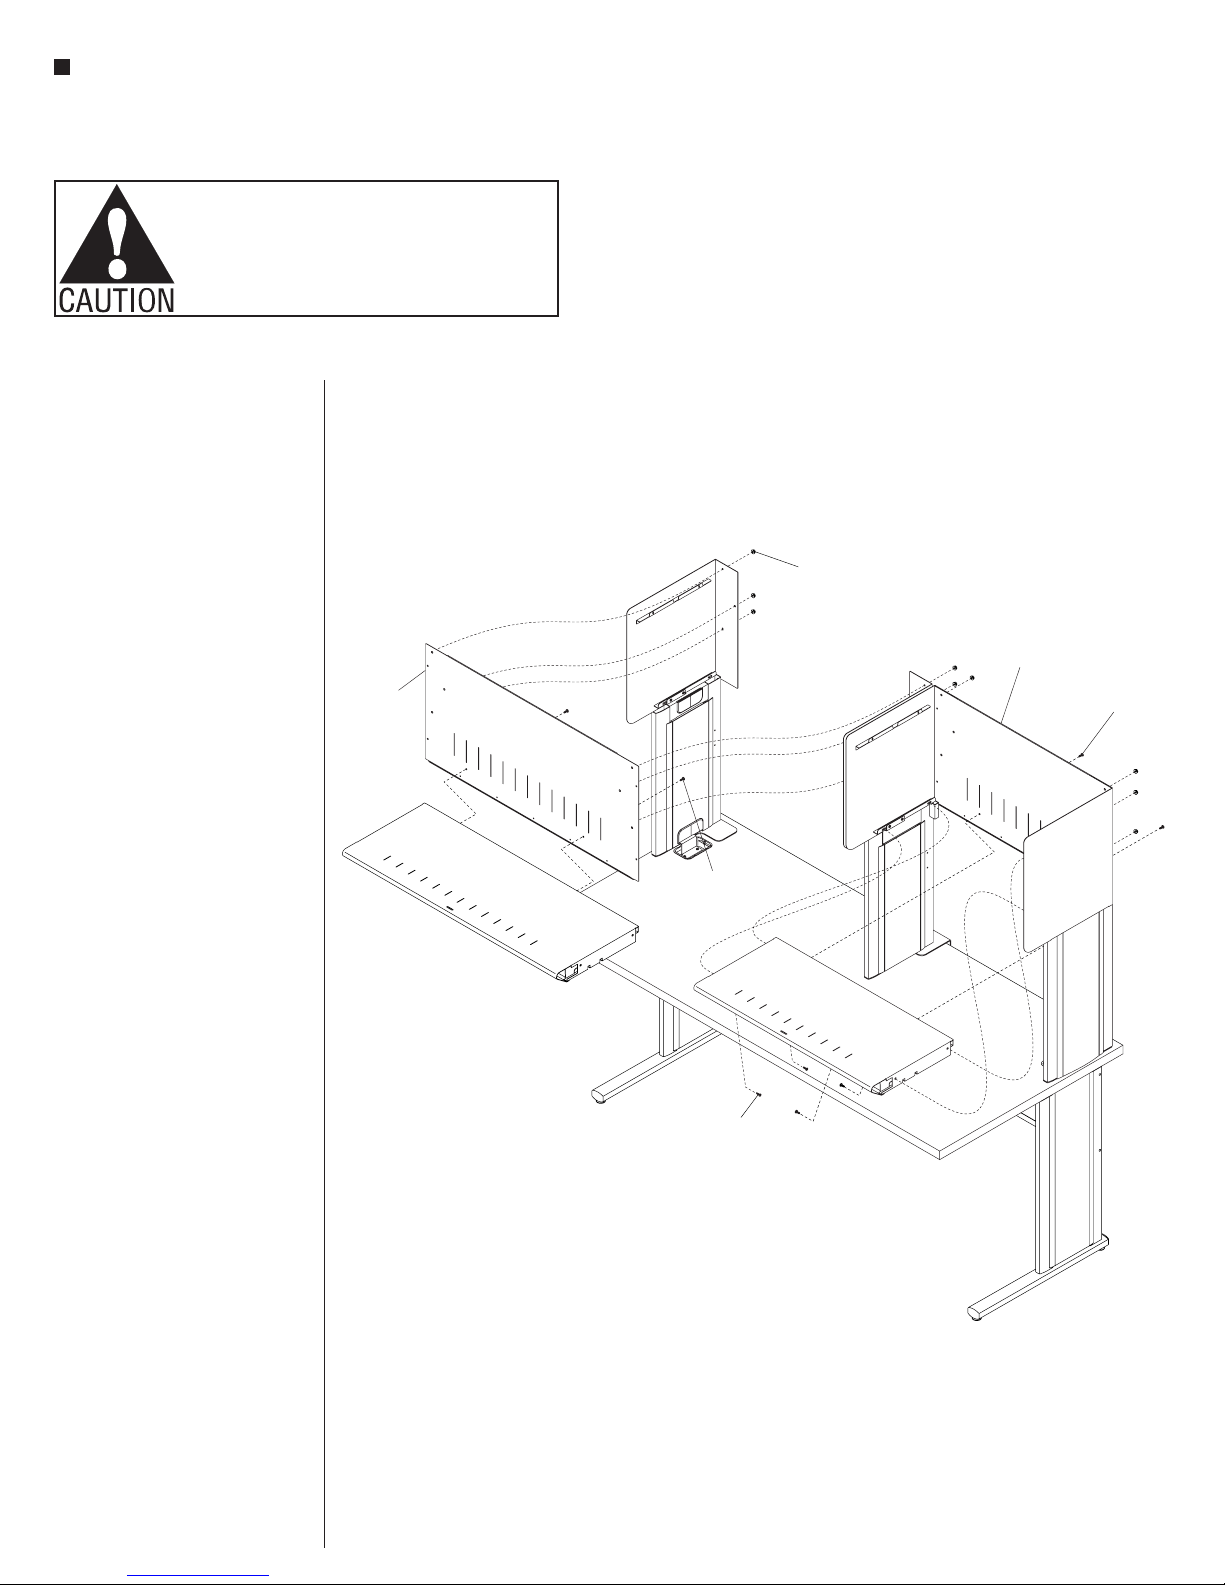
KI WorkZone Series User manual

Assembly Instructions
WorkZone®Overheads
December 2015

2
WorkZone®Overheads
Table of Contents
WorkZone Overhead Cabinets
Single Universal Overhead Cabinet Installation......................................................................3
Single Universal Overhead Shelf Installation..........................................................................6
Dual Universal Overhead Cabinet Installation ........................................................................9
Dual Universal Overhead Shelf Installation ..........................................................................12
Corner Universal Overhead Cabinet Installation...................................................................15
Corner Universal Overhead Shelf Installation.......................................................................18
Single & Double Balance Overhead Cabinet Installation ......................................................21
Corner Balance Overhead Cabinet Installation .....................................................................22

Assemble units as described herein only. To do otherwise
may result in instability. All screws, nuts and bolts must be
tightened securely and must be checked periodically after
assembly. Failure to assemble properly, or to secure parts
may result in assembly failure and personal injury.
3
WorkZone®Single Universal Overhead Cabinet
Assembly Instructions
Figure 1
#10-32 x /
1
2"
screw
#8-32 x /
1
2"
screw
cabinet side
(right-hand)
cabinet side
(left-hand)
right-hand
stanchion
stanchion
inser
t (outer)
WorkZone
Desk
left-hand
stanchion
stanchion
insert (inner)
grommet
hole
grommet
covers
Single Universal Overhead
Cabinet Installation
Important: WorkZone desk must be
fully assembled prior to installing the
overhead unit.
1. Begin by removing grommet covers
from the back sides at the top of the
desk where the overhead cabinet will
install (Figure 1).
2. Reference Figure 1 below to identify
the left- and right-hand stanchions,
as well as the left- and right-hand
cabinet sides. One side at a time,
position the appropriate stanchion
as illustrated such that the lower
mounting bracket of the stanchion
inserts into the grommet hole. Align
the mounting holes in the bracket
with the holes in the top of the leg
and secure using two #10-32 x 1/2”
screws (Figure 1).
3. Orient the right- and left-hand cabinet
sides as illustrated, then nest them
into the tops of the stanchions and
align the mounting holes. Secure
from the inside using two #8-32 x 1/2”
screws at each stanchion side
(Figure 1).

4
Assemble units as described herein only. To do otherwise
may result in instability. All screws, nuts and bolts must be
tightened securely and must be checked periodically after
assembly. Failure to assemble properly, or to secure parts
may result in assembly failure and personal injury.
WorkZone®Single Universal Overhead Cabinet
Assembly Instructions
4. Position cabinet back as illustrated,
with studs facing the rear. Orient
the cabinet back into position,
inserting the studs on the cabinet
back through the mounting holes in
rear flanges of both installed cabinet
sides. Use six #10-24 serrated nuts
to secure back to sides (Figure 2).
5. Place the shelf bottom into position
between the cabinet sides, above the
lower mounting flanges and tight
to the installed shelf back. Nest the
bottom shelf down onto both cabinet
sides lower mounting flanges and
align mounting holes. Secure the
bottom shelf to the cabinet sides
from underneath, at each end using
two #8-32 x 1/2” screws (Figure 3).
6. At the lower rear of the shelf back,
secure the shelf back to the rear edge
of the bottom shelf using two
#8-32 x 1/2” screws (Figure 3).
Figure 2
cabinet side
(right-hand)
cabinet side
(left-hand)
right-hand
stanchion
left-hand
stanchion
WorkZone
Desk
#10-24
serrated nut
#10-24
serrated nut
cabinet
back
cabinet side
(right-hand)
cabinet side
(left-hand)
right-hand
stanchion
left-hand
stanchion
cabinet
back
#8-32 x /
1
2"
screw
Figure 3
#8-32 x /
1
2"
screw
shelf
bottom

Assemble units as described herein only. To do otherwise
may result in instability. All screws, nuts and bolts must be
tightened securely and must be checked periodically after
assembly. Failure to assemble properly, or to secure parts
may result in assembly failure and personal injury.
5
WorkZone®Single Universal Overhead Cabinet
Assembly Instructions
7. Carefully set the top shelf/cabinet
door up onto the top mounting
flanges of both cabinet sides. Align
mounting holes and secure using
two #8-32 x 1/2” screws at each end
(Figure 4).
8. Position the stiffener beam as
illustrated to the lower rear of the
back shelf, align mounting holes
and secure beam to shelf back
using the required number of
#8-32 x 1/2” screws. Also, at each
end of the stiffener beam, use two
#10-32 x 1/2” screws with tooth
washers and secure the beam to the
top rear of the right- and left-hand
stanchions (Figure 4).
9. Orient the back plate as illustrated
behind the cabinet, then hang it
onto the back of the cabinet such
that the top vertical flange of the
back plate captures the top inside
edge of the shelf back. Use the two
barb clips provided and press them
up at the underside of the cabinet to
attach the bottom of the back plate
to the rear, bottom of the shelf back
(Figure 4).
10. Take grommets removed in step one
and remove the knock-outs from
each. Snap the grommets back into
place in the grommet hole at the
installed stanchions (Figure 4).
Figure 4
WorkZone
Desk
top shelf
& cabinet door
back
plate
barb clip
#10-32 x /
1
2"
screw & tooth
washer
stiffener
beam
#8-32 x /
1
2
"
screw
#8-32 x /
1
2"
screw
grommet
covers
grommet
hole
top mounting
flange
grommet
knock-out

6
Assemble units as described herein only. To do otherwise
may result in instability. All screws, nuts and bolts must be
tightened securely and must be checked periodically after
assembly. Failure to assemble properly, or to secure parts
may result in assembly failure and personal injury.
WorkZone®Single Universal Overhead Shelf
Assembly Instructions
Single Universal Overhead Shelf
Installation
Important: WorkZone desk must be
fully assembled prior to installing the
overhead shelf unit.
1. Begin by removing grommet covers
from the back sides at the top of the
desk where the overhead shelf will
install (Figure 5).
2. Reference Figure 5 below to identify
the left- and right-hand stanchions,
as well as the left- and right-hand
shelf sides. One side at a time,
position the appropriate stanchion
as illustrated such that the lower
mounting bracket of the stanchion
inserts into the grommet hole. Align
the mounting holes in the bracket
with the holes in the top of the leg
and secure using two #10-32 x 1/2”
screws (Figure 5).
3. Orient the right- and left-hand shelf
sides as illustrated, then nest them
into the tops of the stanchions and
align the mounting holes. Secure
from the inside using two
#8-32 x 1/2” screws at each stanchion
side (Figure 5).
Figure 5
#10-32 x /
1
2"
screw
#8-32 x /
1
2"
screw
shelf side
(right-hand)
shelf side
(left-hand)
right-hand
stanchion
stanchion
insert (outer)
WorkZone
Desk
left-hand
stanchion
stanchion
insert (inner)
grommet
hole
grommet
cover

Assemble units as described herein only. To do otherwise
may result in instability. All screws, nuts and bolts must be
tightened securely and must be checked periodically after
assembly. Failure to assemble properly, or to secure parts
may result in assembly failure and personal injury.
7
WorkZone®Single Universal Overhead Shelf
Assembly Instructions
4. Position shelf back as illustrated,
with studs facing the rear. Orient the
shelf back into position, inserting
the studs on the back through the
mounting holes in rearflanges of
both installed shelf sides. Use six
#10-24 serrated nuts to secure back
to sides (Figure 6).
5. Place the shelf bottom into position
between the shelf sides, above the
lower mounting flanges and tight
to the installed shelf back. Nest the
bottom shelf down onto both shelf
sides lower mounting flanges and
align mounting holes. Secure the
bottom shelf to the shelf sides from
underneath, at each end using two
#8-32 x 1/2” screws (Figure 7).
6. At the lower rear of the shelf back,
secure the shelf back to the rear edge
of the bottom shelf using two
#8-32 x 1/2” screws (Figure 7).
Figure 6
shelf side
(right-hand)
shelf side
(left-hand)
right-hand
stanchion
left-hand
stanchion
WorkZone
Desk
#10-24
serrated nut
#10-24
serrated nut
shelf
back
shelf side
(right-hand)
shelf side
(left-hand)
right-hand
stanchion
left-hand
stanchion
shelf
back
#8-32 x /
1
2"
screw
Figure 7
#8-32 x /
1
2"
screw
shelf
bottom

8
Assemble units as described herein only. To do otherwise
may result in instability. All screws, nuts and bolts must be
tightened securely and must be checked periodically after
assembly. Failure to assemble properly, or to secure parts
may result in assembly failure and personal injury.
WorkZone®Single Universal Overhead Shelf
Assembly Instructions
7. Position the stiffener bar as
illustrated to the lower rear of the
back shelf, align mounting holes
and secure beam to shelf back using
the required number of #8-32 x 1/2”
screws. Also, at each end of the
stiffener beam, use two #10-32 x 1/2”
screws with tooth washers and
secure the beam to the top rear of
the right- and left-hand stanchions
(Figure 8).
8. Orient the back plate as illustrated
behind the shelf, then hang it onto
the back of the cabinet such that the
top vertical flange of the back plate
captures the top inside edge of the
shelf back. Use the two barb clips
provided and press them up at the
underside of the cabinet to attach
the bottom of the back plate to the
bottom, rear of the shelf back
(Figure 8).
9. Take grommets removed in step one
and remove the knock-outs from
each. Snap the grommets back into
place in the grommet hole at the
installed stanchions (Figure 8).
back
plate
#10-32 x /
1
2"
screw & tooth
washer
#8-32 x /
1
2
"
screw
#10-32 x /
1
2"
screw & tooth
washer
Figure 8
stiffener
beam
barb clip
WorkZone
Desk
grommet
covers
grommet
hole
grommet
knock-out

Assemble units as described herein only. To do otherwise
may result in instability. All screws, nuts and bolts must be
tightened securely and must be checked periodically after
assembly. Failure to assemble properly, or to secure parts
may result in assembly failure and personal injury.
9
WorkZone®Dual Universal Overhead Cabinet
Assembly Instructions
Figure 9
#10-32 x /
1
2"
screw
#8-32 x /
1
2"
screw
cabinet side
(right-hand)
cabinet side
(left-hand)
right-hand
stanchion
WorkZone
Desk
left-hand
stanchion
center
stanchion
cabinet side
(right-hand)
cabinet side
(left-hand)
stanchion
insert (outer)
stanchion
insert (inner)
grommet
hole
grommet
cover
#12 x 1"
screw
Dual Universal Overhead Cabinet
Installation
Important: WorkZone desk must be
fully assembled prior to installing the
dual overhead unit.
Note: Dual overhead cabinet
installations onto 72” long desks
will have two 36” long cabinets
mounted onto three stanchions, with
the center stanchion being “centered”
on the desk. Installations onto 66”
long desks will have one 36” long
cabinet and one 30” long cabinet
mounted onto three stanchions, with
the “center” stanchion being installed
off-set by 3”, so it is not centered
on the desk. The installation below
covers dual cabinet installation onto
a 66” long desk.
1. Begin by removing grommet covers
from the back sides at the top of the
desk where the overhead cabinet will
install (Figure 9).
2. Reference Figure 9 below to identify
the left-, right-hand and center
stanchions, as well as the left- and
right-hand cabinet sides. One side
of the desk at a time, position the
appropriate stanchion as illustrated
such that the lower mounting bracket
of the stanchion inserts into the
grommet hole. Align the mounting
holes in the bracket with the holes
in the top of the leg and secure
using two #10-32 x 1/2” screws.
Next, install the center stanchion
as illustrated to the underside of
the desk using two #12 x 1” screws
at the pre-drilled holes. As noted
above, for 66” desks, the center
stanchion will mount 3” off center on
the desk (Figure 9).
3. Orient the right- and left-hand cabinet
sides as illustrated, then nest them
into the tops of the stanchions and
align the mounting holes. Secure
from the inside using two #8-32 x 1/2”
screws at each stanchion side
(Figure 9).

10
Assemble units as described herein only. To do otherwise
may result in instability. All screws, nuts and bolts must be
tightened securely and must be checked periodically after
assembly. Failure to assemble properly, or to secure parts
may result in assembly failure and personal injury.
WorkZone®Dual Universal Overhead Cabinet
Assembly Instructions
Figure 10
#8-32 x /
1
2"
screw
shelf
bottom (36 )"
#8-32 x /
1
2"
screw
#10-24
serrated nut
shelf
bottom (30 )"
cabinet
back (36 )"
cabinet
back (30 )"
#8-32 x /
1
2"
screw
Note: For installations of dual
overhead cabinets onto 66” long
desks, one cabinet back will be 36”
and the other will be 30”. The center
stanchion should be installed to
accommodate the size differences.
4. Position cabinet backs as illustrated,
with studs facing the rear. Orient
the cabinet backs into position,
inserting the studs on the cabinet
backs through the mounting holes in
rear flanges of both sets of installed
cabinet sides. Use six #10-24
serrated nuts per cabinet back to
secure backs to sides (Figure 10).
5. Place the shelf bottoms into position
between the cabinet sides, above the
lower mounting flanges and tight
to the installed shelf backs. Nest
the bottom shelves down onto both
cabinet sides lower mounting flanges
and align mounting holes. Secure
each bottom shelf to the cabinet
sides from underneath, at each
end using two #8-32 x 1/2” screws
(Figure 10).
6. At the lower rear of each shelf back,
secure the shelf back to the rear edge
of the bottom shelf using two
#8-32 x 1/2” screws as illustrated
(Figure 10).

Assemble units as described herein only. To do otherwise
may result in instability. All screws, nuts and bolts must be
tightened securely and must be checked periodically after
assembly. Failure to assemble properly, or to secure parts
may result in assembly failure and personal injury.
11
WorkZone®Dual Universal Overhead Cabinet
Assembly Instructions
Figure 11
WorkZone
Desk
back
plate (36 )"
stiffener
beam
top shelf &
cabinet door (36 )"
barb clip
top shelf &
cabinet door (30 )"
back
plate (30 )"
#10-32 x /
1
2"
screw & tooth
washer
#8-32 x /
1
2"
screw
grommet
cover
grommet
hole
#8-32 x /
1
2"
screw
grommet
knock-out
7. Carefully set each top shelf/cabinet
door up onto the top mounting
flanges of both cabinet sides. Align
mounting holes and secure using
two #8-32 x 1/2” screws at each end
per cabinet (Figure 11).
8. Position the stiffener bar as
illustrated to the lower rear of each
back shelf, align mounting holes
and secure beam to shelf back
using the required number of
#8-32 x 1/2” screws. Also, at each
end of the stiffener beam, use two
#10-32 x 1/2” screws with tooth
washers and secure the beam to the
top rear of the right- and left-hand
stanchions (Figure 11).
9. Orient the back plates as illustrated
behind each cabinet, then hang it
onto the back of the cabinet such
that the top vertical flange of the
back plate captures the top inside
edge of the shelf back. Use the two
barb clips provided per cabinet and
press them up at the underside of
the cabinet to attach the bottom of
each back plate to the bottom, rear
of the corresponding shelf back
(Figure 11).
10. Take grommets removed in step one
and remove the knock-outs from
each. Snap the grommets back into
place in the grommet hole at the
installed stanchions (Figure 11).

12
Assemble units as described herein only. To do otherwise
may result in instability. All screws, nuts and bolts must be
tightened securely and must be checked periodically after
assembly. Failure to assemble properly, or to secure parts
may result in assembly failure and personal injury.
WorkZone®Dual Universal Overhead Shelf
Assembly Instructions
Figure 12
#10-32 x /
1
2"
screw
#8-32 x /
1
2"
screw
shelf side
(right-hand)
shelf side
(left-hand)
right-hand
stanchion
WorkZone
Desk
left-hand
stanchion
center
stanchion
shelf side
(right-hand)
shelf side
(left-hand)
stanchion
inser
t (outer)
stanchion
insert (inner)
grommet
hole
grommet
cover
#12 x 1"
screw
Dual Universal Overhead Shelf
Installation
Important: WorkZone desk must be
fully assembled prior to installing the
dual overhead shelf unit.
Note: Dual overhead shelf
installations onto 72” long desks
will have two 36” long shelves
mounted onto three stanchions, with
the center stanchion being “centered”
on the desk. Installations onto 66”
long desks will have one 36”
long shelf and one 30” long shelf
mounted onto three stanchions, with
the “center” stanchion being installed
off-set by 3”, so it is not centered
on the desk. The installation below
covers installation onto a 66” long
desk.
1. Begin by removing grommet covers
from the back sides at the top of the
desk where the overhead cabinet will
install (Figure 12).
2. Reference Figure 12 below to identify
the left-, right-hand and center
stanchions, as well as the left- and
right-hand shelf sides. One side
of the desk at a time, position the
appropriate stanchion as illustrated
such that the lower mounting bracket
of the stanchion inserts into the
grommet hole. Align the mounting
holes in the bracket with the holes
in the top of the leg and secure
using two #10-32 x 1/2” screws.
Next, install the center stanchion
as illustrated to the underside of
the desk using two #12 x 1” screws
at the pre-drilled holes. As noted
above, for 66” desks, the center
stanchion will mount 3” off center on
the desk (Figure 12).
3. Orient the right- and left-hand cabinet
sides as illustrated, then nest them
into the tops of the stanchions and
align the mounting holes. Secure
from the inside using two
#8-32 x 1/2” screws at each stanchion
side (Figure 12).

Assemble units as described herein only. To do otherwise
may result in instability. All screws, nuts and bolts must be
tightened securely and must be checked periodically after
assembly. Failure to assemble properly, or to secure parts
may result in assembly failure and personal injury.
13
WorkZone®Dual Universal Overhead Shelf
Assembly Instructions
Note: For installations of dual
overhead shelves onto 66” long
desks, one shelf back will be 36”
and the other will be 30”. The center
stanchion should be installed to
accommodate the size differences.
4. Position shelf backs as illustrated,
with studs facing the rear. Orient the
shelf backs into position, inserting
the studs on the backs through the
mounting holes in rear flanges of
both sets of installed shelf sides.
Use six #10-24 serrated nuts per
shelf back to secure backs to sides
(Figure 13).
5. Place the shelf bottoms into position
between the shelf sides, above the
lower mounting flanges and tight to
the installed shelf backs. Nest the
bottom shelves down onto both shelf
sides lower mounting flanges and
align mounting holes. Secure each
bottom shelf to the shelf sides from
underneath, at each end using two
#8-32 x 1/2” screws (Figure 13).
6. At the lower rear of each shelf back,
secure the shelf back to the rear edge
of the bottom shelf using two
#8-32 x 1/2” screws as illustrated
(Figure 13).
Figure 13
#8-32 x /
1
2"
screw
shelf
bottom (36 )"
#8-32 x /
1
2"
screw
#10-24
serrated nut
shelf
bottom (30 )"
shelf
back (36
)"
shelf
back (30 )"
#8-32 x /
1
2"
screw

14
Assemble units as described herein only. To do otherwise
may result in instability. All screws, nuts and bolts must be
tightened securely and must be checked periodically after
assembly. Failure to assemble properly, or to secure parts
may result in assembly failure and personal injury.
WorkZone®Dual Universal Overhead Shelf
Assembly Instructions
7. Position the stiffener bar as
illustrated to the lower rear of each
back shelf, align mounting holes
and secure beam to shelf back using
the required number of #8-32 x 1/2”
screws. Also, at each end of the
stiffener beam, use two #10-32 x 1/2”
screws with tooth washers and
secure the beam to the top rear of
the right- and left-hand stanchions
(Figure 14).
8. Orient the back plates as illustrated
behind each shelf unit, then hang
each onto the back of the shelf backs
such that the top vertical flange of
the back plate captures the top inside
edge of the shelf back. Use the two
barb clips provided per shelf unit
and press them up at the underside
of the cabinet to attach the bottom
of each back plate to the bottom,
rear of the corresponding shelf back
(Figure 14).
9. Take grommets removed in step one
and remove the knock-outs from
each. Snap the grommets back into
place in the grommet hole at the
installed stanchions (Figure 14).
Figure 14
back
plate (36 )"
stiffener
beam
barb clip
back
plate (30 )"
#10-32 x /
1
2"
screw & tooth
washer
#8-32 x /
1
2"
screw
grommet
cover
grommet
hole
grommet
knock-out
WorkZone
Desk

Assemble units as described herein only. To do otherwise
may result in instability. All screws, nuts and bolts must be
tightened securely and must be checked periodically after
assembly. Failure to assemble properly, or to secure parts
may result in assembly failure and personal injury.
15
WorkZone®Corner Universal Overhead Cabinet
Assembly Instructions
corner overhead
mounting tube
grommet
covers
Figure 15
right-hand
stanchion
left-hand
corner
stanchion
#10-32 x /
1
2"
screw
#8-32 x /
1
2"
screw
cabinet side
(right-hand)
cabinet side
(left-hand)
stanchion
insert (inner)
stanchion
inser
t (outer)
grommet
hole
#12 x 1 /
3
4"
screw
Corner Universal Overhead
Cabinet Installation
Important: WorkZone corner desk
must be fully assembled prior to
installing the overhead unit.
Note: Determine if your cabinet
installation is specified as right- or
left-hand. This instruction covers
right, though left-hand cabinet
installation is similar but it will have
a different set of stanchions.
1. Begin by removing grommet covers
from the back corner, and back side at
the top of the corner desk where the
overhead cabinet will install
(Figure 15).
2. At the rear corner, from underneath
the worksurface, position the
corner overhead mounting tube as
illustrated and align to pre-drilled
holes. Install using two #12 x 13/4”
screws (Figure 15).
3. Reference Figure 15 below to identify
the corner stanchion (left-hand) and
the right-hand stanchion, as well as
the left- and right-hand cabinet sides
(Figure 15).
4. Position the corner stanchion
(left-hand) as illustrated such that
the lower mounting bracket of the
stanchion inserts into the grommet
hole. Align the mounting holes in the
bracket with the holes in the installed
corner overhead mounting tube.
Secure stanchion bracket to corner
overhead mounting tube using two
#10-32 x 1/2” screws (Figure 15).
5. Position the right-hand stanchion
with the bracket through the grommet
hole, aligning the mounting holes
in the bracket with the mounting
holes in the top of the right-hand leg.
Secure bracket to leg using two
#10-32 x 1/2” screws (Figure 15).
6. Orient the right- and left-hand cabinet
sides as illustrated, then nest them
into the tops of the stanchions and
align the mounting holes. Secure
from the inside using two
#8-32 x 1/2” screws at each stanchion
side (Figure 15).

16
Assemble units as described herein only. To do otherwise
may result in instability. All screws, nuts and bolts must be
tightened securely and must be checked periodically after
assembly. Failure to assemble properly, or to secure parts
may result in assembly failure and personal injury.
WorkZone®Corner Universal Overhead Cabinet
Assembly Instructions
7. Position cabinet back as illustrated,
with studs facing the rear. Orient
the cabinet back into position,
inserting the studs on the cabinet
back through the mounting holes in
rear flanges of both installed cabinet
sides. Use six #10-24 serrated nuts
to secure back to sides (Figure 16).
8. Place the shelf bottom into position
between the cabinet sides, above the
lower mounting flanges and tight
to the installed shelf back. Nest the
bottom shelf down onto both cabinet
sides lower mounting flanges and
align mounting holes. Secure the
bottom shelf to the cabinet sides
from underneath, at each end using
two #8-32 x 1/2” screws (Figure 17).
9. At the lower rear of the shelf back,
secure the shelf back to the rear edge
of the bottom shelf using two
#8-32 x 1/2” screws (Figure 17).
Figure 16
right-hand
stanchion
left-hand
corner
stanchion
WorkZone
Corner Desk
#10-24
serrated nut
#10-24
serrated nut
cabinet side
(right-hand)
cabinet side
(left-hand)
cabinet
back
WorkZone
Corner Desk
Figure 17
cabinet side
(right-hand)
cabinet side
(left-hand)
right-hand
stanchion
left-hand
stanchion
cabinet
back
shelf
bottom
#8-32 x /
1
2"
screw
#8-32 x /
1
2"
screw

Assemble units as described herein only. To do otherwise
may result in instability. All screws, nuts and bolts must be
tightened securely and must be checked periodically after
assembly. Failure to assemble properly, or to secure parts
may result in assembly failure and personal injury.
17
WorkZone®Corner Universal Overhead Cabinet
Assembly Instructions
10. Carefully set the top shelf/cabinet
door up onto the top mounting
flanges of both cabinet sides. Align
mounting holes and secure using
two #8-32 x 1/2” screws at each end
(Figure 18).
11. Position the stiffener bar as
illustrated to the lower rear of the
back shelf, align mounting holes
and secure beam to shelf back
using the required number of
#8-32 x 1/2” screws. Also, at each
end of the stiffener beam, use two
#10-32 x 1/2” screws with tooth
washers and secure the beam to the
top rear of the right- and left-hand
stanchions (Figure 18).
12. Orient the back plate as illustrated
behind the cabinet, then hang it
onto the back of the cabinet such
that the top vertical flange of the
back plate captures the top inside
edge of the shelf back. Use the two
barb clips provided and press them
up at the underside of the cabinet to
attach the bottom of the back plate
to the bottom, rear of the shelf back
(Figure 18).
13. Take grommets removed in step one
and remove the knock-outs from
each. Snap the grommets back into
place in the grommet hole at the
installed stanchions (Figure 18).
WorkZone
Corner Desk
Figure 18
#8-32 x /
1
2"
screw
#10-32 x /
1
2"
screw & tooth
washer
& cabinet door
top shelf
& cabinet door
back
plate
stiffener
beam
barb clip
grommet
hole
grommet
knock-out
grommet
cover

18
Assemble units as described herein only. To do otherwise
may result in instability. All screws, nuts and bolts must be
tightened securely and must be checked periodically after
assembly. Failure to assemble properly, or to secure parts
may result in assembly failure and personal injury.
WorkZone®Corner Universal Overhead Shelf
Assembly Instructions
corner overhead
mounting tube
grommet
covers
Figure 19
right-hand
stanchion
left-hand
corner
stanchion
#10-32 x /
1
2"
screw
#8-32 x /
1
2"
screw
shelf side
(right-hand)
shelf side
(left-hand)
stanchion
insert (inner)
stanchion
inser
t (outer)
grommet
hole
#12 x 1 /
3
4"
screw
Corner Universal Overhead Shelf
Installation
Important: WorkZone corner desk
must be fully assembled prior to
installing the overhead unit.
Note: Determine if your cabinet
installation is specified as right- or
left-hand. This instruction covers
right, though left-hand cabinet
installation is similar but it will have
a different set of stanchions.
1. Begin by removing grommet covers
from the back corner, and back side
at the top of the corner desk where
the overhead cabinet will install
(Figure 19).
2. At the rear corner, from underneath
the worksurface, position the
corner overhead mounting tube as
illustrated and align to pre-drilled
holes. Install using two #12 x 13/4”
screws (Figure 19).
3. Reference Figure 19 below to identify
the corner stanchion (left-hand) and
the right-hand stanchion, as well as
the left- and right-hand cabinet sides
(Figure 19).
4. Position the corner stanchion
(left-hand) as illustrated such that
the lower mounting bracket of the
stanchion inserts into the grommet
hole. Align the mounting holes in the
bracket with the holes in the installed
corner overhead mounting tube.
Secure stanchion bracket to corner
overhead mounting tube using two
#10-32 x 1/2” screws (Figure 19).
5. Position the right-hand stanchion
with the bracket through the grommet
hole, aligning the mounting holes
in the bracket with the mounting
holes in the top of the right-hand leg.
Secure bracket to leg using two
#10-32 x 1/2” screws (Figure 19).
6. Orient the right- and left-hand cabinet
sides as illustrated, then nest them
into the tops of the stanchions and
align the mounting holes. Secure
from the inside using two
#8-32 x 1/2” screws at each stanchion
side (Figure 19).

Assemble units as described herein only. To do otherwise
may result in instability. All screws, nuts and bolts must be
tightened securely and must be checked periodically after
assembly. Failure to assemble properly, or to secure parts
may result in assembly failure and personal injury.
19
WorkZone®Corner Universal Overhead Shelf
Assembly Instructions
7. Position cabinet back as illustrated,
with studs facing the rear. Orient
the cabinet back into position,
inserting the studs on the cabinet
back through the mounting holes in
rear flanges of both installed cabinet
sides. Use six #10-24 serrated nuts
to secure back to sides (Figure 21).
8. Place the shelf bottom into position
between the cabinet sides, above the
lower mounting flanges and tight
to the installed shelf back. Nest the
bottom shelf down onto both cabinet
sides lower mounting flanges and
align mounting holes. Secure the
bottom shelf to the cabinet sides
from underneath, at each end using
two #8-32 x 1/2” screws (Figure 22).
9. At the lower rear of the shelf back,
secure the shelf back to the rear edge
of the bottom shelf using two
#8-32 x 1/2” screws (Figure 22).
Figure 21
right-hand
stanchion
left-hand
corner
stanchion
WorkZone
Corner Desk
#10-24
serrated nut
#10-24
serrated nut
shelf
(right-hand)
shelf side
(left-hand)
shelf
back
WorkZone
Corner Desk
Figure 22
shelf side
(right-hand)
shelf side
(left-hand)
right-hand
stanchion
left-hand
stanchion
shelf
back
shelf
bottom
#8-32 x /
1
2"
screw
#8-32 x /
1
2"
screw

20
Assemble units as described herein only. To do otherwise
may result in instability. All screws, nuts and bolts must be
tightened securely and must be checked periodically after
assembly. Failure to assemble properly, or to secure parts
may result in assembly failure and personal injury.
WorkZone®Corner Universal Overhead Shelf
Assembly Instructions
10. Position the stiffener bar as
illustrated to the lower rear of the
back shelf, align mounting holes
and secure beam to shelf back
using the required number of
#8-32 x 1/2” screws. Also, at each
end of the stiffener beam, use two
#10-32 x 1/2” screws with tooth
washers and secure the beam to the
top rear of the right- and left-hand
stanchions (Figure 23).
11. Orient the back plate as illustrated
behind the cabinet, then hang it
onto the back of the cabinet such
that the top vertical flange of the
back plate captures the top inside
edge of the shelf back. Use the two
barb clips provided and press them
up at the underside of the cabinet to
attach the bottom of the back plate
to the bottom, rear of the shelf back
(Figure 23).
12. Take grommets removed in step one
and remove the knock-outs from
each. Snap the grommets back into
place in the grommet hole at the
installed stanchions (Figure 23).
WorkZone
Corner Desk
Figure 23
#8-32 x /
1
2"
screw
#10-32 x /
1
2"
screw & tooth
washer
back
plate
stiffener
beam
barb clip
grommet
hole
grommet
knock-out
grommet
cover
Other manuals for WorkZone Series
1
Table of contents
Other KI Indoor Furnishing manuals

KI
KI InTandem User manual

KI
KI Hiatus Sleeper Bench User manual

KI
KI 700 Series User manual

KI
KI Design Itoki DD User manual

KI
KI USPF2324 User manual

KI
KI WorkUp HF User manual

KI
KI Altus Task Seating Installation instructions

KI
KI Enlite Nesting Table User manual

KI
KI Pirouette User manual

KI
KI CafeWay ECELP Maintenance manual