manuals.online logo
Brands
  1. Home
  2. •
  3. Brands
  4. •
  5. KI
  6. •
  7. Indoor Furnishing
  8. •
  9. KI 700 Series User manual

KI 700 Series User manual

Assemble units as described herein only. To do otherwise
may result in instability. All screws, nuts and bolts must be
tightened securely and must be checked periodically after
assembly. Failure to assemble properly, or to secure parts
may result in assembly failure and personal injury.
Assembly Instructions
KI 700 Series/E-Series/Areus/System Wall Pedestals
Worksurface Supporting & Mobile Pedestals
August 2020
Worksurface Supporting
Pedestal - Installation to
Worksurface
Method “A”
1. To avoid scratching the
worksurface, place face down on a
soft protective surface (Figure 1).
Note: For installation of pedestal
to worksurface without holes
pre-drilled to underside, see
Figure 3, next page.
2. Determine on which side of the
worksurface the pedestal will install
to, then twist four hanger bolts into
the worksurface pedestal holes.
Caution: Do not over-tighten bolts.
3. Position pedestal so hanger bolts
insert through top of pedestal at
larger opening of keyhole slots.
Then slide pedestal back to engage
four hanger bolts in smaller slot of
keyholes (Figure 1).
4. Open top drawer of pedestal and
locate front, center hole in pedestal.
Make sure pedestal mounting
hole aligns with predrilled hole in
worksurface and install thumbscrew
through pedestal, into worksurface
to secure pedestal in place (Detail A).
5. Once pedestal is secured to
underside of worksurface, and
worksurface is right-side up at its
final location on-site, adjust the
four glides under the pedestal to
achieve a level, stable worksurface.
Method “B”
Note: This method should be used
only when attaching a pedestal to
worksurface that cannot be placed
face down on the floor.
1. Follow notes and instructions
in Method “A” excluding step 1
(Figure 2).
Caution: To avoid injury this
operation requires more than one
person to install pedestal.
worksurface
thumbscrew
hole hanger
bolt
pedestal
thumbscrew
Method “B”
Figure 2
Method “A”
Figure 1
hanger
bolt
worksurface
pedestal
adjustable
glide
thumbscrew
hole
thumbscrew
adjustable
glide
predrilled hole
thumbscrew
Detail A
Assemble units as described herein only. To do otherwise
may result in instability. All screws, nuts and bolts must be
tightened securely and must be checked periodically after
assembly. Failure to assemble properly, or to secure parts
may result in assembly failure and personal injury.
2
Mounting Worksurface Supporting Pedestal
Assembly Instructions
edge of pedestal
9 /”
3
8
2 /”
13 16
7 /”
12
1 /”
1
16 1 /”
9
16
15 / ” (for 20” pedestal)
15
16
19 / ” (for 24” pedestal)
15
16
22 / ” (for 30” pedestal)
15
16
front edge of worksurface
Figure 4
Figure 3
Mobile Pedestal - Casters
Installation
Note: Five casters are provided
for installation to the base of the
mobile pedestal. The four larger
casters will thread into the four
corners. One small anti-tip, 5th
wheel caster will fasten to the front
of the drawer body for all pedestals
that contain only one file drawer.
1. Thread the four larger casters into
the inner-most weld-nuts at each
corner of the pedestal base
(Detail B). Position two casters
with locking brakes at the front
of the unit. Be sure to twist the
caster shank in tight such that the
shoulder of the shank is flush and
tight to the weld-nut (Figure 4).
2. If applicable, extend the bottom
pedestal drawer out to expose
the 5th wheel mounting location.
Fasten the anti-tip 5th wheel caster
to the drawer bracket and secure
firmly in place with the 5/16-18 lock
washer nut (Figure 4).
21150-3
non-locking
caster
anti-tip
5th wheel
caster
Detail B
pedestal
/ -18 lock
5
16
washer nut
caster with
locking brake
caster with
locking brake
1330 Bellevue Street • P.O. Box 8100 • Green Bay, WI 54308-8100 • Tel 1-800-424-2432 • www.ki.com
© 2020 Krueger International, Inc. All Rights Reserved • Code KI-60041R3/KI/PDF/0820
Note: Drill all holes using a 3/16”
diameter drill bit. Bore holes no
deeper than 3/8” into underside
of worksurface. To avoid piercing
through the top, add a depth-gauge
to the drill bit by wrapping tape
around the bit.

This manual suits for next models

2

Other KI Indoor Furnishing manuals

KI Enlite ENRC Series User manual

KI

KI Enlite ENRC Series User manual

KI All Terrain ATSW45 User manual

KI

KI All Terrain ATSW45 User manual

KI Ruckus Desk User manual

KI

KI Ruckus Desk User manual

KI Unite System User manual

KI

KI Unite System User manual

KI Uniframe Table Guide

KI

KI Uniframe Table Guide

KI CafeWay ECELP User manual

KI

KI CafeWay ECELP User manual

KI Trek User manual

KI

KI Trek User manual

KI Tattoo Pedestal User manual

KI

KI Tattoo Pedestal User manual

KI Enlite Nesting Table User manual

KI

KI Enlite Nesting Table User manual

KI Unite System User manual

KI

KI Unite System User manual

KI CrossRoads Metal Media Shelving Single Face User manual

KI

KI CrossRoads Metal Media Shelving Single Face User manual

KI Pirouette User manual

KI

KI Pirouette User manual

KI 700 Series User manual

KI

KI 700 Series User manual

KI InTandem Leg-Mounted CPU Holder User manual
KI

KI InTandem Leg-Mounted CPU Holder User manual

KI Grazie Installation guide

KI

KI Grazie Installation guide

KI Altus Task Seating Installation instructions

KI

KI Altus Task Seating Installation instructions

KI Toggle SS User manual

KI

KI Toggle SS User manual

KI 700 Series User manual

KI

KI 700 Series User manual
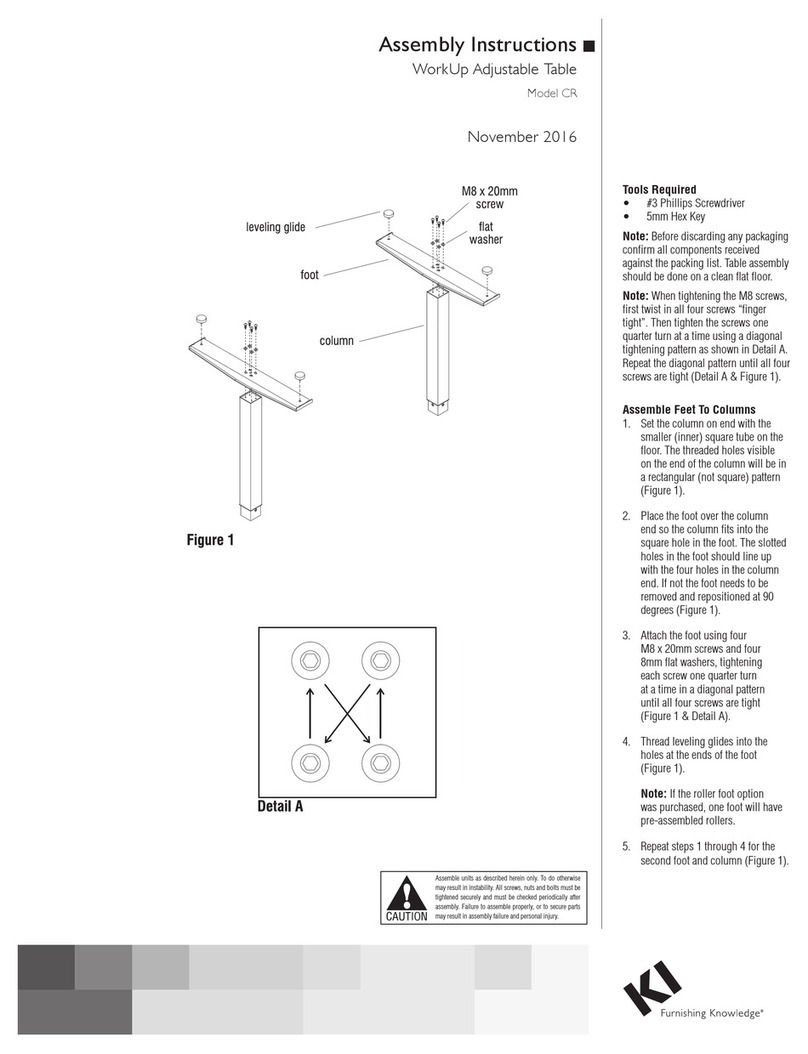
KI Aristotle Casegoods Overhead Paper Sorter User manual

KI

KI Aristotle Casegoods Overhead Paper Sorter User manual

KI Rapture Stack Chair User manual

KI

KI Rapture Stack Chair User manual

KI CafeWay ECRCB Maintenance manual

KI

KI CafeWay ECRCB Maintenance manual

KI Oath Installation instructions

KI

KI Oath Installation instructions

KI Design Itoki DD User manual

KI

KI Design Itoki DD User manual

KI Doni User manual

KI

KI Doni User manual

Popular Indoor Furnishing manuals by other brands

Emmezeta MAX 610948 Assembly instructions

Emmezeta

Emmezeta MAX 610948 Assembly instructions

Furniture of America Cameron CM-BK929F Assembly instructions

Furniture of America

Furniture of America Cameron CM-BK929F Assembly instructions

Rauch M2609 Assembly instructions

Rauch

Rauch M2609 Assembly instructions

LDI Spaces SAFCO Zippi 3386 Assembly instructions

LDI Spaces

LDI Spaces SAFCO Zippi 3386 Assembly instructions

DAVIS Sola Series quick start guide

DAVIS

DAVIS Sola Series quick start guide

FourStarGroup 11224539V quick start guide

FourStarGroup

FourStarGroup 11224539V quick start guide

TCC BELITE operating instructions

TCC

TCC BELITE operating instructions

Lifestyle SOFA Assembly instructions

Lifestyle

Lifestyle SOFA Assembly instructions

Ave Six CARRINGTON CAR51A Assembly instructions

Ave Six

Ave Six CARRINGTON CAR51A Assembly instructions

Moebelix LDXM01-0001 Assembling Instruction

Moebelix

Moebelix LDXM01-0001 Assembling Instruction

Milwaukee 48-22-8510 series Operator's manual

Milwaukee

Milwaukee 48-22-8510 series Operator's manual

CTA LETEUKE FURNITURE 240 user manual

CTA

CTA LETEUKE FURNITURE 240 user manual

Ovela OVKIDSSWWA user guide

Ovela

Ovela OVKIDSSWWA user guide

Silverwood Swivel Vanity Seat with Crossbar CPFV1142 Assembly instructions

Silverwood

Silverwood Swivel Vanity Seat with Crossbar CPFV1142 Assembly instructions

Whittier Wood Furniture McKenzie 1372GACI Assembly instructions

Whittier Wood Furniture

Whittier Wood Furniture McKenzie 1372GACI Assembly instructions

Furniture Values International aspenhome I39-300T Assembly instructions

Furniture Values International

Furniture Values International aspenhome I39-300T Assembly instructions

Symmetry Voyager user guide

Symmetry

Symmetry Voyager user guide

OYPLA Home 3879 user manual

OYPLA Home

OYPLA Home 3879 user manual

manuals.online logo
manuals.online logoBrands
  • About & Mission
  • Contact us
  • Privacy Policy
  • Terms and Conditions

Copyright 2025 Manuals.Online. All Rights Reserved.