Kohler K-EX27460T-NW-CP User manual

安装说明书
科勒(中国)投资有限公司
中国上海市静安区江场三路158号 邮编:200436
制造商:上海科勒电子科技有限公司
中国上海市宝山区丰翔路1955号 邮编:200444
COMPONENTS DM SENSOR FCT 0.5GPM-BN
COMPONENTS DM SENSOR FCT COLD 0.5GPM
COMPONENTS DM SENSOR FCT COLD 0.35GPM
艺廷台盆感应龙头(单冷/1.9升)
艺廷台盆感应龙头(单冷/不含电源盒/1.4升)
艺廷台盆感应龙头(单冷/1.9升)罗曼银
Desk-mount Sensor
COMPONENTS DM SENSOR FCT 0.5GPM-AF
COMPONENTS DM SENSOR FCT 0.5GPM-BL
艺廷台盆感应龙头(单冷/1.9升)法兰金
艺廷台盆感应龙头(单冷/1.9升)原色黑
安装之前
All information is based on the latest product information
available at the time of publication. Kohler Co. reserves
the right to make changes in product characteristics,
packaging, or availability at any time without notice.
Please leave these instructions for the consumer. They
contain important information.
BEFORE YOU BEGIN
1451062-T01-B 1
K-EX27460T-NW-CP
K-EX27460T-NWS3-CP
K-EX27460T-NW-BN
K-EX27460T-NW-AF
K-EX27460T-NW-BL
所有的资料是按最新出版的产品资料编写而成。
科勒公司保留任何时候不经通知即可改变产品特
性、包装或产品可供类型的权利。
说明书包括重要的安装、保养及清洁方面的内容,
请把这些资料交给用户阅读。
艺廷台盆感应龙头(单冷/1.9升)
COMPONENTS DM SENSOR FCT COLD 0.5GPM
艺廷台盆感应龙头(单冷/不含电源盒/1.4升)
COMPONENTS DM SENSOR FCT COLD 0.35GPM
艺廷台盆感应龙头(单冷/1.9升)罗曼银
COMPONENTS DM SENSOR FCT 0.5GPM-BN
艺廷台盆感应龙头(单冷/1.9升)法兰金
COMPONENTS DM SENSOR FCT 0.5GPM-AF
艺廷台盆感应龙头(单冷/1.9升)原色黑
COMPONENTS DM SENSOR FCT 0.5GPM-BL
K-EX27460H-NW-CP
K-EX27460H-S3-CP
K-EX27460H-NW-BN
K-EX27460H-NW-AF
K-EX27460H-NW-BL

注意:
请勿将龙头安装在台面上,同
时搭配台上盆。
Note:
please do not install the faucet on the table
and match the washbasin
手伸到出水口下方感应范围内
(感应距离随面盆、周围的情况
而自动调节),水龙头出水。手
离开0.5~2秒后,水龙头自动止
水。
Put your hand in the sensing -range, the faucet
should turn on. The faucet should turn off after
removal within 0.5~2 seconds. The sensing
distance will be adjusted automatically according
to the condition of the lavatory and surrounding
environment.
OPERATION INSTRUCTIONS
8. Cover the sensingwindow with black tapewhen repairing
lavatories.
8. 修理面盆时,用黑色电工胶布粘住感应窗口。
9. 维修交流龙头时,必须断开交流电源并关闭
水源。 9. Turn off the electrical source and shut down water supply
before the faucets repaired.
6. As for AC type faucets, strictly follow indicated instructions
to perform electric connection. Only provide electric supply
to power box after the installation is completed.
7. One AC/DC transformer for max.one faucets.
7. 一个交流电源盒最多可供一个感应龙头。
2 1451062-T01-B
6. 对于交流龙头,安装时务必按照说明书的要
求正确连接导线,龙头安装完毕后才可向电源盒
供电。
注意事项
1. 一定要先彻底冲洗供水管以清除管道中的杂
质。使用水源为自来水或可供饮用水。
2.请勿将强力及冲击施于产品,以免造成故障,
引起漏水。
3.安装、清洁龙头时,切勿损伤感应窗口表面,
以免造成故障。
4.如果是安装新的洗面盆,可将水龙头和排水组
件先安装好到面盆上。
5. 对于直流龙头,安装时注意电池的正负极不能
装反,电池盒盖要拧紧,防止电池受潮。
1. Flush thewater supply pipes thoroughly to remove debris.
Faucet is designed for tap water or potable water.
2. Do not strike the faucet with rough strength to avoid being
damaged.
3. Do not damage the surface of sensing window when
installing or cleaning the faucet.
4. For new installations, install the faucet and drain to the
lavatory before installing the lavatory.
5. As for DC type faucets, please pay special attention to
insert direction match of battery poles. Tighten the battery
cover completely to prevent its exposure to moisture.
Notes:

安装尺寸 ROUGH-IN DIMENSIONS
艺廷 艺廷
173.8 206
台盆顶面
G1/2
Please prepare external
thread angle valve G1/2
220V交流电Connect
AC 220V
穿线管
Wire Tube
开关
Switch
台盆顶面
G1/2
Please prepare external
thread angle valve G1/2
173.8 206
1451062-T01-B 3
排水组件
φ41.2
φ54
φ31.75
226
φ66.5
72
54
Output: DC6V
输出:
直流电压6V
Input: AC220V
输入:
交流电压220V
36.5
105±5
26844T-NA
DC Power Unit
直流电源盒
Output: DC6V
直流电压6V
26845T-NA
AC/DC Transformer
交流电源盒
The Drain
注:交/直流电源盒需另购。 NOTE: AC/DC transformer and DC power Unit
need purchasing.
206
173.8
167.7
196.6
28.5
60

INSTALLATION
1.
(2) (3)
(4)
(8) (1)
(5)
(6) (7)
(2) (8)
(1)
How to Install the Faucet
1. Fixing the faucet and lavatory
Install the mounting tube (2) to the bottom
of the faucet (3), then slip the washer (4)
over the mounting tube and put them into
the groove on the spout. Insert the power
wire (8) and supply hose (1) into the
hole from underside of the lavatory.
From underside of the lavatory, slide the
washer (5), meter washer (6) and fixed
ring (7) onto the mounting tube (2).
Tighten screw to make faucet installed on
the lavatory.
4 5 (LR06×4)
220V 50/60Hz
0.75
0.5~1
0.1MPa 2.0L/min
1
1 ~55°C
0.5~71°C
0.05~
0.86MPa
PARAMETERS
Power: DC 4 pieces of AA size alkaline batteries
AC 220V, 50/60Hz
Senser Duration: Less than 0.75s
Shut-off Delay: 0.5~1s
Sensing Distance: Automatic adjustment
Flow Rate: No more than 2.0L/min at 0.1MPa.
Overtime Flowing Control: Automatically stop flushing when
the faucet senses an object for more than 1 minute
continuously
Ambient Temperature: 1~55°C
Supply Water Temperature: 0.5~71°C
Supply Water Pressure: 0.05~0.86MPa
2. Fasten control valve assembly
Unscrew valve cover screws (11) by
screwdriver, open valve cover (10).
Determine control box assembly (9)
installation location per rough-in; then
drill holes, and punch plastic expansion
tube (12) in. Place valve box against
the wall and then mount control valve
assembly on the wall by expansion
screws (13). Keep control box assembly
parallel to the wall.
9
11
10
13
12
2. 控制阀组件的安装固定
拧松 11
10
9
12
13
螺管
螺管
固定环
管
螺
用十字螺丝刀
螺丝 在面盆上。
4 1451062-T01-B
4
3
5
6
8
7
1
2

14
15
滤网组件
Filter Assy
14
15
1. Customer shall prepare check valve.
2. Do not mix water inlet with water outlet.
Connect check valve (14) to outlet, then
connect the hose (15) to check valve
(14). Put a bucket in the front of hose
(15). Keep check valve (14) fully open,
turn on the water supply for about 1 min,
make sure no leakage on pipeline, and
then turn off the water supply.
Then connect check valve (15) to valve
outlet to faucet assembly water outlet
hose (
Note:
14
15 14
15 14
(15)
(16)。
1.
2.
二 安装电源盒组件
16).
16
1451062-T01-B 5
Connect to
electrical Source
接交流电源
Connect to
electrical Source
接交流电源
AC220V接入直流DC接线端。
Connect to
Faucet
Connect to
Faucet
Note: Not allowed connect AC 220V electrical source to DC wire connector of AC/DC transformer
注:交流电源盒需另购。 Note: AC/DC transformer need to buy separately.
220V交流电Connect
AC 220V
穿线管
Wire Tube
开关
Switch
1.安装交流电源盒组件
Install AC power unit assembly
Install power unit assembly

6 1451062-T01-B
1.Suggested wire: AC connection wire should with insulated
protecting layer or sleeve and the section should be bigger
than 0.5mm2. The section of DC connection wire should be
bigger than 0.3mm2. The connection pattern must according
to illustrations above.
2. After wire layout finished, check and repair if needed.
Then connect AC connector of AC/DC transformer to
electrical source from the control box, and DC connector
of AC/DC transformer to control assembly. Turn on AC
electrical power, faucet will be in the period of automatic
adjusting sensing distance (about 6~50 seconds). The
faucet will not work during this period.
1.建议交流电源线采用带绝缘和护套层的电线,导
体标称截面积 0.5mm2;直流连接线采用导体标
称截面积 0.3mm2的电线。请严格按照上图进行
连接。
2. 排线完毕后,应检查并确保所有排、接线无误,
再分别连接电源盒AC接线端与排线管内交流接线
端,以及电源盒DC接线端(黑橙线接头)与控制组
件的电源线接插件(从阀盒内引出的电线).最 后
打开AC电源,龙头进入6~50秒自动调距阶段,
此过程龙头不会出水。
2.安装直流电池盒组件
Install DC power unit assembly
1. 取出电池盒组件,旋松螺钉(17),
按电池盒盖(18)上的正负极标示装
入4节5号电池,紧锁电池盒盖(18)
注意:电池极性不能装反,新旧电
池不能混用。
的螺钉(17)后。
1.
18
18
17 4
17
18 Install Batteries
3.接线并固定控制盒组件
Cabling and fix the control box
电源盒组件
Power unit assebly
1. 将交流或直流电源盒组件放入
控制盒内。
1. Assemble AC or DC power unit
assembly into control box.

1451062-T01-B 7
三 如何安装排水组件 How to Install the Drain
19
20
旋下排水器盘片(19),在其底面沿
周围涂上一圈密封油灰。把排水本
体(20)由底下插入面盆。
Screw off the drain flange (19) from drain.
Apply a ring of plumbers putty around
underside of the drain flange (19). Insert
the drain body (20) into the lavatory from
the underside.
19
20
21
会破坏油灰密封。
Thread the drain flange (19) onto the drain
Body (20). Tighten the locknut (21) by hand
from the underside of the fixture. Remove
any excess putty.
Note: Do not try to change the position of
the drain after the locknut (21) is tightened,
or you may break the putty seal.
Apply plumbers putty
涂油灰
把排水器盘片(19)旋入排水本体
(20)。从下方用手拧紧锁紧螺母
(21),去除多余的油灰。
注意:在锁紧螺母(21)拧紧后,不
可再调整排水本体的位置,否则将
注:①为交流电源出线口,使用时,
将①的卡扣(薄片状)去除,保证
出线口光滑。
②为龙头感应器出线口。
Note: ①is the outlet of AC power supply.
Remove the clip (lamellar) during the
process of use to ensure the smoothing
of outlet.
②is the outlet of faucet sensor.
2.Cabing and tidying wires such as
power wire assembly,senor wires
assembly and solenoid wire assembly
to right position. Then lock the control
box.
2.如图所示,将电源线,龙头感应器线
及电磁阀线与相应的接线端相连
接。然后整理好线束并锁紧控制盒
盖。
Power wire connector
电磁阀接线端
Solenoid wire connector 电源线接线端 龙头感应线接线端
Sensor wire connector
(1) 大陆版
型号: EX27460T-NW-CP等
(1) Mainland Version
SKU: EX27460T-NW-CP,etc
(2) 香港版
型号: EX27460H-NW-CP等
(2) Hongkong Version
SKU: EX27460H-NW-CP,etc

如何转换成混水感应龙头
(若用户另购三通软管组件
12 98745-SP)
如何转换成恒温阀感应龙头
(若用户另购
恒温阀16294T-3-CP, 具
体安装详见其说明书
)
注:
软管、三通请用户自备。
HOW TO CHANGE TO MIXING SENSOR
FAUCET (If users buy the tee hose assy
1298745-SP)
HOW TO CHANGE TO THERMOSTATIC
SENSOR FAUCET (If users buy the
thermostatic valve 16294T-3-CP, the installation
refer to the manual of 16294T-3-CP)
Note: Please let users prepare the hose and tee by themselves.
建议使用科勒推荐的三通进水软管
组件,否则有冷热水互窜的风险。
It is recommended to use Kohler TEE inlet hose assembly,
otherwise there is a risk of cold and hot water mixing problem.
外螺纹
三通软管组件
用户自备角阀
8 1451062-T01-B
25 Connect the tailpiece (25) to the trap (26).
The tailpiece should extend 25mm to
55mm into the trap.
26
把尾管(25)接上存水弯(26),尾管
需插入存水弯25mm到55mm之间。
把排水器盘片(22)旋入排水体(23)。
从下方用手拧紧锁紧 螺母(24),去
除多余的油灰。
注意:在锁紧螺母(24)拧紧后,不可
再调整排水本体的位置,否则将会
破坏油灰密封。
Thread the drain flange (22) onto the drain
Body (23).Tighten the locknut (24) by hand
from the underside of the fixture. Remove
any excess putty.
Note: Do not try to change the position of
the drain after the locknut (24) is tightened,
or you may break the putty seal.
22
24
旋下排水器盘片(22)在其底面沿周
围涂上一圈密封油灰。把排水本
体(23)由底下插入面盆。
Screw off the drain flange (22) from drain.
Apply a ring of plumbers putty around
underside of the drain flange (22).Insert
the drain body (23) into the lavatory from
the underside.
22
23
Apply plumbers putty
涂油灰
(3) 接尾管
(3) Connect tailpiece

All Finishes: Clean the finish with a mild soap and warm
water. Wipe entire surface completely dry with a clean soft
cloth. Many cleaners may contain chemicals, such as
ammonia, chlorine, toilet cleaner etc. which could adversely
affect the finish and are not recommended for cleaning.
Do not use abrasive cleaners or solvents on Kohler faucets
and fittings.
CLEANING INSTRUCTIONS
有腐蚀性的清洁剂或溶剂不可使用于科勒的水龙
头及其配件上。
适用于所有加工处理过的表面,以中性肥皂水清
洗镀层表面,再以干净的软布彻底擦干整个表面。
许多清洁剂,比如氨水,去污粉及洁厕灵等,会
对电镀表面造成伤害,切忌使用。
安装结果检查
检查并确保所有衔接处都已拧紧,打开排水系统
和主要供水源,检查并修理有漏水的接口。
Check and ensure that all connections are tight. Open the
drain. Turn on main water supply and check for leaks.
Replace as required.
INSTALLATION CHECKOUT
用户须知
1. 感应指示灯的各种闪烁情况
感应指示灯是使用者了解感应龙头有效、
唯一的途径。所以明白了感应指示灯闪烁
所代表的含义,可以正确使用感应龙头,
如图示:
(1) 快速闪烁,代表感应龙头正处于通电后
的6到50秒自动调节阶段。期间,安装
者、使用者不得干扰其自动调节.感应范
围内不要放置物体。
IMPORTANT CONSUMER INFORMATION
1. Note of the Indicator Flashing
The indicator is the only and effective way to
learn the faucet's working conditions. So the
users can use the sensor faucet correctly with
knowing the meaning of the sensor indicator's
flashing.
(1) Fast flashing means the faucet is in the period
of adjusting sensing distance after power on for
6~50s. During this time, please do not put objects
in the sensing range.
清理说明
指示灯
Indicator Light
1451062-T01-B 9
墙面
Wall
接感应龙头
Connect Sensor Faucet
角阀
Stop Valve 三通
Tee
出水口
Outlet
恒温阀
thermostatic valve
进热水
hot
进冷水
cold
注:软管、三通、角阀请用户自备。
角阀
Stop Valve
三通
Tee
三通
Tee
墙面
Wall
MIN 50mm
Note: Please let users prepare the hose、tee and check
Valve by themselves.
外螺纹用户自备角阀 外螺纹用户自备角阀
单向阀滤网组件
单向阀滤网组件

3.清洗过滤系统 3. Clean the Filtration System
The faucet includes connector assembly with high quality
filtration system. If there is a lot of debris in the supply pipes
or the quality of water is bad, it will cause the flow in bad
condition. Please clean th filtration system as following
steps:
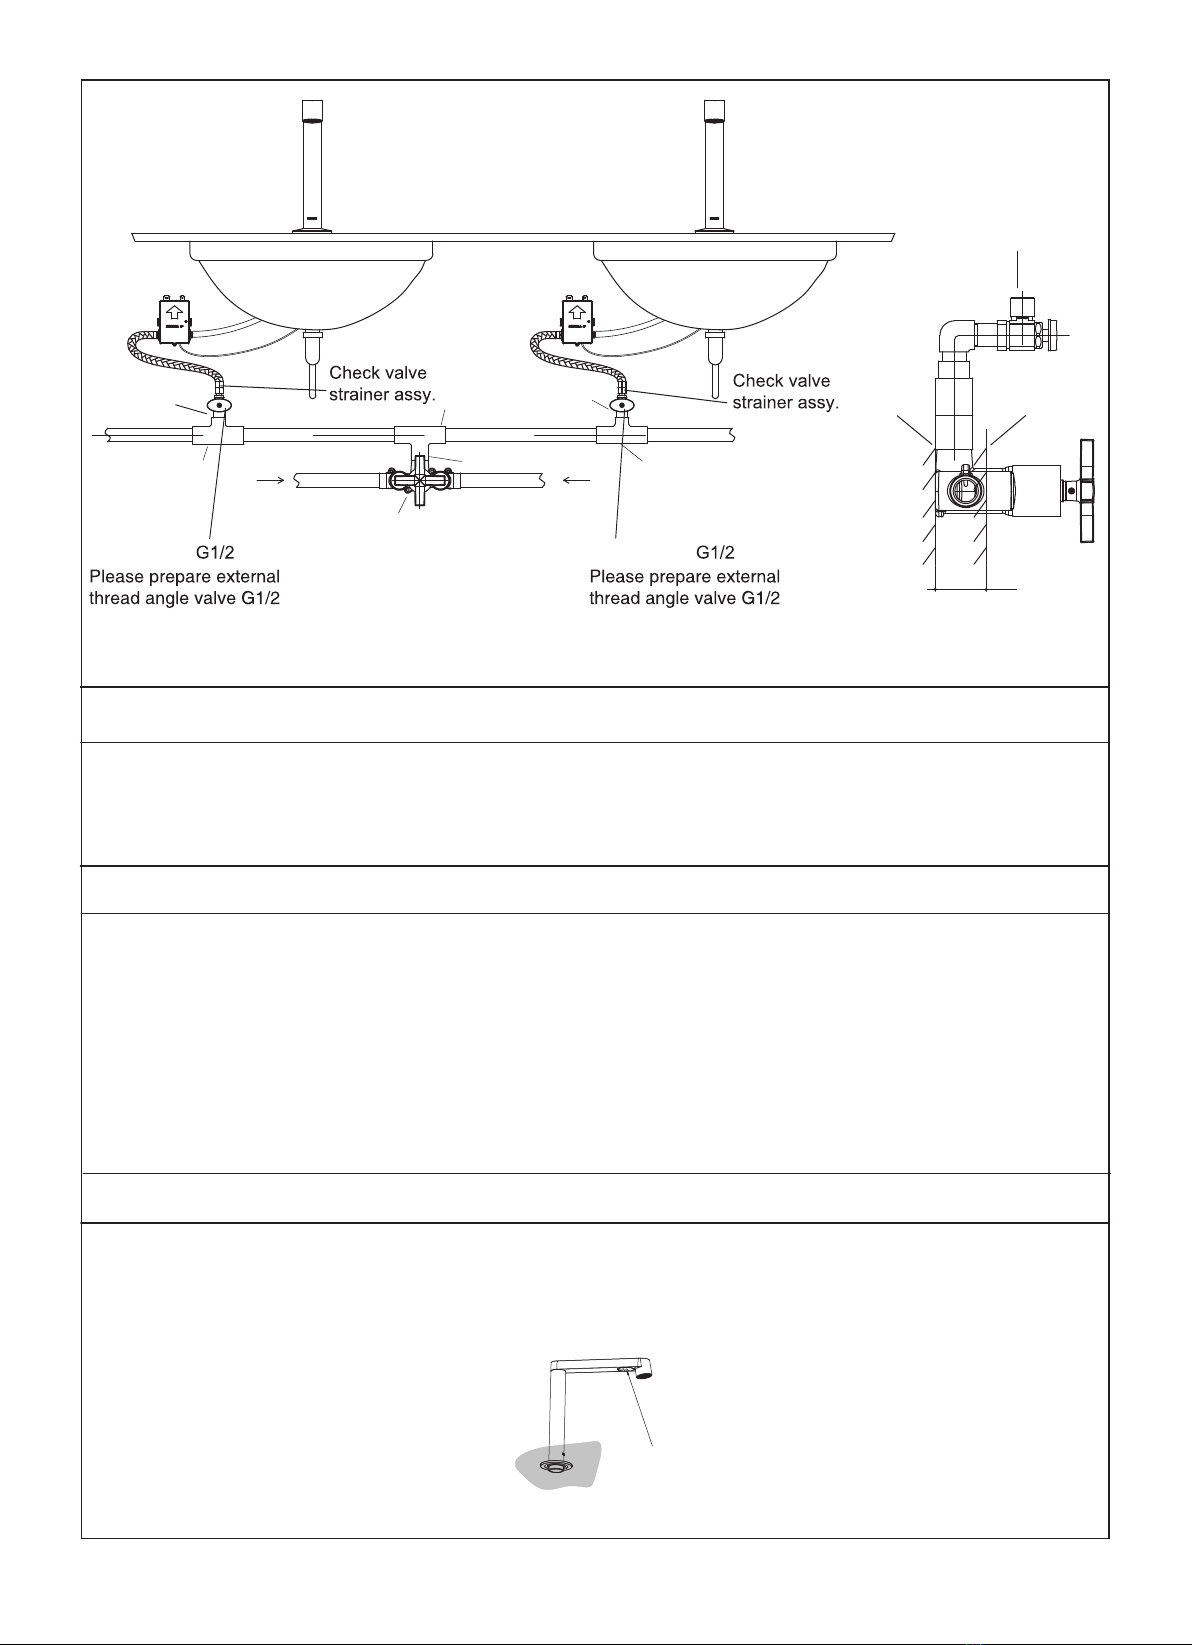
(1) Close the angle valve.
(2) Remove the valve assembly and take out the filter for
cleaning, then re-install it.
Notice: Make sure to install the filter washer after cleaning
the filter.
该感应龙头的阀体组件内已包含了优良的过滤装
置。如管内杂质过多或水质较差,长期使用会引
起出水情况不良。请按以下步骤清洗过滤装置:
(1) 关闭角阀。
(2) 将主阀体组件取下,拿出滤网,用水冲洗完
毕后,重新装入。注意:在清洗完滤网后,不要
遗失平垫。
4.自动清洗存水功能 .
When the faucet is no used for a long period of time, it
will automatically flush to discharge the stagnant water
inside the faucet every 24hrs.
感应龙头长期处于不使用状态时,
每间隔24小时自动冲水一段时间
排出龙头内的存水。
Self-Cleaning the stagnant water
10 1451062-T01-B
2.
超时出水控制
连续在感应状态下使用约一分钟,龙头自动止水。
自动止水后,手或物体离开感应范围后,再次进
入感应范围内,龙头正常工作,否则无反应。
2. Overtime Flowing Control
When the faucet works for about 1 minute continuously, the
water will be shut off automatically. After that, objects must
be removed from the sensing range. Then the water will
flow when objects go into the sensing range again.
Otherwise, the faucet will not work.
(4) 在正常工作情况下,当有物体被感应
时,龙 头出水,感应指示灯闪烁一次。
(龙头关闭,感 应指示灯不闪烁。)
(4) In normal condition, the water will flow and the
indicator will flash one time when objects are
inducted. (The indicator does not flash when
faucet stops flowing.)
(3) 间隔2秒钟连续闪烁:若直流感应龙
头,代表龙头电池耗尽,已停止工作,等
待使用者更换电池;若交流感应龙头,表
示为两种情况:一种为刚刚停电;另一种
为在交流供电正常的情况下,则电源盒直
流接线端接触不良。
(3) The indicator flashes every 2s: as for DC type
faucets, this indicates the unit is out of battery and
ceases working. Please replace batteries. For AC
faucet, it indicates two possibilities: one is that the
unit is out of battery; or poor DC terminal contact
under normal AC power supply.
(2) 间隔6秒钟闪烁一次(直流版本),表示
电池即将使用完,请更换电池。
(2) The indicator flashes every 6 seconds (DC
type) indicates that the unit is out of battery and
has stopped working. Replease batteries.

常见故障排除
以下部分故障现象可通过指示灯闪烁情况识别。(参考“感应指示灯的各种闪烁情况”)
现 象 原因 处理方法
无电池或电池装反(直流电)
无电源或接线有误(交流电)
感应范围内有其它物体
感应窗口较脏
接线端未插好、插错
不出水
(感应指示灯不闪烁)
电池耗尽(直流电)
刚刚停电(交流电)
直流或交流接线端接触不良
更换电池
检查总电源
重新连接接插件
感应指示灯每2秒快速
闪烁1次而不出水
刚装机完毕
阀体组件关闭
起泡器脏堵
过滤装置堵塞
等待 6~50秒
打开阀体组件
清洗起泡器
清洗过滤装置
感应指示灯闪烁
不出水
阀体组件是否彻底打开 用内六角扳手逆时针旋转阀体组件
的调节螺栓
清洗过滤装置
清洗起泡器
检查供水系统
感应指示灯闪烁
出水量小 过滤装置堵塞
起泡器脏
水压太低
约一分钟以内不止水
(感应指示灯不闪烁) 感应范围内有物体 移开物体
平整切除连接处不光滑进水管
(1cm左右)
软管与阀体连接处漏水 进水软管连接处不光滑
如按以上操作仍未解除故障,请与销售商或科勒(中国)投资有限公司联系。
除安装更换电池外,请勿随意拆卸龙头其它部件。
检查电池
检查总电源和接线情况
移开物体
清洁窗口
检查接线端
1451062-T01-B 11

TROUBLE SHOOTING
Some trouble symptoms can be identified by the indicator's flashing. (Refer to "Note of the Indicator Flashing")
Please contactwith distributor or KohlerChina InvestmentCo., Ltd., if the troubleremains after above-mentionedactionsaretaken.
Please do not disassembly the other parts of the faucet freely except installing and replacing batteries.
Symptoms Probable Causes Corrective Action
No battery or wrongly connected
No power supply or wrong connection
Object in sensing range
Dirt on the sensing window
The connector does not connect well
Check the batteries
Check the power supply and the conncetion
Remove the object
Clean the sensing window
Check the connector
No water flow
(Indicator not flashing)
The indicator flashes once
every 2 seconds and the
water doesn't flow out.
Batteries are out of power
Just power cut
DC or AC connector of AC/DC transformer
may not connect well
Replace batteries
Check the power supply
Reconnect the connector
No water flow while
the indicator flashes
Just finishing installation
The connector assemblies are closed
Aerator is blocked
The filter is blocked
Wait for 6~50 seconds
Open the connector assemblies
Clean the aerator
Clean filter
The connector assemblies are not open
completely
The filter is blocked
Aerator is dirty
The supply water pressure is lower
Turn counterclockwise the adjustment bolts on
connector assemblies with the hex wrench
Clean filter
Clean the aerator
Check the water supply system
Low water flow while the
indicator does not flash
Keep water out within 1
minute.
while indicator does not
flash
Object in sensing range Remove object
Leakage happened from
the connection of inlet
hose and valve.
The connection of inlet hose may not smooth. Cut the inlet hose flat and smooth(about 1cm)
12 1451062-T01-B

回收提示
本产品超过使用期限或经过维修无法正常使用后,不应随意丢弃,请交由有废弃电器电子产品处理资质的
企业处理,正确的处理方法请查阅国家或当地有关废旧电器电子产品处理的规定。
本产品的“环保使用期限”为10年,科勒公司根据产品设计特性指定该期限。只有在本产品
使用说明书所述的正常情况下使用本产品时,“环保使用期限”才有效。
10
产品中有害物质含量的说明
有害物质统计表
注:本表格提供的信息是基于供应商提供的数据及科勒公司的检测结果。本产品应用环保设计理念,在当
前技术水平下,所有有害物质或元素的使用已经控制到了最低程度,科勒公司会继续努力通过改善现有技
术来减少这些物质的使用。
有害物质名称
部件名称 铅(Pb) 汞(Hg)
外壳组件 ×○○○○○
阀体组件 ×○○○○○
控制盒组件 ×○○○○○
*电池盒组件 ○○○○○○
*电池 ○○○○○○
*交流电源盒 ○○○○○○
*进水组件 ×○○○○○
附件类 ○○○○ ○ ○
多溴联苯
(PBB)
多溴二苯醚
(PBDE)
镉(Cd) (Cr(VI))
六价铬
○:表示该有害物质在该部件所有均质材料中的含量均在GB/T 26572现行有效版本规定的限量要求以下。
:表示有害物质至少在该部件的某一均质材料中的含量超出GB/T 26572现行有效版本规定的限量要求。
×
*:表示部分机型含有该部件。
1451062-T01-B 13
本表格依据SJ/T 11364-2014的规定编制。

Description of Content of Hazardous Substances in Product
Reclaim Indication
When the product exceeds service life or is unable to use after repair, do not throw the product away in the normal trash.
Please dispose the waste electronic parts through a qualified reclamation enterprise. Make sure the product is handled
properly. Disposing of product must be done in accordance with the local or national government law.
Statistics of Contents of Toxic or Hazardous Substances or Elements
10
Note: the information provided is based on the supplier data and Kohler inspection results. The product is designed not to hurt
the environment. Under current technology, all hazardous materials have been used in the smallest amounts possible. Kohler
will strive to reduce the use of these hazardous materials used in this product.
The product “service life for environment protection” is 10 years; Kohler Company will specify product service
life based on product characteristics. The product “service life for environment protection” is only effective when
the product is used as described in the product specification.
○:Indicates that the substance in the material composition is below the high limits of the current requirements in GB/T26572.
: Indicates that at least one of the homogeneous substance in the material composition is below the high limits of the current
requirements in GB/T 26572.
: Indicate only partial product series contains this substance.
*
×
Toxic or Hazardous Substance or Elements
Part name Lead
(Pb)
Mercury
(Hg)
Cover Assy.
Valve Assy. ×○ ○ ○ ○ ○
Control Box Assy. ×○ ○ ○ ○ ○
* Battery Box Assy. ○○ ○ ○ ○ ○
* Battery ○○ ○ ○ ○ ○
* AC Power Box ○○ ○ ○ ○ ○
* Water Inlet Assy. ×○ ○ ○ ○ ○
Accessories ○ ○ ○ ○ ○ ○
Polybrominated
biphenyls
(PBB)
Polybrominated
Diphenyl Ethers
(PBDE)
Cadmium
(Cd)
Hexavalent
Chromium
(Cr(VI))
×○ ○ ○ ○ ○
14 1451062-T01-B
This form is prepared in accordance with SJ / T 11364.
This manual suits for next models
9
Table of contents
Other Kohler Accessories manuals

Kohler
Kohler Bardon K-8787T-C01 User manual

Kohler
Kohler 24146IN-7 User manual

Kohler
Kohler GM88594-KP1-QS User manual

Kohler
Kohler 1019439 Manual

Kohler
Kohler PATIO K-8791T-YC01(0.5L/DC) User manual

Kohler
Kohler K-EX29936T-N-CP User manual

Kohler
Kohler K-4709 Assembly instructions

Kohler
Kohler K-682 Assembly instructions

Kohler
Kohler 8787T-B01 User manual

Kohler
Kohler KARAT 72870T-ST User manual