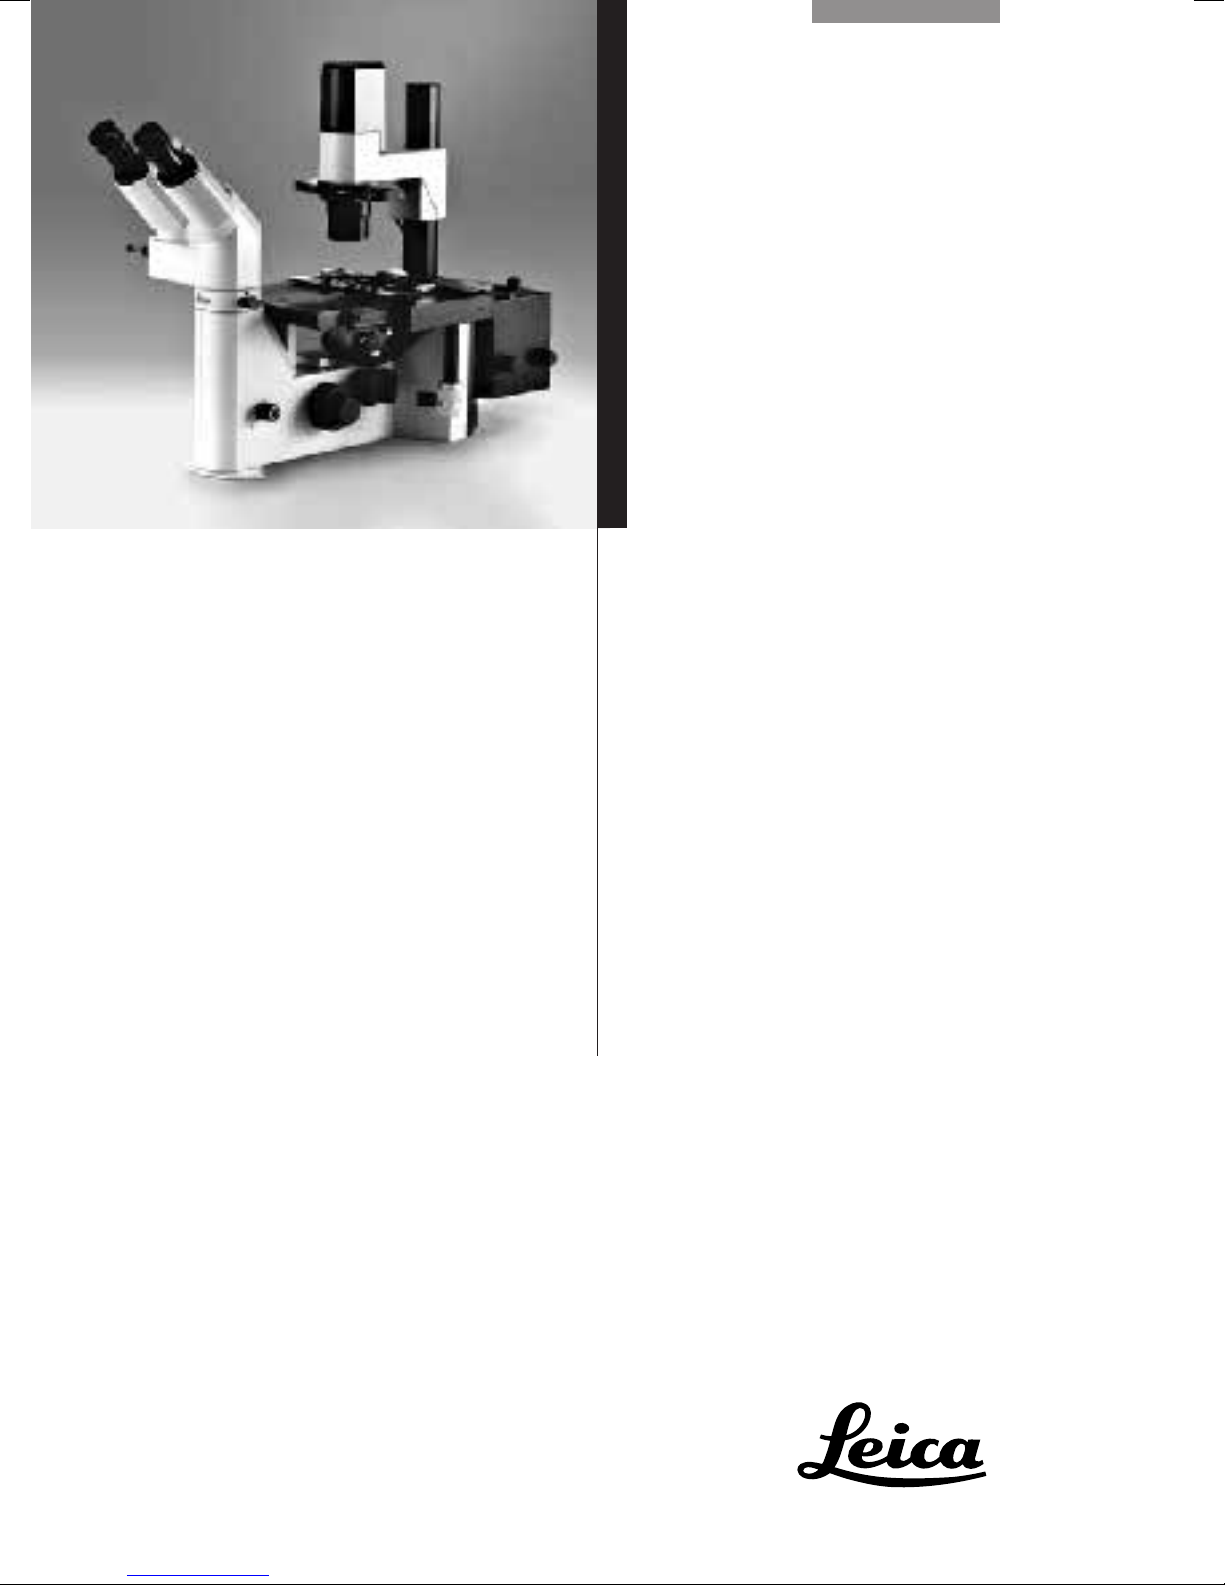
Leica DMIL User manual

Leica DMIL
Instructions · Bedienungsanleitung
Mode d’emploi

Phone/Tel./Tél. +49 (0) 6441-292519
Fax +49 (0) 6441-29 22 55
Issued in 1998 by/
Herausgegeben 1998 von/
Edition 1998 par:
Leica Microsystems Wetzlar GmbH
Ernst-Leitz-Strasse
D-35578 Wetzlar (Germany)
Responsible for contents/
Verantwortlich für den Inhalt/
Département responsable du contenu:
Marketing MQM, Product Management

3
Leica
DM IL
Instructions

4
Copyrights
All rights to this documentation are owned by
Leica Microsystems Wetzlar GmbH. Copying of
text and illustrations – in full or in part – by print-
ing, photostat, microfilm or other techniques,
including electronic systems, is only permitted
subject to the express written consent of Leica
Microsystems Wetzlar GmbH.
The information contained in the following
documentation represents the latest stage of
technology and knowledge. We have composed
the texts and illustrations with great care.
However, as it is impossible to eliminate the risk
of error completely, we cannot accept any kind
of liability for the correctness of the contents of
this manual. Nevertheless, we are always grate-
ful to be notified of any errors.
The information in this manual may be altered
without prior notice.

5
Contents
Technical description........................................ 67
Objectives ............................................................. 67
Eyepieces ............................................................. 70
Filters ..................................................................... 72
Tubes ..................................................................... 73
Condensers .......................................................... 75
Lamps and lamp housings ................................. 76
Specifications ...................................................... 78
Main wear and replacement parts ................. 80
EU Declaration of Conformity .......................... 81
Important notes ................................................... 6
General safety information............................... 7
Application .......................................................... 9
The microscope and its components ............. 10
Installation site ................................................... 15
Unpacking ............................................................ 15
Setting up ............................................................. 17
Setting up the options ........................................ 26
Operation .............................................................. 39
Basic settings for transmitted light ................. 39
Operation of objectives...................................... 42
Operation of transmitted light........................... 43
Operation of phase contrast ............................. 45
Operation of Integrated
Modulation Contrast (IMC) ............................... 47
Operation of incident light fluorescence ....... 51
Care and maintenance ...................................... 56
Troubleshooting
(lamp/fuse replacement) ................................... 58
Storage.................................................................. 66
Packaging and transport................................... 66

6
The manual is multi-lingual. The spiral binding
makes it possible to turn the instructions in the
desired language to the front.
Numbers in brackets, e. g. (1.2), refer to
illustrations, in the example to Fig. 1, pos. 2.
Numbers with an arrow, e. g. → p. 20, refer to a
particular page of this manual.
Special safety information is marked with a
triangular symbol in the margin and printed
on a grey background.
Attention! Operating errors can damage the
microscope or its accessories.
Warning of hot surface.
Explanatory note.
Not part of all configurations.
Important notes
(1.2)
→ p. 20
!
*
This manual is an important part of the Leica
DM IL microscope and should be carefully
read before switching on and using the
instrument.
This manual contains important instructions and
information with regard to operating safety and
maintenance of the system. For this reason, it
should be carefully kept at hand.
Text symbols and their meaning:

7
General safety information
Only fuses of the specified type and rating may
be used as replacements. Never use repaired
fuses or short-circuited fuse holders.
Attention!
The instruments and accessories described
in this manual have been safety-tested and
checked for possible hazards.
Before modifying the instrument in any way
or combining it with non-Leica products not
covered by this manual, please always
contact your local Leica representative or the
main factory in Wetzlar!
Any unauthorised interference with the
instrument or use of the instrument for
applications for which it is not designed will
automatically void any warranty claim!
This instrument of Safety Category I has been
built and tested according to EN 61 010-1/
IEC 1010-1, Safety Standards for Electronic
Measuring Instruments, Electronic Regulators
and Electronic Laboratory Instruments.
Attention!
To maintain this condition and to ensure safe
operation, the user must note and adhere to
the directions and warnings contained in this
manual.
The mains plug may only be inserted into a
grounded socket.
The protection must not be jeopardised by using
an extension cable without ground conductor.
Any break in the ground conductor within or
outside the instrument or loosening of the
ground connection can render the unit
dangerous. Intentional severance is prohibited!
Attention!
Accessory devices connected to the
microscope which have a separate and/or
different power supply should be brought to
the same ground potential by connecting
them to the same grounding system. Contact
the service department in case of an
ungrounded mains supply .

8
Attention!
The electrical accessories for the micro-
scope are not protected against the
penetration of water which can result in
electrical shock.
Do not set up the microscope and its
accessories in the immediate vicinity of a
water outlet or in other places where water
may penetrate into the instrument.
Attention!
Before replacing fuses or lamps, always
switch off the power switch and disconnect
the power cord.
Attention!
Protect the microscope against excessive
temperature fluctuations which may lead to
condensation and thus damage the electrical
and optical components.
Attention!
When using immersion oil, take care to avoid
skin contact! Ask the supplier for a safety
data sheet!

9
Application
The Leica DM IL microscope is designed for
routine examinations of cell and tissue cultures,
liquids, and sediments.
Two basic microscope stands are available for
biologic applications. One is the standard bright
field version using the contrasting methods
bright field (BF), phase contrast (Phaco), and
Integrated Modulation Contrast (IMC), the other
is the fluorescence microscope which also
offers incident-light fluorescence in addition
to the three transmitted-light contrasting
techniques.
All microscope techniques and the required
accessories for the Leica DM IL are described
and explained in detail in the Operation section
of this manual, including the associated
functions and their use.

10
15
13
12
21 22
24
14
20
17
11
23
The microscope and its components
Fig. 1 Right side of microscope stand
Fig. 2 Left side of microscope stand
Fig. 3
Microscope stand with DM L tubes and discussion facility
26
25
28 26
27
Fig. 1 – 3
1 Binocular photo tube DM ILT, 2 Eyepiece tube, 3 Eyepieces,
4 Tube holder, 5 Empty slide or IMC modulator, 6 Integrated
lamp housing with halogen lamp 6 V/35 W, 7 Holder for filter
Ø32 mm, 8 Empty slide or modulation or phase contrast slide,
9 Aperture diaphragm, 10 Condenser S 55, 11 Transmitted-
light illumination carrier, 12 Notched lever for condenser
level adjustment, 13 Transmitted-light illumination column,
14 Specimen stage, 15 Objective nosepiece and objectives,
16 Brightness control, 17 Coarse control adjustment and
micrometer adjustment, 18 Power switch, 19 Fluorescence
filter blocks, 20 Fluorescence lamp housing, 21 Light stop,
22 BG9 Filter, 23 Stabiliser plate, 24 c-mount video adapter,
25 Tube adapter IL/L, 26 DM L tubes, 27 Multi-discussion
facility, 28 Condenser S 90
Main assemblies
The following overall views show and designate
the main assemblies of the microscope and its
accessories.
1
2
3
4
19 18
76
9
8
10
5
16

11
Microscope stand
Owing to its low centre of gravity, the Leica DM IL
microscope stand is very stable. When using
the multi-discussion facility* or for long-term
exposures in micro-photography applications, a
stabiliser plate* is available to improve stability.
For incident-light fluorescence applications, an
incident-light axis is integrated in a second stand
version.
Tube holder
The tube holder is the interface between the
microscope stand and the tube. The tube holder
permits the use of DM ILB and DMILT tubes as
well as the IL/L tube adapter which in turn
permits the use of DM L tubes. The ergo module
and the drawing module can also be directly
mounted on the tube holder if the DM ILB or
DM ILT tubes are used (see also Tube adapter).
Tube
The tube contains a 1x tube lense which creates
the primary image in conjunction with the
objective.
The binocular tube consists of a body, the
binocular part, and the tube change ring.
The trinocular tube offers an additional
documentation output to accommodate photo or
video equipment. A switchable mirror directs
the light 100 % either to the eyepieces or the
photo output.
DM IL tubes can be replaced and rotated.
IL/L tube adapter
The tube adapter serves to accommodate tubes
from the DM L range as well as the drawing
facility*, the multi-discussion facility*, the
magnification changer*, and the ergo module*.
Eyepieces
The eyepiece creates a magnified, virtual image
of the real intermediate image which is
projected by the objective. In this process, the
eyepieces works as a magnifier.
Transmitted-light illumination unit
The transmitted-light illumination facility con-
sists of the transmitted-light illumination carrier
and the transmitted-light illumination column.
The transmitted-light illumination carrier con-
tains a pre-centred, bright 6 V/35 W halogen
lamp, as well as a holder for a diaphragm slide,
a holder for a light filter, a condenser and an
aperture diaphragm.
Lamp housing
The Leica DM IL microscope uses an integrated
lamp housing with a 6 V/35 W halogen lamp.
Filters
The filters are usually employed to improve the
contrast of the specimen. They are firmly
mounted in a holder (Ø32 mm).
Different filters can be inserted into the filter
holder of the transmitted-light ilumination unit.

12
Aperture diaphragm
The aperture diaphragm determines the
resolution, the depth of field and the contrast of
the microscope image. The best resolution is
obtained when the apertures of the objective
and the condenser are roughly the same.
Attention:
The aperture diaphragm in the illumination light
path is not for setting the image brightness. Only
the rotary brightness adjustment knob or the
neutral density filter should be used for this
purpose.
Condenser
The condenser is a lens system which collects
the light and directs it to the specimen from
the top. The condenser permits to utilise the
numerical aperture in the objective.
Notched lever for condenser level adjustment
The notched lever permits the adjustment of the
condenser height by moving the transmitted-
light carrier. The markings on the transmitted-
light column indicated the proper height to be
set for the condenser used.
Specimen stages and accessories
The specimen stage is used to support the
specimens to be subjected to microscopic
examination. Several options are available for
different objects, such as speciment controllers,
stage expansions, scanning table, clamps,
heating table etc.
Objective revolver and objectives
The objective revolver is designed to hold the
objectives. Especially the long-range L-type
objectives are able to compensate for the diffe-
rent thicknesses of vessel bottoms.
All microscope objectives with magnifications
2.5 to 100 can be used. All objectives from the
DM L and DMR range with 25 mm thread are
compatible. A choice of objectives is contained
in chapter ”Specifications; Peformance Data“or
in the current objective lists that are available
from your local Leica representative.
Brightnessadjustment
The microscope stand contains a 6 V/35 W
transformer for continuous brightness adjust-
ment using a rotary brightness switch.
Coarse and fine focus adjustment
Coarse and fine focus adjustment permits a fast
and precise adjustment of the microscopic
image. Focus adjustment is made by moving the
objective revolver. The stroke length is 7 mm.
Power switch
The illuminated power switch permits to switch
the power supply of the microscope on and off.
Due to the illuminated switch, the operating
state of the microscope can easily be
determined even in darkened rooms.
Fuse holder with voltage selector module
The fuse holder is equipped with two fuses and
a voltage selector module. Depending on the
country of use, the voltage needs to be set to
100 V, 115 V or 230 V (tolerance ±10 %).

13
Incident-light fluorescence facility*
The microscrope version with incident-light
fluorescence facility contains the integrated
fluorescence axis and the lamp holder for
mounting of a lamp housing.
Fluorescence filter block slide*
The fluorescence filter block slide holds up to 3
fluorescence filter blocks. The filter block slides
can be moved to three alternative switching
positions.
One position of the slide can also be used as a
bright-field position by leaving it empty (no filter
block inserted).
Lamps and lamp housings*for the
incident-light fluorescence facility
For incident-light fluorescence, an additional
illumination is required. On the DM IL, all lamp
housings of the 106 and 107 ranges can be used.
Depending on the version used, the controls for
the lamp housings are located on the right or left
side.
The LH 106 and LH 107 lamp housings are only
used with a 12 V/100 W halogen lamp which can
be centred in the X/Y plane. Both lamp housings
are not equipped with a reflector but have
diffusing screens, heat-absorbing filters and
focusable aspheric collectors.
The LH 106z lamp housing is similar to the LH 106
lamp housing but has a reflector which can be
centred and focused. It also contains a 4- or 6-
lens collector (quartz collector on request).
The following lamps can be used with their
special sockets:
Halogen lamp, 12 V/100 W
Hg ultra-high pressure lamp 50 W, AC
Hg ultra-high pressure lamp 100 W, DC, without igniter
Hg ultra-high pressure lamp 100 W, DC, with igniter 1)
Xe ultra-high pressure lamp 75 W, DC, with igniter 1)
1) This requires to raise the microscope stand with a base to
increase the necessary clearance.
Power unit*
An external power unit is used to regulate the
lamp for incident-light fluorescence and the
corresponding lamp housings.
Modulation slide or phase contrast slide*
The modulation slide or phase contrast slide is
part of a constrasting method, either Integrated
Modulation Contrast (IMC) or phase contrast.
The same slides are used for the S 55 and S 90
condensers, however, with different phase
rings.
If no phase slide or modulation slide is used, it is
also possible to insert an empty slide into the
corresponding holder on the condenser.
IMC modulator*
For the Leica Integrated Modulation Contrast
technique, the IMC modulator is provided in the
microscope stand. (→ p. 47 Operation of IMC).
In the standard version, all DM IL microscopes
are equipped with an empty slide.

14
Rear of the microscope
1
8
7
236
5
4
Fig. 4
1 6 V/35 W connection
2 Mains connection
3 Fuser holder with 2 mains fuses
4 Equipotential bonding point
5 Logo for equipotential bonding point
6 Lamp holder (for fluorescence version)
7Safety note
8 Nameplate

15
Installation site Unpacking
The microscope should be operated in a dust-
free room which is also free from oil, chemical
fumes, and excessive humidity. Major tem-
perature fluctuations, direct sunlight, and
vibration should be avoided because they can
affect measurements and photomicrography.
Ambient conditions:
Temperature 10 –36 °C
Relative humidity 0 –80 % up to 30 °C
In warm and humid climates, microscopes
require special care to prevent fungal growth.
For additional instructions, please refer to
chapters “Maintenance”and “Storage”.
Attention!
Lamp housings* and power units* must be
located at least 10 cm away from the wall and
combustible objects.
Please compare the delivery carefully with the
packing note, delivery note or invoice. We
strongly recommend that you keep a copy of
these documents with the manual so that you
have the proper information on the time and
scope of delivery at a later time when ordering
more equipment or when the microscope is
serviced. Please make sure that no small parts
are left in the packing material. Some of our
packing material has symbols that indicate that
it can be recycled in an environmental-friendly
manner.
Note
Keep the packing material for the purpose of
storage and transport of the microscope and its
accessories.
Attention!
Avoid touching the surface of the optics lens.
If finger prints are left on the glass surfaces,
use a soft leather or linen cloth to remove
them. Even minute traces of perspi-ration
from fingers can corrode the surfaces of
optical instruments in a very short time. For
additional instructions, please refer to
chapters “Maintenance”and “Cleaning”.

16
Attention!
On no account should you connect the
power unit* and peripherals* to the mains
yet!
The following parts can be included in the
delivery:
–Leica DM IL microscope (transmitted-light or
incident-light fluorescence)
–Illumination and condenser carrier
–Tube
–Eyepieces
–Objectives
–Condenser
–Protective cover
–Power cord
–Instruction manual
Optional components:
–IL/L tube adapter
–Phase slide
–Adjustment telescope
–IMC slide
–IMC module
–Filters for transmitted light
–Filter slide for fluorescence blocks
–Fluorescence blocks
–Lamp housing
–Replacement halogen lamp
–Ultra-high pressure mercury lamp
–External power unit
–c-mount video adapter
–Camera
–Speciment stage accessories
–Additional components from the DM L range,
such as tubes, drawing facility, multi-
discussion facility, magnification changer,
ergo module
Fig. 5 DMIL microscope with drawing facility and ergo photo
tube
1Ergo photo tube from DM L range, 2IL/L tube adapter,
3Drawing facility, 4Specimen stage with accessories
4
1
3
2

17
1
2
22
2
•If the delivery includes a stabiliser plate,
mount this to the bottom of the microscope
stand with two screws so that the two front
feet fit into the recesses (Fig. 7).
Tighten the screws and place the microscope
back on the table in the upright position.
Attaching the condensers
•Screw the S 90 (8.1) or S 55 (8.2) condenser into
the condenser holder (9.2) of the transmitted-
light illumination carrier from below.
•As a first step, remove all components from
the shipping and packing material.
•Place the DM IL basic microscope stand in a
sufficiently clear space on a workbench.
•Make sure that all four feet have been
mounted to the bottom of the microscope
stand.
Attention!
On no account should you connect the
microscope to the mains yet!
Setting up
Fig. 6 Microscope with transmitted-light illumination column
1 Screw for condensor collision protection, 2 Feet
Fig. 7 Stabiliser plate
Fig. 8
1S 90 condenser, 2S 55 condenser
2
1

18
Positioning the transmitted-light
illumination carrier
•Position the transmitted-light illumination car-
rier into the column from above while
pressing on the notched lever for the con-
denser level adjustment (9.5).
•Position the transmitted-light illumination
carrier (9.3) on the transmitted-light illumination
column (9.4) depending on the condensor used
(S 55 or S 90) and release the notched lever.
The markings (9.6) are referred to a liquid
level of 15 mm. For microscopes with dual
markings, the lower line indicates a liquid
level of 15 mm and the upper line indicates a
liquid level of 50 mm.
•Make sure that the transmitted-light illumi-
nation carrier is locked in place.
Fig. 9 Transmitted-light illumination unit with condenser
1Condenser (S 90), 2Condenser holder, 3Transmitted-light
illumination carrier, 4Transmitted-light illumination column,
5 Notched lever for condenser level adjustment, 6 Markings
Note
A screw (6.1) on the transmitted-light illumi-
nation column prevents that the condensor
collides with the specimen stage.
Repositioning the transmitted-light illumination
carrier with the specimen stage
Note
For the heating stage* only one position of the
transmitted-light illumination carrier is possible.
This position is determined by the existing holes
in the stage.
Repositioning of the transmitted-light illumina-
tion carrier is only possible with the DM ILB or
DM ILT tubes.
The specimen stage can be made accessible
from three sides by repositioning it by 180°.
1
3
4
2
5
6
6

19
Attention!
Do not loosen the screws (10.1) below the
stage on the transmitted-light illumination
carrier because this would displace the
optical axis.
•Unscrew the screws (11.1) with a 3 mm fixed
spanner and remove the screws.
•Rotate the stage with the transmitted-light
illumination unit by 180°.
•Position the stage with the transmitted-light
illumination unit. The stage should lock in the
guide pins (10.2) on the microscope.
•Insert the screws (12.1) and tighten them.
•Mount the connecting cable in the plastic
guide below the stage (10.3).
Fig. 10
1Clamping screws for optical exis, 2Guide pins, 3Plastic
guide
Fig. 11
1Screws for repositioning the transmitted-light illumination
carrier
Fig. 12
1Screws for repositioning the transmitted-light illumination
carrier, 2Connecting cable
111
3
1
2
1
2
1
2
11

20
Fig. 15 Binocular photo tube
Fig. 14 Binocular tube
Electrical connection of the transmitted-light
illumination carrier
•Use the connecting cable (12.2) to connect
the transmitted-light illumination with the
integrated power supply via the power socket
(13.1) on the rear of the instrument.
Positioning the tubes
The DM ILB tube (Fig. 14 Binocular tube) or the
DM ILT tube (Fig. 15 Binocular photo tube) is
included in the standard delivery. For additional
instructions, refer to chapter “Specifications;
Performance data”.
DM ILB and DM ILT tube
•Loosen the clamp (16.1) use a 3 mm fixed
spanner.
•Insert the tube (16.3) into the tube holder (16.2).
•Retighten the clamp screw.
•To set a new viewing position, loosen the
clamp screw (16.1) and retighten it after
rotating the tube to the desired position.
Tube from the DM L range
In place of the standard DM IL tubes, you can
also adapt one of the following tubes from the
DM L range:
HC LB 0/3/4 and HC LBP 0/3/4 binocular tube
HC L1T 4/5/7 and HC L1TP 4/5/7 trinocular tube
HC L3TP 4/5/7 trinocular tube with 3 switching positions
HC LVB 0/4/4 ergo tube, binocular
HC L1VT 0/4/4 ergo photo tube, trinocular
Fig. 13 Rear of microscope
1 Socket for connecting cable
1
Table of contents
Languages:
Other Leica Microscope manuals

Leica
Leica OH4 User manual

Leica
Leica Z6 APO User manual

Leica
Leica DM750 M User manual

Leica
Leica TCS SP8 User manual

Leica
Leica ES2 User manual

Leica
Leica DM500 User manual

Leica
Leica DM4000B User manual

Leica
Leica Stellaris 8 FALCON Installation guide

Leica
Leica SP2 User manual

Leica
Leica DM750 User manual
Popular Microscope manuals by other brands

KERN Optics
KERN Optics OZM 912UK User instructions

Cole Parmer
Cole Parmer MSS-400 Series Installation and operating instructions

Vision Engineering
Vision Engineering Mantis Compact user guide

Optika
Optika STEREO Series instruction manual

Olympus
Olympus POS instruction manual

Elikliv
Elikliv EDM401 Max user manual