Level 2 - Electric Vehicle Charging Station
EVB16 (16A) - EVB30 (30A) - EVB40 (40A)
Installation Instructions
WARNINGS AND CAUTIONS:
• TO AVOID FIRE, SHOCK, OR DEATH; TURN OFF POWER AT CIRCUIT BREAKER OR FUSE AND TEST THAT POWER IS OFF BEFORE WIRING!
• Iftheinformationinthisinstructionsheetisnotfollowedexactly,SHOCK OR FIRE MAY RESULT CAUSING PROPERTY DAMAGE, PERSONAL INJURY OR DEATH.
• Foroutdoorinstallations,hard-wireconnectionisrequired.TheEVSEhasawatertight(NEMA4)enclosurewhichhousescriticalelectronics.UseofUL-listedwatertightconduitcompressionttingis
requiredtomaintainthewatertight(NEMA4)rating.Useelectrically-conductive,UL-listedthreadsealant(KOPR-SHIELD®)topreventwater/moisturefromenteringoraccumulatingwithinthebox,conduit
body,ortting.PerNECArticle250,theconduitmusthavecontinuityfromthehubtotheserviceentrance.
• Hard-wireinstallationandservicemustbeperformedbyanelectrician.
• IMPORTANT:Savetheseinstructionsforlocalelectricalinspector’suseandfuturereference.
NOTE:Unitoperateson208Vor240Vcircuit,itwillnotoperateon120V.
PK-93980-10-00-0C
NOTE:ThePlug-InChargingStationmustbeinstalledwithaLevitonPre-WireKit(sold separately).FailuretodosomeansthestationnolongercomplieswithitsULlisting.Thelistingrequiresthestationberemovablewithouttools.RefertoPre-
WireKitinstructionsrstifamountinglocationhasnotbeenestablished.Ensurethatthecorrecttemplatewithinthepre-wirekitisused,asseveraltemplatesareavailablewithinthebox.ForEVB40installation,ensurethattheEVB40-5PTisusedfor
ushmountinstallation,andtheEVB40-SPTisusedforsurfacemountedinstallation.
1. InstallPre-WireKit.ForEVB16,useInstallationKitEVK02;forEVB30andEVB40useInstallationKitEVK05.
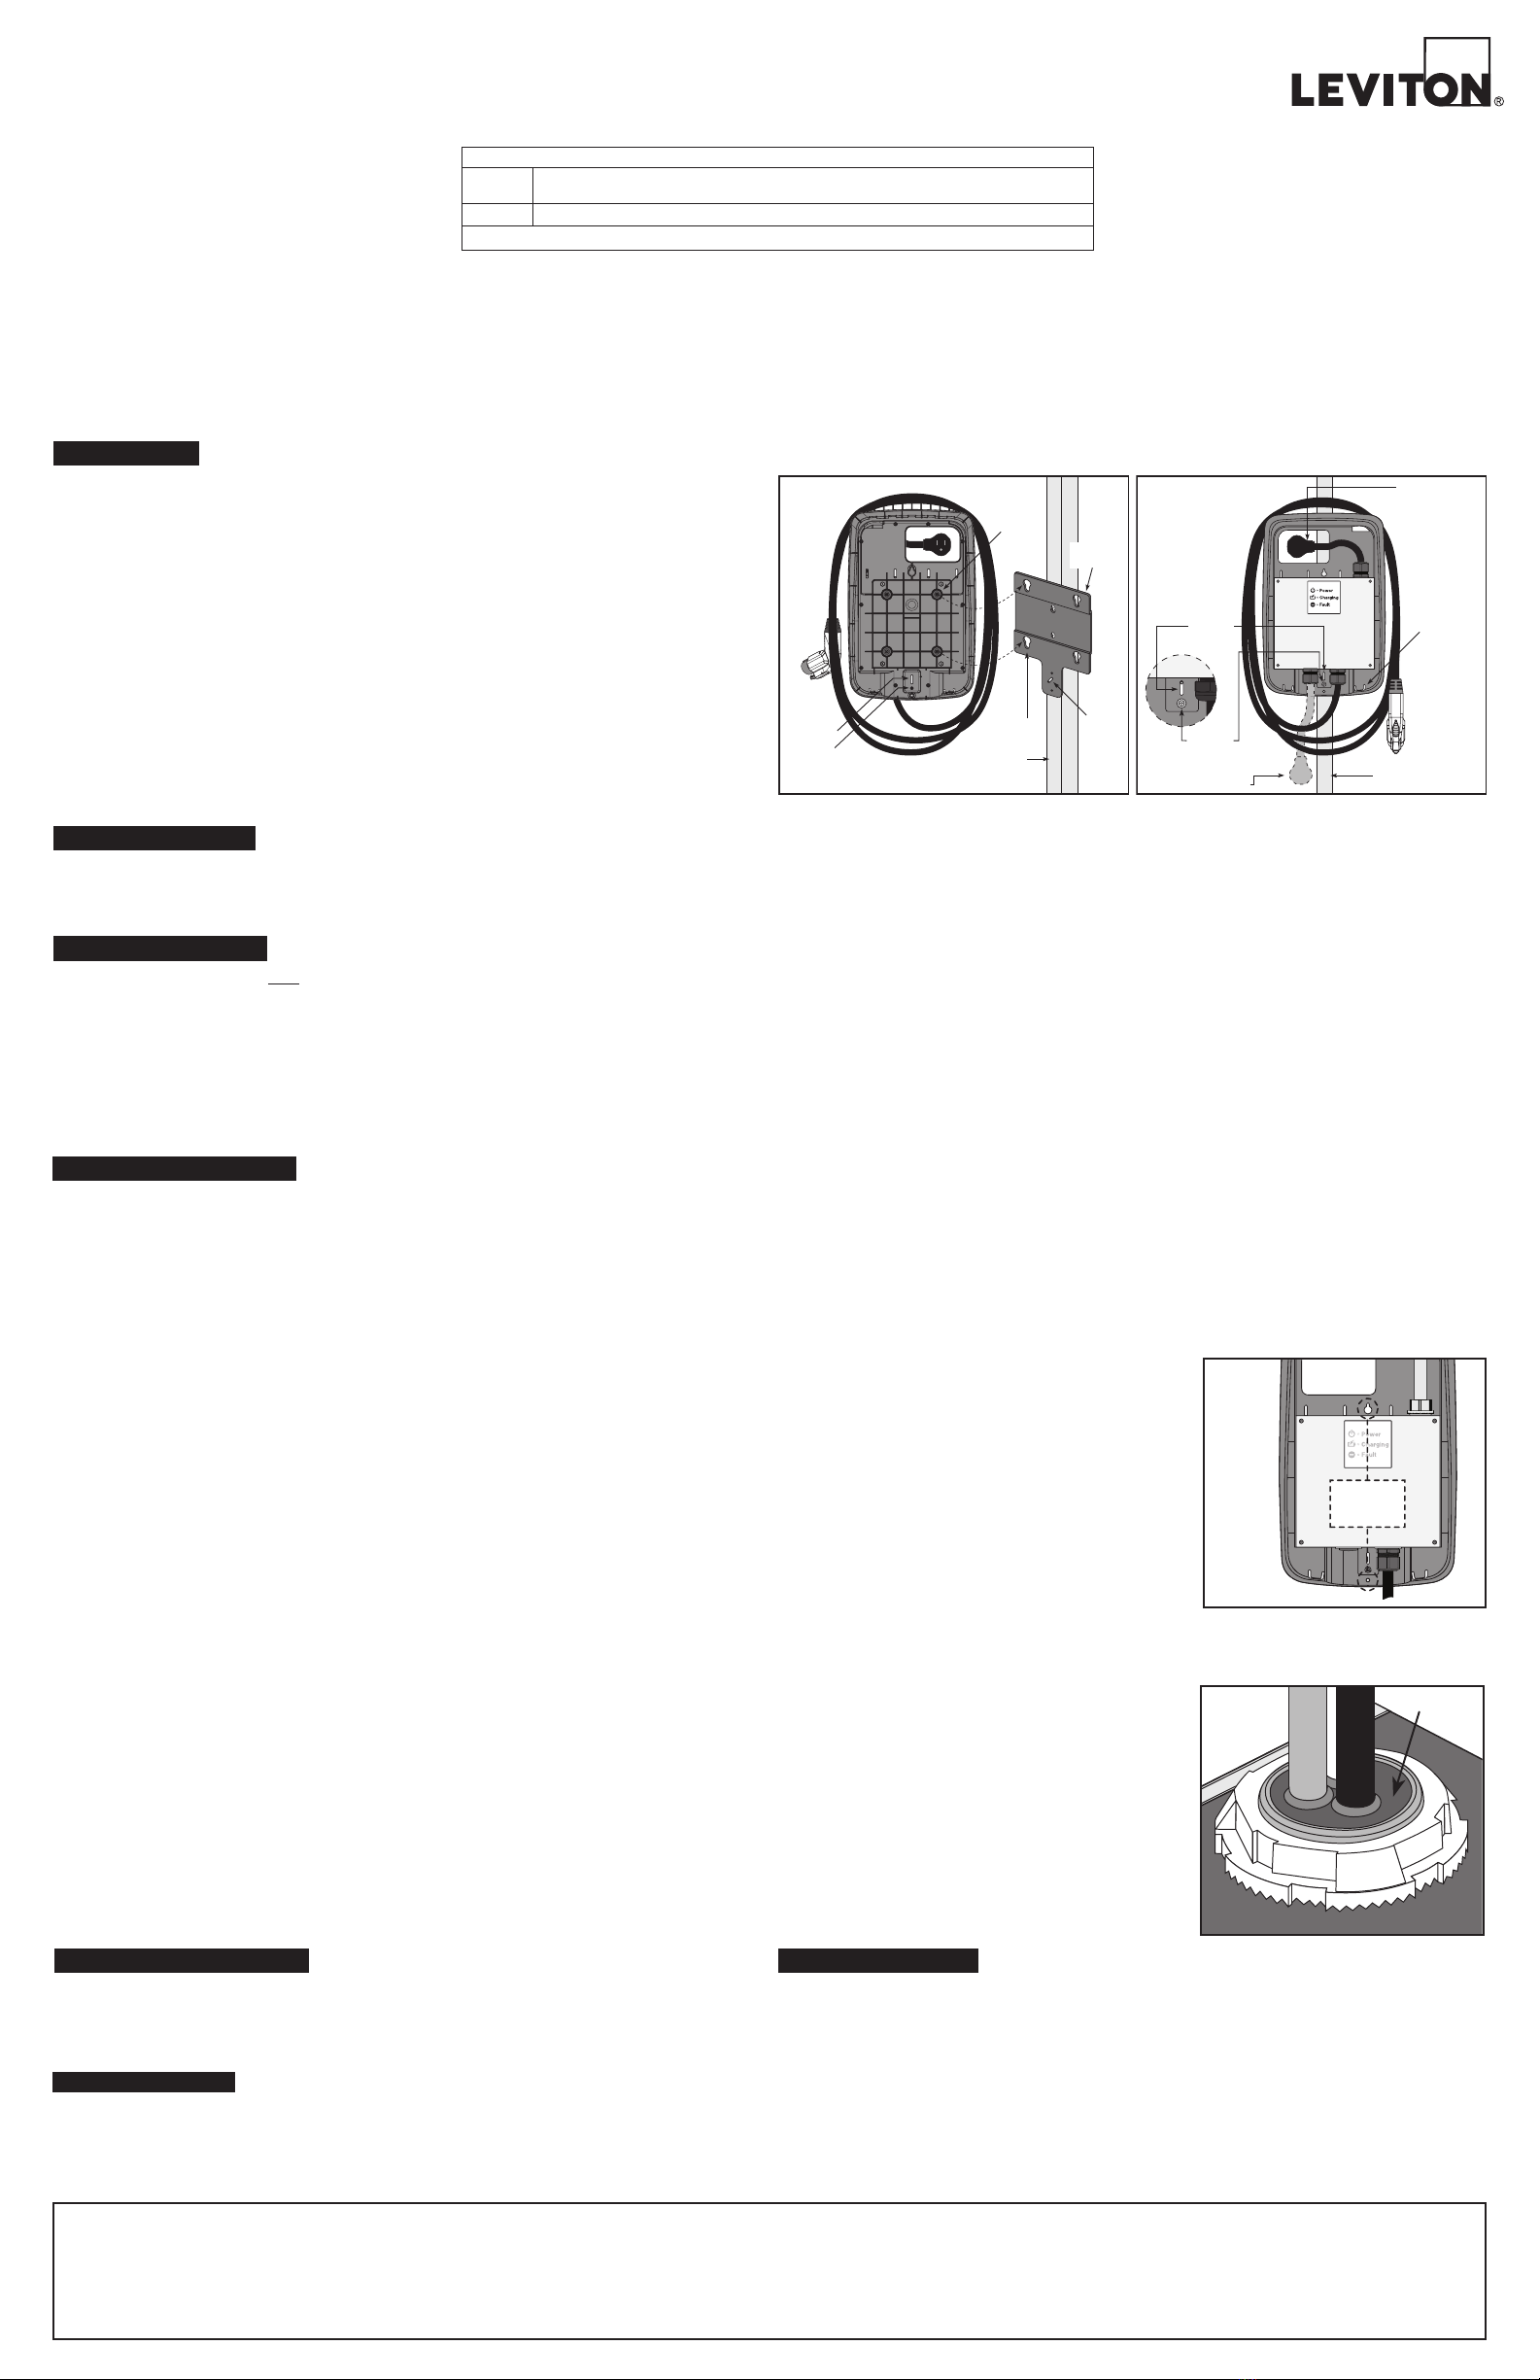
2. DepressreleasetabsonthebottomoftheChargingStation,andremoveChargingStationDoorbyliftingupwards(see Figure 2).
3. LocatethefourMountingButtonsonthebackoftheChargingStation. LocatetheGuidePinSlotabovethePanelFastenerScrew(see Figure 1).
4. AligntheGuidePinSlotwiththeGuidePinontheMountingBracket,andthefourMountingButtonswiththefourkeyholesontheMountingBracket.
5. Oncealigned,gentlypresstheChargingStationontotheMountingBracket.
6. AllowtheChargingStationtoslowlyslidedownintoplace.EnsureallfourMountingButtonsaresecuredineachkeyholeontheMountingBracketbeforereleasingtheChargingStation.
7. TightenthePanelFastenerScrewtosecuretheChargingStationtotheMountingBracket(see Figure 2).
Proceed to POWER CHARGING STATION section.
PLUG-IN INSTALLATION
ThankyouforpurchasingtheLevel2ElectricVehicleChargingStation.Thisinstallationsheetincludesthelatest
informationatthetimeofprinting.Levitonreservestherighttomakechangestothisproductwithoutfurthernotice.
Changesormodicationstothisproductbyotherthananauthorizedserviceprovidercouldvoidtheproduct
warranty.Ifyouhavequestionsabouttheuseofthisproduct,contactyourCustomerServiceRepresentative.Refer
totheCustomerSupportsectionlocatedintheseinstructions.
Important Notes to the Installer:
•TheEVB40-5PTwithtopmountedplugisintendedforushmountapplicationswheretheelectricalboxcanbe
recessedintothewall.
•TheEVB40-SPTwithbottommountedplugisintendedforplug-insolidwallapplicationswheretheelectricalbox
mustbesurfacemountedonthewall.
•TheEVB16andEVB30areonlyavailablewiththetop-mountedplug.
•
Plug-inChargingStationsmustbeinstalledwiththeuseofaLevitonPre-wirekit.ForInstallationoftheEVB16,use
LevitonInstallationKitEVK02;forInstallationoftheEVB30andEVB40,useInstallationKitEVK05.
ReadallinstructionsbeforeinstallingtheMountingBracketandChargingStation.
•Ensurethatthecorrecttemplateisusedforinstallation,asseveraltemplatesareavailablewithinthepre-wirekits.
•
Theinstallerisresponsibleforverifyingthatthewallstructure/surfacewillsafelysupportatotalloadof200lbs.
• Observeallgoverningcodesandordinances.
• Besuretoleavetheseinstructionswiththeconsumer.
Important Notes to the Consumer:
• EnsureyourChargingStationisinstalledbyanelectrician.
• KeeptheseinstructionswithyourUserGuideforfuturereference.
INTRODUCTION
Guide
Pin Slot
Guide
Pin
Wall Stud
Mounting
Button (4)
Keyhole (4)
Panel
Fastener
Screw
Figure 1
Mounting
Bracket
Panel
Fastener
Screw
Power Supply
Plug location on
EVB16, EVB30
and EVB40-5PT.
Wall Stud
Release Tab
Figure 2
Guide
Pin Slot
Power supply plug
location on EVB40-SPT
MOUNTING LOCATION
TheChargingStationshouldbelocatedincloseproximitytotheelectricvehicle’sparkinglocation.TheChargingStationmustconnecttotheelectricvehicleviaaChargeConnectorandChargeConnectorCord.NOTE:Thepathfromthe
ChargingStationtotheelectricvehicleshouldbefreefromobstacles,andbewithintherangeoftheChargeConnectorCord(19footstandardlengthforEVB16,25footstandardlengthforEVB30,EVB40).
TherecommendedmountingheightoftheChargingStationisnottoexceed48inches,butnotlessthan42inchesfromtheoortothetopoftheChargingStation.ThisprovidesconvenientaccessandoperationoftheChargingStation,
andmeetsADArequirementsforaccess.NOTE:TheareasurroundingtheChargingStationenclosureshouldbefreefromobstruction.Recommendedclearancearoundstation:5inchesaboveand3-1/2inchesoneitherside.
RATINGS
120/208V60Hz3-phaseY(L1-G/L2-G-120V,L1-L2–208V)
120/240V60HzSplit-phase(L1-G/L2-G-120V,L1-L2–240V)
16A (EVB16) - 30A (EVB30) - 40A (EVB40)
Voltage
Current
NOTE:ChargingStationoperateson120/208Vor120/240Vcircuitonly.Doesnotoperateon120Vcircuit.
CUSTOMER SUPPORT
CallourCustomerSupportHotlineat1-877-338-7473.PLEASEHAVETHEMODELNUMBERANDSERIAL
NUMBERAVAILABLEWHENYOUCALL.Thesecanbefoundonthelabelontheinsidecover
oftheChargingStation.
Ifyourcallismadeafterbusinesshoursoronweekends,pleaseleaveyourname,telephonenumber,theCharging
Station'sserialnumber,andabriefdescriptionoftheproblem.ACustomerServiceRepresentativewillcallbackat
theearliestopportunity.
Foradditionalproductsandinformation,andforcompletestepbystepguidelinesonhowtoinstall
ourElectricVehicleChargersandPre-WireKits,pleasevisitourwebsiteforour
"HowToInstall"videos-www.leviton.com/evrgreen.
Manyquestionsandanswerscanbefoundinourknowledgebasecommunity.
Justgotoleviton.comandclickontheKnowledgebaselink,orgodirectlyto
http://communities.leviton.com/community/knowledgebaseforums/evr-green.
PlugtheChargingStationintotheinstalledoutlet(20AforEVB16,50AforEVB30andEVB40)andreplacethe
EnclosureDoor.Uponpluggingintheunit,aself-testingsequencewillinitiate.PleaserefertotheLevel2User
Guideforamoredetaileddescription.NOTE:DONOTplugtheChargeConnectorintothevehiclepriortothe
self-test;thismaycausetheChargingStationtogointoColdLoadPick-up,anddelaycharging.Refer to Level 2 -
Electric Vehicle Charging Station User Guide for operation.
POWER CHARGING STATION
HARD-WIRE INSTALLATION
WARNING: TO AVOID FIRE, SHOCK, OR DEATH; TURN OFF POWER AT CIRCUIT BREAKER OR FUSE AND TEST THAT POWER IS OFF BEFORE WIRING!
CAUTION: USE THIS DEVICE WITH COPPER OR COPPER CLAD WIRE ONLY.
CAUTION: 20ACIRCUITBREAKERWITHMINIMUM12AWGWIRETOBEUSEDFOREVB16-40ACIRCUITBREAKERWITHMINIMUM10AWGWIRETOBEUSEDFOREVB30-
50ACIRCUITBREAKERWITHMINIMUM8AWGWIRETOBEUSEDFOREVB40.
NOTE:Choosingtohard-wiretheChargingStationrequirestheuseofthealternatehangholesandappropriatemountinghardwareSeeFigure 3foralternatehangholelocations.If
mountingtoaLevitonpedestal,pleaseproceedusingthemountinginstructionsprovidedwithinthePedestalHeadAssembly.
1. DepressreleasetabsonbottomofEnclosureandremoveEnclosureDoorbycarefullyliftingupandawayfromtheEnclosure (see Figure 2).Useapin-in-TorxType25screwdriverto
removetheMetalHard-WireAccessPanel(with4screws).
IMPORTANT NOTE:CarefullyremovetheribbonswitchconnectorfromprintedcircuitboardassemblyandthegroundwirefromtheHard-WireAccessPanelbeforesettingitaside
(Figure 5).
2. TheHard-wireAccessopeningislocatedatthebottomoftheAccessPanelshowninFigure 7.LoosenwireconnectorsandretainforStep4.Removepre-installedhubanddisconnect
PlugAssembly(see Figure 6).
NOTE:IfthePlugAssemblyisremovedfromthetoplocation,blockthisopeningusingthePlugandGasketfromthebottomholetomaintainwatertightness(NEMA4)oftheCharging
Station.
3. InstalltheH100-TBHub(Figure 7).Torquehubto65in-lbs.
4. RundedicatedcircuitspertheNationalElectricCodeandlocalbuildingcodes.Thecircuitmusthaveanadditional15inchesofloosewirestoterminatetheconnectionsontheinsideof
theChargingStation.SecureconduittoH100-TBHubusingproperUL-listedconduittting.Theuseofareducermayberequiredbasedonconduitttingselected.Stripwireends3/4
inchandsecuretocorrespondingwiresfromtoroidassemblyandgroundwirefromterminalblockwithwireconnectorsasshowninFigure 7.
NOTE:Useelectrically-conductivethreadsealantKOPR-SHIELD®CP8-TBorCP16byThomas&Betts®topreventwater/moisturepenetrationthroughthethreadingontting,reducer
nippleorthreadedconduit.Instructionforthreadsealantapplication:
a)Coat100%ofthemalethreadswiththeKOPR-SHIELD®compound.Workthecompounddownbetweenthethreads.
b)Screwthreadedtting/hub/reducer/conduittogetherandensurethatanoverowofthreadsealantispresent.
c)Thereisnocuretimeforthisproduct(theproductworksfromthepointofapplication).
NOTE:Useofductsealtoblockconduitopeningisneccessaryifconduitleadstoanon-NEMA4junctionbox(useofajunctionboxwithatleastaNEMA3Rratingisrequired).Use
GardnerBenderDS-110ductseal(TheHomeDepot®).Instructionforductsealapplication(ifnecessary):
a)Ductsealapplicationneedstobedoneafterallwiringconnectionshavebeencompleted.
b)Cleanhubsurfaceareasothatitisfreeofanydebrisorchemicalcontamination.
c)Openthe1-poundductsealpackageandbreakoffa11/2"x11/2"ductsealcompoundpiece.
d)Packtheductsealcompounddownwardintothehubopeninguntilthehubiscompletelysealed;ensurethatthecompoundencapsulatesthethreewirescompletely(seeFigure 4).
e)Oncethematerialistightandsecure,levelthesurfaceushwiththebottomofthehub.
5. Reconnectribbonswitchconnectorintomatingconnectoronprintedcircuitboardassemblyandreconnectgroundwire.ReinstalltheHard-WireAccessPanel(Figure 8) andclose
enclosuredoor.
6. Restorepoweratcircuitbreaker.Installation is complete. Refer to Level 2 - Electric Vehicle Charging Station User Guide for operation.
For Metal Stud Applications:
• Wallanchorscapableofsupportingamaximumallowableloadof200lbs.
For Solid Wall Applications:
• Wallanchorscapableofsupportingamaximumallowableloadof200lbs.
• Appropriateconduitandapplicablemountinghardware.
NOTE: Hard-Wire Access opening is located at the bottom of the Access Panel. Remove plug and gasket and place both on top where Plug Assembly and Pre-installed Hub were removed
(Figure 7).
Gathertherequiredtoolsandpartsbeforestartinginstallation.Besuretofollowmanufacturer’sinstructionsforuseofanytoolsorpartsusedforthisinstallation.
Alternate
Hang Holes
Figure 3
• Drillwith3/16"bit • Studnder
• Measuringtape • Wirecutters/strippers
• Pin-inTorxtype25driver • Pliers
•Level•Scratchawl
•Keyholesaw•Utilityknife
•#3Phillipsscrewdriver(formountingbracket)
Tools: Additional Parts (not included):
• Copperelectricalcable(seebelowforgauge)
• #14woodmountingscrews(2)-studmount
•CircuitBreaker-20A(EVB16)-40A(EVB30)or50A(EVB40)
•Conduit
•Strainrelief(ifapplicable)
•H100-TBHub(orengineeringequivalent)
Duct Seal
Figure 4
KOPR-SHIELD is a registered trademark of Jet-Lube, Inc
Thomas&Betts is a registered trademark of Thomas&Betts, Inc.
LIMITED 3 YEAR WARRANTY AND EXCLUSIONS
LevitonwarrantstotheoriginalconsumerpurchaserandnotforthebenetofanyoneelsethatthisproductatthetimeofitssalebyLevitonisfreeofdefectsinmaterialsandworkmanshipundernormalandproperuseforthree
yearsfromthepurchasedate.Leviton’sonlyobligationistocorrectsuchdefectsbyrepairorreplacement,atitsoption,ifwithinsuchthreeyearperiodtheproductisreturnedprepaid,withproofofpurchasedate,andadescription
oftheproblemtoLeviton Mfg. Co., Inc. 201 North Service Road, Melville, N.Y. 11747.Thiswarrantyexcludesandthereisdisclaimedliabilityforlaborforremovalofthisproductorreinstallation.Thiswarrantyisvoidifthisproduct
is installed improperly or in an improper environment, overloaded, misused, opened, abused, or altered in any manner, or is not used under normal operating conditions or not in accordance with any labels or instructions. There
are no other or implied warranties of any kind, including merchantability and fitness for a particular purpose,butifany implied warranty is required bytheapplicablejurisdiction, the duration of any suchimpliedwarranty,
including merchantability and tness for a particular purpose, is limited to three years. Leviton is not liable for incidental, indirect, special, or consequential damages, including without limitation, damage to, or loss of
use of, any equipment, lost sales or profits or delay or failure to perform this warranty obligation.Theremediesprovidedhereinare the exclusiveremediesunderthis warranty, whetherbasedoncontract, tort orotherwise.
FOR CANADA ONLY
Forwarrantyinformationand/orproductreturns,residentsofCanadashouldcontactLevitoninwritingatLeviton
Manufacturing of Canada Ltd to the attention of the Quality Assurance Department, 165 Hymus Blvd, Pointe-
Claire (Quebec), Canada H9R 1E9orbytelephoneat1 800 405-5320.


