Lionelo LUNA User manual

User manual
LUNA
Stroller 3 in 1
EN PL RO HU

Note:
1. Before using the product, please read the included user manual
carefully. The user manual is an integral element of the product.
Therefore, keep it with the packaging for future reference.
2. Before using the product, please ensure that all the parts have been
properly installed, tightened and secured.
3. Always use safety belts in order to ensure the child will not fall out of the
chair.
4. Do not use the mattress thicker than 8mm.
5. This device is not suitable for running.
6. Do not ever leave your child unattended in the stroller or carrier.
7. Keep the product away from fire.
8. Do not mount any parts when a child is in the stroller.
Precautions:
The stroller is suitable for children of maximum: 36 months, 96cm tall and
15kg of weight.
The carrier is suitable for children of maximum: 6 months, 70cm tall and 10kg
of weight.
The assembly of the product must be performed by an adult.
Do not place more than one child in the stroller at the same time.
Always put on the brake when the stroller is at a standstill.
Do not allow your child to stand in the stroller or carrier.
The product should be operated by reliable person only.
Damaged parts should be replaced with new ones. Do not use the stroller
with faulty components.
Only the components supplied by the manufacturer can be used with the
stroller.
Do not park the stroller in excessively hot or cold areas.
Do not place any objects on the covers or canopies of the stroller.
The weight of the items placed in the stroller’s basket cannot exceed 1.5kg.
After unpacking the product, keep the box and protective films away from
children.
Do not mount this
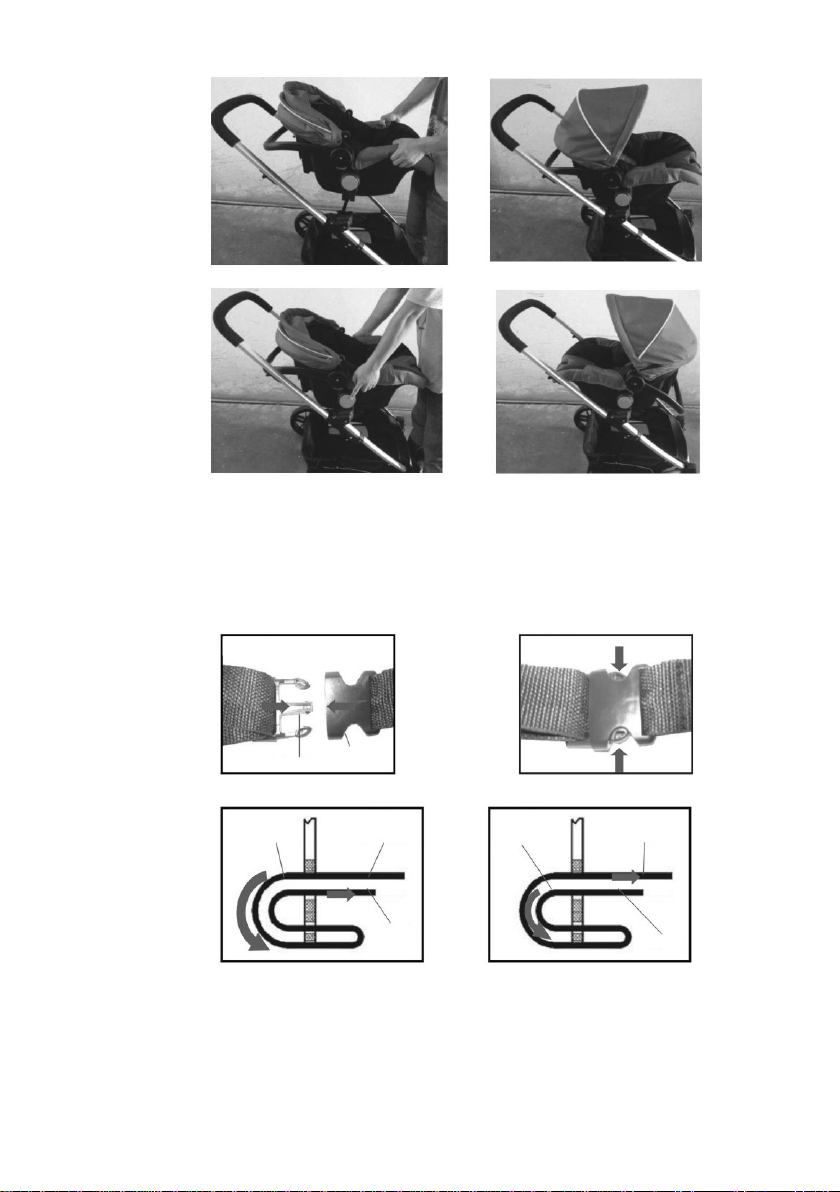
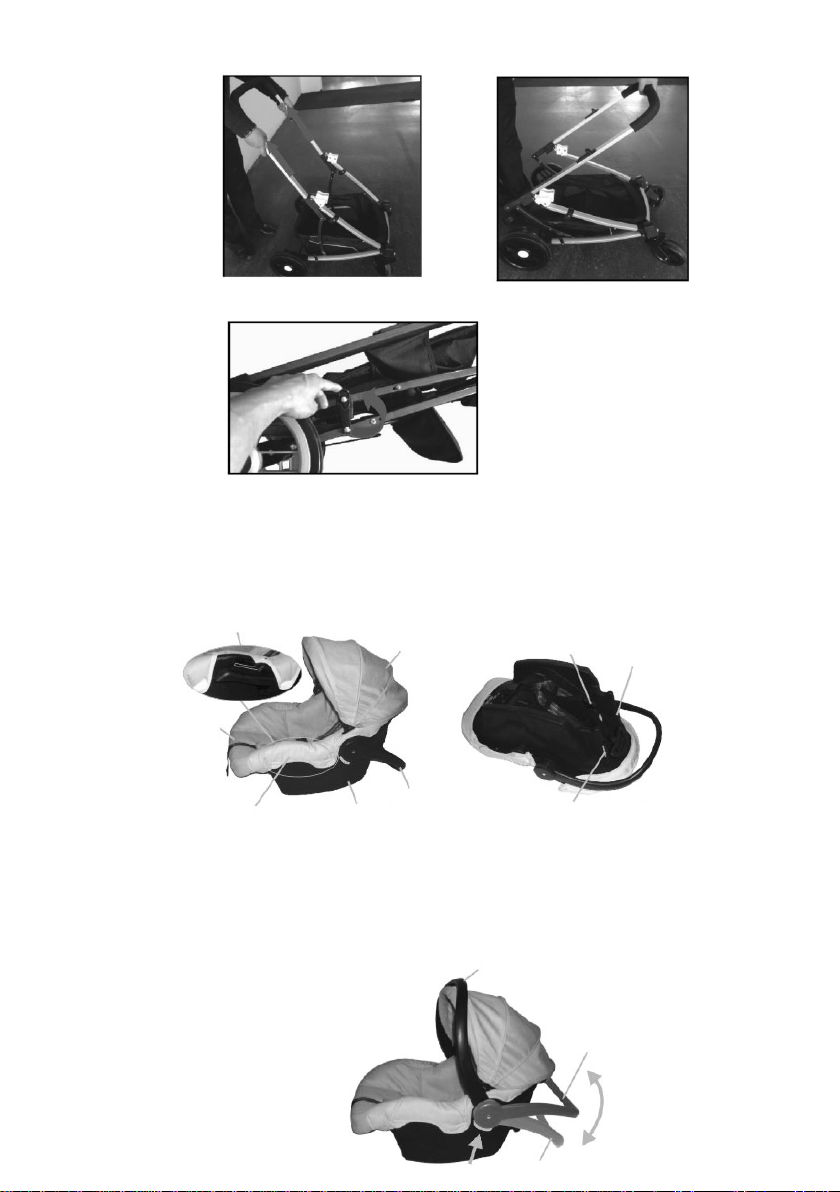
safety seat on a car
seat equipped with an
active airbag!

Main parts:
Front wheel - 2 pieces
Carrier
Rear wheel - 2 pieces
Main frame
Installation guide:
1. Unlock the side lock and lift the handle up. This way you will unfold the
base of the stroller. The “click” sound indicates that the unfolded frame
has been properly secured.
2. Installing front wheels: Slide the stem of the front wheel into the guide.
Push the wheel until you hear the “click” sound indicating that the stem
has been properly locked by the trigger.

3. Installing rear wheels: Slide the stem of the back wheel into the guide.
Push the wheel until you hear the “click” sound indicating that the stem
has been properly locked by the trigger.
4. Installing front protection bar: Slide the ends of the protection bar into
the guides until they are locked by the triggers.
Usage:
1. Canopy adjustment: Pull the canopy up to unfold it. In order to fold it
back, just push it down.
2. Backrest adjustment: Press the security lock at the rear side of the
carrier and increase or decrease the angle of the backrest. There are 3
positions available.

3. Front wheel turning locking: Press the lock at the front side of the front
wheels in order to prevent them from turning. Move the lock up so that
the wheels can be turned again.
4. Brake: To engage the brake, press it with your foot. It is located next to
the right rear wheel. To release the brake use your foot to lift the brake
lever.
5. Switching into the forward-facing mode: Press the security lock at the
rear side of the carrier and increase or decrease the angle of the
backrest. There are 3 positions available.
To move the backrest up, fasten the belts located underneath the
carrier at the level of the head.
To make room for the legs, fasten the belts located underneath the
carrier at the level of the legs.

6. Disassembling the carrier: To remove the carrier from the main frame
press the lock buttons located in the middle of the both sides of the
carrier (please look at the pictures below):
7. Installing the carrier on the main frame: Slide the carrier’s stem into the
main frame. Make sure there is no slack and the carrier is properly
secured in place. The carrier can be installed in a forward or rear-
facing position.
Lock button

8. Safety harness usage: To fasten the safety harness, insert the male end
into the female one. To unfasten it, press the lock buttons on both sides
of the male end and separate the ends:
9. Folding the main frame In order to fold the main frame, move the locks
on the bottom right and left side of the handle. Then, fold the handle,
as shown in the picture below. Prevent the main frame from unfolding
by locking the side security lock.

USING THE CARRIER:
1. Handle adjustment: Press and hold the two side buttons located on
the underside of the middle part of the handle. Then tilt the handle
to the most suitable position. There are 3 positions available:
Car safety belt guide
Hood
Handle
Carrier
base
Removable padding
Removable
padding
Lock connector
Car safety belt guide
Position 3
Position 2

2. 3 positions of the carrier:
•Static
•Swinging
•Carrying
3. Hood adjustment:
4. 5-point safety harness: Place the connectors of the side safety belts
in a way so that the left one is on the right one. Then, slide them
into the buckle of the lower belt. The “click” sound indicates the
belts have been properly fastened. In order to unfasten the safety
harness, press the button on the buckle of the lower belt.
Position 1
Handle adjustment
button
Position 1
Position 2
Position 3
Unfolding - folding

5. Installing the carrier in a car:
a) Place the carrier on a car seat in a rear-facing position.
Then, run the car safety belt through the upper guide:
b) Run the safety belt through the rear guides, as shown in
the picture below:
c) Position the carrier. Then, tighten and fasten the car safety
belt.

All the pictures and information in the manual have been submitted for illustrative
purposes only and are subject to change without prior notice.

Instrukcja obsługi
LUNA
Wózek dziecięcy 3 w 1

Uwaga:
1. Prosimy o uważne zapoznanie się z instrukcją obsługi prze użyciem
zakupionego towaru. Instrukcja jest stałym elementem produktu.
Dlategoteż należy ją zachować wraz z opakowaniem tak, aby móc do
niej powrócić.
2. Przed użyciem, upewnij się, że wszystkie części zostały prawidłowo
zamocowane i zablokowane.
3. Zawsze używaj pasów bezpieczeństwa, zapobiegających wypadnięciu
dziecka z siedzenia.
4. Nie nakładaj materaca większego niż 8mm grubości.
5. Urządzenie nie jest przystosowane do biegania.
6. Nie pozostawiaj dziecka bez opieki w wózku lub nosidełku.
7. Trzymaj urządzenie z dala od ognia.
8. Nie montuj części, gdy dziecko znajduję się w wózku.
Środki ostrożności:
Gondola przystosowana jest dla dzieci do maksimum: 36 miesiąca, 96cm
wzrostu oraz 15kg wagi.
Nosidełko przystosowane jest dla dzieci do maksimum: 6 miesięcy, 70cm
wzrostu oraz 10kg wagi.
Urządzenie powinno być złożone przez osobę dorosłą.
Nie przewozić więcej niż jednego dziecka w wózku.
Zablokuj hamulec, kiedy wózek jest w stanie bezruch.
Nie pozwalaj dziecku stawać na siedzeniu.
Urządzenie powinno być używane tylko przez osobę odpowiedzialną.
Uszkodzone części należy wymienić na nowe. Nie należy używać wózka z
uszkodzonymi podzespołami.
Wózek musi być używany z podzespołami dostarczonymi przez producenta.
Nie przetrzymuj wózka w miejscach nadmiernie zimnych i gorących.
Nie kładź żadnych obiektów na osłony i daszki wózka.
Artykuły umieszczane w koszu wózka nie mogą przekroczyć 1.5kg.
Po rozpakowaniu urządzenia, pudełko i folie ochronne trzymaj z dala od
dzieci.
Ten fotelik nie może
być używany na
siedzeniach
samochodowych z
włączoną poduszką
powietrzną!

Części podstawowe:
Przednie koło - 2 sztuki
Nosidełko/gondola
Koło tylne – 2 sztuki
Platforma wózka
Instrukcja instalacji:
1. Odbolkuj boczne zabezpiecznie i podnieś uchwyt do góry. Podstawa
wózka rozłoży się. Kliknięcie będzie oznaczało prawidłowe
zabezpieczenie przed złożeniem.
2. Instalacja przednich kół. Włóż trzpień przedniego koła w prowadnice.
Dociśnij koło do momentu zatrzaśnięcia trzpienia przez zapadkę,
usłyszysz charakterystyczny dźwięk kliknięcia.

3. Instalacja tylnych kół. Włóż trzpień tylnego koła w prowadnice. Dociśnij
koło do momentu zatrzaśnięcia trzpienia przez zapadkę, usłyszysz
charakterystyczny dźwięk kliknięcia.
4. Instalacja przedniego zabezpieczenia. Wsuń końcówki zabezpieczenia
w prowadniki, do momentu zatrzaśnięcia zabezpieczeń.
Używanie:
1. Regulacja daszka. Aby rozłożyć daszek, pociągnij go do góry. Aby
złożyć daszek przesuń go do dołu.
2. Regulacja oparcia. Wciśnij zabezpieczenie znajdujące się z tyłu gondoli
i zwiększ lub zmniejsz kąt pochylenia oparcia. Dostępne są trzy
możliwości ustawienia kąta.

3. Blokowanie skrętu przednich kół. Wciśnij blokadę znajdującą się z
przodu przednich, kół, aby zablokować skręt. Aby odblokować skręt
kół, przesuń zabezpieczenie do góry.
4. Hamulec. Aby użyć hamulca, wciśnij go nogą. Hamulec znajduje się
przy prawym tylnym kole. Aby zwolnić hamulec, podnieś do góry.
5. Zmiana wózka w spacerówkę. Wciśnij zabezpieczenie znajdujące się z
tyłu gondoli i zwiększ lub zmniejsz kąt pochylenia oparcia. Dostępne są
trzy możliwości ustawienia kąta.
Aby podnieść oparcie do góry, zapnij pasy znajdujące się pod spodem
gondoli na wysokości miejsca na głowę.
Aby zrobić miejsce na nogi, zapnij pasy znajdujące się pod spodem
gondoli na wysokości miejsca na nogi.

6. Demontaż gondoli. Aby zdjąć gondolę z platformy wózka, wciśnij
zabezpieczenia znajdujące się po obu stronach gondoli na środku
(patrz zdjęcie):
7. Montaż nosidełka na platformę wózka. Wsuń uchwyt nosidełka do
platformy wózka. Sprawdź czy nie ma luzów i czy nie można zdjąć
nosidełka. Nosidełko można zamontować tłem do tory jazdy lub
przodem.
Przycisk zabezpieczający

8. Użycie pasów bezpieczeństwa. Aby zapiąć pasy, wsuń męską
końcówkę w żeńską, aby rozłączyć wciśnij zabezpieczenia z obu stron
na końcówce męskiej i rozsuń końcówki:
9. Składanie platformy wózka. Aby złożyć platformę, przesuń oba
zabezpieczenia znajdujące się po prawej i lewej dolnej stronie
uchwytu. Następnie złóż uchwyt, tak jak na poniższym zdjęciu.
Zabezpiecz złożoną platformę przed samoistnym rozłożeniem, blokując
boczne zabezpieczenie.

UŻYWANIE NOSIDEŁKA:
1. Regulacja uchwytu. Wciśnij jednocześnie oba przyciski znajdujące
się z obu stron, na spodniej środkowej części uchwytu i przestaw
kąt pochylenia uchwytu. Możliwe do ustawienia są trzy pozycje:
2. Trzy pozycje nosidełka:
•Statyczna
•Bujanie
Prowadnica pasa bezpieczeństwa
samochodowego
Baldachim
Uchwyt
Obudowa
nosidełka
Pokrowiec można
zdjąć
Pokrowiec
Zaczep blokady
Prowadnica pasa
bezpieczeństwa
samochodowego
Prowadnica pasa bezpieczeństwa
samochodowego
Pozycja 3
Pozycja 2
Pozycja 1
Przycisk do
regulacji uchwytu
Pozycja 1
Pozycja 2

•Przenoszenie
3. Regulacja baldachimu:
4. Pięciopunktowe pasy bezpieczeństwa. Ustaw zaczepy pasów lewy
na prawym i wsuń je w prowadnice dolnego zaczepu. Usłyszysz
charakterystyczne kliknięcie, oznaczające poprawne zapięcie
pasów. Aby rozpiąć pasy, naciśnij przycisk znajdujący się na środku
dolnego zaczepu.
5. Instalacja nosidełka w samochodzie.
a) Ustaw nosidełko na siedzeniu tyłem do kierunku jazdy i
przepuść pas przez prowadnicę górną:
Pozycja 3
Rozkładanie – Składanie
Table of contents
Languages:
Other Lionelo Stroller manuals

Lionelo
Lionelo Mika User manual

Lionelo
Lionelo Annet Tour User manual

Lionelo
Lionelo Dani User manual

Lionelo
Lionelo Alexia User manual

Lionelo
Lionelo ELIA User manual

Lionelo
Lionelo LIV User manual

Lionelo
Lionelo Mari Tour User manual

Lionelo
Lionelo Annet Plus User manual

Lionelo
Lionelo Riya User manual

Lionelo
Lionelo EMMA PLUS User manual

Lionelo
Lionelo Amber User manual

Lionelo
Lionelo LEA User manual

Lionelo
Lionelo JulieONE User manual

Lionelo
Lionelo LO-EMMA User manual

Lionelo
Lionelo Natt User manual

Lionelo
Lionelo Cloe User manual

Lionelo
Lionelo Irma User manual

Lionelo
Lionelo Elia Oslo User manual

Lionelo
Lionelo EMMA PLUS User manual

Lionelo
Lionelo Dani User manual