manuals.online logo
Brands
  1. Home
  2. •
  3. Brands
  4. •
  5. luminii
  6. •
  7. Lighting Equipment
  8. •
  9. luminii Teava Suspension TEA-S Series User manual

luminii Teava Suspension TEA-S Series User manual

Page 1 of 3
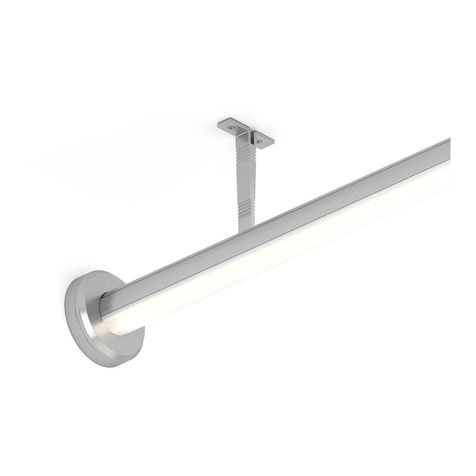
Teava Suspension - Installation Instructions
REV0.1
Please read all instructions prior to installation and keep for future reference!
1. Product to be installed by a qualied electrician.
2. Prior to installation ensure power is off at fuse box to prevent electrical shock.
3. More than one person is recommended for this installation.
*LUMINII RESERVES THE RIGHTS TO CHANGE SPECIFICATION & INSTRUCTION WITHOUT NOTICE
Model: TEA-XX-S 7777 Merrimac Ave
Niles, IL 60714
T 224.333.6033
F 224.757.7557
[email protected]
www.luminii.com
Note: Prior to installation all 24VDC wires must be present in
junction box. Refer to the power supply installation
instruction for additional information.
Note: More than one person is recommended for this
installation.
standoff
location
marks
anchor
1
1.1 Align one standoff hub to the junction box & measure the
distance from standoff hub to the other hub. Then mark this
location to the ceiling, if over 72” an additional support will be
included that would also need a mark. Also marks will be
necessary if using more than one fixture. Use canopy detail to
slighting off center standoff hub. If connecting multiple fixtures
together reference step 7.
2.1 On the marked location(s), make a hole using a 13/64" drill
bit.
2.2 Insert the anchor into the hole and push completely in.
2.3 Insert wood screw through cap & washer and then tighten to
secure into the anchors.
ceiling
drill
13/64"
drill bit
2.1
2.3
2.3
canopy detail
4-3/8"
4-3/8"
7/8"
standoff
cap
hole
2.2
2
wood screw
cap
spacer
3
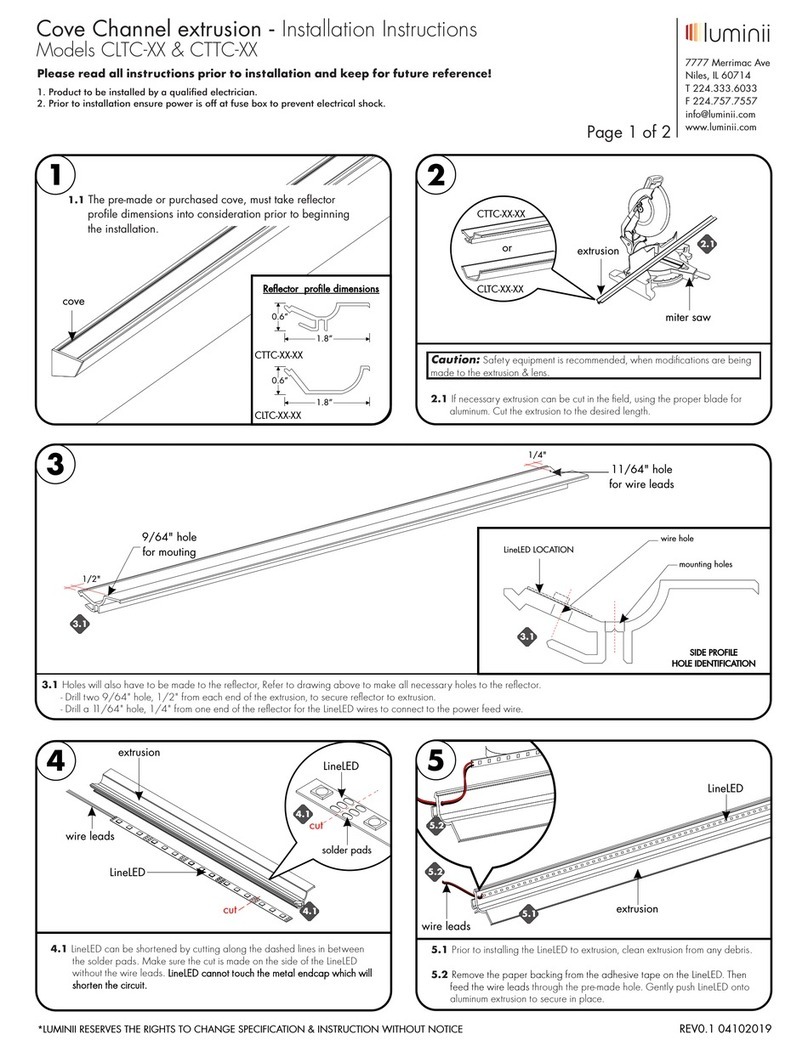
3.1 While one person is holding the fixture, the other person can
slide the coaxial cable end through the clear o-rings, thumb
nut, backplate & crossbar assembly.
3.2 Peel back the coaxial cable to expose the power wires. Connect
the red (24VDC+) & black (24VDC-) power supply wires to the
fixture red & black wires.
junction box
backplate
crossbar
assembly
fixture
power wire
3.1
Note: Prior to wiring the desired fixture height must be
determined to cut off any un-necessary wire.
4.1 Insert the wire nut connections into the junction box & align the
crossbar to the junction box holes and secure using the provided
two #8-32 screw.
4.2 Slide the backplate up to the crossbar and secure by hand
tightening the thumb nut into the crossbar.
#8-32 screw
crossbar
backplate
junction box
4.1
4
4.2
thumb nut
24V DC+24V DC-
3.2
strain
relief
coaxial
cable
3.1
o-ring
1.1
E472444
1.1
measure
standoff
hub
fixture
over 72”, comes
with support
support
aircraft cable
cable stopper
threaded post
5
5.1 Untangle each aircraft cable and insert into the threaded post
until the cable stopper.
5.2 Push on the standoff hub tab and feed the aircraft cable into the
standoff hub until necessary. Release tab to secure in place. For
the aircraft cable closest to the coaxial cable slide through the
o-rings on the coaxial cable first.
5.3 Remove the clear protective film from the face of the lens.
5.1
6.1 Tighten each threaded post into a cap, one will be on the
backplate and other(s) on the ceiling. If fixture not leveled,
adjustments can be made by pushing on the standoff hub tab.
Then either feed more cable into the standoff hub or pull out
cable from the standoff hub and release to secure.
6.2 Cut off any extra aircraft cable from the standoff hub hole.
6
standoff
hub tab
threaded post
aircraft cable
cap 6.1
6.2
6.2
Teava Suspension - Installation Instructions
Please read all instructions prior to installation and keep for future reference!
1. Product to be installed by a qualied electrician.
2. Prior to installation ensure power is off at fuse box to prevent electrical shock.
3. More than one person is recommended for this installation.
*LUMINII RESERVES THE RIGHTS TO CHANGE SPECIFICATION & INSTRUCTION WITHOUT NOTICE
Model: TEA-XX-S 7777 Merrimac Ave
Niles, IL 60714
T 224.333.6033
F 224.757.7557
[email protected]
www.luminii.com
Page 2 of 3
5.2
aircraft cable
threaded post
standoff
hub tab
E472444
REV0.1
7
7.1 If joining fixtures together, insert the fixture end into the corresponding fixture. Secure by tightening the two set screw that is the closest to
the fixture. Reference drawing above as reference, to join correctly.
116.00”-232.00”
joiner @ center in addition to 2 supports
support
fixture
joiner
joiner
7.1
7.1
7.1
fixture
fixture
fixture
set screw
Allen wrench
Teava Suspension - Installation Instructions
Please read all instructions prior to installation and keep for future reference!
1. Product to be installed by a qualied electrician.
2. Prior to installation ensure power is off at fuse box to prevent electrical shock.
3. More than one person is recommended for this installation.
*LUMINII RESERVES THE RIGHTS TO CHANGE SPECIFICATION & INSTRUCTION WITHOUT NOTICE
Model: TEA-XX-S 7777 Merrimac Ave
Niles, IL 60714
T 224.333.6033
F 224.757.7557
[email protected]
www.luminii.com
Page 3 of 3
E472444
REV0.1
8.1 If necessary fixture head can be slightly rotated by loosening the inside set
screws (highlighted in blue) on the end cap & joiner if applicable using a
Allen wrench. Make the necessary adjustments then re-tighten the set screws.
fixture
joiner
8.1
set screw
Allen wrench
fixture
set screw on joiner
set screw on endcap
fixture
Allen wrench
set screw
8.1
8
down
model
up
model

Other luminii Lighting Equipment manuals

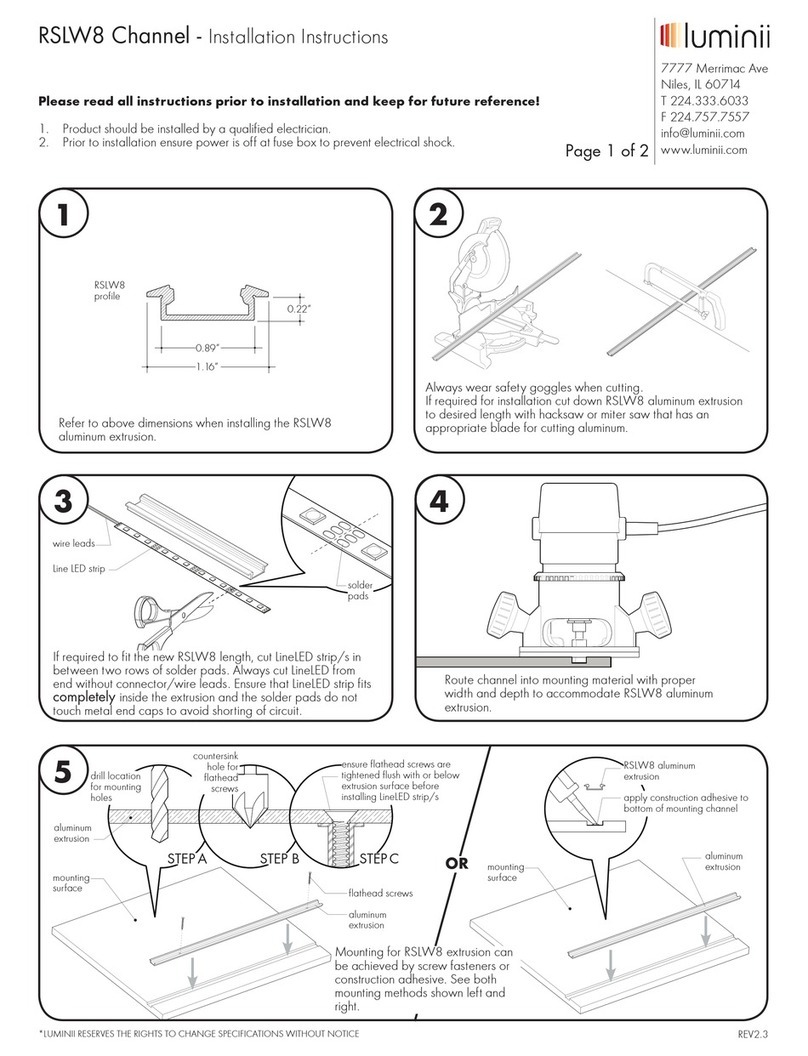
luminii RSLW8 Channel User manual

luminii

luminii RSLW8 Channel User manual

luminii Level User manual

luminii

luminii Level User manual

luminii Kendo Closet Rod User manual

luminii

luminii Kendo Closet Rod User manual

luminii Optic Arts KM Series User manual

luminii

luminii Optic Arts KM Series User manual

luminii Optic Arts PS010TW-96-24 User manual

luminii

luminii Optic Arts PS010TW-96-24 User manual

luminii PS010WD-96-24 User manual

luminii

luminii PS010WD-96-24 User manual

luminii senso LETO 4 User manual

luminii

luminii senso LETO 4 User manual

luminii Optic Arts KILO Channel User manual

luminii

luminii Optic Arts KILO Channel User manual

luminii KMC Series User manual

luminii

luminii KMC Series User manual

luminii Explorer Wall EXPW Series User manual

luminii

luminii Explorer Wall EXPW Series User manual

luminii Optic Arts K45RC Series User manual

luminii

luminii Optic Arts K45RC Series User manual

luminii TOVE-G Series User manual

luminii

luminii TOVE-G Series User manual

luminii RPLW80 Channel User manual

luminii

luminii RPLW80 Channel User manual

luminii CLTC Series User manual

luminii

luminii CLTC Series User manual

luminii Matrix Plus MP-DO-DW-22K-60K User manual

luminii

luminii Matrix Plus MP-DO-DW-22K-60K User manual

luminii Optic Arts CH-MD-LS-SF Series User manual

luminii

luminii Optic Arts CH-MD-LS-SF Series User manual

luminii Matrix Plus Series User manual

luminii

luminii Matrix Plus Series User manual

luminii Optic Arts PLAS Channel User manual

luminii

luminii Optic Arts PLAS Channel User manual

luminii QUE Channel User manual

luminii

luminii QUE Channel User manual

luminii Kurba Pixel KBL-F-V-SPI User manual

luminii

luminii Kurba Pixel KBL-F-V-SPI User manual

luminii mCove M User manual

luminii

luminii mCove M User manual

luminii Katana KAT User manual

luminii

luminii Katana KAT User manual

Popular Lighting Equipment manuals by other brands

Pinegreen Lighting CL-2PKG2SL-ST user manual

Pinegreen Lighting

Pinegreen Lighting CL-2PKG2SL-ST user manual

MaxLite HL Series operating instructions

MaxLite

MaxLite HL Series operating instructions

ACME LIGHT PANEL 1000 user manual

ACME

ACME LIGHT PANEL 1000 user manual

Chromlech JARAG-5 user manual

Chromlech

Chromlech JARAG-5 user manual

American DJ Epsilon User instructions

American DJ

American DJ Epsilon User instructions

Martin Alien 05 user manual

Martin

Martin Alien 05 user manual

Elation DW PROFILE user manual

Elation

Elation DW PROFILE user manual

Somogyi Elektronic DRM 16 quick start guide

Somogyi Elektronic

Somogyi Elektronic DRM 16 quick start guide

Viabizzuno a1 system Installing instructions

Viabizzuno

Viabizzuno a1 system Installing instructions

Griven SWAN AL1610 instruction manual

Griven

Griven SWAN AL1610 instruction manual

Larson Electronics LEDP5W-30-TP1-50CR quick start guide

Larson Electronics

Larson Electronics LEDP5W-30-TP1-50CR quick start guide

HEISSNER L124-T Instructions for use

HEISSNER

HEISSNER L124-T Instructions for use

LED's light 1000542 quick start guide

LED's light

LED's light 1000542 quick start guide

ISGM i-2UVA user manual

ISGM

ISGM i-2UVA user manual

BAYLED PRIMUS PRL-8 installation guide

BAYLED

BAYLED PRIMUS PRL-8 installation guide

Bionizer OxiBOSS Instruction book

Bionizer

Bionizer OxiBOSS Instruction book

Jandy TruGuard Installation and operation manual

Jandy

Jandy TruGuard Installation and operation manual

Varytec LED Giga Bar 4 user manual

Varytec

Varytec LED Giga Bar 4 user manual

manuals.online logo
manuals.online logoBrands
  • About & Mission
  • Contact us
  • Privacy Policy
  • Terms and Conditions

Copyright 2025 Manuals.Online. All Rights Reserved.