manuals.online logo
Brands
  1. Home
  2. •
  3. Brands
  4. •
  5. molex
  6. •
  7. Power Tools
  8. •
  9. molex 57131-6000 User manual

molex 57131-6000 User manual

INSTRUCTION MANUAL NO.
IS-0035JE
ISSUED 1989-03-07
REVISED 2005-02-15
REV. B
防水コネクタキャップ装着工具
SPLASH PROOF CONNECTOR CAP
FITTING TOOL
57130−6000:52116ハウジング用 (For 52116 Housing)
57131−6000:52117ハウジング用 (For 52117 Housing)
取扱説明書
OPERATING MANUAL
日本モレックス株式会社
Molex Ja
p
an Co., Ltd.
日本モレックス株式会社
Molex Japan Co., Ltd. 変更履歴
Contents of Update 取扱説明書番号
Instruction Manual No. IS-0035JE
名称
Title 防水コネクタキャップ装着工具
Splash Proof Connector Cap Fitting Tool 治具番号
Tool Number 57130-6000
57131-6000
Rev. Issued Description
0 1989/03/07
新規作成リリース。
New creation release.
A 1989/03/16
パーツリストを追加。
Added the parts list. Prepared by Y. Ishiwata
Checked by T. Yoshida
B 2005/02/15
バイリンガル版に改訂。
Revised to a bilingual version.
ECN-JM50015 Approved by A. Horino
A–1
<安全についてのご注意>
ご使用前に必ずお読み下さい。
<Safety Precautions>
Please read the following before operating the tool.
1.はじめに
Introduction
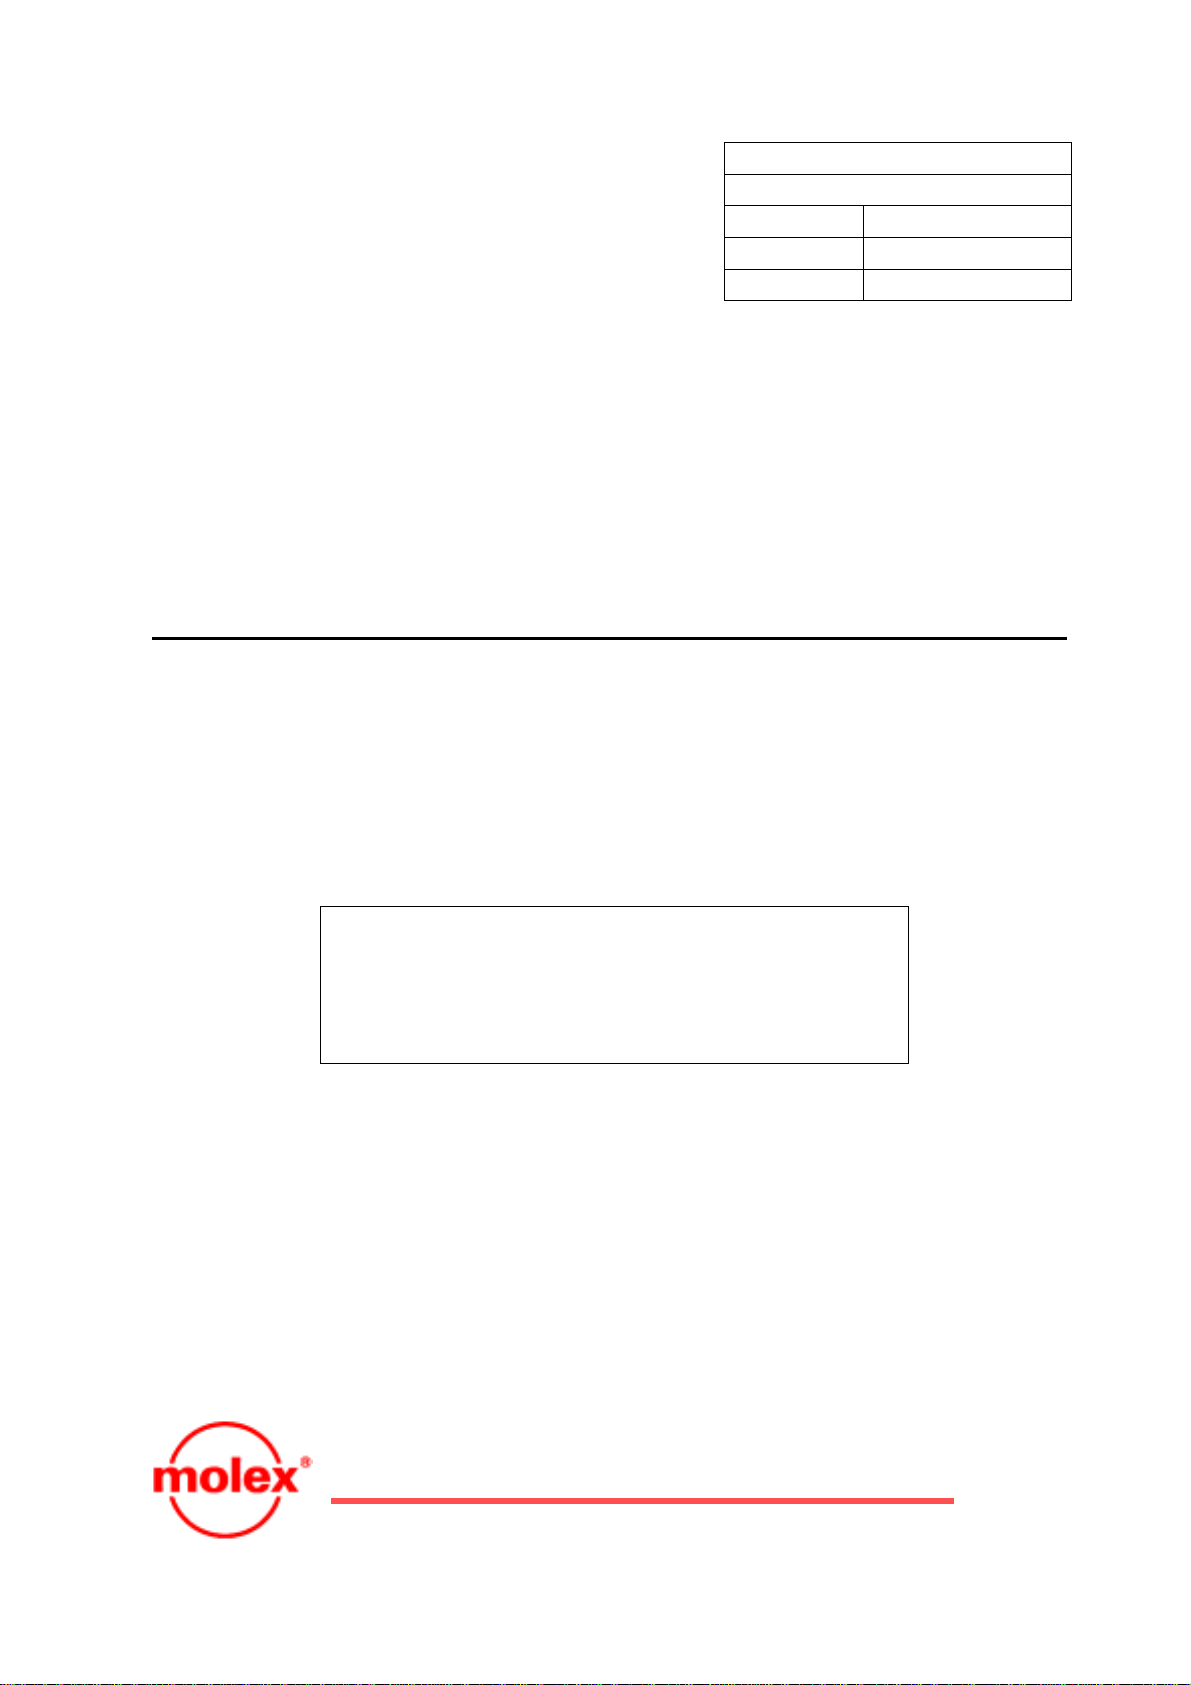
このたびは、弊社の防水コネクタキャップ装着工具をご採用頂きありがとうございました。
本ツールを正しくご使用頂くために、本取扱説明書が作成されています。
作業前に本取扱説明書を十分に注意してお読み頂きますようお願い致します。
Thank you for choosing our Splash Proof Connector Cap Fitting Tool.
This document is prepared so that the tool is properly used.
Please take the time to read this manual, making sure you understand the operating
procedures described herein before attempting to operate the tool.
2.危険な操作について
Dangerous operations
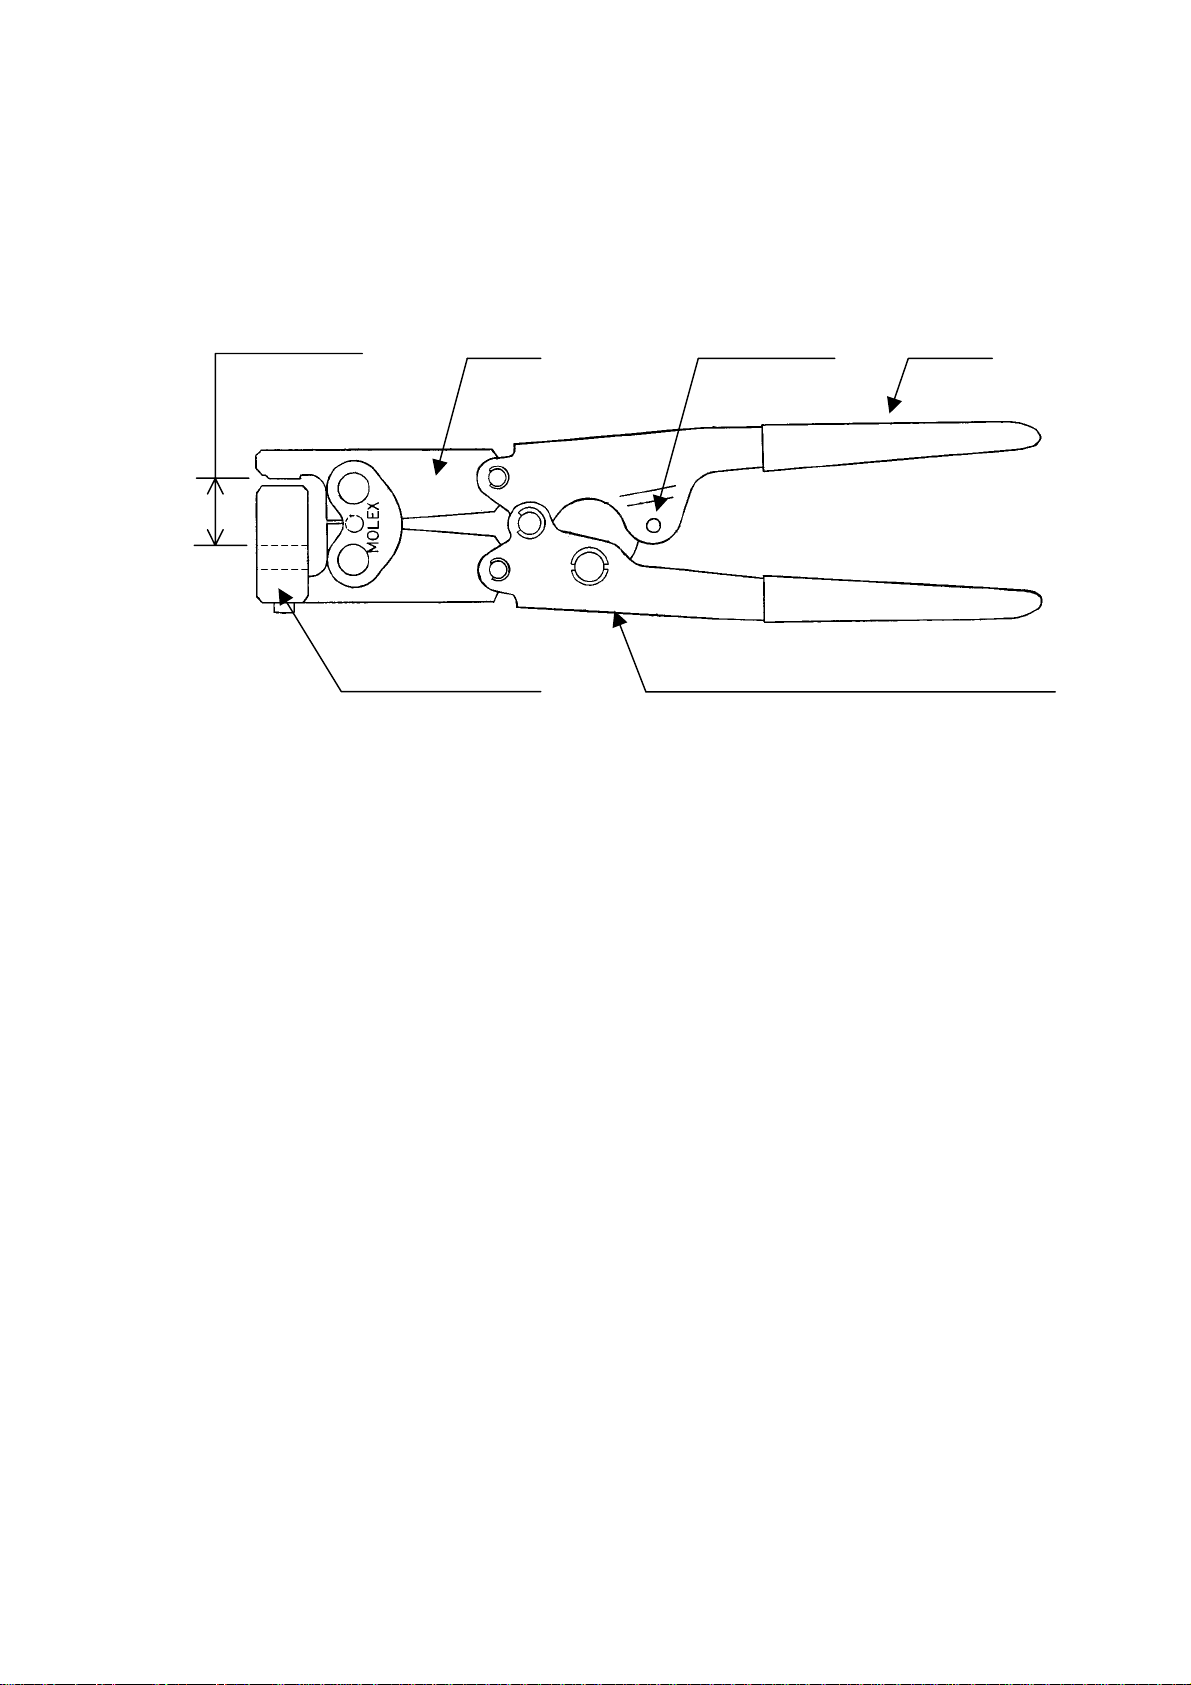
1)防水コネクタキャップ装着工具(以下、工具という)のハンドルを操作するときは、身体の一部
や異物などを工具の内部に入れないで下さい。ケガをする危険が有ります。
Don’t insert a part of your body or other foreign materials in the splash proof connector cap
fitting tool (hereinafter referred to as the “tool”) while you’re operating the handle of a tool,
as injury my result.
2)ハンドルが開く時、ハンドルの動きに注意して下さい。ラチェットが外れる時ハンドルが勢い良
く開く事が有り、ケガをする危険が有ります。
Beware of a handle when it is opened. Releasing a ratchet may cause the handle to open
abruptly, resulting in injury.
3)工具は、操作についてと安全に作業を行うための教育を管理者より受け、適正な知識と操作技能
を有する作業者だけが使用して下さい。不慣れな作業者の場合はケガをする危険が有ります。
Only users who have received adequate training on usage and safety from their manager,
and have appropriate knowledge and skills must use the tool. Use by unfamiliar users may
cause injury.
<注意>
<Caution>
1)本書の内容の一部又は全部を無断転載することは禁じられています。
Unauthorized reproduction of this document in part or in whole is prohibited.
2)本書の内容に関しては将来予告無しに変更することがあります。
The contents of this document are subject to change without notice.
3)本書の運用を理由とする損失、遺失利益などの請求については、弊社はいかなる
責任も負いかねますので、予めご了承下さい。
Molex Japan Co., Ltd. assumes no responsibility for losses resulting from use or
misuse of this document.
A–2
<安全についてのご注意>
ご使用前に必ずお読み下さい。
<Safety Precautions>
Please read the following before operating the tool.
3.取扱い上の注意
Careful handling
1)工具の工具番号を必ず確認の上、適合コネクタでのキャップ装着作業を行って下さい。
Carry out the cap fitting work with the acceptable connector after confirming the tool
number.
2)ご使用前に各部の損傷が無いか工具をチェックし、損傷がある場合は修理して下さい。キャップ
装着不良の原因になる恐れが有ります。
Check the tool for any damage, and repair prior to use. There is fear that it causes a cap
defective fitting.
3)工具の使用期間中は定期的に清掃を行って下さい。
Clean the tool regularly if used frequently.
4)工具の保管場所は極端に高温、低温、又は湿度が高い所は避けて下さい。
Avoid storing the tool in extremes of temperature, or high-humidity environment.
5)使用しない場合は子供の手の届かない場所に保管して下さい。事故の恐れが有ります。
Keep the tool in a place out of reach of children in order to prevent accidents.
4.してはいけない操作
Must not be carried out
1)工具をハンマーやペンチの代わり等、キャップ装着作業以外の用途に使用しないで下さい。又、
工具に改造等を加えないで下さい。工具破損等により事故やケガをする危険が有ります。
Use the tool only for the cap fitting purpose. Don’t use it in place of a hammer, pliers, or
other tools. Don’t remodel the tool. Parts damage may result in accident or injury.
2)工具は表示されたコネクタ以外は使用しないで下さい。又、適合しないキャップを圧装着しない
で下さい。工具破損の恐れが有ります。
Don’t use a tool for unspecified connectors. Don’t press fit an unspecified cap. Both may
cause parts damage.
3)工具のラチェット機構は手の握力での動作を基準に設計されています。他の機械類に装着して使
用したり、無理にハンドルを開いたりする不適当な使い方は工具の機能や寿命を正常に保持でき
ませんので注意して下さい。
The ratchet mechanism of the tool is designed based on operation by the grip of the hand.
Note that improper handling such as inserting it into other devices and opening the handle
forcibly may decrease its capabilities and lifespan.
Page 1
1.概要
Description
このツールは、モレックス社の防水コネクタのハウジングにキャップを装着するために開発さ
れた手動工具です。
本ツールをご使用前に、工具に刻印されている適用コネクタ番号をご確認してから、キャップ
装着作業を実施して下さい。
This tool is a hand tool, which is designed for the cap fitting to the housing of a splash
proof connector of Molex.
Please confirm the connector number on the hand tool before attempting to operate this
tool, and carry out the cap fitting operation.
2.工具仕様
Tool Specification
1)工具名称:
Tool name: 防水コネクタキャップ装着工具
Splash Proof Connector Cap Fitting Tool
2)工具型番:
Tool number: ①57130−6000
②57131−6000
3)外形寸法と重量:
Outer dimensions and weight: 230(横幅)x 70(奥行き)x 20(厚さ)mm、約500gf
230 (width) x 70 (depth) x 20 (thickness) mm, Approx. 500gf
4)管理方法
Management method: ハンドルを動作端まで十分に握った時、ハウジングホルダーとロ
アージョー間の「閉じ高さ寸法」が規格値にあること。
The “shutting height size” between the housing holder and the
lower jaw must be in the standard value when grips the
handle enough to the operation end.
5)適合工具とハウジング:(2.5mm ピッチ スプラッシュプルーフコネクタ)
Applicable tool and housing: (2.5mm Pitch Splash Proof connector)
工具型番
Tool number ハウジングASS’Y
Housing ASS’Y 極数
Circuits number ターミナル番号
Terminal number 適合電線
Applicable wire
57130-6000 52116
プラグハウジング
Plug housing 2-4 50038 AVS0.3
57131-6000 52117
リセプタクルハウジング
Receptacle housing 2-4 50039 AVS0.3
Page 2
6)工具外観と各部名称
Tool appearance and parts name
ハンドル
Handle
ラチェット調整ネジ&固定ナット
Ratchet adjustment screw & Fixing nut
ジョー
Jaw
ハウジングホルダー
Housing holder
ラチェット部
Ratchet part
閉じ高さ寸法
Shutting height size
Page 3
3.作業方法
Operation Method
1)工具のハンドルを軽く握って「ラチェット」が1〜3歯引っ掛かる予備ロック状態にします。
Grip the handle of a tool lightly to put it into the state of a preliminary that the “ratchet” is
caught of 1-3 teeth.
2)ハウジングアッセンブリーを「キャップ③」が「ロアージョー④」と平行になるように工具に装
着します。この時、ロアージョーに装着する「電線②」は「U溝⑤」の奥まで押し込みます。
Set a housing assembly to the tool so that the “cap (3)” may become parallel to the “lower
jaw (4).” At this time, the “wire (2)” installed in the lower jaw is pushed into the interior of
the “U ditch (5).”
3)片手で「電線②」が動かないように、かつ「キャップ③」と「ロアージョー④」との間に隙間が
開かないように、「矢印」方向に電線を引っ張りながら、反対側の手でラチェットが外れるまで
ハンドルを握り締めます。
Pull the “wire (2)” to the “arrow” direction so that any space should not open between the
“cap (3)” and the “lower jaw (4)” and the wire doesn’t move by one hand, and grasp the
handle until the ratchet comes off by the other hand.
4)作業後、キャップがハウジングに確実にロックされて、ハウジングやキャップに破損や変形がな
いことを確認します。
After work, confirm that the cap is surely locked to the housing, and there are neither
damage nor transformations in the housing and the cap.
『注意』ハウジング、キャップ、電線等の寸法変動によりキャップはハウジングにロックする位置が
変化します。よって使用する工具のラチェットを適正位置に作業開始前に調整して下さい。
“Note” The position in which the cap is locked to the housing by the size changes such as the
housing, caps, and wires changes. Therefore, please adjust the ratchet of the tool used
at a proper position before operation start.
①ハウジング
Housing
②電線
Wire
③キャップ
Cap
④ロアージョー
Lower jaw
②電線
Wire
⑤U溝
U ditch
ここに隙間がないこと
Must not be space in this.
④ロアージョー
Lower jaw
矢印
A
rrow
Page 4
4.日常点検
Daily Maintenance
4.1.日常点検
Daily Maintenance
1)ツールの管理
Management of tool
作業開始前に、本書の『始業点検一覧表』に基づくツールチェックを実施し、規格に合格して
いることを確認してから作業を開始して下さい。
*同時に各々の点検結果を記録して下さい。
Before a work start, please carry out the tool check in accordance with the “startup
checklist” in this manual, and start work after checking that it satisfies a standard.
* Please record each check result simultaneously.
2)異物の除去
Removal of foreign substances
作業中に「コネクタホルダー」等に埃や電線屑の異物が付着しますので、異物を適時取り除い
て下さい。
*そのまま放置はキャップ装着不完全の原因になる場合が有ります。
Since foreign substances such as dust and wire scrap adheres to a “connector holder”, etc.
during operation, please remove a foreign substance timely.
* Neglect may become the cause that the cap pressing lock imperfection.
3)終業時の清掃
Cleaning of work end
作業終了時に治具を毎日圧縮エアーで清掃してから軽く乾拭きして下さい。錆びを防ぐ効果が
あります。
Please wipe with a dry cloth lightly after cleaning a tool with compression air every day
at the time of a work end. There is an effect that prevents rusting.
4)給油
Lubrication
月に一度の周期で稼動部へ機械油を適量給油して下さい。
Please supply proper amount of the machine oil to the moveable points with the
frequency of once a month.
5)閉じ高さ寸法
Shutting height size
ハンドルを動作端まで十分に握った時、「ハウジングホルダー⑤」と「ロアージョー⑥」間の
「閉じ高さ寸法④」が規格値にあること。(次頁図を参照下さい)
『閉じ高さ寸法の規格値』
57130-6000 のツール: 25.4±0.1 mm
57131-6000 のツール: 13.9±0.1 mm
The shutting height size between the housing holder and the lower jaw must be in the
standard value when grips the handle enough to the operation end. (Please refer the figure
on the next page)
[Standard value of shutting height size]
Tool of 57130-6000: 25.4+/-0.1 mm
Tool of 57131-6000: 13.9+/-0.1 mm
Page 5
4.2.閉じ高さ寸法の調整方法
Adjustment Method of Shutting Height Size
1)付属の「スパナ①」を使い、「固定ナット②」(裏側)を緩めます。
Loosen the “fixing nut (2)” by using the “spanner (1)” (back side) of the attachment.
2)「調整ネジ③」を回転させて、「閉じ高さ寸法④」を調整します。
*調整ネジを右回転:ジョーが多く閉じる
*調整ネジを左回転:ジョーが少し閉じる
Rotate the “adjustment screw (3)”, and adjust the “shutting height size (4).”
 Rotate to right: The jaw shuts a lot.
 Rotate to left: The jaw shuts a little.
『閉じ高さ寸法の規格値』
57130-6000: 25.4±0.1 mm
57131-6000: 13.9±0.1 mm
[Standard value of shutting height size]
57130-6000: 25.4+/-0.1 mm
57131-6000: 13.9+/-0.1 mm
3)適正寸法が得られたら「固定ナット②」を締め付けます。
Tighten the “fixing nut (2)” when a proper size is obtained.
調整ネジ③
A
djustment screw
固定ナット②(裏側)
Fixing nut (back side)
付属の「スパナ①」
“Spanner (1)” of the attachment
閉じ高さ寸法④
Shutting height size ロアージョー⑥
Lower jaw
ハウジングホルダー⑤
Connector holder
Page 6
5.パーツリスト
Parts List
No. 部品番号
Parts number 部品名称
Parts Name 数量
Q’ty 部品名称
Parts Name 摘要
Remarks
J4160 Handle ASS’Y (1) ハンドル一式
1 J4174 Outside Handle 1 外側ハンドル
2 J4170 Inside Handle 1 内側ハンドル
3 J4163 Torsion Spring 1 トーションスプリング
4 J4168 Ratchet Spring 1 ラチェットスプリング
5 J4175 Adjustment Screw 1 調整ネジ
6 J4176 Nut 1 ナット
7 J4161 Pivot Pin 1 ピボットピン
8 J4166 Ratchet pin 1 ラチェットピン
9 J4177 Handle pin 2 ハンドルピン
10 J4164 Ratchet Plate 1 ラチェット板
11 J4165 Ratchet 1 ラチェット
12 - Spring Pin phi3x10L 1 スプリングピン φ3x10L
13 - E-ring 5mm 2 Eリング 5mm
14 - E-ring 3mm 4 Eリング 3mm
15 - E-ring 2.5mm 4 Eリング 2.5mm
16 J4173 Rivet 2 リベット
17 J4172 Link 2 リンク
18 J4171 Insert Pivot Pin 2 インサートピボットピン
19 57128-1003 Upper Jaw 1 アッパージョー
20 57128-1002 Lower jaw 1 ロアージョー
57130-1001 Housing Holder 1 ハウジングホルダー
21 57131-1001 Housing Holder 1 ハウジングホルダー
22 - Cap Screw M4x12L 1 キャップスクリュー M4x12L
57128-1004 Shim 1 シム
Page 7
6.防水コネクタキャップ装着工具 始業点検一覧表
Splash Proof Connector Cap Fitting Tool Startup Checklist
【適合ツール】57130-6000: 防水コネクタキャップ装着工具
57131-6000: 防水コネクタキャップ装着工具
[Applicable Tool] 57130-6000: Splash Proof Connector Cap Fitting Tool
57131-6000: Splash Proof Connector Cap Fitting Tool
『注意』始業前に下記事項の点検を実施し、問題無しを確認してから作業を開始して下さい。
“Note” Please check the following matter before the commencement of work, and start operation
after checking those without a problem.
No. 点検個所
Checkpoint 規格
Standard 方法/部材
Method/equipment 点検結果
Check result
1 閉じ高さ寸法
Shutting height
size
『規格値』
[Standard value]
57130-6000: 25.4+/-0.1 mm
57131-6000: 13.9+/-0.1 mm
ノギスで測定
Measure with calipers.
2 キャップ装着
Cap fitting
キャップがハウジングに確実にロック
され、かつハウジングやキャップに破
損や変形がないこと。
The cap must surely be locked to the
housing, and there must be neither
damage nor transformations in the
housing and the cap.
試し操作で確認
Check by trial
operation.
3 ハウジングの傷
Crack of hosing
ツールによる傷や変形がハウジングや
キャップに無いこと。
There are no crack and deformations
by the hand tool in a housing and a
cap.
目視確認
Check visually.
4 異物や埃
Article and dust
ハウジングホルダーに異物や埃無き
事。
There are no article and dust in a
housing holder.
清掃
Cleanup
調整ネジ
A
djustment screw
固定ナット(裏側)
Fixing nut (back side)
閉じ高さ寸法①
Shutting height size ロアージョー
Lower jaw
ハウジングホルダー④
Connector holder

This manual suits for next models

1

Other molex Power Tools manuals

molex 63816-1700 User manual

molex

molex 63816-1700 User manual

molex TM2000 User manual

molex

molex TM2000 User manual

molex TM2000 User manual

molex

molex TM2000 User manual

molex 63816-0100 Manual

molex

molex 63816-0100 Manual

molex 63816-0270 User manual

molex

molex 63816-0270 User manual

molex 63600-0478 User manual

molex

molex 63600-0478 User manual

molex 207129 Series User manual

molex

molex 207129 Series User manual

molex TM-3000 User manual

molex

molex TM-3000 User manual

molex TM42 User manual

molex

molex TM42 User manual

molex 63823-5600 User manual

molex

molex 63823-5600 User manual

molex 69020-2025 User manual

molex

molex 69020-2025 User manual

molex 43375 User manual

molex

molex 43375 User manual

molex 64000-0041 User manual

molex

molex 64000-0041 User manual

molex 11-31-6356 User manual

molex

molex 11-31-6356 User manual

molex TM-3000 User manual

molex

molex TM-3000 User manual

molex 63823-5700 User manual

molex

molex 63823-5700 User manual

molex 63801-8550 User manual

molex

molex 63801-8550 User manual

molex 69020-1908 User manual

molex

molex 69020-1908 User manual

molex AT-200 Manual

molex

molex AT-200 Manual

molex 19286-1000 User manual

molex

molex 19286-1000 User manual

molex Mini Mi2 User manual

molex

molex Mini Mi2 User manual

molex TM-3000 User manual

molex

molex TM-3000 User manual

molex 63827-2000 User manual

molex

molex 63827-2000 User manual

molex Mini Mi2 User manual

molex

molex Mini Mi2 User manual

Popular Power Tools manuals by other brands

Bort BPS-505-P manual

Bort

Bort BPS-505-P manual

Black & Decker KX2001 manual

Black & Decker

Black & Decker KX2001 manual

SPIT 352 Safety, operating and maintenance instructions

SPIT

SPIT 352 Safety, operating and maintenance instructions

Stihl KMA 130 R instruction manual

Stihl

Stihl KMA 130 R instruction manual

National Flooring Equipment 5200QL OPERATING & SERVICE MANUAL

National Flooring Equipment

National Flooring Equipment 5200QL OPERATING & SERVICE MANUAL

Strongway 57522 owner's manual

Strongway

Strongway 57522 owner's manual

Westfalia 16 84 84 instruction manual

Westfalia

Westfalia 16 84 84 instruction manual

Hubbell ANDERSON VC6-500-BP Service and operation manual

Hubbell

Hubbell ANDERSON VC6-500-BP Service and operation manual

Yokota Y-41A-JQ manual

Yokota

Yokota Y-41A-JQ manual

Cornwell Tools CAT8000BP operating instructions

Cornwell Tools

Cornwell Tools CAT8000BP operating instructions

Milwaukee M18 FUEL 2871-20 Operator's manual

Milwaukee

Milwaukee M18 FUEL 2871-20 Operator's manual

Ilsco IDTB-6-LIO instruction manual

Ilsco

Ilsco IDTB-6-LIO instruction manual

stayer VAC L 18 operating instructions

stayer

stayer VAC L 18 operating instructions

Proma FP-20A instruction manual

Proma

Proma FP-20A instruction manual

SCHUSTER GT-1011-SOLO Installation and operating manual

SCHUSTER

SCHUSTER GT-1011-SOLO Installation and operating manual

Roland DWX-51D Setup guide

Roland

Roland DWX-51D Setup guide

Current Tools Mantis 8885 Series Operating, Maintenance, Safety and Parts Manual

Current Tools

Current Tools Mantis 8885 Series Operating, Maintenance, Safety and Parts Manual

haupa HS-8 instruction manual

haupa

haupa HS-8 instruction manual

manuals.online logo
manuals.online logoBrands
  • About & Mission
  • Contact us
  • Privacy Policy
  • Terms and Conditions

Copyright 2025 Manuals.Online. All Rights Reserved.