manuals.online logo
Brands
  1. Home
  2. •
  3. Brands
  4. •
  5. Monacor
  6. •
  7. Batteries Charger
  8. •
  9. Monacor JTS TG-10CH2 User manual

Monacor JTS TG-10CH2 User manual

www.jts-europe.com
TG-10CH2
Bestell.-Nr. • Order No. 25.2670
Ladestation für Empfänger und
Sender des TG-10-Systems
Charging Station for Receivers and
Transmitters of the TG-10 System
®
Vertrieb von JTS-Produkten – Distribution of JTS products
MONACOR INTERNATIONAL GmbH & Co. KG, Zum Falsch 36, 28307 Bremen, Germany
Copyright
©by MONACOR INTERNATIONAL. All rights reserved. A-1127.99.03.08.2017
Diese Anleitung richtet sich an Benut-
zer ohne besondere Fachkenntnisse.
Bitte lesen Sie die Anleitung vor dem
Betrieb gründlich durch und heben
Sie sie für ein späteres Nachlesen auf.
1 Verwendungsmöglichkeiten
Dieses Ladegerät dient zum Laden der Lithium-Ionen-
Akkus der Sender und Empfänger des TG-10-Funk-
Systems. Es können die Akkus von zwei Geräten
gleichzeitig aufgeladen werden.
Zum Aufladen der Akkus werden die Sender/Emp-
fänger in die Ladeschächte gesetzt. Diese sind so aus-
gelegt, dass ein falsches Einsetzen der Geräte und
damit eine versehentliche Verpolung ausgeschlossen
ist. Schutzschaltungen sorgen dafür, dass die Akkus
nicht beschädigt werden (z.B. durch Überladung).
2 Hinweise für den sicheren Gebrauch
Die Geräte (Ladestation und Netzgerät) entsprechen
allen relevanten Richtlinien der EU und tragen deshalb
das -Zeichen.
WARNUNG Das Netzgerät wird mit lebensgefähr-
licher Netzspannung versorgt. Nehmen
Sie deshalb niemals selbst Eingriffe
daran vor! Es besteht die Gefahr eines
elektrischen Schlags.
•
Benutzen Sie die Geräte nur im Innenbereich. Schüt-
zen Sie sie vor Tropf- und Spritzwasser und vor
hoher Luftfeuchtigkeit. Der zulässige Einsatztempe-
raturbereich beträgt 0–40 °C.
•
Stellen Sie keine mit Flüssigkeit gefüllten Gefäße,
z.B. Trinkgläser, auf die Geräte.
•
Die in der Ladestation entstehende Wärme muss
durch Luftzirkulation abgegeben werden. Decken
Sie darum die Lüftungsöffnungen am Gehäuse
nicht ab.
•
Ziehen Sie sofort das Netzgerät aus der Steckdose:
1. wenn sichtbare Schäden am Netzgerät oder an
der Ladestation vorhanden sind,
2. wenn nach einem Sturz oder Ähnlichem der Ver-
dacht auf einen Defekt besteht,
3. wenn Funktionsstörungen auftreten.
Geben Sie die Geräte in jedem Fall zur Reparatur in
eine Fachwerkstatt.
•
Verwenden Sie für die Reinigung nur ein trockenes,
weiches Tuch, niemals Wasser oder Chemikalien.
•
Werden die Geräte zweckentfremdet, falsch be-
dient oder nicht fachgerecht repariert, kann keine
Haftung für daraus resultierende Sach- oder Per-
sonenschäden und keine Garantie für die Geräte
übernommen werden.
Sollen die Geräte endgültig aus dem Betrieb
genommen werden, übergeben Sie sie zur
umweltgerechten Entsorgung einem ört-
lichen Recyclingbetrieb.
3 Akkus aufladen
1) Das Netzgerät an die Buchse auf der Rückseite der
Ladestation anschließen und in eine Steckdose
(230V/50 Hz) stecken. Die Station ist damit ein-
geschaltet. Solange ein Ladeschacht leer ist, blinkt
seine Ladeanzeige.
2)
Den Sender/Empfänger mit den Ladekontakten
nach unten in einen Ladeschacht setzen. Beim
Einsetzen darauf achten, das Gerät ganz in den
Schacht zu drücken, so dass es fest sitzt. Während
des Aufladens leuchtet die Ladeanzeige des Lade-
schachts konstant.
3) Ist der Akku eines Geräts voll aufgeladen, erlischt
die jeweilige Ladeanzeige. Das Gerät kann dann aus
dem Ladeschacht genommen werden.
4)
Nach dem Aufladen das Netzgerät aus der Steckdose
ziehen, damit es nicht unnötig Strom verbraucht.
Hinweis: Blinkt eine Ladeanzeige während des Ladens, führt
die Ladestation zum Schutz des Akkus einen Selbsttest durch.
4 Technische Daten
Ladedauer: . . . . . . bis zu ca. 8 Stunden (abhängig
vom Akku-Ladezustand)
Stromversorgung: . 12V(⎓) /0,6A
über beiliegendes Netzgerät an
100– 240V, 50/60Hz
Abmessungen
(B × H × T):. . . . . . 75 × 41 × 85 mm
Gesamtgewicht: . . 485g
Änderungen vorbehalten.
DEUTSCH
ENGLISH These instructions are intended for
users without any specific technical
knowledge. Please read the instruc-
tions carefully prior to operation and
keep them for later reference.
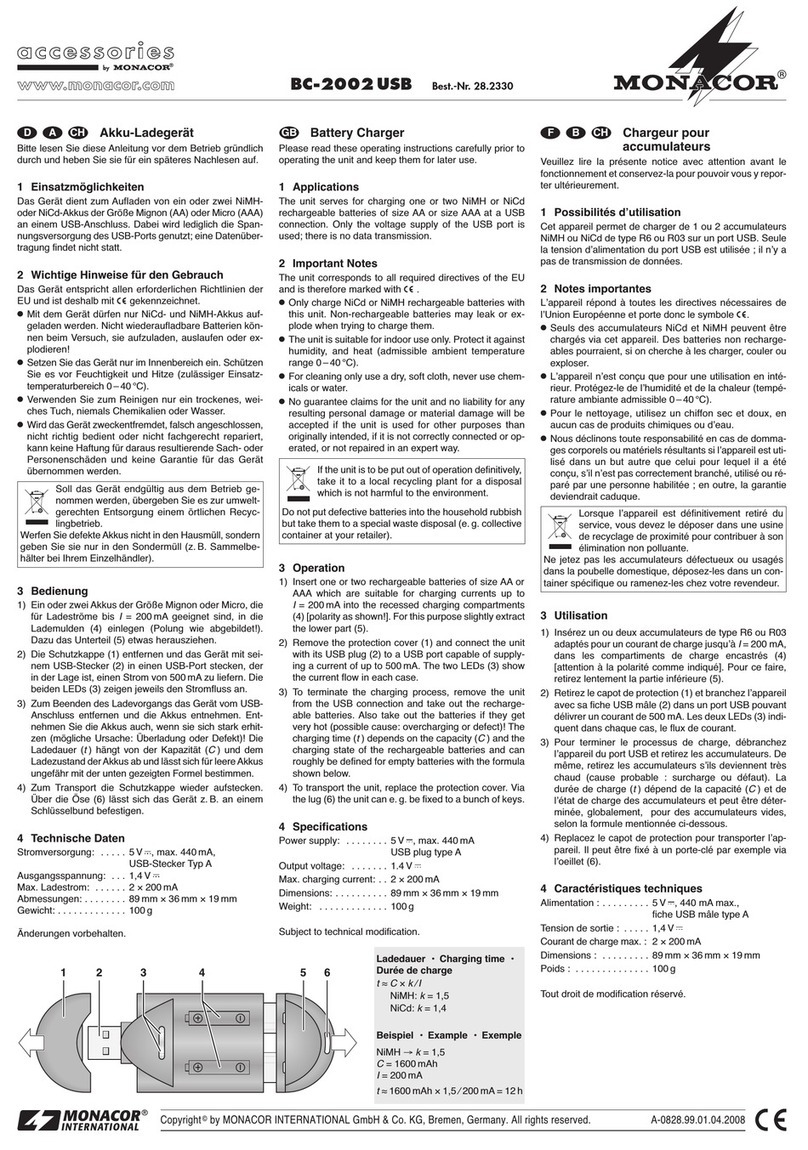
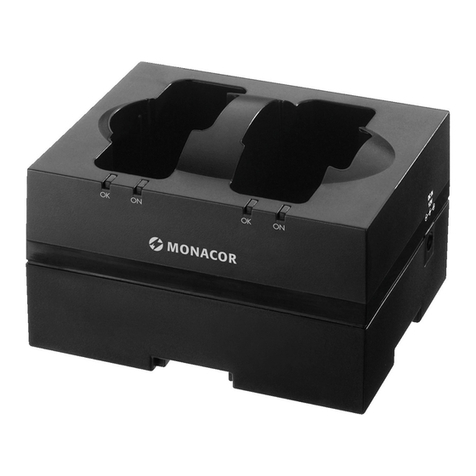
1 Applications
This charger is used for recharging the lithium-ion
batteries of the transmitters and the receivers of the
wireless TG-10 system. It will be possible to recharge
the batteries of two units at the same time.
To recharge the batteries, insert the transmitters/
receivers in the charging compartments. The design of
the charging compartments will ensure correct inser-
tion of the units and thus prevent inadvertent reverse
polarity. Protective circuits are provided to prevent
damage to the batteries, e.g. by overload.
2 Safety Notes
The units (charging station and power supply unit)
correspond to all relevant directives of the EU and are
therefore marked with .
WARNING The power supply unit uses dangerous
mains voltage. Leave servicing to skilled
personnel only. Inexpert handling may
result in electric shock.
•
The units are suitable for indoor use only. Protect
them against dripping water and splash water and
high air humidity. The admissible ambient tempera-
ture range is 0–40 °C.
•
Do not place any vessel filled with liquid on the
units, e.g. a drinking glass.
•
The heat generated within the charging station
must be dissipated by air circulation. Therefore, do
not cover the air vents of the housing.
•
Immediately disconnect the power supply unit from
the mains socket
1. if the power supply unit or the charging station
is visibly damaged,
2. if a defect might have occurred after a unit was
dropped or suffered a similar accident,
3. if malfunctions occur.
In any case the units must be repaired by skilled
personnel.
•
For cleaning only use a dry, soft cloth; never use
water or chemicals.
•
No guarantee claims for the units and no liability
for any resulting personal damage or material dam-
age will be accepted if the units are used for other
purposes than originally intended, if they are not
correctly operated, or if they are not repaired in an
expert way.
If the units are to be put out of operation
definitively, take them to a local recycling
plant for a disposal which is not harmful to
the environment.
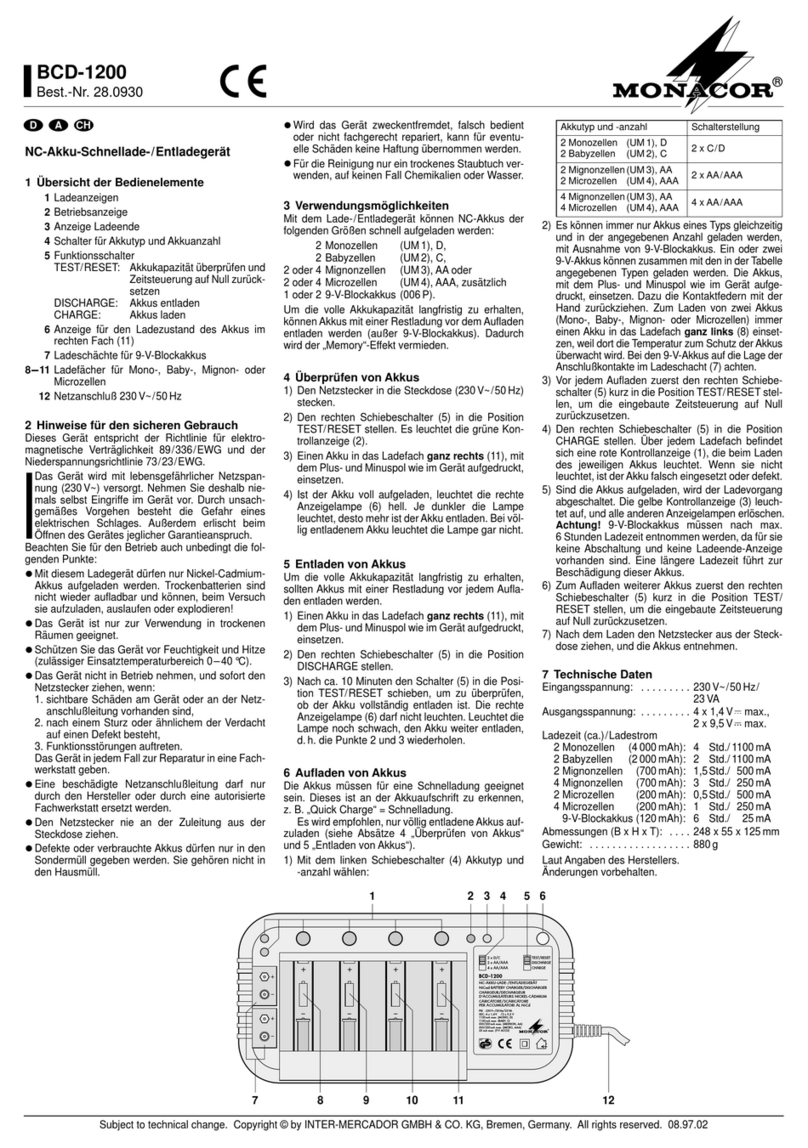
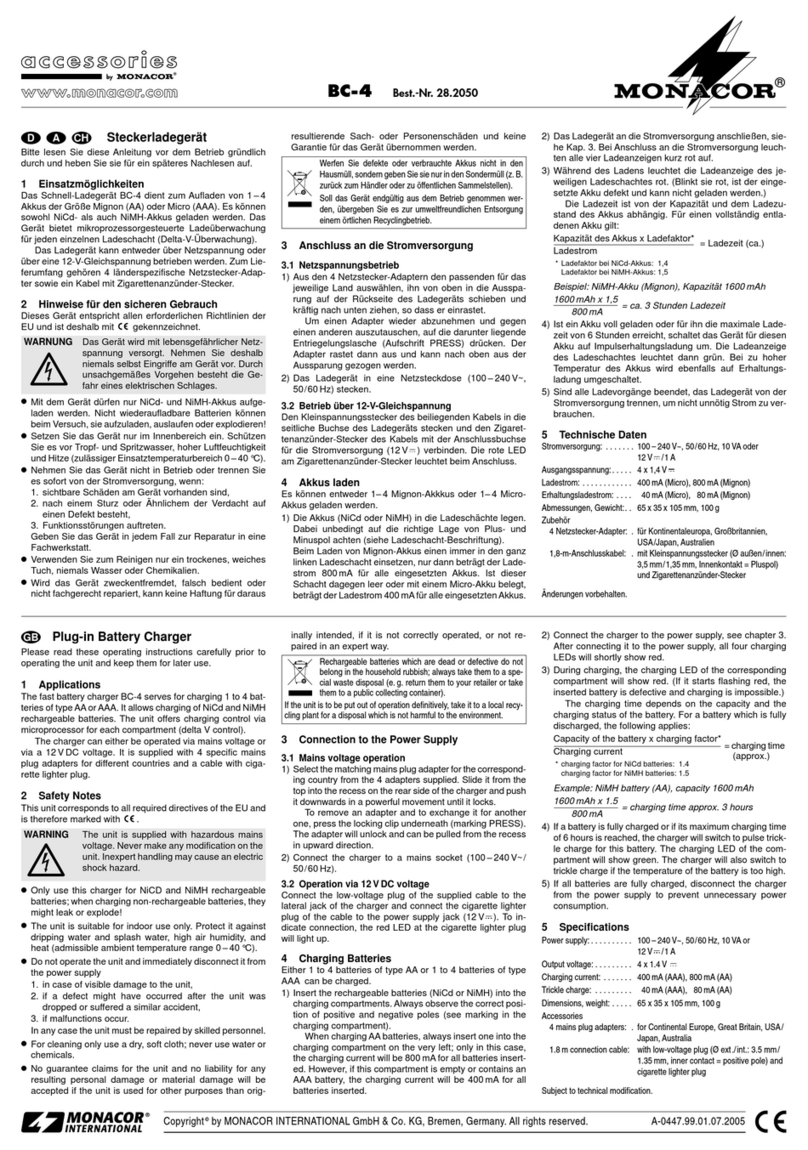
3 Charging Batteries
1) Connect the power supply unit to the jack on the
rear side of the charging station and to a mains
socket (230V/50Hz). Thus, the station is switched
on. As long as a charging compartment is empty,
its charging LED will keep flashing.
2)
Insert the transmitter/receiver, with its charging
contacts facing downwards, in one of the charg-
ing compartments. When inserting, push the unit
into the compartment to ensure a tight fit. While
charging, the charging LED of the compartment will
light permanently.
3)
When the battery of the unit has been fully re-
charged, the corresponding charging LED will be
extinguished. The unit may be removed from the
compartment.
4) After charging, disconnect the power supply unit
from the mains socket to prevent unnecessary power
consumption.
Note: If a charging LED starts flashing while charging is
still in progress, the charging station performs a self-test to
protect the battery.
4 Specifications
Charging time: . . . up to approx. 8 hours
(depending on batterystatus)
Power supply: . . . . 12 V(⎓) /0.6 A via power supply
unit provided and connected to
100– 240V, 50/60Hz
Dimensions
(W × H × D): . . . . . 75 × 41 × 85 mm
Total weight:. . . . . 485 g
Subject to technical modification.
www.jts-europe.com
®
Vertrieb von JTS-Produkten – Distribution of JTS products
MONACOR INTERNATIONAL GmbH & Co. KG, Zum Falsch 36, 28307 Bremen, Germany
Copyright
©by MONACOR INTERNATIONAL. All rights reserved. A-1127.99.03.08.2017
Estas instrucciones van dirigidas a
usuarios sin ningún conocimiento téc-
nico específico. Lea atentamente estas
instrucciones antes de funcionamiento
y guárdelas para usos posteriores.
1 Aplicaciones
Este cargador se utiliza para recargar las baterías Li-Ion
de los emisores y receptores del sistema inalámbrico
TG-10. Pueden recargarse las baterías de dos unidades
al mismo tiempo.
Para recargar las baterías, inserte los emisores/re-
ceptores en los compartimentos de carga. El diseño
de los compartimentos de carga asegura la correcta
inserción de los aparatos, evitando errores en la pola-
ridad. Los circuitos de protección están provistos para
prevenir daños en las baterías, por ejemplo por una
sobrecarga.
2 Notas de Seguridad
Los aparatos (estación de carga y alimentador) cum-
plen con todas las directivas relevantes de la UE y por
lo tanto están marcados con el símbolo .
ADVERTENCIA El alimentador utiliza un voltaje pe-
ligroso. Deje el mantenimiento en
manos del personal cualificado. El
manejo inexperto puede provocar
una descarga.
•
Los aparatos están adecuados para su aplicación
sólo en interiores. Protéjalos contra goteos, salpi-
caduras y humedad elevada. Rango de temperatura
ambiente admisible: 0– 40ºC.
•
No coloque ningún recipiente con líquido encima de
los aparatos, p.ej. un vaso.
•
El calor generado en el interior de la estacíon de
carga tiene que disiparse con la circulación del aire.
Así pues, no cubra las rejillas de ventilación de la
carcasa.
•
Desconecte inmediatamente el alimentador de la
toma si:
1. El alimentado o la estación de carga están visi-
blemente dañados.
2. El aparato ha sufrido daños después de una caída
o accidente similar.
3. No funciona correctamente.
Sólo el personal técnico puede reparar los aparatos
bajo cualquier circunstancia.
•
Utilice sólo un paño suave y seco para la limpieza;
no utilice nunca ni agua ni productos químicos.
•
No podrá reclamarse garantía o responsabilidad
alguna por cualquier daño personal o material re-
sultante si los aparatos se utilizan para otros fines di-
ferentes a los originalmente concebidos, si no se uti-
lizan adecuadamente o no se reparan por expertos.
Si va a poner los aparatos fuera de servicio
definitivamente, llévelos a la planta de reci-
claje más cercana para que su eliminación
no sea perjudicial para el medioambiente.
3 Cargar las Baterías
1)
Conecte el alimentador a la toma de la parte
posterior de la estación de carga y a un enchufe
(230V/50 Hz). De este modo, se conecta la estación.
Mientras un compartimento de carga esté vacío, su
LED de carga se mantendrá parpadeando.
2)
Inserte el emisor/receptor, con sus contactos de
carga mirando hacia abajo, en uno de los compar-
timentos de carga. Cuando lo inserte, empuje el
aparato hacia el compartimento para asegurar un
buen encaje. Durante la carga, se iluminará el LED
de carga del compartimento permanentemente.
3) Cuando la batería del aparato esté completamente
cargada, se apagará el LED de carga correspon-
diente. El aparato puede sacarse del compartimento.
4)
Después de la carga, desconecte el alimentador
de la toma de corriente para prevenir un consumo
innecesario.
Nota: Si un LED de carga empieza a parpadear mientras la
carga está en proceso, la estacíon de carga hará un autotest
para proteger la batería.
4 Especificaciones
Tiempo de carga: . Hasta 8 horas aprox. (depen-
diendo del estado de la batería)
Alimentación: . . . . 12V (⎓) /0,6A mediante alimen-
tador entregado y conectado a
100– 240V, 50/60Hz
Dimensiones
(B × H × P):. . . . . . 75 × 41 × 85 mm
Peso total:. . . . . . . 485g
Sujeto a modificaciones técnicas.
TG-10CH2
Réf. num. • Ref. núm. 25.2670
Station de charge pour les récepteurs
et les émetteurs du système TG-10
Estación de carga para receptores y
emisores del sistema TG-10
Cette notice s’adresse aux utilisateurs
sans connaissances techniques parti-
culières. Veuillez lire avec attention
la notice avant le fonctionnement et
conservez-la pour pouvoir vous y re-
porter ultérieurement.
1 Possibilités d’utilisation
Ce chargeur permet de charger les accumulateurs
Lithium-ion des émetteurs et récepteurs du système
sans fil TG-10. Il est possible de charger simultané-
ment les accumulateurs de deux appareils.
Pour charger les accumulateurs, les émetteurs/les
récepteurs se placent dans les compartiments de
charge. Ils sont configurés de telle sorte qu’un posi-
tionnement incorrect des appareils et donc une inver-
sion de polarité involontaire sont exclus. Les circuits de
protection évitent tout dommage aux accumulateurs
(p.ex. par surcharge).
2 Conseils d’utilisation et de sécurité
Les appareils (station de charge et bloc secteur) ré-
pondent à toutes les directives nécessaires de l’Union
européenne et porte donc le symbole .
AVERTISSEMENT Le bloc secteur est alimenté par
une tension dangereuse. Ne tou-
chez jamais l’intérieur de l’appa-
reil ! En cas de mauvaise mani-
pulation, vous pourriez subir une
décharge électrique.
•
Les appareils ne sont conçus que pour une utilisa-
tion en intérieur. Protégez-les des éclaboussures, de
tout type de projections d‘eau et d’une humidité
d‘air élevée. La plage de température ambiante ad-
missible est de 0– 40°C.
•
En aucun cas, vous ne devez poser d’objet conte-
nant du liquide ou un verre sur les appareils.
•
La chaleur dégagée par la station de charge doit être
évacuée par une circulation d’air correcte. En aucun
cas, les ouïes de ventilation du boîtier ne doivent
être obturées.
•
Débranchez immédiatement le bloc secteur lorsque:
1. des dommages visibles apparaissent sur la station
de charge ou sur le bloc secteur,
2. après une chute ou un cas similaire, vous avez un
doute sur l’état de l’appareil,
3. des dysfonctionnements apparaissent.
Dans tous les cas, les dommages doivent être répa-
rés par un technicien spécialisé.
•
Pour nettoyer, utilisez uniquement un chiffon sec et
doux, en aucun cas de produits chimiques ou d’eau.
•
Nous déclinons toute responsabilité en cas de dom-
mages matériels ou corporels résultants si les appa-
reils sont utilisés dans un but autre que celui pour le-
quel ils ont été conçus, s’ils ne sont pas correctement
utilisés ou ne sont pas réparés par une personne
habilitée, en outre, la garantie deviendrait caduque.
Lorsque les appareils sont définitivement
retirés du service, vous devez les déposer
dans une usine de recyclage adaptée pour
contribuer à leur élimination non polluante.
CARTONS ET EMBALLAGE
PAPIER À TRIER
3 Chargement des accumulateurs
1) Reliez le bloc secteur à la prise sur la face arrière de
la station de charge et à une prise 230V/50Hz. La
station est alors allumée. Tant qu‘un compartiment
de charge est vide, son témoin de fonctionnement
clignote.
2)
Placez l’émetteur/le récepteur dans un comparti-
ment de charge, contacts de charge orientés vers le
bas. Lorsque vous le positionnez, veillez à enfoncer
complètement l’appareil dans le compartiment pour
qu’il soit bien fixe. Pendant la charge, le témoin de
fonctionnement du compartiment de charge brille
en continu.
3)
Lorsque l’accumulateur est totalement chargé, le
témoin de charge correspondant s’éteint. L’appareil
peut alors être retiré du compartiment de charge.
4) Après la charge, débranchez le bloc secteur pour
éviter toute consommation inutile de courant.
Remarque : Si un témoin de charge clignote pendant la
charge, la station de charge effectue un auto-test pour pro-
téger l’accumulateur.
4 Caractéristiques techniques
Durée de charge : . 8 heures max. environ (selon
l’état de charge de l’accumula-
teur)
Alimentation :. . . . 12V (⎓) /0,6A par bloc secteur
livré relié à 100– 240V, 50/60Hz
Dimensions
(l × h × p) : . . . . . . 75 × 41 × 85 mm
Poids total :. . . . . . 485g
Tout droit de modification réservé.
ESPAÑOL
FRANÇAIS

This manual suits for next models

1

Other Monacor Batteries Charger manuals

Monacor BC-1800L User manual

Monacor

Monacor BC-1800L User manual

Monacor IMG STAGELINE ATS-12C User manual

Monacor

Monacor IMG STAGELINE ATS-12C User manual

Monacor img Stage Line ATS-162PS User manual

Monacor

Monacor img Stage Line ATS-162PS User manual

Monacor JTS CH-2 User manual

Monacor

Monacor JTS CH-2 User manual

Monacor BC-29 User manual

Monacor

Monacor BC-29 User manual

Monacor JTS TG-10CH2 User manual

Monacor

Monacor JTS TG-10CH2 User manual

Monacor img Stage Line ATS-12CB User manual

Monacor

Monacor img Stage Line ATS-12CB User manual

Monacor ATS-60PS User manual

Monacor

Monacor ATS-60PS User manual

Monacor ATS-12CB User manual

Monacor

Monacor ATS-12CB User manual

Monacor IMG STAGELINE RBC-1AA User manual

Monacor

Monacor IMG STAGELINE RBC-1AA User manual

Monacor ATS-850PS User manual

Monacor

Monacor ATS-850PS User manual

Monacor BC-1000L User manual

Monacor

Monacor BC-1000L User manual

Monacor JTS TG-10CH18 User manual

Monacor

Monacor JTS TG-10CH18 User manual

Monacor BCD-1200 User manual

Monacor

Monacor BCD-1200 User manual

Monacor TXA-800PS User manual

Monacor

Monacor TXA-800PS User manual

Monacor ATS-50PS User manual

Monacor

Monacor ATS-50PS User manual

Monacor BC-4HQ User manual

Monacor

Monacor BC-4HQ User manual

Monacor JTS TG-10CH18 User manual

Monacor

Monacor JTS TG-10CH18 User manual

Monacor BC-6000 User manual

Monacor

Monacor BC-6000 User manual

Monacor ATS-25C User manual

Monacor

Monacor ATS-25C User manual

Monacor TXA-12C User manual

Monacor

Monacor TXA-12C User manual

Monacor BC-1000L User manual

Monacor

Monacor BC-1000L User manual

Monacor ATS-16PS User manual

Monacor

Monacor ATS-16PS User manual

Monacor JTS TG-10CH18 User manual

Monacor

Monacor JTS TG-10CH18 User manual

Popular Batteries Charger manuals by other brands

Westfalia MW2168GS instruction manual

Westfalia

Westfalia MW2168GS instruction manual

Digitus DK-1P16-A-050BL Quick installation guide

Digitus

Digitus DK-1P16-A-050BL Quick installation guide

DEFA WorkShopCharger 35A user guide

DEFA

DEFA WorkShopCharger 35A user guide

DSR INC-812A owner's manual

DSR

DSR INC-812A owner's manual

ROCK WTS-H001A Series user manual

ROCK

ROCK WTS-H001A Series user manual

unicraft MBC-Series operating instructions

unicraft

unicraft MBC-Series operating instructions

VOLTCRAFT SL-6 operating instructions

VOLTCRAFT

VOLTCRAFT SL-6 operating instructions

Sony CP-W5 user manual

Sony

Sony CP-W5 user manual

ABB Terra AC wallbox UL installation manual

ABB

ABB Terra AC wallbox UL installation manual

Cristec YPOWER 12V-24V/30A user manual

Cristec

Cristec YPOWER 12V-24V/30A user manual

ensto One Apartment EVH161-ACRM0 INSTALLATION GUIDE/USER GUIDE

ensto

ensto One Apartment EVH161-ACRM0 INSTALLATION GUIDE/USER GUIDE

Sealey SPI3S.V2 instructions

Sealey

Sealey SPI3S.V2 instructions

S&C TA-3370 instruction sheet

S&C

S&C TA-3370 instruction sheet

KUSSMAUL 091-12VHO instruction manual

KUSSMAUL

KUSSMAUL 091-12VHO instruction manual

Endura EC2M user manual

Endura

Endura EC2M user manual

Steren COM-134 instruction manual

Steren

Steren COM-134 instruction manual

Hilti Nuron C 6-22 Original operating instructions

Hilti

Hilti Nuron C 6-22 Original operating instructions

Torqeedo 1130-00 operating manual

Torqeedo

Torqeedo 1130-00 operating manual

manuals.online logo
manuals.online logoBrands
  • About & Mission
  • Contact us
  • Privacy Policy
  • Terms and Conditions

Copyright 2025 Manuals.Online. All Rights Reserved.