© MONACOR INTERNATIONAL
All rights reserved
A-0160.99.06.02.2023
MONACOR INTERNATIONAL GmbH & Co. KG
Zum Falsch 36, 28307 Bremen
Germany
Importer: Epic Audio Ltd, Unit 9 Apollo Park
Station road, Long Buckby, NN6 7PF
United Kingdom,Company Registration:13878247
THE AUDIO COMPANY THE AUDIO COMPANY THE AUDIO COMPANY THE AUDIO COMPANY THE AUDIO COMPANY THE AUDIO COMPANY
BEDIENUNGSANLEITUNG
INSTRUCTION MANUAL
MODE D’EMPLOI
ECM-450
Bestell-Nr. • Order No. • Réf. num. 0233370
Cette notice s‘adresse aux utilisateurs
sans connaissances techniques parti-
culières. Veuillez lire la présente notice
avant le fonctionnement et conser-
vez-la pour pouvoir vous y reporter
ultérieurement.
1 Possibilités d’utilisation
Ce microphone de table col de cygne avec
fonction gong est spécialement conçu pour
une utilisation dans des installations de
Public Adress et s’adapte également bien
pour d’autres utilisations pour lesquelles un
microphone de table fixe est nécessaire pour
effectuer des annonces (p.ex. dans des bu-
reaux, hôpitaux, magasins …).
2 Conseils de sécurité
Le produit répond à toutes les directives né-
cessaires de l’Union européenne et porte
donc le symbole .
AVERTISSEMENT
Le bloc secteur est ali-
menté par une tension
dangereuse. Ne touchez
jamais l’intérieur de l’ap-
pareil car vous pourriez
subir une décharge élec-
trique dangereuse.
•
Le produit n‘est pas conçu que pour une
utilisation en intérieur. Protégez-le des
éclaboussures, de tout type de projections
d‘eau et d’une humidité d‘air élevée. La
plage de température ambiante admissible
est de 0– 40 °C.
•
N’utilisez pas le produit et débranchez im-
médiatement le bloc secteur du secteur
lorsque :
1. des dommages visibles apparaissent sur
le micro ou sur le bloc secteur,
2. après une chute ou un cas similaire, vous
avez un doute sur l’état de l’appareil,
3. des dysfonctionnements apparaissent.
Dans tous les cas, les dommages doivent
être réparés par un technicien spécialisé.
•
Pour le nettoyage, utilisez uniquement un
chiffon sec et doux, en aucun cas de pro-
duits chimiques ou d’eau.
•
Nous déclinons toute responsabilité en cas
de dommages corporels ou matériels résul-
tants si le produit n’est pas correctement
utilisé ou réparé ; en outre, la garantie de-
viendrait caduque.
Lorsque le produit est définitive-
ment retiré du service, éliminez-le
conformément aux directives lo-
cales.
CARTONS ET EMBALLAGE
PAPIER À TRIER
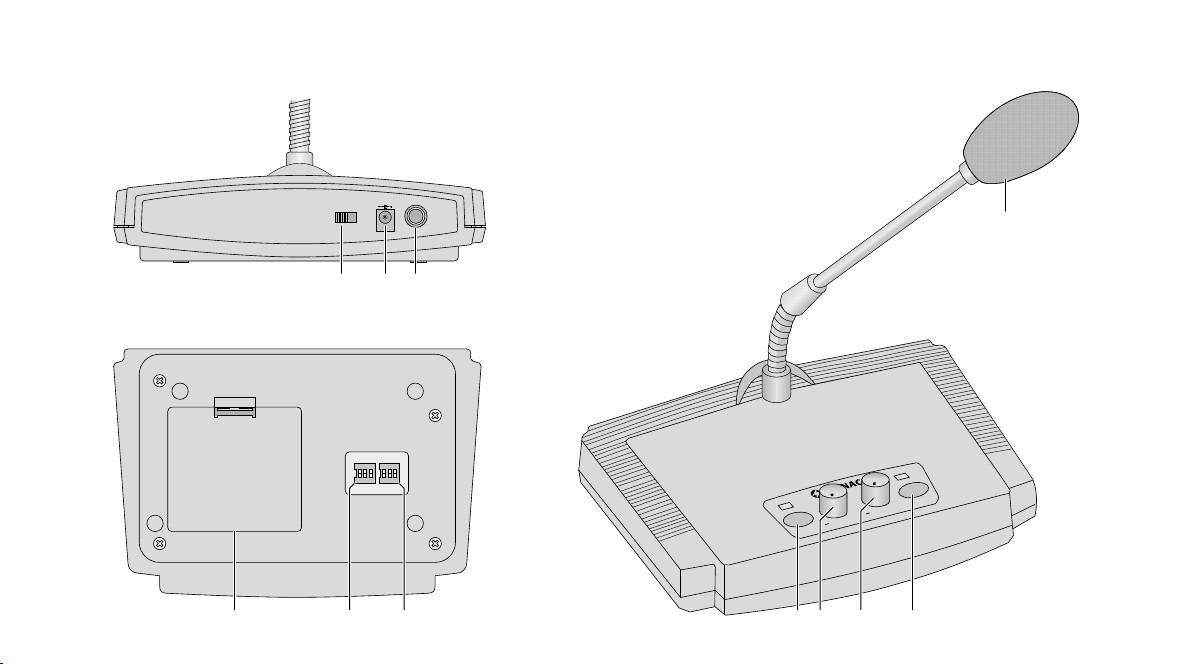
3 Alimentation
L’alimentation peut s’effectuer soit via le bloc
secteur livré soit via des batteries (non li-
vrées). Avec le sélecteur (1) sur la face arrière
de l’appareil, réglez le type d’alimentation :
Pour une alimentation via le bloc secteur :
mettez le sélecteur sur la position droite
EXT.
Pour une alimentation via des batteries :
mettez le sélecteur sur la position gauche
BATT.
3.1 Bloc secteur
Reliez le bloc secteur à la prise DC 5V (2) et à
une prise secteur 230V/50 Hz.
Si le micro n’est pas utilisé pendant une
longue période, débranchez le bloc secteur
de la prise secteur car même si le micro est
éteint, le bloc secteur a une faible consom-
mation.
3.2 Batteries
Retirez le couvercle du compartiment bat-
terie (4) sur la face inférieure de l’appareil.
Insérez deux batteries 1,5V, type R14, en res-
pectant les connexions plus et moins comme
inscrit dans le compartiment. Refermez le
compartiment batterie.
En cas de non-utilisation prolongée du
micro, retirez les batteries. On évite ainsi tout
dommage sur l’appareil si les batteries ve-
naient à couler.
Les batteries ne doivent pas être je-
tées dans la poubelle domestique.
Déposez-les dans un container spé-
cifique conformément aux direc-
tives locales.
4 Branchement audio
Reliez la prise AUDIO OUT (3) via le cordon
livré à une prise d’entrée micro (jack 6,35)
d’un amplificateur ou d’une table de mixage.
5 Fonctionnement
1) Placez la bonne anti-vent livrée (7).
2) Pour allumer l’appareil, enfoncez la
touche POWER (8). L’appareil est en mode
stand-by (prêt à fonctionner) ; le témoin
de contrôle au-dessus de la touche brille.
3) Pour effectuer une annonce, enfoncez la
touche MIC (11). Le témoin de contrôle
au-dessus de la touche brille et un gong
retentit pour introduire l’annonce. Par-
lez dans le micro après le gong. Avec le
potentiomètre de réglage MIC (9), ré-
glez le volume de l’annonce. A la fin de
l’annonce, enfoncez une nouvelle fois
la touche MIC ; le témoin de contrôle
au-dessus de la touche s’éteint, un gong
retentit, signalant la fin de l’annonce.
Pour les deux gongs, repérant respec-
tivement le début et la fin de l’annonce,
on peut sélectionner séparément le type
de gong souhaité parmi trois réglages :
voir chapitre 5.1.
4) Avec le potentiomètre CHIME (10), réglez
le volume du gong. Si aucun gong ne doit
retentir, tournez le potentiomètre entière-
ment à gauche sur la position «– ».
5) Pour éteindre l’appareil, enfoncez la
touche POWER.
5.1 Réglage du type de gong
Trois variantes de gong sont disponibles pour
le gong d’introduction et le gong de fin, elles
sont sélectionnables via les interrupteurs DIP
sur la face inférieure de l’appareil. Avec les
trois interrupteurs DIP (5) gauches, réglez le
gong d’introduction, avec les trois interrup-
teurs DIP droits (6), réglez le gong de fin.
Type gong 1 Type gong 2 Type gong 3
Suite de sons
montants
C, E, G, C
Suite de sons
descendants
C, G, E, C
Suite de sons
descendants
E, C
1 2 3
Remarque : si le gong d’introduction ou de fin
doit être supprimé, mettez l’ensemble des trois in-
terrupteurs DIP pour le gong correspondant sur la
position inférieure.
6 Caractéristiques techniques
Type : . . . . . . . . . . . . microphone électret
Caractéristique : . . . . cardioïde
Bande passante :. . . . 100–12000 Hz
Sensibilité : . . . . . . . . 3,2mV/Pa à 1 kHz
Impédance : . . . . . . . 600Ω
Rapport signal/bruit : > 40dB
Température fonc. :. . 0–40°C
Alimentation :. . . . . . ⎓5 V/50mA par
bloc secteur livré relié
à ~230V/50 Hz
ou 2 × batterie 1,5V,
type R14
Dimensions du
boîtier :. . . . . . . . . . . 180 × 50 × 130 mm
Longueur
col de cygne : . . . . . . 210mm
Poids :. . . . . . . . . . . . 925g
Branchement audio :. jack 6,35
Longueur câble :. . . 1,5 m
Tout droit de modification réservé.
Notice d’utilisation protégée par le copyright de
MONACOR ®INTERNATIONAL GmbH & Co. KG.
Toute reproduction même partielle à des fins com-
merciales est interdite.
These instructions are intended for
users without any specific technical
knowledge. Please read these instruc-
tions carefully prior to operation and
keep them for later reference.
1 Applications
This gooseneck desktop microphone with
chime function has especially been designed
for application in PA systems and for other
applications for which a stable desktop micro-
phone is required for announcements (e.g. in
office buildings, hospitals, stores, etc.).
2 Safety Notes
The product corresponds to all relevant di-
rectives of the EU and is therefore marked
with .
The product corresponds to the relevant
UK legislation and is therefore marked with
UKCA.
WARNING The power supply unit uses
dangerous mains voltage. Leave
servicing to skilled personnel
only. Inexpert handling may re-
sult in electric shock.
•
The product is suitable for indoor use only.
Protect it against dripping water, splash
water and high air humidity. The admissi-
ble ambient temperature range is 0–40°C.
•
Do not use the product and immediately
disconnect the power supply unit from the
mains socket
1. if the desktop microphone or the power
supply unit is visibly damaged,
2. if a defect might have occurred after a
device was dropped or suffered a similar
accident,
3. if malfunctions occur.
Any repairs must be carried out by special-
ists.
•
For cleaning only use a dry, soft cloth, by
no means chemicals or water.
•
No guarantee claims for the product and
no liability for any resulting personal dam-
age or material damage will be accepted
if the product is not correctly used or not
expertly repaired.
If the product is to be put out of
operation definitively, dispose of
the product in accordance with
local regulations.
3 Power Supply
The power supply can be provided via the
supplied power supply unit or via batteries
(not supplied). With the selector switch (1)
on the rear side of the device, set the device
to the type of power supply:
In case of supply via the power supply unit:
set the switch to the right position EXT.
In case of supply via batteries:
set the switch to the left position BATT.
3.1 Power supply unit
Connect the power supply unit to the jack
DC5V (2) and to a mains socket (230V/50Hz).
If the microphone is not used for a longer
period, disconnect the power supply unit
from the mains as it consumes a low current
even when the microphone is switched off.
3.2 Batteries
Remove the battery compartment cover (4)
on the lower side of the device. Insert two
1.5V batteries of C size, with the positive
and negative connections as printed in the
compartment. Close the battery compart-
ment.
Remove the batteries if the microphone is
not used for a longer time. Thus, the device
remains undamaged in case the batteries
should leak.
Never put batteries in the house-
hold waste. Always dispose of the
batteries in accordance with local
regulations.
4 Audio Connection
Connect the jack AUDIO OUT (3) via the
supplied cable to a microphone input jack
(6.3mm jack) of an amplifier or mixer.
5 Setting into Operation
1) Place the windshield supplied (7) onto the
microphone.
2) Press the POWER button (8) to switch on
the device. The device will be in stand-by
mode; the LED indicator above the button
will light up.
3) To make an announcement, press the
button MIC (11). The LED indicator above
the button will light up and a chime will
sound to introduce the announcement.
When the chime has stopped, speak into
the microphone. Use the control MIC (9)
to adjust the volume for the announce-
ment. At the end of the announcement,
press the button MIC again. The LED in-
dicator above the button will extinguish
and a chime will sound, marking the end
of the announcement.
Three chime types are available for
the two chimes that mark the beginning
and the end of the announcement re-
spectively: For each of the two chimes, a
separate chime type can be selected: see
chapter 5.1.
4) Use the control CHIME (10) to adjust the
chime volume. If no chimes are desired,
turn the control counterclockwise to posi-
tion “–“ (left stop).
5) Press the POWER button to switch off the
device.
5.1 Setting the chime type
For each of the two chimes (marking the be-
ginning and the end of the announcement
respectively), three chime types are available.
To select the chime type desired, use the DIP
switches on the lower side of the device; the
three left switches (5) apply to the chime
marking the beginning of the announce-
ment, the three right switches (6) apply to
the chime marking the end.
Chime type 1 Chime type 2 Chime type 3
Tone sequence
ascending
C, E, G, C
Tone sequence
descending
C, G, E, C
Tone sequence
descending
E, C
1 2 3
Note: To suppress a chime, set all three DIP switches
of the respective chime to the lower position.
6 Specifications
Type:. . . . . . . . . . . electret microphone
Directivity:. . . . . . . cardioid
Frequency range: . 100 –12 000 Hz
Sensitivity:. . . . . . . 3.2 mV/Pa at 1 kHz
Impedance:. . . . . . 600 Ω
S/N ratio: . . . . . . . > 40 dB
Ambient
temperature:. . . . . 0 –40°C
Power supply: . . . . ⎓5V/50mA via
supplied PSU connected
to ~230V/50 Hz
or 2 × 1.5 V battery of
C size
Dimensions of the
console housing:. . 180 × 50 × 130 mm
Gooseneck length: 210mm
Weight: . . . . . . . . 925g
Audio connection: 6.3mm jack
Cable length: . . . 1.5 m
Subject to modification.
All rights reserved by MONACOR ®INTERNATIONAL
GmbH & Co. KG. No part of this instruction manual
may be reproduced in any form or by any means
for any commercial use.
Diese Anleitung richtet sich an Benut-
zer ohne besondere Fachkenntnisse.
Bitte lesen Sie die Anleitung vor dem
Betrieb gründlich durch und heben Sie
sie für ein späteres Nachlesen auf.
1 Einsatzmöglichkeiten
Dieses Schwanenhals-Tischmikrofon mit
Gong-Funktion ist speziell für den Einsatz
in ELA-Anlagen konzipiert sowie für wei-
tere Anwendungen geeignet, bei denen ein
standfestes Tischmikrofon für Durchsagen
benötigt wird (z.B. in Bürogebäuden, Kran-
kenhäusern, Kaufhäusern etc.).
2 Sicherheitshinweise
Das Produkt entspricht allen relevanten Richt-
linien der EU und trägt deshalb das -Zei-
chen.
WARNUNG Das Netzgerät wird mit le-
bensgefährlicher Netzspan-
nung versorgt. Nehmen Sie
deshalb niemals selbst Ein-
griffe daran vor. Es besteht
die Gefahr eines elektri-
schen Schlags.
•
Verwenden Sie das Produkt nur im Innen-
bereich und schützen Sie es vor Tropf- und
Spritzwasser sowie vor hoher Luftfeuchtig-
keit. Der zulässige Einsatztemperaturbe-
reich beträgt 0–40°C.
•
Benutzen Sie das Produkt nicht und ziehen
Sie das Netzgerät sofort aus der Steckdose,
wenn:
1. sichtbare Schäden am Tischmikrofon
oder am Netzgerät vorhanden sind,
2. nach einem Sturz oder Ähnlichem der
Verdacht auf einen Defekt besteht,
3. Funktionsstörungen auftreten.
Lassen Sie Schäden in jedem Fall in einer
Fachwerkstatt reparieren.
•
Säubern Sie das Produkt nur mit einem tro-
ckenen, weichen Tuch, niemals mit Wasser
oder Chemikalien.
•
Wird das Produkt falsch verwendet oder
nicht fachgerecht repariert, kann keine
Haftung für daraus resultierende Sach-
oder Personenschäden und keine Garantie
für das Produkt übernommen werden.
Soll das Produkt endgültig aus dem
Betrieb genommen werden, ent-
sorgen Sie es gemäß den örtlichen
Vorschriften.
3 Stromversorgung
Die Stromversorgung kann über das beilie-
gende Netzgerät oder über Batterien (nicht
mitgeliefert) erfolgen. Mit dem Umschal-
ter (1) auf der Rückseite das Gerät auf die
Art der Stromversorgung einstellen:
Bei Versorgung über das Netzgerät:
den Schalter in die rechte Position EXT stellen.
Bei Versorgung über Batterien:
den Schalter in die linke Position BATT stellen.
3.1 Netzgerät
Das Netzgerät mit der Buchse DC 5V (2) ver-
binden und in eine Steckdose (230V/50 Hz)
stecken.
Wird das Mikrofon längere Zeit nicht ver-
wendet, das Netzgerät vom Stromnetz tren-
nen, weil es auch bei ausgeschaltetem Mik-
rofon einen geringen Strom verbraucht.
3.2 Batterien
Den Batteriefachdeckel (4) auf der Geräte-
unterseite abnehmen. Zwei 1,5-V-Batterien
der Größe Baby (C), mit den Plus- und Minus-
anschlüssen wie im Fach aufgedruckt, einset-
zen. Das Batteriefach wieder schließen.
Nehmen Sie bei längerem Nichtgebrauch
des Mikrofons die Batterien heraus. So bleibt
das Gerät bei einem eventuellen Auslaufen
der Batterien unbeschädigt.
Batterien dürfen nicht im Hausmüll
entsorgt werden. Geben Sie sie
gemäß den örtlichen Vorschriften in
den Sondermüll.
4 Audioanschluss
Die Buchse AUDIO OUT (3) über das beilie-
gende Anschlusskabel mit einer Mikrofon-
eingangsbuchse (6,3-mm-Klinke) eines Ver-
stärkers oder Mischpults verbinden.
5 Inbetriebnahme
1) Den beiliegenden Windschutz (7) aufste-
cken.
2) Zum Einschalten des Geräts die Taste
POWER (8) drücken. Das Gerät befin-
det sich dann im Bereitschaftsmodus
(Standby). Die Kontrollanzeige über der
Taste leuchtet.
3) Um eine Durchsage zu machen, die Taste
MIC (11) drücken. Die Kontrollanzeige
über der Taste leuchtet und es ertönt ein
Gong zur Einleitung der Durchsage. Nach
dem Gong in das Mikrofon sprechen. Mit
dem Regler MIC (9) die Lautstärke für
die Durchsage einstellen. Am Ende der
Durchsage die Taste MIC erneut drücken.
Die Kontrollanzeige über der Taste erlischt
wieder und es ertönt ein Gong, der das
Ende der Durchsage markiert.
Für die beiden Gongs, die jeweils An-
fang und Ende der Durchsage markieren,
lässt sich separat aus drei Einstellungen
der gewünschte Gongtyp auswählen:
siehe dazu Kapitel 5.1.
4) Mit dem Regler CHIME (10) die Gong-
Lautstärke einstellen. Sollen keine Gongs
ertönen, den Regler ganz nach links auf
Position „–“ drehen.
5) Zum Ausschalten des Geräts die Taste
POWER drücken.
5.1 Gongtyp einstellen
Es stehen für den Einleitungsgong und den
Abschlussgong jeweils drei Gongvarianten
zur Verfügung, die über die DIP-Schalter auf
der Geräteunterseite ausgewählt werden.
Mit den linken drei DIP-Schaltern (5) den Ein-
leitungsgong einstellen und mit den rechten
drei DIP-Schaltern (6) den Abschlussgong.
Gongtyp 1 Gongtyp 2 Gongtyp 3
Tonfolge
aufsteigend
C, E, G, C
Tonfolge
absteigend
C, G, E, C
Tonfolge
absteigend
E, C
1 2 3
Hinweis: Soll der Einleitungs- oder der Abschluss-
gong unterdrückt werden, alle drei DIP-Schalter für
den jeweiligen Gong in die untere Position stellen.
6 Technische Daten
Typ:. . . . . . . . . . . . . Elektret-Mikrofon
Richtcharakteristik: . Niere
Frequenzbereich: . . 100–12000 Hz
Empfindlichkeit: . . . 3,2 mV/Pa bei 1kHz
Impedanz:. . . . . . . . 600 Ω
Signal-Rausch-
Abstand:. . . . . . . . . > 40dB
Einsatztemperatur: . 0 –40°C
Stromversorgung: . . ⎓5 V/50mA über
beiliegendes Netzgerät
an ~230V/50 Hz
oder 2 × 1,5-V-Batterie
der Größe Baby (C)
Maße des
Pultgehäuses: . . . . . 180 × 50 × 130 mm
Schwanenhalslänge: 210mm
Gewicht:. . . . . . . . . 925g
Audioanschluss: . . . 6,3-mm-Klinke
Kabellänge: . . . . . 1,5 m
Änderungen vorbehalten.
Diese Bedienungsanleitung ist urheberrechtlich für
MONACOR
®INTERNATIONAL GmbH & Co. KG
geschützt. Eine Reproduktion für eigene kommer-
zielle Zwecke – auch auszugsweise – ist untersagt.
ELA-Tischmikrofon
PA Desktop Microphone
Microphone de table Public Adress
ON
1 2 3
ON
1 2 3
➁
DC 5V
BATT/ EX T
AUDIO OUT
➀
ECM-450
POWER
MIC ++
CHIME
MIC
7


