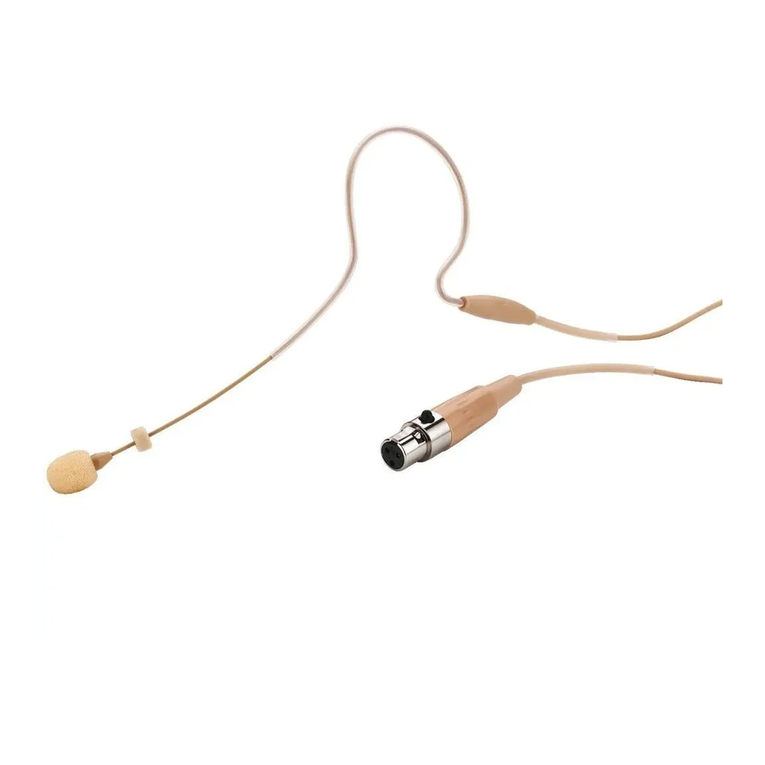
Ohrbügelmikrofon
Bitte lesen Sie diese Bedienungsanleitung vor dem Betrieb
gründlich durch und heben Sie sie für ein späteres Nach-
lesen auf.
1 Einsatzmöglichkeiten
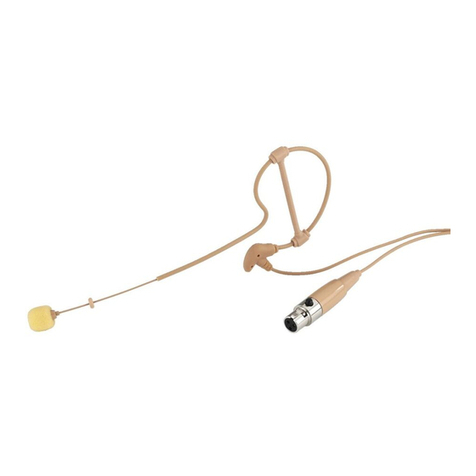
Dieses hautfarbene Ohrbügelmikrofon ist für den Betrieb
mit einem Taschensender eines drahtlosen Audio-Über-
tragungssystems vorgesehen (z. B. ein Taschensender
TXS-...HSE mit 3-poligem Mini-XLR-Anschluss von „img
Stage Line“). Es eignet sich damit optimal für Gesangs-
und Sprachanwendungen, bei denen ein unauffälliges
Mikrofon gefordert ist, das Bewegungsfreiheit bietet, z. B.
bei Theateraufführungen.
Alternativ zum Betrieb mit einem Taschensender lässt
sich das Mikrofon auch über einen Speiseadapter (z. B.
EMA-1 von „img Stage Line“), der die Mikrofonversor-
gungsspannung bereitstellt, mit einem Audiogerät, z. B.
Mischpult, verbinden.
2 Wichtige Hinweise für den Gebrauch
Das Mikrofon entspricht allen relevanten Richtlinien der
EU und ist deshalb mit gekennzeichnet.
GDas Mikrofon ist nur zur Verwendung im Innenbereich
geeignet. Schützen Sie es vor Feuchtigkeit und Hitze
(zulässiger Einsatztemperaturbereich 0 – 40 °C).
GVerwenden Sie für die Reinigung nur ein trockenes, wei-
ches Tuch, niemals Chemikalien oder Wasser.
GWird das Mikrofon zweckentfremdet, falsch ange-
schlossen oder nicht fachgerecht repariert, kann keine
Haftung für daraus resultierende Sach- oder Personen-
schäden und keine Garantie für das Mikrofon übernom-
men werden.
3 Inbetriebnahme
Den beiliegenden Schaumstoff-Poppschutz über das Mi-
krofon ziehen. Zum Anbringen des Ohrbügels am linken
Ohr das elastische Band nach hinten ziehen, so dass der
Bügel um die Ohrmuschel gelegt werden kann. Für einen
sicheren Sitz sollte die Ohrläppchenstütze hinten am Ohr-
läppchen anliegen.
Das Mikrofon an den Eingang des Taschensenders
anschließen oder über einen Speiseadapter mit einem
Mikrofoneingang des Audiogeräts verbinden.
4 Technische Daten
Typ: . . . . . . . . . . . . . . . Back-Elektret
Richtcharakteristik: . . . Kugel
Frequenzbereich: . . . . 20 – 20 000 Hz
Impedanz: . . . . . . . . . . 2 kΩ
Empfindlichkeit: . . . . . . 7,9 mV/Pa bei 1 kHz
Maximaler Schalldruck: 130 dB
Stromversorgung: . . . . 1,5–9V
über
Taschensender oder
Speiseadapter
Gewicht: . . . . . . . . . . . 15 g
Anschluss: . . . . . . . . . . Mini-XLR, 3-polig
Kontaktbelegung: . . . 1 = Masse, 2 = Audiosignal,
3 = Stromversorgung
Änderungen vorbehalten.
Soll das Mikrofon endgültig aus dem Betrieb ge-
nommen werden, übergeben Sie es zur umwelt-
gerechten Entsorgung einem örtlichen Recyc-
lingbetrieb.
Earband Microphone
Please read these operating instructions carefully prior to
operation and keep them for later use.
1 Applications
This skin-coloured earband microphone is designed to
be used in combination with a pocket transmitter of a wire-
less audio transmission system (e. g. pocket transmitter
TXS-…HSE with 3-pole mini XLR connection from “img
Stage Line”). It is ideally suited for vocal sound and speech
applications that require inconspicuous microphones
offering much freedom of movement, e. g. for theatre per-
formances.
As an alternative to the operation with a pocket trans-
mitter, the microphone may be connected to an audio unit,
e. g. mixer, by means of a power supply adapter (e. g.
EMA-1 from “img Stage Line”) that provides the micro-
phone with power.
2 Important Notes
The microphone corresponds to all relevant directives of
the EU and is therefore marked with .
GThe microphone is suitable for indoor use only. Protect
it against humidity and heat (admissible ambient tem-
perature range: 0 – 40 °C).
GFor cleaning only use a dry, soft cloth; never use water
or chemicals.
GNo guarantee claims for the microphone and no liability
for any resulting personal damage or material damage
will be accepted if the microphone is used for other pur-
poses than originally intended, if it is not correctly con-
nected, or if it is not repaired in an expert way.
3 Setting into Operation
Place the foam pop protection supplied onto the micro-
phone. Put the earband on your left ear: Pull back the elas-
tic band so that you can put the earband around your au-
ricle. To ensure a tight fit of the earband, the earlobe sup-
port should be behind your earlobe.
Connect the microphone to the input of the pocket trans-
mitter or connect it to a microphone input of the audio unit,
using a power supply adapter.
4 Specifications
Type: . . . . . . . . . . . . . . back electret
Pick-up characteristic: . omnidirectional
Frequency range: . . . . 20 – 20 000 Hz
Impedance: . . . . . . . . . 2 kΩ
Sensitivity: . . . . . . . . . . 7.9 mV/Pa at 1 kHz
Maximum SPL: . . . . . . 130 dB
Power supply: . . . . . . . 1.5 – 9 Vvia
pocket transmitter or
power supply adapter
Weight: . . . . . . . . . . . . 15 g
Connection: . . . . . . . . . mini XLR, 3 poles
Pin configuration: . . . 1 = ground, 2 = audio signal,
3 = power supply
Subject to technical modification.
If the microphone is to be put out of operation de-
finitively, take it to a local recycling plant for a dis-
posal which is not harmful to the environment.
Microphone oreillette
Veuillez lire la présente notice avec attention avant le fonc-
tionnement et conservez-la pour pouvoir vous y reporter
ultérieurement.
1 Possibilités dʼutilisation
Ce microphone oreillette de couleur chair est conçu pour
un fonctionnement avec un émetteur de poche dʼun sys-
tème de transmission audio sans fil (p. ex. un émetteur de
poche TXS-…HSE avec mini XLR 3 pôles de “img Stage
Line”). Il est ainsi adapté de manière optimale pour des
applications de chant et de discours où un microphone
discret est nécessaire, tout en procurant une liberté de
mouvements, p. ex. pour des représentations théâtrales.
A la place du fonctionnement avec un émetteur de
poche, le microphone peut être relié à un appareil audio,
p. ex. table de mixage, via un adaptateur dʼalimentation
(p. ex. EMA-1 de “img Stage Line”) qui met à disposition
lʼalimentation pour le microphone.
2 Conseils importants dʼutilisation
Le microphone répond à toutes les directives nécessaires
de lʼUnion européenne et porte donc le symbole .
GLe microphone nʼest conçu que pour une utilisation en
intérieur. Protégez-le de lʼhumidité et de la chaleur (tem-
pérature ambiante admissible 0 – 40 °C).
GPour le nettoyage, utilisez un chiffon sec et doux, en
aucun cas de produits chimiques ou dʼeau.
G
Nous déclinons toute responsabilité en cas de dom-
mages corporels ou matériels résultants si le microphone
est utilisé dans un but autre que celui pour lequel il a été
conçu, sʼil nʼest pas correctement branché ou réparé par
une personne habilitée ; en outre, tout droit à la garantie
deviendrait caduque.
3 Fonctionnement
Placez la bonnette anti-pop en mousse livrée sur le mi-
crophone. Pour placer lʼoreillette derrière votre oreille
gauche, tirez lʼélastique vers lʼarrière de telle sorte que
lʼoreillette puisse être posée autour de lʼoreille. Pour une
fixation sûre, il faut que le support du lobe de lʼoreille soit
derrière votre lobe dʼoreille.
Reliez le microphone à lʼentrée de lʼémetteur de poche
ou, via un adaptateur dʼalimentation, à une entrée micro-
phone de lʼappareil audio.
4 Caractéristiques techniques
Type : . . . . . . . . . . . . . . back-électret
Caractéristique : . . . . . omnidirectionnel
Bande passante : . . . . 20 – 20 000 Hz
Impédance : . . . . . . . . . 2 kΩ
Sensibilité : . . . . . . . . . 7,9 mV/Pa à 1 kHz
Pression sonore max. : 130 dB
Alimentation : . . . . . . . . 1,5 – 9 Vvia
émetteur de poche ou
adaptateur alimentation
Poids : . . . . . . . . . . . . . 15 g
Branchement : . . . . . . . mini XLR 3 pôles
Configuration
des contacts : . . . . . . 1 = masse, 2 = signal audio,
3 = alimentation
Tout droit de modification réservé.
Lorsque le microphone est définitivement retiré
du service, vous devez le déposer dans une
usine de recyclage de proximité pour contribuer
à son élimination non polluante.
MONACOR INTERNATIONAL GmbH & Co. KG • Zum Falsch 36 • 28307 Bremen • Germany
Copyright ©by MONACOR INTERNATIONAL. All rights reserved. A-1559.99.01.05.2014
®
HSE-40/SK
Bestellnummer 23.6380
ELECTRONICS FOR SPECIALISTS ELECTRONICS FOR SPECIALISTS ELECTRONICS FOR SPECIALISTS ELECTRONICS FOR SPECIALISTS ELECTRONICS FOR SPECIALISTS ELECTRONICS FOR SPECIALISTS ELECTRONICS FOR SPECIALISTS
D A CH GB F B CH
