manuals.online logo
Brands
  1. Home
  2. •
  3. Brands
  4. •
  5. Monacor
  6. •
  7. Microphone
  8. •
  9. Monacor HSE-50/SK User manual

Monacor HSE-50/SK User manual

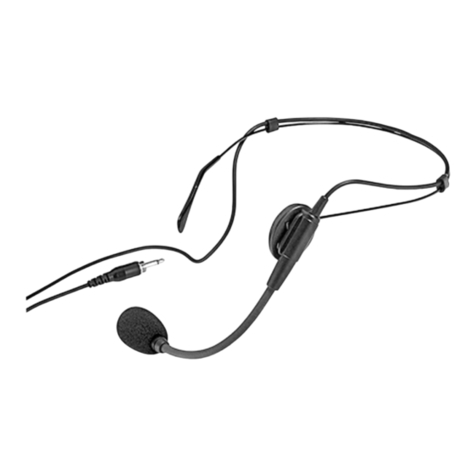
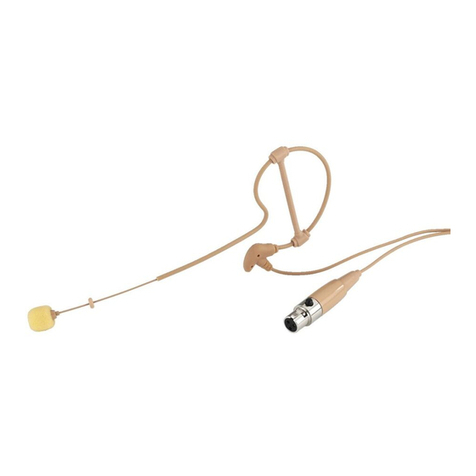
Ohrbügelmikrofon
Bitte lesen Sie diese Bedienungsanleitung vor dem
Betrieb gründlich durch und heben Sie sie für ein
späteres Nachlesen auf.
1 Einsatzmöglichkeiten
Dieses unauffällige, extrem leichte Miniatur-Ohr-
bügelmikrofon eignet sich optimal für Gesangs- und
Sprachanwendungen, die viel Bewegungsfreiheit
erfordern. Für den Betrieb ist zusätzlich ein Speise-
adapter (z. B. EMA-1 von „img Stage Line“) nötig
oder zur drahtlosen Tonübertragung ein Taschen-
sender (z. B. TXS-...HSE mit 3-poligem Mini-XLR-
Anschluss von „img Stage Line“).
2 Wichtige Hinweise für den Gebrauch
Das Mikrofon entspricht allen relevanten Richtlinien
der EU und ist deshalb mit gekennzeichnet.
GDas Mikrofon ist nur zur Verwendung im Innen-
bereich geeignet. Schützen Sie es vor Feuchtig-
keit und Hitze (zulässiger Einsatztemperatur-
bereich 0 – 40 °C).
HSE-50/SK
Bestellnummer 23.5910
wwwwww..iimmggssttaaggeelliinnee..ccoomm
GVerwenden Sie für die Reinigung nur ein trocke-
nes, weiches Tuch, niemals Chemikalien oder
Wasser.
GWird das Mikrofon zweckentfremdet, falsch ange-
schlossen oder nicht fachgerecht repariert, kann
keine Haftung für daraus resultierende Sach- oder
Personenschäden und keine Garantie für das
Mikrofon übernommen werden.
3 Inbetriebnahme
Den beiliegenden Windschutz auf das Mikrofon ste-
cken. Den Ohrbügel auf das linke Ohr setzen und
das Mikrofon dicht vor dem Mund in eine günstige
Sprechposition bringen.
Das Mikrofon an den Eingang des Taschensen-
ders oder des Speiseadapters anschließen. Bei Ver-
wendung eines Speiseadapters diesen an den
Mikrofoneingang eines Audiogerätes anschließen.
Soll das Mikrofon endgültig aus dem
Betrieb genommen werden, übergeben
Sie es zur umweltgerechten Entsorgung
einem örtlichen Recyclingbetrieb.
4 Technische Daten
Typ: . . . . . . . . . . . . . . . Back-Elektret
Richtcharakteristik: . . . Kugel
Frequenzbereich: . . . . 20 – 20 000 Hz
Impedanz: . . . . . . . . . . 1,5 kΩ
Empfindlichkeit: . . . . . . 5 mV/Pa bei 1 kHz
Maximaler Schalldruck: 110 dB
Stromversorgung: . . . . 1 – 10 V
über Speiseadapter oder
Taschensender
Gewicht: . . . . . . . . . . . 5 g (ohne Kabel)
Anschluss: . . . . . . . . . . 1,3-m-Kabel mit 3-pol.
Mini-XLR-Kupplung
Änderungen vorbehalten.
1 = Masse
2 = Audiosignal
3 = Stromversorgung
Earband Microphone
Please read these operating instructions carefully
prior to operating the microphone and keep them for
later reference.
1 Applications
This inconspicuous and extra lightweight miniature
earband microphone is ideally suited for vocal
sound and speech applications which require much
freedom of movement. For the operation, addition-
ally a power supply adapter (e. g. EMA-1 from “img
Stage Line”) or for wireless audio transmission a
pocket transmitter (e. g. TXS-…HSE with 3-pole
mini XLR connection from “img Stage Line”) is re-
quired.
2 Important Notes
The microphone corresponds to all relevant direc-
tives of the EU and is therefore marked with .
GThe microphone is suitable for indoor use only.
Protect it against humidity and heat (admissible
ambient temperature range 0 – 40 °C).
GFor cleaning only use a dry, soft cloth, never use
chemicals or water.
GNo guarantee claims for the microphone or liabil-
ity for any resulting personal damage or material
damage will be accepted if the microphone is
used for other purposes than originally intended,
if it is not correctly connected, or not repaired in
an expert way.
3 Setting into Operation
Place the supplied windshield on the microphone.
Put the earband on the left ear and place the micro-
phone close to the mouth into a favourable talk po-
sition.
Connect the microphone to the input of the
pocket transmitter or the power supply adapter. If a
power supply adapter is used, connect it to the
microphone input of an audio unit.
If the microphone is to be put out of oper-
ation definitively, take it to a local recycling
plant for a disposal which is not harmful to
the environment.
4 Specifications
Type: . . . . . . . . . . . . . . back electret
Directivity: . . . . . . . . . . omnidirectional
Frequency range: . . . . 20 – 20 000 Hz
Impedance: . . . . . . . . . 1.5 kΩ
Sensitivity: . . . . . . . . . . 5 mV/Pa at 1 kHz
SPL max.: . . . . . . . . . . 110 dB
Power supply: . . . . . . . 1 – 10 V
via power supply adapter
or pocket transmitter
Weight: . . . . . . . . . . . . 5 g (w/o cable)
Connection: . . . . . . . . . 1.3 m cable with 3-pole
mini XLR inline jack
Subject to technical modification.
1 = ground
2 = audio signal
3 = power supply
Microphone oreillette
Veuillez lire la présente notice avec attention avant
le fonctionnement et conservez-la pour pouvoir vous
y reporter ultérieurement.
1 Possibilités dʼutilisation
Ce microphone oreillette miniature, discret, extrê-
mement léger, est idéalement adapté pour des ap-
plications de discours et de chant requérant une
grande liberté de mouvements. Pour le fonctionne-
ment, un adaptateur dʼalimentation (par exemple
EMA-1 de “img Stage Line”) ou un émetteur de
poche (par exemple TXS-...HSE avec connexion
mini XLR 3 pôles de “img Stage Line”) pour la trans-
mission audio sans fil est en plus nécessaire.
2 Conseils importants dʼutilisation
Le microphone répond à toutes les directives né-
cessaires de lʼUnion européenne et porte donc le
symbole .
GLe microphone nʼest conçu que pour une utilisa-
tion en intérieur. Protégez-le de lʻhumidité et de la
chaleur (plage de température de fonctionnement
autorisée : 0 – 40 °C).
GPour le nettoyer, utilisez uniquement un chiffon
sec et doux, en aucun cas de produits chimiques
ou dʼeau.
GNous déclinons toute responsabilité en cas de
dommages matériels ou corporels résultants si le
microphone est utilisé dans un but autre que celui
pour lequel il a été conçu, sʼil nʼest pas correcte-
ment branché ou sʼil nʼest pas réparé par une per-
sonne habilitée ; en outre, la garantie deviendrait
caduque.
3 Fonctionnement
Placez la bonnette de protection livrée sur le micro-
phone. Placez lʼoreillette sur lʼoreille gauche et pla-
cez le microphone près de la bouche dans une po-
sition favorable pour parler.
Connectez le microphone à lʼentrée de lʼémetteur
de poche ou de lʼadaptateur dʼalimentation. Si vous
utilisez un adaptateur dʼalimentation, reliez-le à lʼen-
trée micro dʼun appareil audio.
Lorsque le microphone est définitivement
retiré du service, vous devez le déposer
dans une usine de recyclage adaptée pour
contribuer à son élimination non polluante.
4 Caractéristiques techniques
Type micro : . . . . . . . . . back électret
Caractéristique : . . . . . omnidirectionnel
Bande passante : . . . . 20 – 20 000 Hz
Impédance . . . . . . . . . . 1,5 kΩ
Sensibilité : . . . . . . . . . 5 mV/Pa à 1 kHz
Pression sonore max. : 110 dB
Alimentation : . . . . . . . . 1 – 10 V
par adaptateur dʼalimen-
tation ou émetteur de
poche
Poids : . . . . . . . . . . . . . 5 g (sans câble)
Connexion : . . . . . . . . . câble 1,3 m avec mini
fiche XLR 3 pôles
Tout droit de modification réservé.
1 = masse
2 = signal audio
3 = alimentation
®
MONACOR INTERNATIONAL GmbH & Co. KG
•
Zum Falsch 36
•
28307 Bremen
•
Germany
Copyright
©
by MONACOR INTERNATIONAL. All rights reserved. A-1434.99.01.04.2013
D A CH
GB
F B CH
Microfono archetto
Vi preghiamo di leggere attentamente le presenti
istruzioni prima dellʻuso e di conservarle per un uso
futuro.
1 Possibilità dʼimpiego
Questo microfono archetto mini, estremamente leg-
gero e non vistoso, è adatto in modo ottimale per le
applicazioni di canto e di lingua parlata che richie-
dono molta libertà di movimento. Per il funziona-
mento è richiesto un adattatore di alimentazione
(p. es. EMA-1 di “img Stage Line”) oppure, per la
trasmissione audio senza fili, un trasmettitore
tascabile (p. es. TXS-...HSE con contatto mini XLR
a 3 poli di “img Stage Line”).
2 Avvertenze importanti per lʼuso
Il microfono è conforme a tutte le direttive rilevanti
dellʼUE e pertanto porta la sigla .
GFar funzionare il microfono solo allʼinterno di lo-
cali e proteggerlo da umidità e calore (tempera-
tura dʼimpiego ammessa fra 0 e 40 °C).
HSE-50/SK
Bestellnummer 23.5910
wwwwww..iimmggssttaaggeelliinnee..ccoomm
GPer la pulizia usare solo un panno morbido,
asciutto; non impiegare in nessun caso prodotti
chimici o acqua.
GNel caso dʼuso improprio, di collegamenti sbagliati
o di riparazione non a regola dʼarte del microfono,
non si assume nessuna responsabilità per even-
tuali danni consequenziali a persone o a cose e
non si assume nessuna garanzia per il microfono.
3 Messa in funzione
Applicare sul microfono la spugna antivento in do-
tazione. Mettere lʼarchetto sullʼorecchio sinistro e
portare il microfono vicino alla bocca, in posizione
opportuna per parlare.
Collegare il microfono con lʼingresso del trasmet-
titore tascabile o dellʼadattatore di alimentazione.
Usando un adattatore di alimentazione, collegarlo
con lʼingresso microfono di un apparecchio audio.
Se si desidera eliminare il microfono defi-
nitivamente, consegnarlo per lo smalti-
mento ad unʼistituzione locale per il rici-
claggio.
4 Dati tecnici
Tipo: . . . . . . . . . . . . . . . back-elettrete
Caratteristica
direzionale: . . . . . . . . . onnidirezionale
Gamma di frequenze: . 20 – 20 000 Hz
Impedenza: . . . . . . . . . 1,5 kΩ
Sensibilità: . . . . . . . . . . 5 mV/Pa con 1 kHz
Pressione sonora max.: 110 dB
Tensione
dʼalimentazione: . . . . . 1 – 10 V
tramite adattatore di ali-
mentazione o trasmetti-
tore tascabile
Peso: . . . . . . . . . . . . . . 5 g (senza cavo)
Collegamento: . . . . . . . cavo 1,3 m con presa mini
XLR a 3 poli
Con riserva di modifiche tecniche.
1 = massa
2 = segnale audio
3 = alimentazione
Micrófono de oreja
Lea atentamente estas instrucciones de funciona-
miento antes de utilizar el micrófono y guárdelas
para usos posteriores.
1 Aplicaciones
Este micrófono de oreja miniatura, discreto y extra
ligero, es ideal para sonido vocal y aplicaciones de
habla que requieren mucha libertad de movimiento.
Para su funcionamiento también es necesario un
adaptador de alimentación (por ejemplo EMA-1 de
“img Stage Line”) o, para transmisión audio inalám-
brica, un emisor de petaca (por ejemplo TXS-…HSE
con conexión mini XLR de 3 polos de “img Stage
Line”).
2 Notas Importantes
El micrófono cumple con todas las directivas rele-
vantes de la UE y por lo tanto está marcado con el
símbolo .
GEl micrófono está adecuado para su utilización
sólo en interiores. Protéjalo de la humedad y del
calor (temperatura ambiente admisible: 0 – 40 ºC).
GUtilice sólo un paño suave y seco para la limpieza,
no utilice nunca ni productos químicos ni agua.
GNo podrá reclamarse garantía o responsabilidad
alguna por cualquier daño personal o material re-
sultante si se utiliza el micrófono para otros fines
diferentes a los originalmente concebidos, si no
se conecta adecuadamente o no se repara por
expertos.
3 Puesta en Marcha
Coloque la espuma antiviento que se entrega en el
micrófono. Ponga el enganche de oreja en la oreja
izquierda y coloque el micrófono cerca de la boca
en una posición adecuada para hablar.
Conecte el micrófono a la entrada del emisor de
petaca o del adaptador de alimentación. Si se uti-
liza un adaptador de alimentación, conéctelo a la
entrada de micro de una unidad de audio.
Si va a poner el micrófono fuera de servicio
definitivamente, llévelo a la planta de reci-
claje más cercana para que su eliminación
no sea perjudicial para el medioambiente.
4 Especificaciones
Tipo: . . . . . . . . . . . . . . . back electret
Direccionamiento: . . . . omnidireccional
Banda pasante: . . . . . . 20 – 20 000 Hz
Impedancia: . . . . . . . . . 1,5 kΩ
Sensibilidad: . . . . . . . . 5 mV/Pa a 1 kHz
Presión sonora máx.: . 110 dB
Alimentación: . . . . . . . . 1 – 10 V
a través del adaptador de
alimentación o del emisor
de petaca
Peso: . . . . . . . . . . . . . . 5 g (sin cable)
Conexión: . . . . . . . . . . cable de 1,3 m de longi-
tud con mini XLR 3 polos
Sujeto a modificaciones técnicas.
1 = masa
2 = señal audio
3 = alimentación
Mikrofon nauszny
Przed rozpoczęciem pracy proszę zapoznać się z
niniejszą instrukcją a następnie zachować ją do
wglądu.
1 Zastosowanie
Elektretowy mikrofon nauszny HSE-50/SK jest nie-
zwykle mały i lekki, co sprawia, że znajduje idealne
zastosowanie tam, gdzie konieczna jest duża swo-
boda ruchu. Mikrofon działa w połączeniu z adapte-
rem zasilania (np. EMA-1 z oferty “img Stage Line”)
lub do transmisji bezprzewodowej z nadajnikiem
kieszonkowym (np. TXS-...HSE z 3-pinowym złą-
czem mini XLR z oferty “img Stage Line”).
2 Środki bezpieczeństwa
Mikrofon spełnia wszystkie wymagania norm UE i
dlatego został oznaczony symbolem .
GUrządzenie przeznaczone jest do użytku jedynie
wewnątrz pomieszczeń. Należy chronić je przed
działaniem wilgoci oraz wysokiej temperatury
(dopuszczalna temperatura otoczenia pracy to
0 – 40 ºC).
GDo czyszczenia urządzenia należy używać su-
chej, miękkiej tkaniny. Nie stosować wody, ani
chemicznych środków czyszczących.
GProducent ani dostawca nie ponoszą odpowie-
dzialności za wynikłe szkody (uszkodzenie
sprzętu lub obrażenia użytkownika), jeśli urzą-
dzenie używano niezgodnie z przeznaczeniem,
nieprawidłowo podłączono bądź poddano nieau-
toryzowanej naprawie.
3 Przygotowanie do pracy
Na mikrofon należy założyć wiatrochron. Następnie
należy założyć mikrofon na lewe ucho oraz ustawić
mikrofon w optymalnej pozycji, blisko ust.
Należy podłączyć mikrofon do nadajnika kie-
szonkowego lub do adaptera zasilania; adapter za-
silania należy podłączyć do wejścia mikrofonowego
urządzenia audio.
Po całkowitym zakończeniu eksploatacji
urządzenie należy oddać do punktu utyli-
zacji odpadów.
4 Specyfikacja
Typ: . . . . . . . . . . . . . . . elektretowy typu „back“
Kierunkowość: . . . . . . . dookólny
Pasmo przenoszenia: . 20 – 20 000 Hz
Impedancja: . . . . . . . . . 1,5 kΩ
Czułość: . . . . . . . . . . . . 5 mV/Pa przy 1 kHz
SPL max.: . . . . . . . . . . 110 dB
Zasilanie: . . . . . . . . . . . 1 – 10 V
przez adapter zasilania
lub nadajnik kieszonkowy
Waga: . . . . . . . . . . . . . 5 g (bez kabla)
Podłączanie: . . . . . . . . kabel 1,3 m z 3-pinowym
gniazdem mini XLR
Z zastrzeżeniem możliwości zmian.
1 = masa
2 = sygnał audio
3 = zasilanie
®
MONACOR INTERNATIONAL GmbH & Co. KG
•
Zum Falsch 36
•
28307 Bremen
•
Germany
Copyright
©
by MONACOR INTERNATIONAL. All rights reserved. A-1434.99.01.04.2013
I
E
PL

This manual suits for next models

1

Other Monacor Microphone manuals

Monacor IMG STAGELINE DM-065 User manual

Monacor

Monacor IMG STAGELINE DM-065 User manual

Monacor DM-3 User manual

Monacor

Monacor DM-3 User manual

Monacor HSE-160/CR User manual

Monacor

Monacor HSE-160/CR User manual

Monacor img Stage Line ECM-250 User manual

Monacor

Monacor img Stage Line ECM-250 User manual

Monacor img Stage Line ECM-130 User manual

Monacor

Monacor img Stage Line ECM-130 User manual

Monacor IMG STAGELINE ECM-220 USB User manual

Monacor

Monacor IMG STAGELINE ECM-220 USB User manual

Monacor IMG STAGELINE HSE-300/SK User manual

Monacor

Monacor IMG STAGELINE HSE-300/SK User manual

Monacor HSE-70A/SK User manual

Monacor

Monacor HSE-70A/SK User manual

Monacor IMG STAGELINE DM-20 User manual

Monacor

Monacor IMG STAGELINE DM-20 User manual

Monacor DH-95N User manual

Monacor

Monacor DH-95N User manual

Monacor img Stage Line ECM-2200ST User manual

Monacor

Monacor img Stage Line ECM-2200ST User manual

Monacor IMG Stageline ECM-310W User manual

Monacor

Monacor IMG Stageline ECM-310W User manual

Monacor HSE-300/SK User manual

Monacor

Monacor HSE-300/SK User manual

Monacor img Stage Line HSE-130/SK User manual

Monacor

Monacor img Stage Line HSE-130/SK User manual

Monacor ECM-310P User manual

Monacor

Monacor ECM-310P User manual

Monacor ECM-925P User manual

Monacor

Monacor ECM-925P User manual

Monacor img Stage Line EMG-450 User manual

Monacor

Monacor img Stage Line EMG-450 User manual

Monacor JTS KA-8TH /1 User manual

Monacor

Monacor JTS KA-8TH /1 User manual

Monacor IMG STAGELINE ECM-306B/SW User manual

Monacor

Monacor IMG STAGELINE ECM-306B/SW User manual

Monacor img Stage Line HSE-72 User manual

Monacor

Monacor img Stage Line HSE-72 User manual

Monacor img Stage Line ECM-330W User manual

Monacor

Monacor img Stage Line ECM-330W User manual

Monacor ECM-10/SW User manual

Monacor

Monacor ECM-10/SW User manual

Monacor PA ECM-450 User manual

Monacor

Monacor PA ECM-450 User manual

Monacor img Stage Line DM-2100 User manual

Monacor

Monacor img Stage Line DM-2100 User manual

Popular Microphone manuals by other brands

Sennheiser SL Connection guide

Sennheiser

Sennheiser SL Connection guide

Audio Technica ATW-2110 Installation and operation

Audio Technica

Audio Technica ATW-2110 Installation and operation

Nady Audio OHCM-20 user guide

Nady Audio

Nady Audio OHCM-20 user guide

Behringer C-1 user manual

Behringer

Behringer C-1 user manual

Sennheiser Evolution E 604 Specifications

Sennheiser

Sennheiser Evolution E 604 Specifications

Audibax RF10 user manual

Audibax

Audibax RF10 user manual

Shure SM80-LC Specifications

Shure

Shure SM80-LC Specifications

Yamaha DM-105 manual 

Yamaha

Yamaha DM-105 manual 

Sennheiser MD 43 manual

Sennheiser

Sennheiser MD 43 manual

Sennheiser HSP 4 Bedienungsanleitung

Sennheiser

Sennheiser HSP 4 Bedienungsanleitung

Microtech Gefell PEM 975 user manual

Microtech Gefell

Microtech Gefell PEM 975 user manual

Galaxy Audio AS-900T quick start guide

Galaxy Audio

Galaxy Audio AS-900T quick start guide

Audio Technica AT3527 Specifications

Audio Technica

Audio Technica AT3527 Specifications

Sennheiser evolution e 835 Instructions for use

Sennheiser

Sennheiser evolution e 835 Instructions for use

TIE Studio Condensor Mic USB user manual

TIE

TIE Studio Condensor Mic USB user manual

Peavey PVM 520i Specifications

Peavey

Peavey PVM 520i Specifications

AKG LC User instructions

AKG

AKG LC User instructions

Gems Messenger 570 user guide

Gems

Gems Messenger 570 user guide

manuals.online logo
manuals.online logoBrands
  • About & Mission
  • Contact us
  • Privacy Policy
  • Terms and Conditions

Copyright 2025 Manuals.Online. All Rights Reserved.