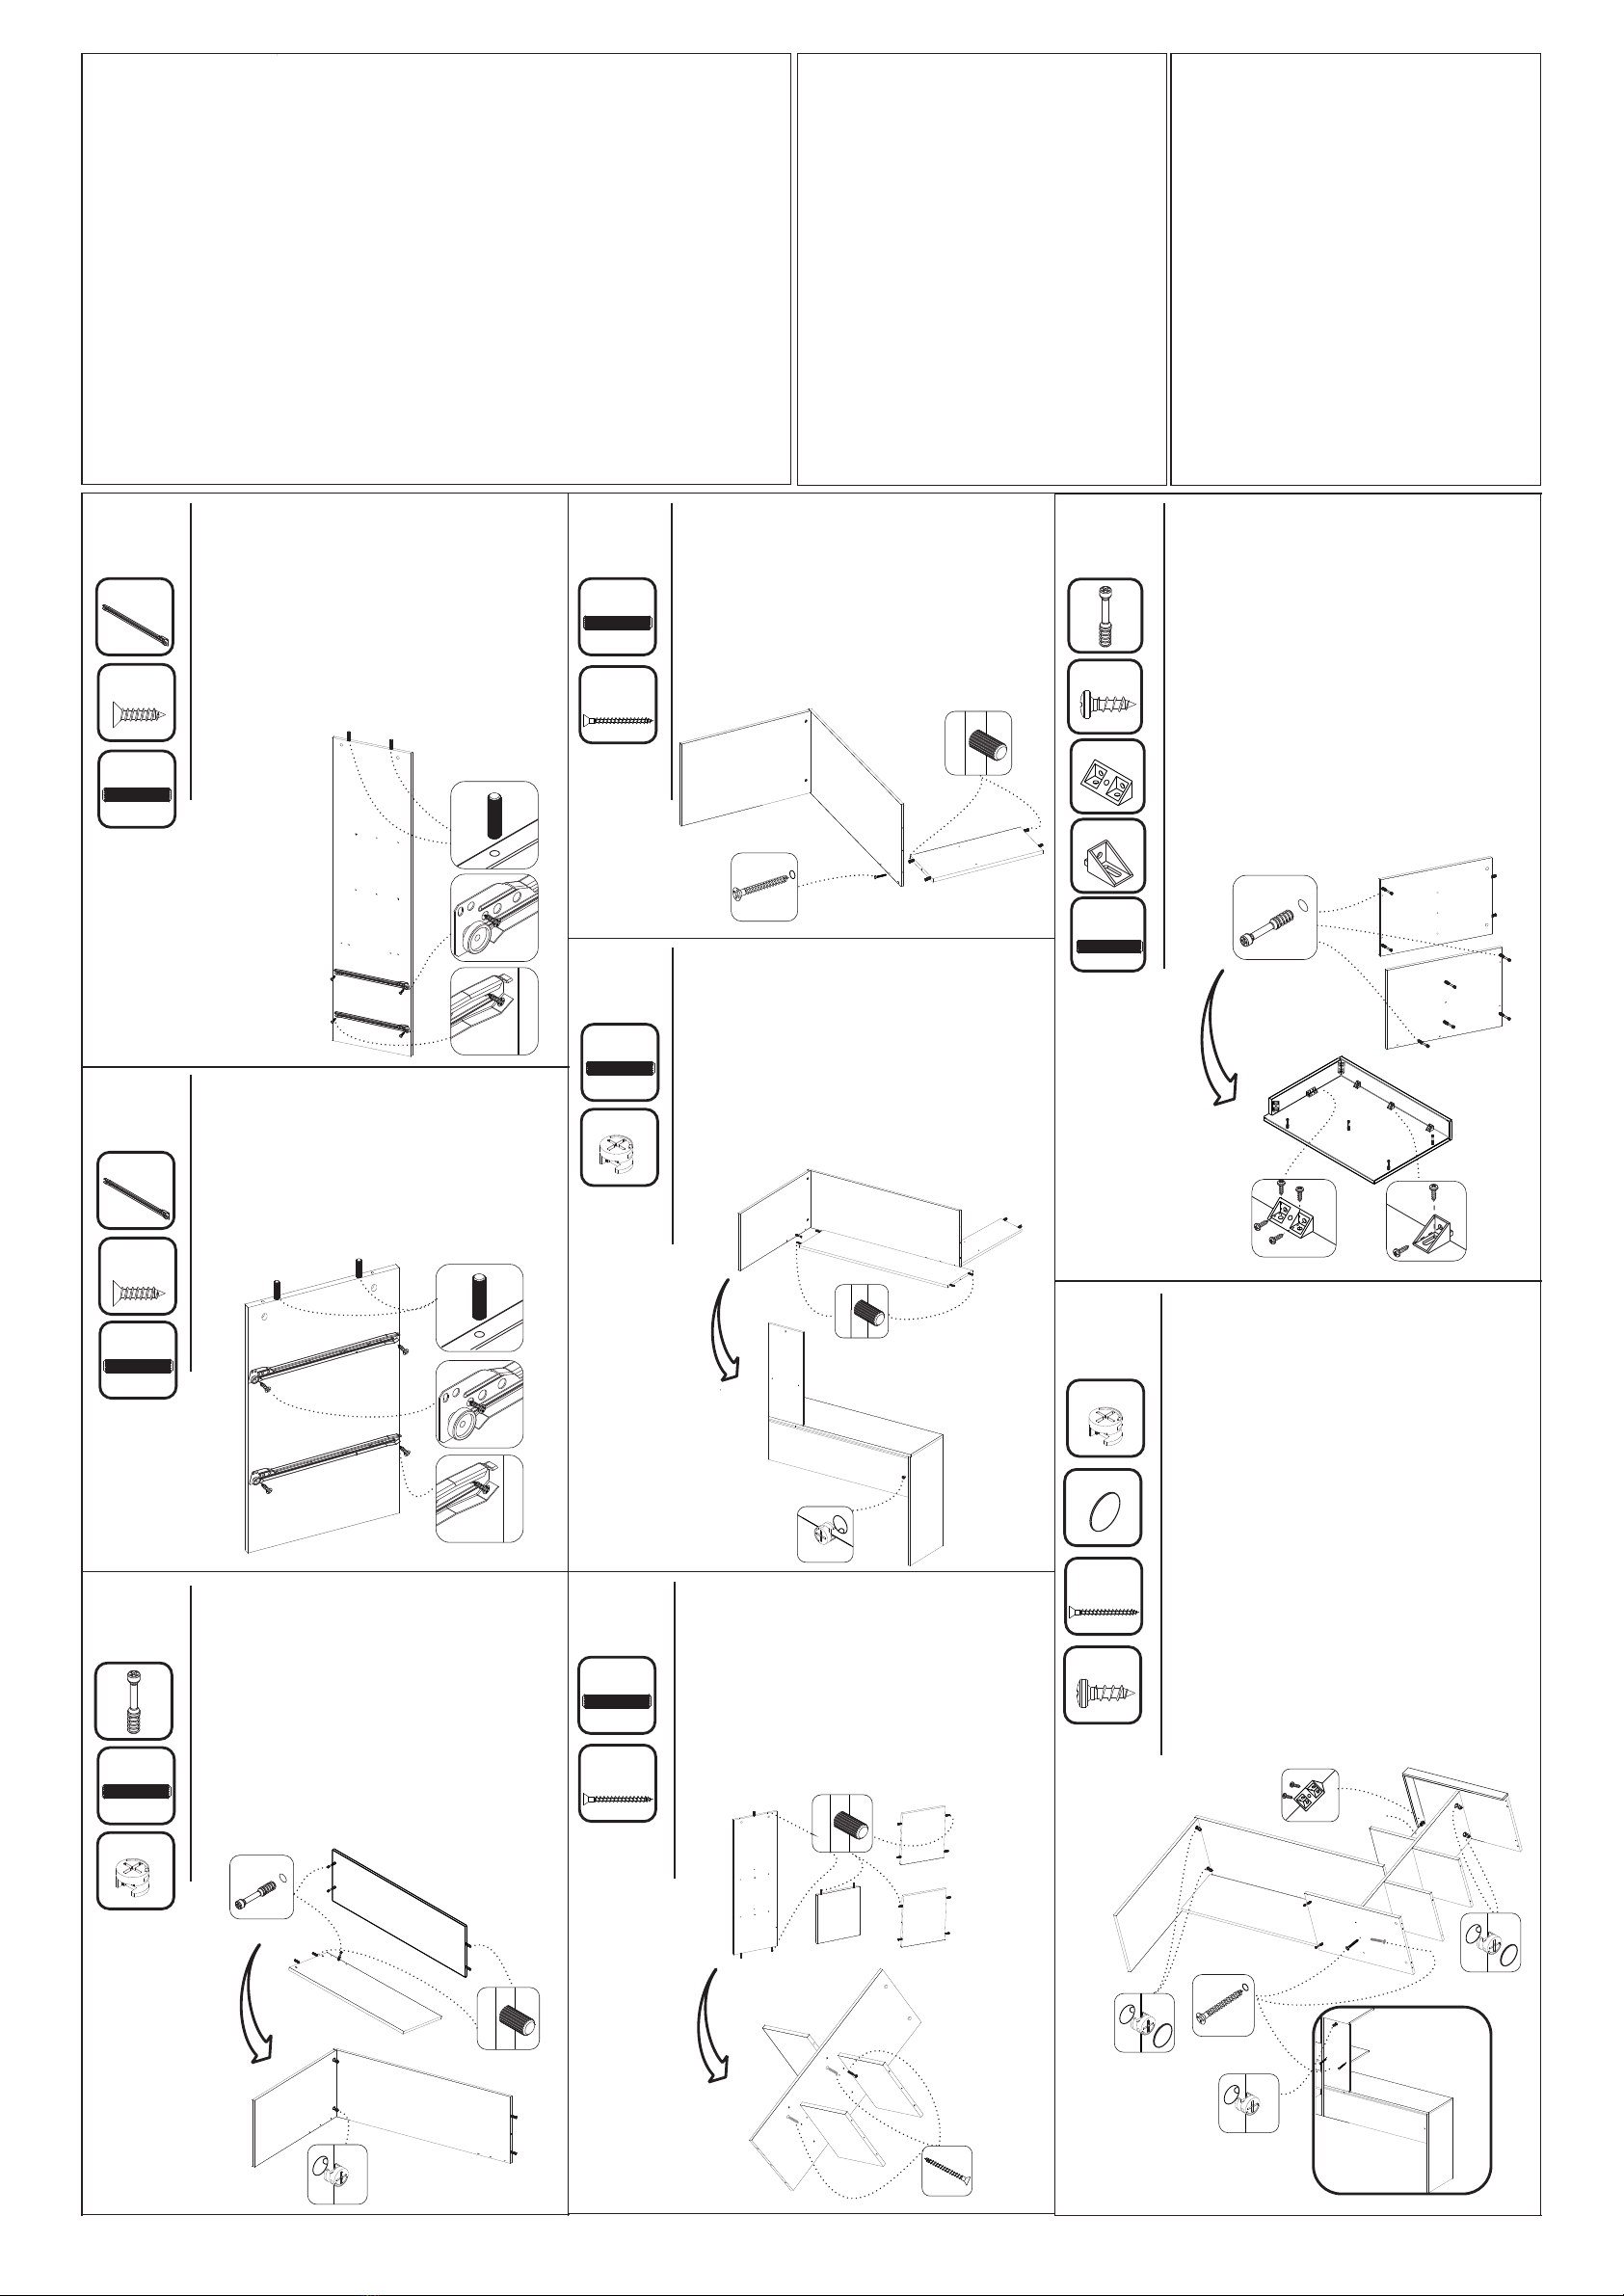
manuals.online logo
Brands
  1. Home
  2. •
  3. Brands
  4. •
  5. Notável Móveis
  6. •
  7. Indoor Furnishing
  8. •
  9. Notável Móveis NT2010 User manual

Notável Móveis NT2010 User manual

Instalação
Instalación
Installation
ESQUEMA DE MONTAGEM
INSTRUCCIONES DE MONTAJE
ASSEMBLY INSTRUCTIONS
RELAÇÃO DE FERRAGENS | LISTA DE HARDWARE | LIST OF HARDWARE
01. A marcação do número de lote e código da peça que aparece nas fitas é facilmente removida com
borracha escolar ou com pano e álcool.
01. La marca del número de lote y el código de pieza que aparece en las cintas se quita fácilmente con
goma escolar o con paño y alcohol.
01. The marking of the lot number and part code that appears on the tapes is easily removed with school
rubber or with cloth and alcohol.
02. Para reclamações, ter à mão a etiqueta do produto com número do lote e data da fabricação.
02. Para cualquiera que sea la reclamación hay que tener siempre a mano la etiqueta del producto con el
número del lote y la fecha de fabricación.
02. For complaints always have the product label with the batch number and manufacturing date at hand.
03. Sr. Montador, favor conferir as peças antes da montagem, pois só efetuamos a troca do produto antes de
ser montado.
03. Señor ensamblador, favor conferir las piezas antes del montaje, pues sólo cambiamos los productos antes
de ensamblados.
03. Mr. Assembler, please check parts before assembling. We only replace products before put together.
COD: NT2010
MESA OFFICE NT 2010
EST. DE TRABAJO OFFICE NT 2010
OFFICE TABLE NT 2010
DIMENSÕES TOTAIS | DIMENSIONES TOTALES |
: 1365x1315x375mm OVERALL DIMENSIONS
VOLUME | VOLUMEN | VOLUME: 01
FERRAMENTAS PARA MONTAGEM E INSTALAÇÃO
HERRAMIENTAS PARA ENSAMBLAJE E INSTALACIÓN
TOOLS FOR ASSEMBLY AND INSTALLATION
Ferramentas não fornecidas | Herramientas no proporcionadas | Tools not supplied
Montagem
Ensamblaje
Assembly
ATENÇÃO: Sugerimos montar os produtos sobre
a embalagem para evitar arranhões nas peças.
PRECAUCIÓN: Sugerimos ensamblar los
productos sobre el embalaje para evitar
rayaduras en las partes.
ATTENTION: We suggest assembling the
products on the packaging to avoid scratches on
the parts.
DESTORNILLADOR
ELETRIC SCREW
DRIVER
MARTILLO
HAMMER
DESTORNILLADOR
Y DE CRUCETA
PHILLIPS
SCREWDRIVER
CINTA MÉTRICA
MEASURING
TAPE
5M
PARAFUSADEIRA CHAVE PHILIPS
E FENDA MARTELO TRENA
3kg
2
4
4
5
1
16
17
27
10 22
21
24
8
6
7
3
15
19
20
13
13
26
26
26
26
14
14
25
25
3kg
20kg
3kg
3kg
CÓD PRODUTO
CÓD PRODUCTO
CODE
Nº PEÇA
NR. PIEZA
ITEM
DESCRIÇÃO
DESCRIPCIÓN
DESCRIPTION
MATERIAL
COD PEÇA
COD PIEZA
PART CODE
QTDE
CTD.
QTY.
COMP.
LARGO
LENGTH
LARG
ANCHO
WIDTH
ESP
ESP
THICK
NT2010 1 TAMPO ESQUERDO | CUBIERTA IZQUIERDA | LEFT COVER MDP 41186 1 1030 355 15
NT2010 2 LATERAL ESQUERDA | LATERAL IZQUIERDA | LEFT SIDE MDP 41187 1 720 355 15
NT2010 3 SUPORTE TRASEIRO | SOPORTE TRASERO | REAR SUPPORT MDP 41188 1 1013 269 15
NT2010 4 PRATELEIRA DIREITA | REPISA DERECHA | RIGHT SHELF MDP 41189 2 251 294 15
NT2010 5 PRATELEIRA ESQUERDA | REPISA IZQUIERDA | LEFT SHELF MDP 41216 1 251 280 15
NT2010 6 TAMPO SUPERIOR | CUBIERTA SUPERIOR | UPPER COVER MDP 41190 1 535 356 15
NT2010 7 DIVISÓRIA CENTRAL | DIVISIÓN CENTRAL | CENTRAL DIVISORY MDP 41191 1 900 297 15
NT2010 8 TAMPO GAVETA | CUBIERTA CAJÓN | DRAWER COVER MDP 41192 1 518 356 15
NT2010 10 SUPORTE ESQUERDO | SOPORTE IZQUIERDO | LEFT SUPPORT MDP 41194 1 615 252 15
NT2010 13 FUNDO GAVETA | FONDO CAJÓN | DRAWER BOTTOM HDF 41197 2 474 303 3
NT2010 14 FUNDO TRASEIRO | FONDO TRASERO | REAR BOTTOM MDP 41198 2 446 86 15
NT2010 15 RODAPÉ FRONTAL | RODAPIÉ FRONTAL | FRONT SKIRTING BOARD MDP 41199 1 502 102 15
NT2010 16 VISTA ESQUERDA | VISTA IZQUIERDA | LEFT VIEW MDP 41200 1 1031 80 15
NT2010 17 VISTA SUP. FRONTAL | VISTA SUP. FRONTAL | FRONTAL UPPER VIEW MDP 41201 1 536 80 15
NT2010 19 VISTA SUP. ESQUERDA | VISTA IZQUIERDA | LEFT VIEW MDP 41203 1 341 64 15
NT2010 20 VISTA INF. DIREITA | VISTA DERECHA | RIGHT VIEW MDP 41204 1 266 64 15
NT2010 21 FUNDO INFERIOR | FONDO INFERIOR | RIGT BOTTOM HDF 41233 1 525 350 3
NT2010 22 FUNDO DIREITO | FONDO DERECHO | RIGHT BOTTOM HDF 41234 1 920 276 3
NT2010 23 KIT ACESSÓRIO | KIT ACCESORIOS | ACCESSORIES SET . 41207 1 . . .
NT2010 24 DIVISÓRIA GAVETA | DIVISÍON CAJÓN | DRAWER DIVISORY MDP 41270 1 435 356 15
NT2010 25 FRENTE GAVETA | FRONTAL CAJÓN | DRAWER FRONT MDP 41271 2 529 176 15
NT2010 26 LATERAL GAVETA | LATERAL CAJÓN | DRAWER SIDE MDP 41272 4 298 113 15
NT2010 27 LATERAL DIREITA | LATERAL DERECHA | RIGHT SIDE MDP 41273 1 1350 356 15
RELAÇÃO DE PEÇAS | LISTA DE PIEZAS | PARTS LIST
PÁGINA | PAGINA | PAGE: 01
6
R
TAPA FURO ADESIVO PLÁSTICO 15mm
TAPA-AGUJERO ADHESIVO PLÁSTICO 15mm
15MM PLASTIC ADHESIVE HOLE COVER
R
5
T
CANTONEIRA 15x15x40mm
ANGULAR 15x15x40mm
15X15X40MM ANGLE
4
TA
CANTONEIRA PLÁSTICA 2 FUROS 18X18 mm
ANGULAR PLÁSTICA 2 AGUJEROS 18X18 mm
PLASTIC CORNER 2 HOLES 18X18 mm
S
PUXADOR ALUMÍNIO ANODIZADO 224mm
MANIJA ALUMÍNIO ANODIZADO 224mm
224mm ANODIZED ALUMINIUM HANDLE 2
16
PP
PARAFUSO 3X12mm CABEÇA CHATA
TORNILLO 3X12mm CABEZA PLANA
3X12mm FLAT HEAD SCREW 6
PARAFUSO 3,5X25MM CABEÇA CHATA
TORNILLO 3,5X25MM CABEZA PLANA
3.5X25MM FLAT HEAD SCREW
W
44
X
PARAFUSO 4X12mm CABEÇA PANELA
TORNILLO 4X12mm CABEZA CUCHARA
4X12mm PAN HEAD SCREW
X
15
Y
PARAFUSO 3,5x40mm CABEÇA CHATA
TORNILLO 3,5x40mm CABEZA PLANA
3.5X40MM FLAT HEAD SCREW
12
B
PARAFUSO MINIFIX 5x31mm
TORNILLO MINIFIX 5x31mm
5X31mm MINI-FIX SCREW
40
A
CAVILHA MADEIRA 6x30mm
CLAVIJA MADERA 6x30mm
6X30MM WOODEN DOWEL
A
12
C
TAMBOR MINIFIX 12x9mm
BARRIL MINIFIX 12x9mm
12X9mm MINI-FIX BARREL
60
D
PREGO 23x4mm
CLAVO 23x4mm
23X4MM NAIL
SUPORTE ANGULAR PLÁSTICO 22x12mm
SOPORTE ANGULAR PLÁSTICO 22X12mm
22x12mm PLASTIC ANGLE SUPPORT
H86
L
SAPATA DESLIZADORA PLÁSTICA 12x12x6mm
ZAPATA DESLIZADORA PLÁSTICA 12x12x6mm
12x12x6mm PLASTIC SLIP SHOE
2
N
PAR CORREDIÇA METÁLICA 350mm
PAR CORREDIZA METÁLICA 350mm
350MM PAIR OF SLIDES
A MARCAÇÃO DO NÚMERO DE LOTE E CÓDIGO DA PEÇA QUE APARECE NAS
FITAS É FACILMENTE REMOVIDA COM BORRACHA ESCOLAR OU COM PANO E ÁLCOOL
Vídeo de Montagem disponível em nosso site!
Video de montaje disponible en nuestro sitio web!
Assembly Video available on our website!
www.notavel.ind.br
PASSO 1
PASO 1
STEP 1
Faça a preparação de todas as peças, com os acessórios e
as quantidades dos mesmos
1 - Posicione as corrediças N nas marcações do lado esquerdo
da peça 27 e fixe-as com os parafusos PP (3x12mm)
2 - Insira as cavilhas A (6x30mm) no topo da peça 18
Haga la separación de todas las piezas, con los accesorios
y las cantidades de los mismos.
1 - Coloque las corredizas N en las marcas del lado izquierdo
de la pieza 27 y fíjelas con los tornillos PP (3x12mm)
2 - Introduzca las clavijas A (6x30mm) en el alto de la pieza 27.
Prepare all parts, accessories and quantities.
1 - Align the N slides on the markings on the left side of part 18
and secure them with PP screws (3x12mm).
2 - Insert
(6x30mm) pegs
in the top of part
27.
N2
PP 4
A2
27
PP
PP
24
N2
PP 4
A2
B3
C2
A4
1
21
2
PASSO 2
PASO 2
STEP 2
1 - Alinhe as corrediças N na peça 24 fixe-a com os parafusos
PP (3x12mm)
2 - Insira as cavilhas A (6x30mm) no topo da peça 24
1 - Coloque las corredizas N en las marcas de las piezas 24 y
fíjelas con los tornillos PP (3x12mm)
2 - Introduzca las clavijas A (6x30mm) en las piezas 24.
1 - Align the N slides on the markings of part 24 fasten them
with (3x12mm) PP screws
2 - Insert (6x30mm) pegs in the top of part 24
PASSO 3
PASO 3
STEP 3
1 - Insira as cavilhas A (6x30mm) no topo da peça 1 e 2
2 - Fixe os parafusos de minifix B na peça 1 e 2
3 - Em seguida, encaixe a peça 2 na 1
4 - Encaixe os tambores de minifix C na peça 2 e gire até travar
utilizando uma chave philips
1 - Insert (6x30mm) pegs in the top of part 1 and 2.
2 - Insert a B minifix of parts 1 and 2.
3 - Fit part 2 in the part 1
4 - Insert C barrels of part 2 and turn to lock with a Phillips
screwdriver.
1 - Introduzca las clavijas A (6x30mm) en la parte superior de
las piezas 1 y 2.
2 - Fije los tornillos de minifix B en las piezas 1 y 2, y encaje la
pieza 2 en la pieza 1.
4 - Encaje los barriles Minifix C en la pieza 2 y gire hasta trabar.
A4
C1
Y1
A4
Y3
A13
21
10
5
7
4
4
5
4
4
7
3
21
10
3
2
1
10
PASSO 4
PASO 4
STEP 4
1 - Insira as cavilhas A (6x30mm) no topo inferior e superior
da peça 10
2 - Em seguida, encaixe a peça 10 na 1 e fixe-a com o parafuso
Y (3,5X40mm)
1 - Introduzca las clavijas A (6x30mm) en la pieza 10.
2 - Encaje la pieza 10 en la pieza 1 y fíjelos con los tornillos
Y (3,5X40mm)
1 - Insert (6x30mm) pegs into the top and bottom of part 10
2 - Fith the part 10 to part 1 and fasten them with (3.5x40mm)
Y screws.
PASSO 7
PASO 7
STEP 7
1 - Fixe os parafusos de minifix B na peça 6 e 8
2 - Insira as cavilhas A (6x30mm) no topo da peça 8
3 - Fixe a peça 17 na 6 com os suportes angular H e os
parafusos X (4X12mm)
4 - Fixe a peça 19 na 6 e 17 com a cantoneira T e os parafusos
X (4X12mm) e fixe mais uma cantoneira T no topo da 19
1 - Encaje los Minifix B en las piezas 6 y 8.
2 - Introduzca las clavijas A (6x30mm) en la parte superior de
la pieza 8.
3 - Fije la pieza 17 en la pieza 6 con los soportes angulares
H y los tornillos X (4X12mm).
3 - Fije la pieza 19 en la pieza 6 y 17 con las angulares T y
los tornillos X (4X12mm), fije un angulo más T a la parte
superior de lo 19
1 - Insert a B minifix of part 6 and 8
2 - Insert (6x30mm) A pegs in the on top of the part 8
3 - Fix part 17 to 6 with the plastic angle support H and the
(4X12mm) X screws
4 - Fix part 19 to 6 and 17 with the angle T and the (4X12mm)
X screws.
5 - Fix one more angle T to the top of the 19
PASSO 5
PASO 5
STEP 5
1 - Insira as cavilhas A (6x30mm) no topo da peça 3
2 - Em seguida, encaixe a peça 3 na 2
3 - Encaixe os tambores de minifix C na face traseira da 3 e gire
até travar utilizando uma chave philips.
1 - Introduzca las clavijas A (6x30mm) en el alto de la pieza 3.
2 - Encaje la pieza 3 en la pieza 2
3 - Encaje los Minifix C en la face trasera de la pieza 3 y gire
hasta trabar.
1 - Insert (6x30mm) pegs in the top of part 3
2 - Fit part 3 in the part 2
3 - Insert C barrels of part 2 and turn to lock with a Phillips
screwdriver.
PASSO 6
PASO 6
STEP 6
1 - Insira as cavilhas A (6x30mm) no topo inferior e superior
das peças 4 e 7 e no topo superior da 5
2 - Em seguida, encaixe a peça 4 e 5 na 7 e fixe-as com o
parafuso Y (3,5X40mm)
1 - Introduzca las clavijas A (6x30mm) en las piezas 4 y 7 en la
parte superior de la pieza 5.
2 - Encaje la pieza 4 y 5 en la pieza 7 y fíjelos con los tornillos
Y (3,5X40mm)
1 - Introduzca las clavijas A (6x30mm) en las piezas 4 y 7 en la
parte superior de la pieza 5.
2 - Encaje la pieza 4 y 5 en la pieza 7 y fíjelos con los tornillos
Y (3,5X40mm)
PÁGINA | PAGINA | PAGE: 02
PASSO 8
PASO 8
STEP 8
1 - Encaixe o conjunto montado no passo 5 e fixe a peça 3
na 7 com o parafuso Y (3,5X40mm)
2 - Encaixe a peça 6 na 7 e 10
3 - Encaixe os tambores de minifix C na peça 7 e na face
traseira da 10, gire até travar utilizando uma chave philips
4 - Fixe a cantoneira T da peça 19 na 10 com os parafusos
X (4x12mm)
5 - Fixe a peça 8 na 7 com o parafuso Y (3,5x40mm)
6 - Fixe a peça 5 na 10 com os parafusos Y (3,5x40mm)
7 - Cole os adesivos R sobre os tambores de minifix da 2 e 7
1 - Encaje el conjunto ensamblado en el passo 5 y fíje la pieza 3
en la pieza 7 con los tornillos Y (3,5X40mm).
2 - Encaje la pieza 6 en las piezas 7 y 10.
3 - Encaje los barriles Minifix C en la pieza 7 y en la face trasera
de la pieza 10, y gire hasta trabar.
4 - Fije el soporte T de la pieza 19 a la 10 con los tornillos X
(4X12mm)
5 - Fije la pieza 8 en la 7 con los tornillos Y (3,5x40mm)
6 - Fije la pieza 5 en la 10 con los tornillos Y (3,5x40mm)
7 - Peque los adhesivos R sobre los barriles de la pieza 2 y 7
1 - Fit the set assembled on the step 05 and fasten part 3 in the
7 them with (3.5x40mm) Y screws.
2 - Fit part 6 to 7 and 10.
3 - Fit the C Mini-fix Barrel on the part 7 and on the face rear 10,
urn to lock with a Phillips screwdriver.
4 - Fix the angular T of part 19 to 10 with the screws X
(4x12mm)
5 - Fix part 8 to 7 with the Y screw (3.5x40mm)
6 - Fix part 5 to 10 with the Y screw (3.5x40mm)
7 - Place R adhesives on the barrels in the part 2 and 7
T3
X16
B7
H3
A2
6
19 17
6
8
4
C3
R4
2
10
8
7
10 6
5
3
1
2
19
Y
X
TERMO DE GARANTIA
A presente garantia deverá ser exercida nos prazos aqui indicados,
mediante apresentação deste certificado e da nota fiscal.
Para que o produto esteja assegurado pela garantia conferida neste
documento, o cliente deverá adotar as seguintes orientações e cuidados
quanto à montagem, conservação e limpeza.
MONTAGEM
A montagem deverá ser feita obedecendo as instruções do manual
de montagem que será fornecido com o produto no momento da entrega.
Para o uso adequado e conservação do móvel deve-se evitar maus
tratos, como por exemplo: bater portas e gavetas, arrastar ou riscar o
móvel, umidade ou calor excessivos e exposição ao sol, para evitar
possível alteração na cor original dos móveis.
Não será de responsabilidade da Notável Móveis problemas que
tenham origem na utilização dos produtos de forma inadequada ou
quebra do móvel em função do excesso de peso por colocação de pedras
de granito, mármore e outros.
- O peso suportado por cada prateleira deverá obedecer os valores
indicados na ilustração.
Também não serão de responsabilidade da Notável Móveis,
problemas que tenham origem em:
- Instalações elétricas ou hidráulicas.
- Ações de cupins ou outras pragas.
- Armazenamento e deslocamento do móvel em locais impróprios e
não dedetizados periodicamente.
- Todo e qualquer recorte ou alteração nos móveis.
- Uso de produtos de limpeza ou abrasivos não recomendados.
CONSERVAÇÃO E LIMPEZA
Para maior durabilidade, recomenda-se que a limpeza dos móveis
seja feita da seguinte forma:
Nas partes externas (portas, laterais e frente de gaveta), internas,
vidros e espelhos, a limpeza deverá ser feita com pano limpo e levemente
umedecido em água e sabão neutro. Em seguida, deverá ser passado um
pano limpo e seco.
Em caso de transferência do móvel para local diverso, esta só
poderá ocorrer através de profissional especializado, sendo que para a
movimentação do móvel é necessário que o mesmo seja levantado do
chão. O produto não deve ser arrastado, pois avarias no manuseio e
transporte, não estão contempladas na garantia.
DOCUMENTO DE FIANZA
Esta garantía se ejerce dentro del
periodo en el presente documento, con
la presentación de este certificado y la
factura.
Pa ra que el pro d uct o e sté
garantizado por la garantía dada en este
documento, el cliente debe tomar las
siguientes directrices y precauciones de
instalación, mantenimiento y limpieza.
MONTAJE
El montaje se realizará siguiendo
las instrucciones de ensamblaje que
serán proporcionadas con la entrega del
producto.
Para el u so adecuado y la
conservación del mueble se debe evitar
los malos tratos, tales como: golpear
puertas y cajones, arrastrar o arañar los
muebles, humedad o el calor excesivos y
la exposición al sol para evitar un posible
cambio en el color original de los
muebles.
No será responsabilidad de
Notável Móveis problemas que se
originen en el uso de los productos de
forma inapropiada o ruptura del mueble
en función de exceso de peso mediante
la colocación de piedras de granito,
mármol y otros.
- El peso soportado por cada
estante debe cumplir con los valores
indicados en la ilustración.
Tampoco serán responsabilidad
de Notável Muebles los problemas que
se originan en:
- Instalaciones eléctricas o
hidráulicas.
- Acciones de termitas u otras
plagas.
- Almacenamiento y cambio del
mueble en locales inapropiados y no
fumigados periódicamente.
- Todo y cada corte o cambio en
los muebles.
- Uso de productos de limpieza o
abrasivos no recomendados.
CUIDADO Y LIMPIEZA
Para una mayor durabilidad, se
recomienda que la limpieza de los
muebles sea hecha como sigue:
En las partes externas (puertas,
laterales y frontales de cajón), internas,
vidrios y espejos, la limpieza debe ser
hecha con paño limpio y ligeramente
humedecido con agua y jabón suave. A
continuación, se debe pasar un paño
limpio y seco.
En el caso del traslado del mueble
a otro sitio, esto sólo puede ocurrir a
través de profesionales especializados,
y para el manejo del mueble se requiere
que el mismo sea levantado del piso. El
producto no debe ser arrastrado pues
daños en la manipulación y el transporte
no están cubiertos por la garantía.
WARRANTY TERM
This warranty shall be applied
within the time limits specified herein, by
presentation of this certificate and
invoice.
In order for the product to be
covered by the warranty provided in this
document, the client should follow the
following guidelines and precautions for
assembly, maintenance and cleaning.
ASSEMBLY
Assembly must be carried out
according to the instructions in the
assembly manual which is supplied with
the product at the time of delivery.
For proper use and conservation
of this furniture, mistreatment should be
avoided, such as hitting doors and
drawers, dragging or scratching the
furniture, excessive moisture or heat to
avoid possible changes in its original
color.
Problems from improper use of
the products as breaking of the furniture
due to the excess weight by installation
of granite, marble, and others will not be
the responsibility of Notável Móveis
- The weight withstood by each
shelf/drawer must comply with the
values indicated in illustration.
It will not be responsibility of the
Notável Móveis either problem from:
- E l e c t r i c a l o r h y d r a u l i c
installations.
- Actions of termites or other pests.
- Storage and moving of the
furniture in inappropriate places and not
fumigated periodically.
- Any trimming or alteration in the
furniture.
- Use of cleaning agents or
abrasives not recommended.
UPKEEP AND CLEANING
For durability, it is recommended
that the furniture be cleaned this way:
In the outer parts (doors, sides
and drawer front), inside, glass and
mirrors, the cleaning should be done with
a cloth clean and lightly moistened with
mild soap and water. Then a clean, dry
cloth should be used.
In case of transfer of the furniture
to a different place, this can only be done
by specialized professionals, and for the
moving of the furniture it is necessary
that it is lifted off the ground. It should not
be dragged because malfunctions due to
handle and moving are not covered by
the warranty.
PRAZO DE GARANTIA
O prazo de garantia será de noventa (90) dias, conforme prevista no artigo 26 do Código
do Consumidor, a contar da efetiva entrega do produto, desde que observadas as condições
normais de uso e conservação. Essa garantia cobre defeitos de fabricação. A Indústria de
Móveis Notável não se responsabiliza pela garantia estendida adquirida pelos consumidores
junto aos lojistas e seguradoras, a garantia legal da fabricante é de 90 dias. Art. 26, II, CDC.”
PÁGINA | PAGINA | PAGE: 03
PASSO 9
PASO 9
STEP 9
1 - Fixe os parafusos de minifix B na peça 27
2 - Encaixe a peça 27 na 6, 4 e 8
3 - Encaixe a peça 24 na 8
4 - Encaixe os tambores de minifix C nas peças 8, 24 e 27
gire até travar utilizando uma chave philips
5 - Fixe as peças 4 na 27 com os parafusos Y (3,5x40mm)
6 - Cole os adesivos R sobre os tambores de minifix da 27
1 - Encaje los Minifix B en la pieza 27.
2 - Encaje la pieza 27 en las piezas 6, 4 y 8.
3 - Encaje la pieza 24 en las piezas 8.
4 - Encaje los barriles Minifix C en las piezas 8, 24 y 27
y gire hasta trabar.
5 - Fije las piezas 4 en la 27 con los tornillos Y (3,5x40mm)
6 - Peque los adhesivos R sobre los barriles de la pieza 27
1 - Insert a B minifix of part 27
2 - Fit part 27 to 6, 4 and 8.
3 - Fit part 24 to 8.
4 - Fit the C Mini-fix Barrel on the parts 8, 24 ande 27. Turn to
lock with a Phillips screwdriver.
5 - Fit part 4 to 27 then fasten them with (3.5x40mm) Y screws.
6 - Place R adhesives on the barrels in the part 27.
B
6
2
2
2
C
Y
R
27
27
6
4
4
8
24
PASSO 10
PASO 10
STEP 10
1 - Alinhe as cantoneiras H na peça 16 e fixe com os parafu
sos X (4X12mm), em seguida fixe-a na peça 1 com os
parafusos X (4x12mm)
2 - Fixe as cantoneiras T na face interna da peça 15 com os
parafusos X (4x12mm), em seguida fixe a peça 15 entre a 24
e a 27
3 - Fixe as sapatas L na base das peças 2, 24 e 27
1 - Alinee las angular H en la pieza 16 y fíjelos con los tornillos X
(4X12mm). Fije la pieza 16 en la pieza 1 con los tornillos X
(4x12mm)
2 - Fije las angulares T en la face interna de la pieza 15 con
los tornillos X (4x12mm). Fije la piza 15 entre las piezas 24 y 27.
3 - Fije las zapatas L en la base de las piezas 2, 24 e 27
1 - Align the angle support H the part 16 then fasten them with
(4X12mm) X screws. Secure it to part 1 with the (4x12mm)
X screws .
2 - Fasten the angle T on the inner face of the part 15 them
with (4x12mm) X screws. Fit part 15 between the 24 and 27.
3 - Fith the sliding shoe L in the base parts 2, 24 and 27.
H5
X18
2
T
D42
S2
Y4
W4
21
22
6
24
27
15
16
16
1
2
A8
25
26
14
26
PASSO 11
PASO 11
STEP 11
1 - ATENÇÃO: Antes de fixar os fundos verifique o esquadro
da mesa
2 - Alinhe a peça 21 e fixe-a com os pregos D
3 - Alinhe a peça 22 e fixe-a com os pregos D
1 - PRECAUCIÓN: antes de fijar los fondos, compruebe la
escuadra del mesa.
2 - Alinee la pieza 21 y fíjelas con los clavos D
3 - Alinee la pieza 22 y fíjelas con los clavos D
1 - ATTENTION: Before fixing the backs check the table
square.
2 - Align part 21 and fix it with nails D.
3 - Align part 22 and fix it with nails D.
PASSO 12
PASO 12
STEP 12
1 - Alinhe os puxadores S nos furos das frentes de gaveta e
fixe-os com os parafusos W (3,5x25mm)
2 - Alinhe a peça 14 entre as peças 26 e fixe-as com os
parafusos Y (3,5x40mm)
3 - Insira as cavilhas A (6X30mm) no topo da peça 26
1 - Alinee las manijas S en los agujeros de los frontales de cajón
y fíjelas con los tornillos W (3,5x25mm).
2 - Alinee la pieza 14 entre las piezas 26 y fíjelas con los
tornillos Y (3,5x40mm)
3 - Introduzca las clavijas A (6x30mm) en las piezas 26.
1 - Align the S handles on the drawer front and fasten them with
(3.5x25mm) W screws
2 - Align the part 14 between part 26 and fasten them with
(3.5x40mm) Y screws.
3 - Insert (6x30mm) A pegs in the on top of the part 26.
PASSO 13
PASO 13
STEP 13
1 - Encaixe a peça 25 no conjunto montado no passo
anterior
2 - Fixe as peças 26 na peça 25 utilizando as cantoneiras
TA e os parafusos X (4x12mm)
1 - Encaje el conjunto ensamblado en el paso anterior en
la pieza 25
2 - Fije las piezas 26 en la pieza 25 con las angulares TA e
los tornillos X (4x12mm)
1 - Fit part 25 to the assembly assembled in the previous
step
2 - Fix parts 26 to part 25 using the angle brackets TA and
screws X (4x12mm)
13
PP 8
N4
1313 26
14
D18
W2
16
1
7
20
X8
TA 4
25
25
26 26
PASSO 14
PASO 14
STEP 14
1 - Encaixe a peça 13 na frente de gaveta e alinhe-a nas
peças 26 e 14 fixando com os pregos D
2 - Em seguida, encoste as corrediças N na frente de
gaveta e no fundo 13 e fixe-as com os parafusos PP
(3x12mm)
1 - Encaje la pieza 13 en los fontales de cajón y aliunee con
las piezas 26 y 14 y fijelas con los clavos D
2 - Apoye la corrediza N en el frontal de cajón y en el fondo
13, y fíjelos con los tornillos PP (3x12mm)
1 - Fit part 13 in front of the drawer and align it with parts 26
and 14, fixing with nails D
2 - Place the N slide to the drawer face and to the bottom
13. Fasten them with (3x12mm) PP screws.
PASSO 15
PASO 15
STEP 15
1 - Encaixe a peça 20 entre a peça 1 e a 16 para
fechamento do espaço entre elas e fixe internamente na
peça 7com os parafusos W (3,5X25mm)
1 - Encaje la pieza 20 entre la pieza 1 y 16 para cerrar de
espacio entre ellos y fijar internamente a la pieza 7 con
los tornillos W (3.5X25mm)
1 - Fit part 20 between parts 1 and 16 to close the space
between them and fix internally to part 7 with screws
W (3.5X25mm)
ACOMPANHE A NOTÁVEL MÓVEIS NAS REDES SOCIAIS.
SIGA EL NOTAVEL MOVEIS EN LAS REDES SOCIALES.
FOLLOW THE NOTAVEL MOVEIS ON THE SOCIAL NETWORKS
@NOTAVELMOVEIS
/NOTAVELMOVEIS

Other Notável Móveis Indoor Furnishing manuals

Notável Móveis NT 1320 User manual

Notável Móveis

Notável Móveis NT 1320 User manual

Notável Móveis NT 5075 User manual

Notável Móveis

Notável Móveis NT 5075 User manual

Notável Móveis NT 1080 HOME User manual

Notável Móveis

Notável Móveis NT 1080 HOME User manual

Notável Móveis NT3000 User manual

Notável Móveis

Notável Móveis NT3000 User manual

Notável Móveis NT5000 User manual

Notável Móveis

Notável Móveis NT5000 User manual

Notável Móveis NT 2005 User manual

Notável Móveis

Notável Móveis NT 2005 User manual

Notável Móveis NT 2060 User manual

Notável Móveis

Notável Móveis NT 2060 User manual

Notável Móveis FRUIT BOWL DIVA NEW User manual

Notável Móveis

Notável Móveis FRUIT BOWL DIVA NEW User manual

Notável Móveis NT 1295 User manual

Notável Móveis

Notável Móveis NT 1295 User manual

Notável Móveis NT 1295 HOME User manual

Notável Móveis

Notável Móveis NT 1295 HOME User manual

Notável Móveis 51015 User manual

Notável Móveis

Notável Móveis 51015 User manual

Notável Móveis CABINET NT 3035 User manual

Notável Móveis

Notável Móveis CABINET NT 3035 User manual

Notável Móveis BELIZE NEW 55088 User manual

Notável Móveis

Notável Móveis BELIZE NEW 55088 User manual

Notável Móveis 56118 User manual

Notável Móveis

Notável Móveis 56118 User manual

Notável Móveis NT 1300 User manual

Notável Móveis

Notável Móveis NT 1300 User manual

Notável Móveis NT 1290 User manual

Notável Móveis

Notável Móveis NT 1290 User manual

Notável Móveis PAINEL NT 1010 User manual

Notável Móveis

Notável Móveis PAINEL NT 1010 User manual

Notável Móveis NT 1305 User manual

Notável Móveis

Notável Móveis NT 1305 User manual

Notável Móveis NT 1280 PANEL User manual

Notável Móveis

Notável Móveis NT 1280 PANEL User manual

Notável Móveis NT 5175 User manual

Notável Móveis

Notável Móveis NT 5175 User manual

Notável Móveis NT 1110 User manual

Notável Móveis

Notável Móveis NT 1110 User manual

Notável Móveis NT 5170 User manual

Notável Móveis

Notável Móveis NT 5170 User manual

Notável Móveis NT5170 User manual

Notável Móveis

Notável Móveis NT5170 User manual

Notável Móveis PANEL EROS 52130 User manual

Notável Móveis

Notável Móveis PANEL EROS 52130 User manual

Popular Indoor Furnishing manuals by other brands

Cooper Lighting Shaper 689 Series Specification sheet

Cooper Lighting

Cooper Lighting Shaper 689 Series Specification sheet

Confycare CFMC03A installation manual

Confycare

Confycare CFMC03A installation manual

KROKWOOD Jana Solid Assembly instructions

KROKWOOD

KROKWOOD Jana Solid Assembly instructions

Costway HW61596 user manual

Costway

Costway HW61596 user manual

OVE GRANADA 60 installation guide

OVE

OVE GRANADA 60 installation guide

Stryker Unity Coast Glider Operation & maintenance manual

Stryker

Stryker Unity Coast Glider Operation & maintenance manual

Hülsta TAMIS Assembly instruction

Hülsta

Hülsta TAMIS Assembly instruction

Workrite Ergonomics Sierra HX Assembly instructions

Workrite Ergonomics

Workrite Ergonomics Sierra HX Assembly instructions

Forte JLTL167 Assembling Instruction

Forte

Forte JLTL167 Assembling Instruction

Seconique SEVILLE 1 DRAWER BEDSIDE Assembly instructions

Seconique

Seconique SEVILLE 1 DRAWER BEDSIDE Assembly instructions

Costway HW63923 user manual

Costway

Costway HW63923 user manual

Armour Home Electronics Dakota 9200 quick start guide

Armour Home Electronics

Armour Home Electronics Dakota 9200 quick start guide

Polywood 4601X Assembly instructions

Polywood

Polywood 4601X Assembly instructions

Monarch I 3045 Assembly instructions

Monarch

Monarch I 3045 Assembly instructions

less care VANITY SET LV11-24 installation instructions

less care

less care VANITY SET LV11-24 installation instructions

Work Smart KCM1420 operating instructions

Work Smart

Work Smart KCM1420 operating instructions

SouthShore 3150 Assembly instructions

SouthShore

SouthShore 3150 Assembly instructions

Tee-Zed Dreambaby instruction manual

Tee-Zed

Tee-Zed Dreambaby instruction manual

manuals.online logo
manuals.online logoBrands
  • About & Mission
  • Contact us
  • Privacy Policy
  • Terms and Conditions

Copyright 2025 Manuals.Online. All Rights Reserved.