manuals.online logo
Brands
  1. Home
  2. •
  3. Brands
  4. •
  5. Notável Móveis
  6. •
  7. Indoor Furnishing
  8. •
  9. Notável Móveis NT 5175 User manual

Notável Móveis NT 5175 User manual

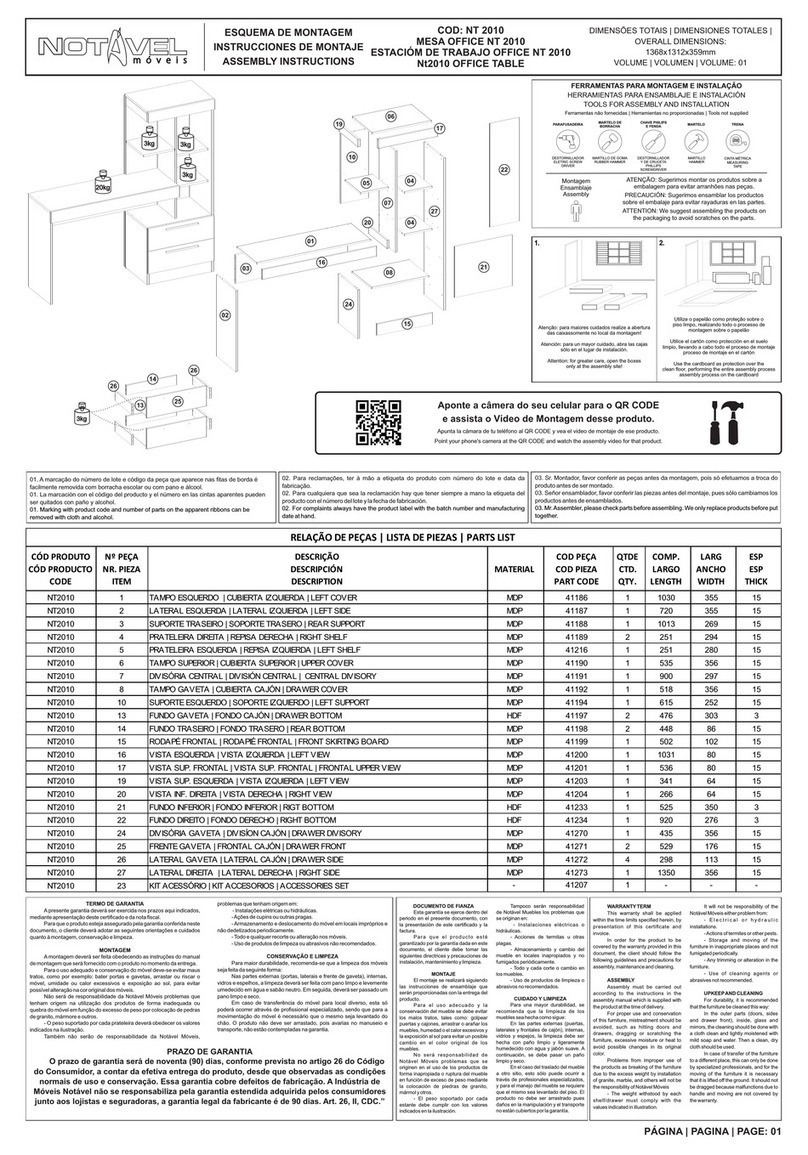
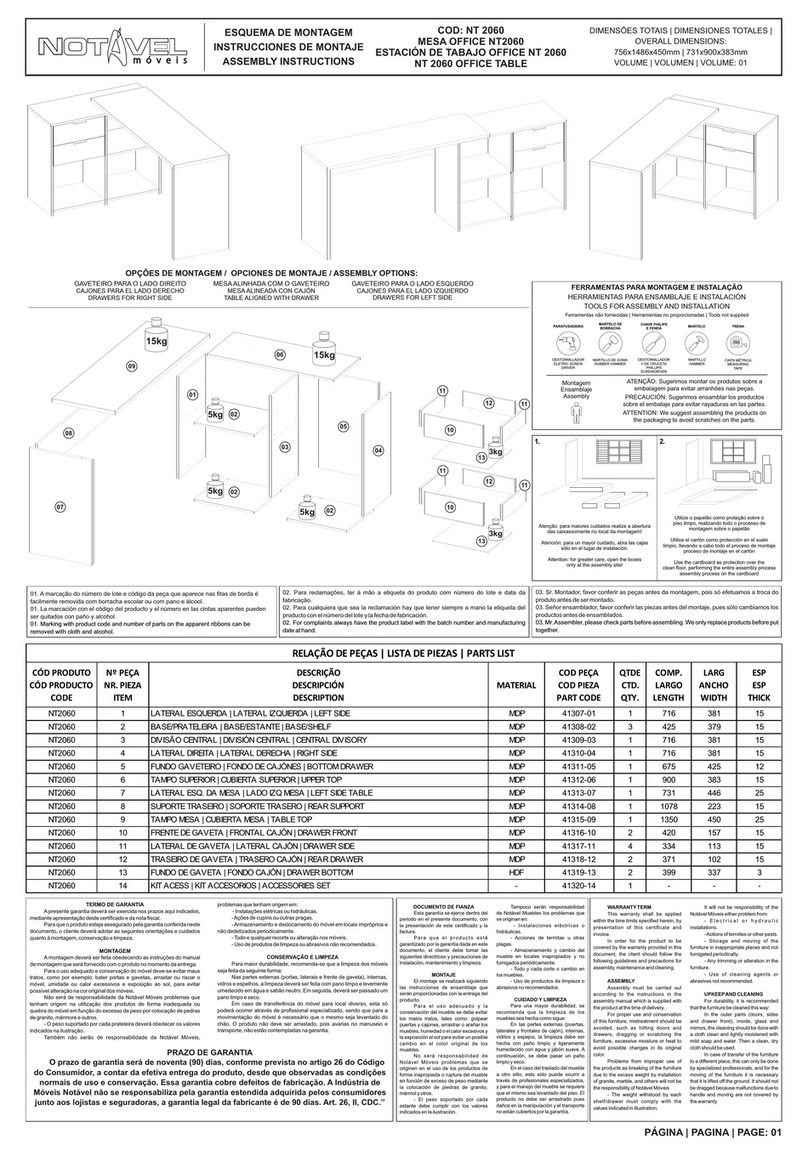
TERMO DE GARANTIA
A presente garantia deverá ser exercida nos prazos aqui indicados,
mediante apresentação deste certificado e da nota fiscal.
Para que o produto esteja assegurado pela garantia conferida neste
documento, o cliente deverá adotar as seguintes orientações e cuidados
quanto à montagem, conservação e limpeza.
MONTAGEM
A montagem deverá ser feita obedecendo as instruções do manual
de montagem que será fornecido com o produto no momento da entrega.
Para o uso adequado e conservação do móvel deve-se evitar maus
tratos, como por exemplo: bater portas e gavetas, arrastar ou riscar o
móvel, umidade ou calor excessivos e exposição ao sol, para evitar
possível alteração na cor original dos móveis.
Não será de responsabilidade da Notável Móveis problemas que
tenham origem na utilização dos produtos de forma inadequada ou
quebra do móvel em função do excesso de peso por colocação de pedras
de granito, mármore e outros.
- O peso suportado por cada prateleira deverá obedecer os valores
indicados na ilustração.
Também não serão de responsabilidade da Notável Móveis,
problemas que tenham origem em:
- Instalações elétricas ou hidráulicas.
- Ações de cupins ou outras pragas.
- Armazenamento e deslocamento do móvel em locais impróprios e
não dedetizados periodicamente.
- Todo e qualquer recorte ou alteração nos móveis.
- Uso de produtos de limpeza ou abrasivos não recomendados.
CONSERVAÇÃO E LIMPEZA
Para maior durabilidade, recomenda-se que a limpeza dos móveis
seja feita da seguinte forma:
Nas partes externas (portas, laterais e frente de gaveta), internas,
vidros e espelhos, a limpeza deverá ser feita com pano limpo e levemente
umedecido em água e sabão neutro. Em seguida, deverá ser passado um
pano limpo e seco.
Em caso de transferência do móvel para local diverso, esta só
poderá ocorrer através de profissional especializado, sendo que para a
movimentação do móvel é necessário que o mesmo seja levantado do
chão. O produto não deve ser arrastado, pois avarias no manuseio e
transporte, não estão contempladas na garantia.
DOCUMENTO DE FIANZA
Esta garantía se ejerce dentro del
periodo en el presente documento, con
la presentación de este certificado y la
factura.
Para que el pr o ducto e s t é
garantizado por la garantía dada en este
documento, el cliente debe tomar las
siguientes directrices y precauciones de
instalación, mantenimiento y limpieza.
MONTAJE
El montaje se realizará siguiendo
las instrucciones de ensamblaje que
serán proporcionadas con la entrega del
producto.
Para el uso adecuado y la
conservación del mueble se debe evitar
los malos tratos, tales como: golpear
puertas y cajones, arrastrar o arañar los
muebles, humedad o el calor excesivos y
la exposición al sol para evitar un posible
cambio en el color original de los
muebles.
No será responsabilidad de
Notável Móveis problemas que se
originen en el uso de los productos de
forma inapropiada o ruptura del mueble
en función de exceso de peso mediante
la colocación de piedras de granito,
mármol y otros.
- El peso soportado por cada
estante debe cumplir con los valores
indicados en la ilustración.
Tampoco serán responsabilidad
de Notável Muebles los problemas que
se originan en:
- Instalaciones eléctricas o
hidráulicas.
- Acciones de termitas u otras
plagas.
- Almacenamiento y cambio del
mueble en locales inapropiados y no
fumigados periódicamente.
- Todo y cada corte o cambio en
los muebles.
- Uso de productos de limpieza o
abrasivos no recomendados.
CUIDADO Y LIMPIEZA
Para una mayor durabilidad, se
recomienda que la limpieza de los
muebles sea hecha como sigue:
En las partes externas (puertas,
laterales y frontales de cajón), internas,
vidrios y espejos, la limpieza debe ser
hecha con paño limpio y ligeramente
humedecido con agua y jabón suave. A
continuación, se debe pasar un paño
limpio y seco.
En el caso del traslado del mueble
a otro sitio, esto sólo puede ocurrir a
través de profesionales especializados,
y para el manejo del mueble se requiere
que el mismo sea levantado del piso. El
producto no debe ser arrastrado pues
daños en la manipulación y el transporte
no están cubiertos por la garantía.
WARRANTY TERM
This warranty shall be applied
within the time limits specified herein, by
presentation of this certificate and
invoice.
In order for the product to be
covered by the warranty provided in this
document, the client should follow the
following guidelines and precautions for
assembly, maintenance and cleaning.
ASSEMBLY
Assembly must be carried out
according to the instructions in the
assembly manual which is supplied with
the product at the time of delivery.
For proper use and conservation
of this furniture, mistreatment should be
avoided, such as hitting doors and
drawers, dragging or scratching the
furniture, excessive moisture or heat to
avoid possible changes in its original
color.
Problems from improper use of
the products as breaking of the furniture
due to the excess weight by installation
of granite, marble, and others will not be
the responsibility of Notável Móveis
- The weight withstood by each
shelf/drawer must comply with the
values indicated in illustration.
It will not be responsibility of the
Notável Móveis either problem from:
- E le c t r i c a l o r h y d r a u l i c
installations.
- Actions of termites or other pests.
- Storage and moving of the
furniture in inappropriate places and not
fumigated periodically.
- Any trimming or alteration in the
furniture.
- Use of cleaning agents or
abrasives not recommended.
UPKEEP AND CLEANING
For durability, it is recommended
that the furniture be cleaned this way:
In the outer parts (doors, sides
and drawer front), inside, glass and
mirrors, the cleaning should be done with
a cloth clean and lightly moistened with
mild soap and water. Then a clean, dry
cloth should be used.
In case of transfer of the furniture
to a different place, this can only be done
by specialized professionals, and for the
moving of the furniture it is necessary
that it is lifted off the ground. It should not
be dragged because malfunctions due to
handle and moving are not covered by
the warranty.
PRAZO DE GARANTIA
O prazo de garantia será de noventa (90) dias, conforme prevista no artigo 26 do Código
do Consumidor, a contar da efetiva entrega do produto, desde que observadas as condições
normais de uso e conservação. Essa garantia cobre defeitos de fabricação. A Indústria de
Móveis Notável não se responsabiliza pela garantia estendida adquirida pelos consumidores
junto aos lojistas e seguradoras, a garantia legal da fabricante é de 90 dias. Art. 26, II, CDC.”
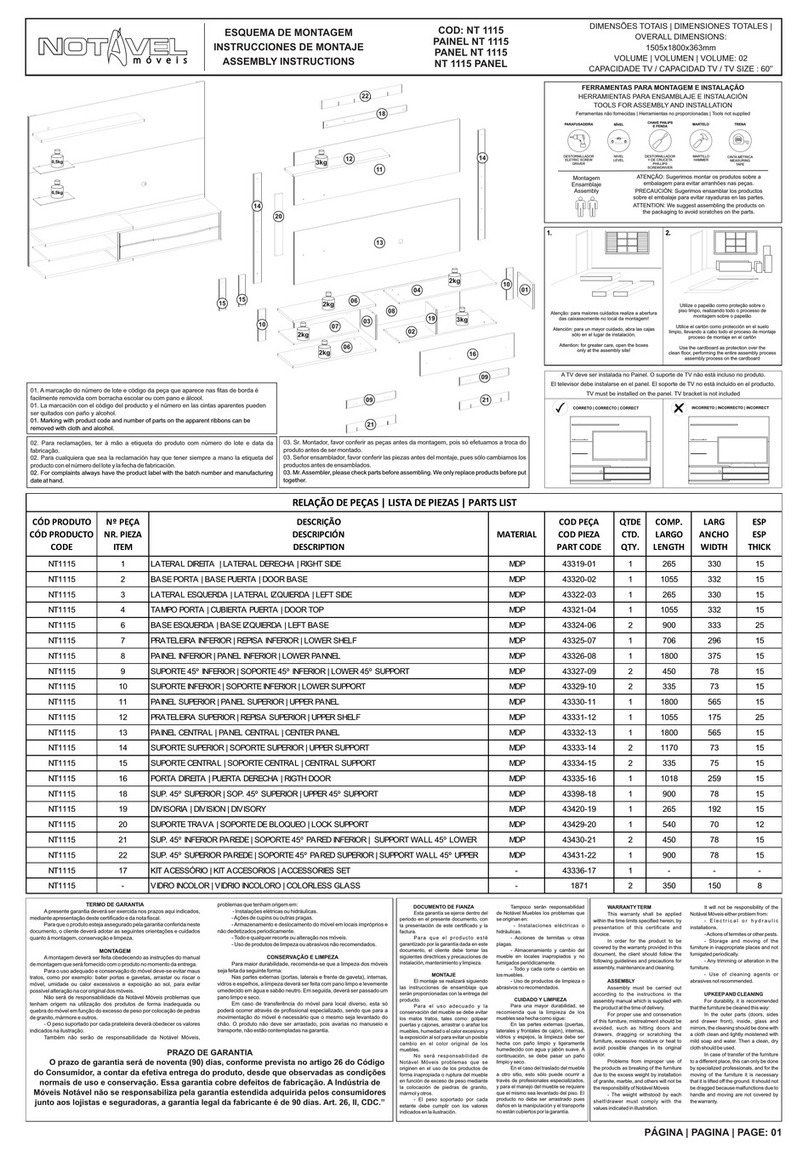
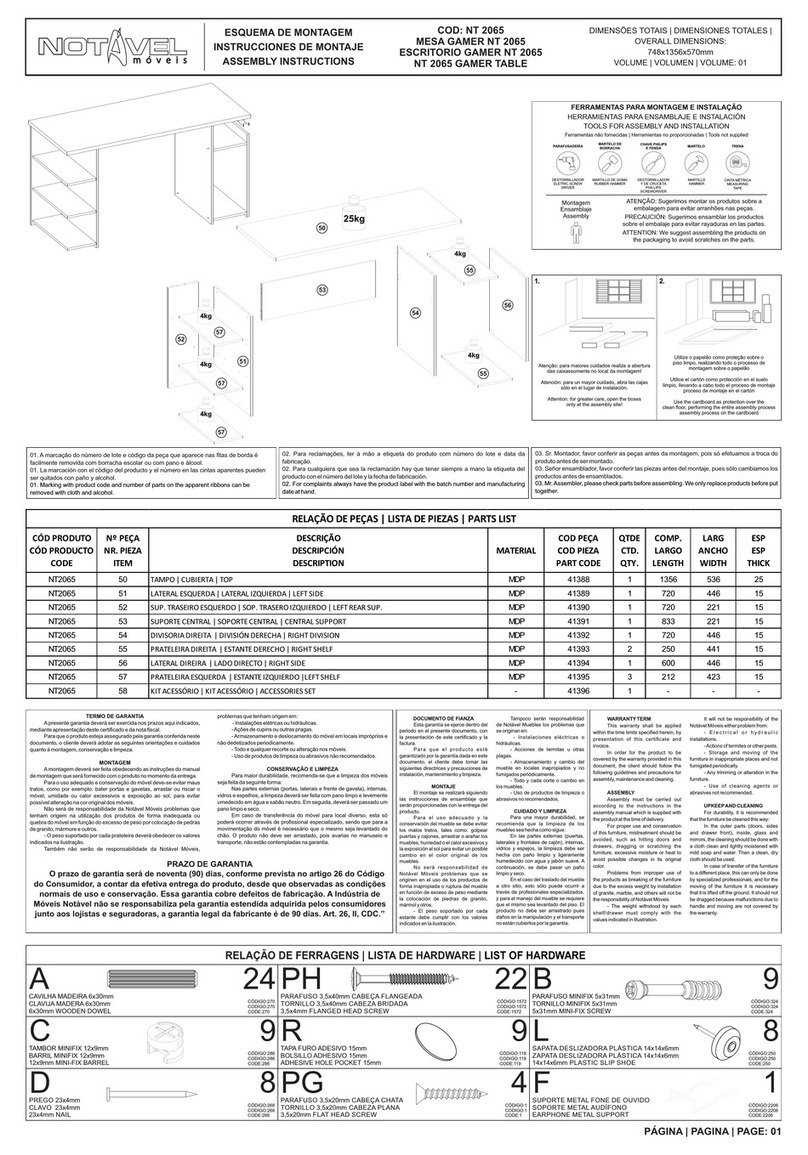
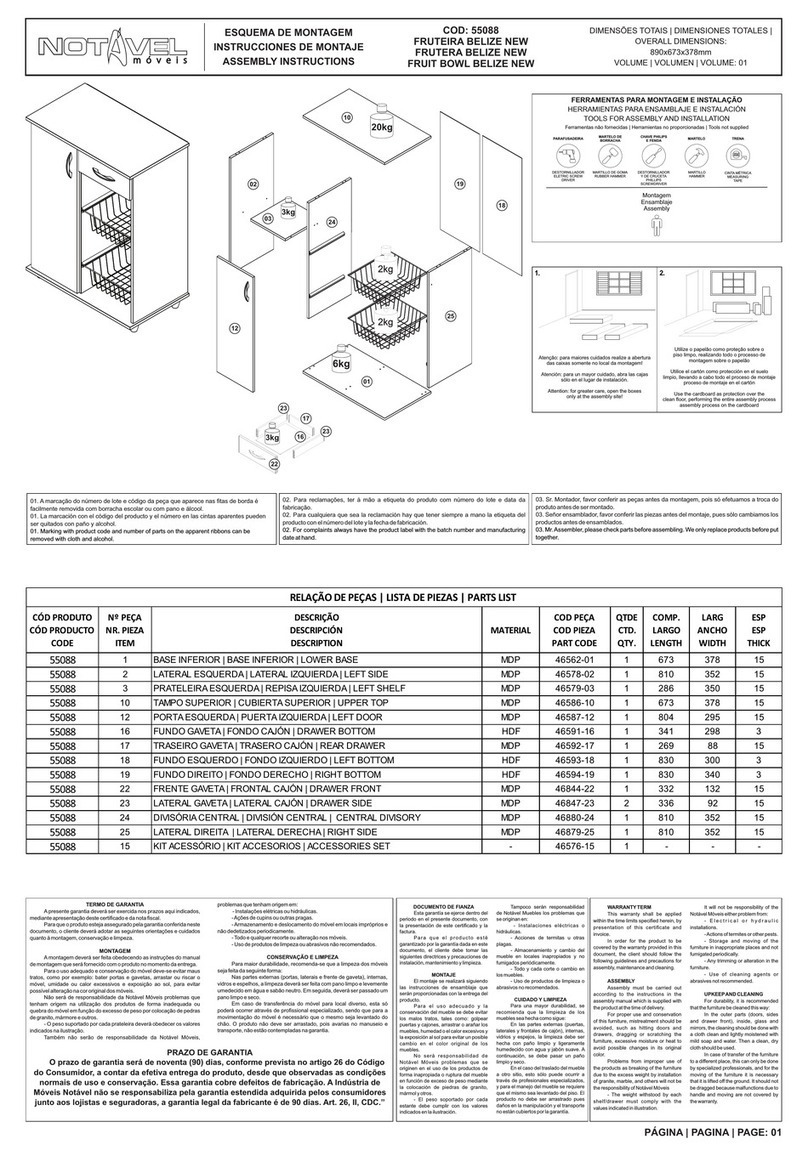
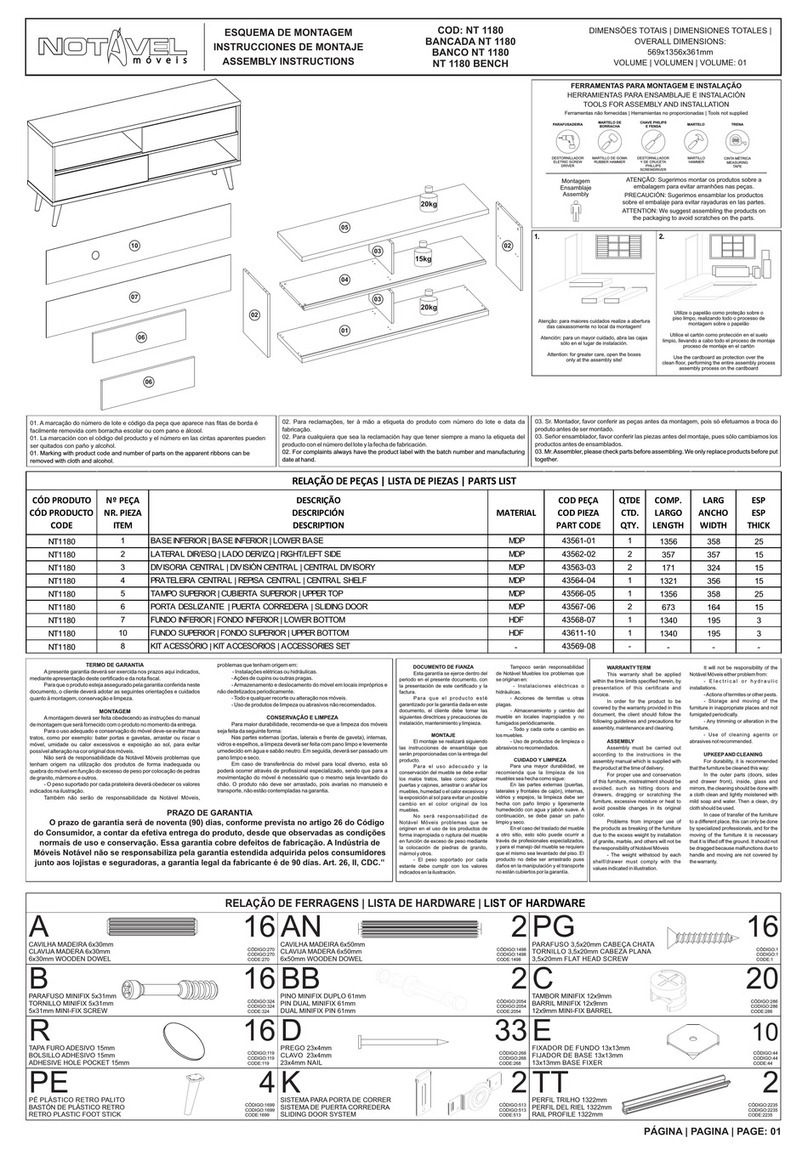
01. A marcação do número de lote e código da peça que aparece nas fitas de borda é
facilmente removida com borracha escolar ou com pano e álcool.
01. La marcación con el código del producto y el número en las cintas aparentes pueden
ser quitados con paño y alcohol.
01. Marking with product code and number of parts on the apparent ribbons can be
removed with cloth and alcohol.
02. Para reclamações, ter à mão a etiqueta do produto com número do lote e data da
fabricação.
02. Para cualquiera que sea la reclamación hay que tener siempre a mano la etiqueta del
producto con el número del lote y la fecha de fabricación.
02. For complaints always have the product label with the batch number and manufacturing
date at hand.
03. Sr. Montador, favor conferir as peças antes da montagem, pois só efetuamos a troca do
produto antes de ser montado.
03. Señor ensamblador, favor conferir las piezas antes del montaje, pues sólo cambiamos los
productos antes de ensamblados.
03. Mr. Assembler, please check parts before assembling. We only replace products before put
together.
FERRAMENTAS PARA MONTAGEM E INSTALAÇÃO
HERRAMIENTAS PARA ENSAMBLAJE E INSTALACIÓN
TOOLS FOR ASSEMBLY AND INSTALLATION
Ferramentas não fornecidas | Herramientas no proporcionadas | Tools not supplied
Montagem
Ensamblaje
Assembly
ATENÇÃO: Sugerimos montar os produtos sobre a
embalagem para evitar arranhões nas peças.
PRECAUCIÓN: Sugerimos ensamblar los productos
sobre el embalaje para evitar rayaduras en las partes.
ATTENTION: We suggest assembling the products on
the packaging to avoid scratches on the parts.
DESTORNILLADOR
ELETRIC SCREW
DRIVER
MARTILLO
HAMMER
DESTORNILLADOR
Y DE CRUCETA
PHILLIPS
SCREWDRIVER
CINTA MÉTRICA
MEASURING
TAPE
5M
PARAFUSADEIRA CHAVE PHILIPS
E FENDA MARTELO TRENA
MARTILLO DE GOMA
RUBBER HAMMER
MARTELO DE
BORRACHA
ESQUEMA DE MONTAGEM
INSTRUCCIONES DE MONTAJE
ASSEMBLY INSTRUCTIONS
COD: NT 5175
GUARDA-ROUPA NT 5175
CLOSET NT 5175
NT 5175 WARDROBE
DIMENSÕES TOTAIS | DIMENSIONES TOTALES |
: OVERALL DIMENSIONS
1870x1384x440mm
VOLUME | VOLUMEN | VOLUME: 02
PÁGINA | PAGINA | PAGE: 01
Atenção: para maiores cuidados realize a abertura
das caixassomente no local da montagem!
Atención: para un mayor cuidado, abra las cajas
sólo en el lugar de instalación.
Attention: for greater care, open the boxes
only at the assembly site!
Utilize o papelão como proteção sobre o
piso limpo, realizando todo o processo de
montagem sobre o papelão
Utilice el cartón como protección en el suelo
limpio, llevando a cabo todo el proceso de montaje
proceso de montaje en el cartón
Use the cardboard as protection over the
clean floor, performing the entire assembly process
assembly process on the cardboard
1. 2.
CÓD PRODUTO
CÓD PRODUCTO
CODE
Nº PEÇA
NR. PIEZA
ITEM
DESCRIÇÃO
DESCRIPCIÓN
DESCRIPTION
MATERIAL
COD PEÇA
COD PIEZA
PART CODE
QTDE
CTD.
QTY.
COMP.
LARGO
LENGTH
LARG
ANCHO
WIDTH
ESP
ESP
THICK
NT5175 1 LATERAL ESQUERDA | LATERAL IZQUIERDA | LEFT SIDE MDP 49320-01 1 1820 422 12
NT5175 2 BASE CENTRAL | BASE CENTRAL | CENTRAL BASE MDP 49321-02 1 336 422 12
NT5175 3 DIVISORIA INF ESQ | DIV. INFERIOR IZQ | LEFT LOWER DIVISION MDP 49322-03 1 259 422 12
NT5175 4 DIVISORIA INF DIR | DIV. INFERIOR DER | RIGHT LOWER DIVISION MDP 49323-04 1 259 422 12
NT5175 5 TAMPO SUP/INF | CUBIERTA SUP/INF | UPPER/LOWER COVER MDP 49324-05 2 1360 422 12
NT5175 6 DIVISÃO SUP DIR | DIVISIÓN SUP DER | RIGHT UPPER DIVISORY MDP 49325-06 1 1348 90 12
NT5175 7 DIVISÃO SUP ESQ | DIVISIÓN SUP IZQ | LEFT UPPER DIVISORY MDP 49326-07 1 1348 422 12
NT5175 8 PRATELEIRA SUPERIOR | ESTANTE SUPERIOR | UPPER SHELF MDP 49327-08 2 521 421 12
NT5175 9 LATERAL DIREITA | LATERAL DERECHA | RIGHT SIDE MDP 49328-09 1 1820 422 12
NT5175 10 PORTA MAIOR | PUERTA MAYOR | MAJOR DOOR MDP 49329-10 1 1629 302 15
NT5175 11 PORTA MENOR | PUERTA BAJA | LOWER DOOR MDP 49330-11 4 1358 263 15
NT5175 12 TRASEIRO GAVETA | TRASERO CAJÓN | REAR DRAWER MDP 49331-12 2 471 107 12
NT5175 13 RODAPÉ FRONTAL | RODAPIÉ FRONTAL | FRONT SKIRTING BOARD MDP 49332-13 1 1360 92 12
NT5175 14 RODAPÉ CENTRAL | PIE CENTRAL | CENTER FOOTER MDP 49333-14 1 394 90 15
NT5175 15 RODAPÉ TRASEIRO | RODAPIÉ TRASERO | REAR SKIRTING BOARD MDP 49334-15 1 1360 92 12
NT5175 16 RODAFORRO SUPERIOR | RUEDO DEL FORRO SUPERIOR | BOARD CEILING BOARD MDP 49335-16 1 1384 88 15
NT5175 17 FRENTE GAVETA | FRONTAL CAJÓN | DRAWER FRONT MDP 49336-17 2 528 267 15
NT5175 18 LATERAL GAVETA | LATERAL CAJÓN | DRAWER SIDE MDP 49337-18 4 385 146 12
NT5175 19 FUNDO GAVETA | FONDO CAJÓN | DRAWER BOTTOM HDF 49338-19 2 493 385 3
NT5175 20 FUNDO TRASEIRO ESQ | FONDO TRASERO IZQ | LEFT REAR BOTTOM HDF 49339-20 2 1660 266 3
NT5175 21 FUNDO TRASEIRO DIR | FONDO TRASERO DER | REAR BOTTOM RIGHT HDF 49340-21 2 1660 419 3
NT5175 22 KIT ACESSÓRIO | KIT ACESSÓRIO | ACCESSORIES SET - 49341-22 1 - - -
RELAÇÃO DE PEÇAS | LISTA DE PIEZAS | PARTS LIST
21
21
20
20
05
16
09
06
07
08
08
01
05
04
03
02
15 14
13
17
18
12
18 19
10
11
11
11 11
10kg
3kg
5kg
5kg
8kg
6kg
PÁGINA | PAGINA | PAGE: 02
RELAÇÃO DE FERRAGENS | LISTA DE HARDWARE | LIST OF HARDWARE
A
CAVILHA MADEIRA 6x30mm
CLAVIJA MADERA 6x30mm
6x30mm WOODEN DOWEL
34
CÓDIGO:270
CODIGO:270
CODE:270
D
PREGO 23x4mm
CLAVO 23x4mm
23x4mm NAIL
96
CÓDIGO:268
CODIGO:268
CODE:268
Y
PARAFUSO 3,5x40mm CABEÇA CHATA
TORNILLO 3,5x40mm CABEZA PLANA
3,5x40mm FLAT HEAD SCREW
10
CÓDIGO:4
CODIGO:4
CODE:4
TT
CANTONEIRA 15x15x40mm
ANGULAR 15x15x40mm
15x15x40mm ANGLE
8
CÓDIGO:45
CODIGO:45
CODE:45
PH
PARAFUSO 3,5x40mm CABEÇA FLANGEADA
TORNILLO 3,5x40mm CABEZA BRIDADA
3,5x40mm FLANGED HEAD SCREW
28
CÓDIGO:1572
CODIGO:1572
CODE:1572
W
PARAFUSO 3,5x25mm CABEÇA CHATA
TORNILLO 3,5x25mm CABEZA PLANA
3,5x25mm FLAT HEAD SCREW
14
CÓDIGO:2
CODIGO:2
CODE:2
E
FIXADOR DE FUNDO 13x13mm
FIJADOR DE BASE 13x13mm
13x13mm BASE FIXER
14
CÓDIGO:44
CODIGO:44
CODE:44
TA
CANTONEIRA PLÁSTICA 2 FUROS 20x20mm
ANGULAR PLÁSTICA 2 AGUJEROS 20x20mm
PLASTIC CORNER 2 HOLES 20x20mm
4
CÓDIGO:1916
CODIGO:1916
CODE:1916
M
DOBRADIÇA CURVA 26mm COM CALÇO 5mm
BISAGRA CURVA 26mm CON VÁSTAGO 5mm
CURVED HINGE 26mm WITH 5mm SHIM
15
CÓDIGO:278/685
CODIGO:278/685
CODE:278/685
PE
PÉ PLÁSTICO 100x50x40mm
PATA PLÁSTICA 100x50x40mm
100x50x40mm PLASTIC FOOT
6
CÓDIGO:617
CODIGO:617
CODE:617
N
PAR DE CORREDIÇA METÁLICA 350mm
PAR DE GUÍAS METÁLICAS 350mm
PAIR OF METAL SLIDES 350mm
2
CÓDIGO:313
CODIGO:313
CODE:313
S
PUXADOR PLÁSTICO 128mm
MANIJA PLÁSTICA 128mm
128mm PLASTIC HANDLE
7
CÓDIGO:1623
CODIGO:1623
CODE:1623
H
PERFIL H PLÁSTICO 1650X20mm
PERFIL EN H DE PLÁSTICO 1650X20mm
PLASTIC H-PRILL 1650X20mm
2
CÓDIGO:29
CODIGO:29
CODE:29
PC
PARAFUSO 5x32mm CABEÇA CHATA COM PORCA
TORNILLO 5x32mm CABEZA PLANA CON TUERCA
SCREW 5x32mm FLAT HEAD WITH NUT
12
CÓDIGO:6/7
CODIGO:6/7
CODE:6/7
R
TAPA FURO ADESIVO 15mm
BOLSILLO ADHESIVO 15mm
ADHESIVE HOLE POCKET 15mm
8
CÓDIGO:119
CODIGO:119
CODE:119
CA
CABIDEIRO 820mm
PERCHERO 820mm
820mm HANGER
1
CÓDIGO:2359
CODIGO:2359
CODE:2359
X
PARAFUSO 4x12mm CABEÇA PANELA
TORNILLO 4x12mm CABEZA SARTÉN
4x12mm PAN HEAD SCREW
102
CÓDIGO:13
CODIGO:13
CODE:13
PP
PARAFUSO 3,5x12mm CABEÇA CHATA
TORNILLO 3,5x12mm CABEZA PLANA
3,5x12mm FLAT HEAD SCREW
16
CÓDIGO:2202
CODIGO:2202
CODE:2202
LL
SUPORTE PLÁSTICO CALCEIRO
ZAPATERO DE PLÁSTICO
PLASTIC SHOEHORN SUPPORT
2
CÓDIGO:248
CODIGO:248
CODE:248
N 2
PP 4
1
M 6
X12
A
AN
CAVILHA MADEIRA 6x50mm
CLAVIJA MADERA 6x50mm
6x50mm WOODEN DOWEL
2
CÓDIGO:1498
CODIGO:1498
CODE:1498
B
PARAFUSO MINIFIX 5x31mm
TORNILLO MINIFIX 5x31mm
5x31mm MINI-FIX SCREW
4
CÓDIGO:324
CODIGO:324
CODE:324
C
TAMBOR MINIFIX 12x9mm
BARRIL MINIFIX 12x9mm
12x9mm MINI-FIX BARREL
4
CÓDIGO:286
CODIGO:286
CODE:286
PASSO 01
PASO 01
STEP 01
1 - Posicione os calços de dobradiças M nas marcações das
peças 1 e 9 e fixe-os com os parafusos X (4x12mm).
2 - Alinhe as corrediças N nas marcações da peça 1 e 9 e fixe-
as com os parafusos PP (3,5x12mm). Utilize os furos
indicados no desenho abaixo para a fixação:
1 - Coloque las cuñas de bisagra M en las marcas de las
piezas 1 y 9 y fíjelas con los tornillos X (4x12mm).
2 - Alinee las guías N en las marcas de las piezas 1 y 9 y
fíjelas con los tornillos PP (3,5x12mm). Utilice para la fijación
los orificios indicados en el dibujo inferior:
1 - Position the hinge wedges M on the markings of parts 1
and 9 and secure them with the screws X (4x12mm).
2 - Align the runners N on the markings of parts 1 and 9 and
secure them with the screws PP (3.5x12mm). Use the holes
indicated in the drawing below for fastening:
PASSO 03
PASO 03
STEP 03
1 - Insira as cavilhas A (6x30mm) nas peças 5 e 8.
2 - Fixe os minifix B (5x31mm) em uma das peças 5.
1 - Inserte las clavijas A (6x30mm) en las partes 5 y 8.
2 - Fije el minifix B (5x31mm) en una de las partes 5.
1 - Insert the dowels A (6x30mm) into parts 5 and 8.
2 - Fix the minifix B (5x31mm) in one of the parts 5.
A 16
N 2
PP 4
PASSO 02
PASO 02
STEP 02
1 - Insira as cavilhas A (6x30mm) nas peças 3 e 4.
2 - Insira as cavilhas AN (6x50mm) na peça 3.
3 - Alinhe as corrediças N nas marcações da peça 3 e 4 e fixe-
as com os parafusos PP (3,5x12mm). Utilize os furos
indicados no desenho abaixo para a fixação:
1 - Inserte los pernos A (6x30mm) en las partes 3 y 4.
2 - Inserte las clavijas AN (6x50mm) en la pieza 3.
3 - Alinee las guías N en las marcas de las piezas 3 y 4 y
fíjelas con los tornillos PP (3,5x12mm). Utilice los agujeros
indicados en el dibujo de abajo para la fijación:
1 - Insert the A bolts (6x30mm) in parts 3 and 4.
2 - Insert the AN pegs (6x50mm) in part 3.
3 - Align the N slides on the markings of parts 3 and 4 and
secure them with the PP screws (3.5x12mm). Use the holes
indicated in the drawing below for fastening:
A 6
AN
AN 2
9
34
B 4
PASSO 04
PASO 04
STEP 04
1 - Insira as cavilhas A (6x30mm na peça 6 e na parte superior
da peça 7.
2 - Posicione o calço de dobradiças M nas marcações da peça
3 e fixe-o com os parafusos X (4x12mm).
3 - Posicione os calços de dobradiças M alinhados aos furos
da peça 7. Utilize os parafusos e porcas PC (5x32mm) para
fixar o conjunto com 2 calços, sendo um em cada lado da
peça.
4 - Posicione os calços de dobradiças M alinhados aos furos
das peças 6 e 7, fixe-os utilizando os parafusos e porcas PC
(5x32mm).
1 - Introduzca las espigas A (6x30mm en la pieza 6 y en la
parte superior de la pieza 7.
2 - Posicione la cuña de bisagra M en las marcas de la pieza 3
y fíjela con los tornillos X (4x12mm).
3 - Coloque las cuñas de la bisagra M alineadas con los
orificios de la pieza 7. Utilice los tornillos y tuercas PC
(5x32mm) para fijar el conjunto con 2 cuñas, una a cada lado
de la pieza.
4 - Coloque las cuñas de bisagra M alineadas con los
agujeros de las piezas 6 y 7, fíjelas con los tornillos y tuercas
PC (5x32mm).
1 - Insert the dowels A (6x30mm in part 6 and in the upper part
of part 7.
2 - Position the hinge pad M on the markings of part 3 and
secure it with the screws X (4x12mm).
3 - Position the hinge wedges M aligned to the holes of part 7.
Use the screws and nuts PC (5x32mm) to fix the set with 2
shims, one on each side of the part.
4 - Position the M hinge shims aligned to the holes of parts 6
and 7, fix them using the screws and PC nuts (5x32mm).
A 4
A
5
8
8
5
PASSO 05
PASO 05
STEP 05
1 - Encaixe as peças 5 na peça 9 e fixe-as com os parafusos
PH (3,5x40mm).
1 - Coloque la pieza 5 en la pieza 9 y fíjelas con los tornillos
PH (3,5x40mm).
1 - Fit part 5 to part 9 and secure them with the PH screws
(3.5x40mm).
M 9
X2
PC 12
A
3
7
6
PASSO 06
PASO 06
STEP 06
1 - Encaixe a peça 6 entre as peças 5 e fixe-a com os
parafusos Y (3,5x40mm).
1 - Coloque la pieza 6 entre las piezas 5 y fíjela con los
tornillos Y (3,5x40mm).
1 - Fit part 6 between parts 5 and secure it with the Y screws
(3.5x40mm).
PH 4
5
5
9
Y
Y 2
6
5
5
PASSO 07
PASO 07
STEP 07
1 - Encaixe a peça 7 entre as peças 5 e fixe-as com os
parafusos Y (3,5x40mm).
2 - Encaixe a peça 3 e 4 na peça 5. Encaixe os tambores
minifix C nas peças 3 e 4 e gire até travar.
1 - Coloque la pieza 7 entre las piezas 5 y fíjelas con los
tornillos Y (3,5x40mm).
2 - Monte las piezas 3 y 4 en la pieza 5. Monte los tambores
minifix C en las piezas 3 y 4 y gírelos hasta que se bloqueen.
1 - Fit part 7 between parts 5 and secure them with the Y bolts
(3,5x40mm).
2 - Fit part 3 and 4 to part 5. Fit the minifix C drums to parts 3
and 4 and turn them until they lock.
Y 4
C 4
5
5
7
34
Y
PÁGINA | PAGINA | PAGE: 03
PASSO 08
PASO 08
STEP 08
1 - Encaixe as peças 8 na peça 7 e fixe-as com os parafusos
PH (3,5x40mm).
2 - Encaixe a peça 1 nas peças 5 e 8 e fixe-as com os
parafusos PH (3,5x40mm).
1 - Monte la pieza 8 en la pieza 7 y fíjelas con los tornillos PH
(3,5x40mm).
2 - Monte la pieza 1 en las piezas 5 y 8 y fíjelas con los
tornillos PH (3,5x40mm).
1 - Fit part 8 to part 7 and fix them with the PH screws
(3,5x40mm).
2 - Fit part 1 to parts 5 and 8 and fix them with the PH screws
(3,5x40mm).
5
PH 12
PASSO 09
PASO 09
STEP 09
1 - Encaixe a peça 2 nas peças 3 e 4 e fixe-as com os
parafusos PH (3,5x40mm).
1 - Encaje la pieza 2 en las piezas 3 y 4 y fíjelas con los
tornillos PH (3,5x40mm).
1 - Fit part 2 to parts 3 and 4 and fix them with the PH screws
(3,5x40mm).
PH 4
5
1
8
8
PASSO 10
PASO 10
STEP 10
1 - Encaixe as peças 13 e 15 entre as peças 1 e 9 e fixe-as
com os parafusos PH (3,5x40mm).
1 - Coloque las piezas 13 y 15 entre las piezas 1 y 9 y fíjelas
con los tornillos PH (3,5x40mm).
1 - Fit parts 13 and 15 between parts 1 and 9 and secure them
with the PH screws (3.5x40mm).
PH 8
2
4
3
PASSO 11
PASO 11
STEP 11
1 - Centralize a peça 14 entre as peças 13 e 15. Fixe a peça
14 nas peças 2, 13 e 15 com as cantoneiras TT e os
parafusos X (4x12mm).
1 - Centre la pieza 14 entre las piezas 13 y 15. Fije la pieza 14
a las piezas 2, 13 y 15 con los ángulos TT y los tornillos X
(4x12mm).
1 - Center part 14 between parts 13 and 15. Fix part 14 on
parts 2, 13 and 15 with the TT angles and the X screws
(4x12mm).
1
9
15
13
PASSO 12
PASO 12
STEP 12
1 - Fixe 4 pés PE entre as laterais 1 e 9 e os rodapés 13 e 15
com os parafusos X (4x12mm).
2 - Fixe 2 pés PE nos rodapés 13, 14 e 15 com os parafusos
X (4x12mm).
1 - Fije 4 pies de PE entre los paneles laterales 1 y 9 y a los
zócalos 13 y 15 con los tornillos X (4x12mm).
2 - Fije 2 pies de PE a los rodapiés 13, 14 y 15 con los
tornillos X (4x12mm).
1 - Fix 4 PE feet between sides 1 and 9 and to skirting boards
13 and 15 with the X screws (4x12mm).
2 - Fix 2 PE feet on the toe boards 13, 14 and 15 with the X
screws (4x12mm).
X12
TT 3
15
13
14
2
PE 6
X18
PASSO 13
PASO 13
STEP 13
1 - Insira as cavilhas A (6x30mm) nas peças 18.
2 - Fixe-as peças 18 na peça 12 com os parafusos Y
(3,5x40mm).
1 - Introduzca las espigas A (6x30mm) en las piezas 18.
2 - Fije las piezas 18 en la pieza 12 con los tornillos Y
(3,5x40mm).
1 - Insert the pegs A (6x30mm) in the pieces 18.
2 - Fasten part 18 to part 12 with the Y screws (3,5x40mm).
A 8
Y 4
18
18
12
PASSO 14
PASO 14
STEP 14
1 - Encaixe a peça 17 no conjunto montado no passo anterior.
2 - Fixe as peças 18 na peça 17 utilizando as cantoneiras TA e
os parafusos X (4x12mm).
1 - Encaje la pieza 17 en el conjunto montado en el paso
anterior.
2 - Fije las piezas 18 en la pieza 17 utilizando los ángulos TA y
los tornillos X (4x12mm).
1 - Fit piece 17 in the assembly assembled in the previous
step.
2 - Fasten part 18 to part 17 using the TA angles and the X
screws (4x12mm).
17
18
17
18
TA 4
X8
PASSO 15
PASO 15
STEP 15
1 - Encaixe o fundo 19 no canal da peça 17 e alinhe-o nas
peças 12 e 18. Em seguida fixe o fundo 19 nas peças 12 e 18
com os pregos D.
2 - Encoste a corrediça N na frente da gaveta e no fundo e
fixe-as com os parafusos PP (3,5x12mm).
1 - Encaje el fondo 19 en el canal de la pieza 17 y alinéelo en
las piezas 12 y 18. A continuación, fije el fondo 19 en las
piezas 12 y 18 con los clavos D.
2 - Coloque la guía N sobre el frente y el fondo del cajón y
fíjelos con los tornillos PP (3,5x12mm).
1 - Fit the bottom 19 into the channel of part 17 and align it on
parts 12 and 18. Then fix the bottom 19 on parts 12 and 18
with the nails D.
2 - Place the runner N on the drawer front and on the bottom
and fix them with the screws PP (3.5x12mm).
PP 8
D20
N4
PASSO 16
PASO 16
STEP 16
1 - Alinhe os puxadores S nos furos das frentes de gavetas e
fixe-os com os parafusos W (3,5x25mm).
1 - Alinee los tiradores S en los agujeros de los frentes de los
cajones y fíjelos con tornillos W (3,5x25mm).
1 - Align the knobs S in the holes of the drawer fronts and fix
them with the screws W (3.5x25mm).
W 4
S 2
PASSO 17
PASO 17
STEP 17
1 - Encaixe as dobradiças M nas peças 10 e 11 e fixe-as com
os parafusos X (4x12mm).
1 - Coloque las bisagras M en las piezas 10 y 11 y fíjelas con
los tornillos X (4x12mm).
1 - Fit the M hinges to parts 10 and 11 and secure them with
the X screws (4x12mm).
M 15
X30
11
10
11
PASSO 18
PASO 18
STEP 18
1 - Alinhe os puxadores S nos furos das peças 10 e 11 e fixe-
os com os parafusos W (3,5x25mm).
1 - Alinee las asas S en los orificios de las piezas 10 y 11 y
fíjelas con los tornillos W (3,5x25mm).
1 - Align the knobs S in the holes of parts 10 and 11 and
secure them with the screws W (3.5x25mm).
10 11
W 10
S 5
PASSO 19
PASO 19
STEP 19
1 - Fixe a peça 16 alinhada nas laterais 1 e 9 e no tampo 5
com as cantoneiras TT e os parafusos X (4x12mm).
2 - Encaixe os suportes de cabideiro LL nas peças 7 e 9.
1 - Fije la pieza 16 enrasada con los laterales 1 y 9 y la parte
superior 5 con las escuadras TT y tornillos X (4x12mm).
2 - Fije las escuadras de suspensión LL a las piezas 7 y 9.
1 - Attach the aligned part 16 to the sides 1 and 9 and to the
top 5 with the TT angle brackets and the X screws (4x12mm).
2 - Attach the LL hanger brackets to pieces 7 and 9.
X20
TT 5
LL 2
91
5
1
9
5
16
16
7
PASSO 20
PASO 20
STEP 20
1 - Encaixe o cabideiro CA nos suportes LL das peças 7 e 9.
2 - Cole os tapa furos R nos furos das peças 5.
1 - Coloque el colgador CA en los soportes LL de las piezas 7
y 9.
2 - Pega las tapas de los agujeros R en los agujeros de las
piezas 5.
1 - Fit the CA hanger to the LL brackets of parts 7 and 9.
2 - Glue the hole covers R into the holes on parts 5.
CA 1
R 8
5
5
7
9
7
19
20
20
21
21
PÁGINA | PAGINA | PAGE: 04
ACOMPANHE A NOTÁVEL MÓVEIS NAS REDES SOCIAIS.
SIGA EL NOTAVEL MOVEIS EN LAS REDES SOCIALES.
FOLLOW THE NOTAVEL MOVEIS ON THE SOCIAL NETWORKS
/NOTAVELMOVEIS @NOTAVELMOVEIS
PASSO 21
PASO 21
STEP 21
ATENÇÃO: Antes de fixar os fundos verifique o esquadro do produto.
1 - Alinhe um fundo 21 a lateral 9, ao tampo e a base do roupeiro e fixe-o com os pregos D.
2 - Em seguida, encaixe o perfil H no fundo preso ao roupeiro. Encaixe o outro fundo 21 no perfil H e
fixe-o com os pregos D.
3 - Repita o processo agora ao lado da lateral 1, para fixar os fundos 20.
4 - Na junção entre os fundos 20 e 21 utilize os pregos D em conjunto com os fixadores E.
ATENCIÓN: Antes de fijar los fondos, compruebe el soporte del producto.
1 - Alinee un fondo 21 al lado 9, a la parte superior y a la base del armario y fíjelo con los clavos D.
2 - A continuación, monte el perfil en H en el fondo fijado al armario. Encaje el otro fondo 21 en el perfil
H y fíjelo con los clavos D.
3 - Repita el proceso ahora en el lado 1, para fijar los fondos 20.
4 - En la unión entre los fondos 20 y 21 utilice los clavos D junto con las fijaciones E.
ATTENTION: Before attaching the bottoms, check the product's square.
1 - Align a bottom 21 to side 9, to the top and the base of the closet and fix it with the D nails.
2 - Next, fit the H-profile to the bottom attached to the closet. Fit the other bottom 21 to the H-profile and
fix it with the D-nails.
3 - Repeat the process now on the side 1, to fix the bottoms 20.
4 - At the junction between bottoms 20 and 21 use nails D together with the fasteners E.
PASSO 22
PASO 22
STEP 22
1 - Para montar as portas no produto, encaixe as dobradiças M nos calços M travando-a no parafuso
indicado com o número 1 abaixo:
1 - Para montar las puertas en el producto, encaje las bisagras M en las placas de fijación M,
bloqueándolas en el tornillo indicado con el número 1 a continuación:
1 - To mount the doors on the product, fit the M hinges on the M wedges by locking it on the screw
indicated with the number 1 below:
PASSO 23
PASO 23
STEP 23
1 - Cole o espelho na peça 10 com a altura que desejar.
2 - Encaixe as gavetas através das corrediças.
1 - Pegue el espejo a la baldosa 10 con la altura que desee.
2 - Encaje los cajones a través de las guías.
1 - Glue the mirror to part 10 with the height you want.
2 - Fit the drawers through the runners.
1
Para a regulagem das portas siga as instruções conforme os números abaixo:
1 - Se precisar subir ou abaixar um pouco a porta desaperte um pouco os parafusos indicados com o
número 1, reposicione e aperte novamente.
2 - Se precisar empurrar a porta um pouco mais para dentro ou puxá-la para fora, desaperte um
pouco o parafuso indicado com o numero 2, reposicione e aperte novamente.
3 - Se precisar alinhas as portas um pouco mais para o centro ou em direção as laterais, utilize uma chave philips para
firar o parafuso indicado com o numero 3 até posicionar a porta da forma desejada.
Para ajustar las puertas siga las instrucciones según los números que aparecen a continuación:
1 - Si necesita subir o bajar un poco la puerta afloje los tornillos indicados con el número 1, vuelva a colocarlos y
apriételos de nuevo.
2 - Si necesita empujar la puerta un poco más hacia dentro o sacarla, afloje el tornillo indicado con el número 2, vuelva
a colocarlo y apriételo de nuevo.
3 - Si necesita alinear las puertas un poco más hacia el centro o hacia los lados, utilice un destornillador philips para
girar el tornillo indicado con el número 3 hasta que la puerta quede posicionada como desee.
To adjust the doors follow the instructions according to the numbers below:
1 - If you need to raise or lower the door a little loosen the screws indicated with number 1, reposition and tighten again.
2 - If you need to push the door a little more inside or pull it out, loosen the screw indicated with number 2, reposition
and tighten again.
3 - If you need to align the doors a little more toward the center or toward the sides, use a philips screwdriver to turn the
screw indicated with number 3 until the door is positioned as desired.
PASSO 24
PASO 24
STEP 24
1
2
3
D76
E14
H2
H
H

Other Notável Móveis Indoor Furnishing manuals

Notável Móveis 55012 User manual

Notável Móveis

Notável Móveis 55012 User manual

Notável Móveis NT 5170 User manual

Notável Móveis

Notável Móveis NT 5170 User manual

Notável Móveis PAINEL NT 1110 User manual

Notável Móveis

Notável Móveis PAINEL NT 1110 User manual

Notável Móveis PAINEL NT 1200 User manual

Notável Móveis

Notável Móveis PAINEL NT 1200 User manual

Notável Móveis NT5165 User manual

Notável Móveis

Notável Móveis NT5165 User manual

Notável Móveis NT 1305 User manual

Notável Móveis

Notável Móveis NT 1305 User manual

Notável Móveis NT 5175 User manual

Notável Móveis

Notável Móveis NT 5175 User manual

Notável Móveis NT2055 User manual

Notável Móveis

Notável Móveis NT2055 User manual

Notável Móveis NT 1190 User manual

Notável Móveis

Notável Móveis NT 1190 User manual

Notável Móveis NT 1120 User manual

Notável Móveis

Notável Móveis NT 1120 User manual

Notável Móveis NT 4015 User manual

Notável Móveis

Notável Móveis NT 4015 User manual

Notável Móveis BELIZE NEW 55088 User manual

Notável Móveis

Notável Móveis BELIZE NEW 55088 User manual

Notável Móveis 51015 User manual

Notável Móveis

Notável Móveis 51015 User manual

Notável Móveis NT 2010 User manual

Notável Móveis

Notável Móveis NT 2010 User manual

Notável Móveis MULTIPURPOSE NT 4030 User manual

Notável Móveis

Notável Móveis MULTIPURPOSE NT 4030 User manual

Notável Móveis NT 1295 HOME User manual

Notável Móveis

Notável Móveis NT 1295 HOME User manual

Notável Móveis NT 3110 User manual

Notável Móveis

Notável Móveis NT 3110 User manual

Notável Móveis NT5170 User manual

Notável Móveis

Notável Móveis NT5170 User manual

Notável Móveis NT1180 User manual

Notável Móveis

Notável Móveis NT1180 User manual

Notável Móveis CABINET NT 3035 User manual

Notável Móveis

Notável Móveis CABINET NT 3035 User manual

Notável Móveis NT1190 User manual

Notável Móveis

Notável Móveis NT1190 User manual

Notável Móveis CHICAGO 56100 User manual

Notável Móveis

Notável Móveis CHICAGO 56100 User manual

Notável Móveis PAINEL NT 1100 User manual

Notável Móveis

Notável Móveis PAINEL NT 1100 User manual

Notável Móveis NT 2065 User manual

Notável Móveis

Notável Móveis NT 2065 User manual

Popular Indoor Furnishing manuals by other brands

modway EEI-6399 Assembly instructions

modway

modway EEI-6399 Assembly instructions

Forte Rayong RXGS82511 Assembling Instruction

Forte

Forte Rayong RXGS82511 Assembling Instruction

Forte VERZ12 Assembling Instruction

Forte

Forte VERZ12 Assembling Instruction

Alvin Olympian CH300-40 Assembly instructions

Alvin

Alvin Olympian CH300-40 Assembly instructions

AKRUS ak 150 DL user manual

AKRUS

AKRUS ak 150 DL user manual

Germania 1687 Assembly instruction

Germania

Germania 1687 Assembly instruction

Displays2go RNDH B1548 Assembly instructions

Displays2go

Displays2go RNDH B1548 Assembly instructions

siena GARDEN Ricon C30992 Assembly instruction

siena GARDEN

siena GARDEN Ricon C30992 Assembly instruction

Swedstyle Quadro 2.0 Flex QU33AA01FB40X Assembly instruction

Swedstyle

Swedstyle Quadro 2.0 Flex QU33AA01FB40X Assembly instruction

SHANGRI-LA SERENGETI SLSERENDCWA user guide

SHANGRI-LA

SHANGRI-LA SERENGETI SLSERENDCWA user guide

Berlin Gardens GCDT0048D Assembly Directions

Berlin Gardens

Berlin Gardens GCDT0048D Assembly Directions

Riverside Furniture Verona Assembly instructions

Riverside Furniture

Riverside Furniture Verona Assembly instructions

Otto WF318095AAA Assembly instruction

Otto

Otto WF318095AAA Assembly instruction

Living Spaces Ashford II Assembly instruction

Living Spaces

Living Spaces Ashford II Assembly instruction

Songmics VASAGLE LBT25 quick start guide

Songmics

Songmics VASAGLE LBT25 quick start guide

Astonica 50105597 instruction manual

Astonica

Astonica 50105597 instruction manual

PHI VILLA THD7-322-116 Use and care guide

PHI VILLA

PHI VILLA THD7-322-116 Use and care guide

Bouclair 9389564 Assembly instructions

Bouclair

Bouclair 9389564 Assembly instructions

manuals.online logo
manuals.online logoBrands
  • About & Mission
  • Contact us
  • Privacy Policy
  • Terms and Conditions

Copyright 2025 Manuals.Online. All Rights Reserved.