Nuna aase CS-41 User manual

MODEL CS-41
instructions
IMPORTANT: KEEP THIS INSTRUCTION BOOKLET IN THE
PLACE PROVIDED ON THE CHILD RESTRAINT

Please keep this Instruction Booklet in the storage area under the
seat for future reference.
Smart
Design
DO NOT USE THIS CHILD RESTRAINT UNTIL YOU HAVE READ
AND UNDERSTOOD THE INSTRUCTIONS IN THIS USER GUIDE
AND IN YOUR VEHICLE OWNERS MANUAL

2
Contents
Quick Reference .........................................3
WARNINGS .............................................4
Features............................................ 5 & 6
IMPORTANT INFORMATION ...............................7
Installation..............................................8
Seating Location .......................................8
Correct Seat Belt.......................................9
Airbags ..............................................9
Select a Stable Position ................................10
Reclining Backrest.....................................11
Use...................................................12
Headrest Adjustment...................................12
Seat Bottom Adjustment ................................13
Extra Side Impact Protection ............................14
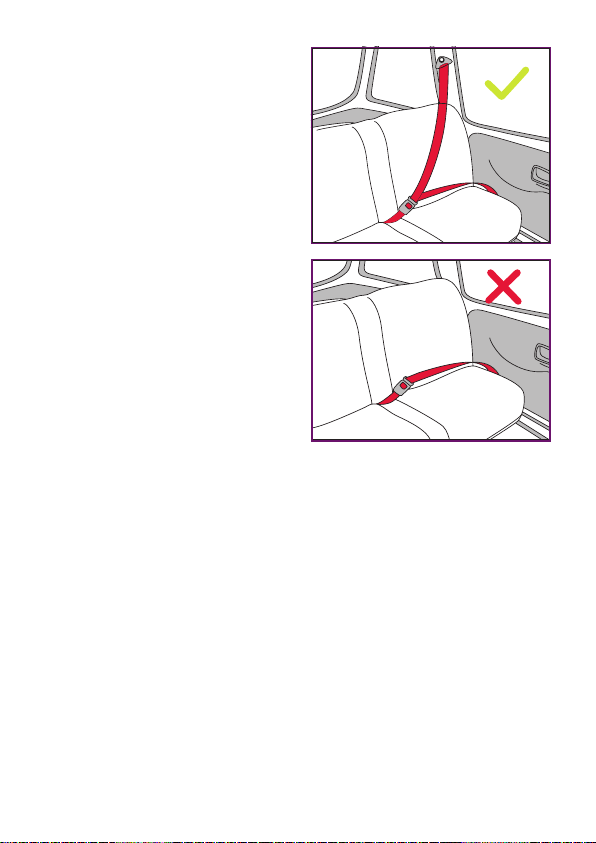
Correct Vehicle Belt Placement...........................15
Vehicle Belt Checklist ..................................16
Removing and Refitting Cover ............................17
Fitting and Removing Cupholder ..........................18
Shoulder Height Labels ..................................19
After this Booster Seat...................................20
TETHER STRAP WARNINGS ..............................21
Tether Strap Use................................... 22 & 23
Tether Strap Anchorage - Installation ................. 24 & 25
Care, Maintainance and Storage ..........................26
Accessories and Spare Parts .............................27

3
Quick Reference
Suitable for children from approximately 4 years of age to
approximately 8 years. See page 7 for more detailed information.
DO NOT use with a
Lap only seatbelt.
page 9
Always use the
Tether Strap.
page 22 & 23
Always t the sash
belt through the
headrest guide.
page 15 & 16
Both Lap and Sash belt
pass under the armrest.
page 15 & 16
Lap belt passes over the child’s
upper thighs, not across the
stomach.
page 15 & 16
Booster Seat must
sit rmly back
against the vehicle
seat. page 11
Sash belt must
make good
contact with the
child’s chest.
page 15 & 16
Vehicle Belt must
always be securely
latched.
page 16
No heavy or sharp objects in
the cupholder.
Headrest adjusted to
suit the child’s height.
page 12
SIP correctly adjusted
page 14
IMPORTANT: Also read the detailed instructions that follow this
quick reference

4
WARNING
• DO NOT LEAVE CHILDREN UNATTENDED IN THE CAR
• Use the restraint exactly as shown in the Instructions.
• Supervision of children is needed because they may be able
to undo buckles.
• DO NOT USE WITH JUST A LAP BELT. You must use with a
lap-sash seat belt.
• Do not alter or modify this restraint.
• This child restraint is not approved for use with any
connectors that connect to the car’s ISOFIX low anchorages
• The lap part of the seatbelt must be rmly across the thighs
and the sash strap tted diagonally across the chest and
shoulder.
• Do not allow the restraint to come into contact with polishes,
oils, bleach and other chemicals.
• Destroy the restraint if it has been in a severe crash, even if
no damage is visible.
• Repairs must only be done by the manufacturer or agent.
• DO NOT USE THIS RESTRAINT WITHOUT THE COVER.
THIS RESTRAINT MUST BE USED IN CARS WITH FORWARD-
FACING SEATS WITH A LAP-SASH SEATBELT. THIS BOOSTER
SEAT IS NOT SUITABLE FOR USE WITH A CHILD HARNESS.
NOTE: The warnings on this page are those required by the
Australian and New Zealand Standard AS/NZS 1754 for this type
of child restraint. Other warnings specic to this particular child
restraint will be found throughout these instructions.

5
Features - Front View
Height Adjustable
Headrest
Vehicle Sash
Belt Guide
Armrest
Cupholder
Lower Vehicle
Belt Path
Shoulder Height
Labels
Lower Vehicle
Belt Path
Armrest
SIP pod (Side
Impact Protection)
SIP pod
(Side Impact
Protection)

6
Features - Back View
Lower Vehicle
Belt Path
Tether Strap
Tether
Anchorage
Headrest Adjuster
Storage Pocket
for Tether End
Vehicle Sash
Belt Guide
SIP pod
(Side Impact
Protection)
Vehicle Sash
Belt Guide

7
This Child Restraint is: To be used with a lap-sash seatbelt by a child
whose shoulders are above the lower shoulder height marker with
head restraint in the lowest position (approximately 4 years of age)
until the child’s shoulders reach the upper shoulder height marker with
the head restraint in highest position (approximately 6 to 8 years of
age). See facing page.
• Continue to use this booster seat until the child reaches this limit.
Children are safest in a booster seat until their shoulders reach the
upper shoulder height marker of the booster seat.
• Do not use this restraint until child’s shoulders are above the lower
shoulder height marker with the head restraint in the lowest position.
• If the knees do not bend in front of the vehicle seat cushion continue
to use a booster seat.
• Ensure that children have adequate ventilation and shade when in
the vehicle.
• Seat Belt extenders are not recommended. If the vehicle seat belt
is not long enough to secure the restraint seek advice from a child
restraint tter.
• An unsecured booster seat can be thrown around and may injure
occupants in a sharp turn, sudden stop or crash. Remove it or make
sure that it is securely belted in the vehicle.
• Read carefully the whole of the instructions for the installation, and in
the event of doubt about the method of installation, consult the child
restraint manufacturer or agent, or a child restraint tting station
authorized by the relevant transport authority, or in New Zealand,
consult the agent for the vehicle.
IMPORTANT INFORMATION

8
CHILD RESTRAINT INSTALLATION LAW (AUSTRALIA)
For Booster Seats: A passenger who is 4 years old or older, but
is less than 7 years old, must not be in the front row of a motor
vehicle that has 2 or more rows of seats unless all of the other
seats in the row or rows behind the front row are occupied by
passengers who are also under 7 years old.
Installation
Seating Location
The safest position for this
booster seat is in the centre rear
of the back seat provided it is
tted with a lap/sash seat belt
and a tether anchorage.
DO NOT use the front seating po-
sition unless there is no rear seat
and there is a tether strap mount-
ing position available behind the
front seat.
NOTE: In some vehicles (mostly
utes or pickups), the tether strap
mounting position is behind the
vehicle seat backrest and is so
close to the back of the booster
seat that the tether cannot be
tensioned. In this case refer to a
licenced child restraint tter for
advice.

9
Correct Seat Belt
Use only the vehicle’s lap and
shoulder belt when restraining a
child in this booster seat.
DO NOT use a lap belt only. The
centre rear seating position can
be used ONLY if there is a lap
and shoulder belt seat belt in that
seating position.
DO NOT use the centre rear
position if there is a lap belt only.
Airbags
Front Seat Airbags - if using the front seating position and the vehicle
is tted with a front airbag in this position move the front seat back as
far as possible.
Side or Seatbelt Airbags - if your vehicle has side or seatbelt airbags
consult the Vehicle Owners Handbook for information regarding
suitable child restraint installation positions. If in doubt refer to a
licenced child restraint tter for advice.

10
If the Booster Seat is stable
connect the Tether Strap (see
pages 22 and 23).
Select a Stable Position
Before using the Booster Seat
check the suitability of the seating
position.
Place the Booster Seat on the
vehicle seat. Push it rmly into
place. Check that it is stable and
if not try another position in the
vehicle.
NOTE: in some vehicles the recommended centre rear position is
raised and the booster will not sit securely on it. In this case use
an outboard position.

11
Reclining Backrest
Vehicle seats have different
shapes and some have a greater
backrest angle than others.
The backrest of the AACE can be
pushed back to better t a more
reclined vehicle seat.
Always have the backrest a close
t to the back of the vehicle seat
backrest.
DO NOT try to recline the backrest
past the second position.
1
2

12
Use
Headrest Adjustment
Squeeze headrest release
lever until locking mechanism
disengages, raise or lower
headrest as required.
As the headrest rises the width
of the sides will automatically
increase.
Headrest should be just above
the shoulders.

13
Seat Bottom Adjustment
The seat bottom can be pulled
forward to suit bigger children.
To adjust:
Reach under the seat pad, locate
the release lever, press this
upwards.
Slide the seat pad forward or
back as required.
There are three positions for the
best t.

14
Extra Side Impact
Protection
There are SIP pods on each side
of the backrest.
When the booster seat is installed
in an outboard position the SIP
pod closest to the door can be
extended to keep the booster
further away from the door in an
impact.
To extend simply pull the pod out.
To retract push the button in.
Do not extend the pod on the side
facing into the vehicle or when
the booster seat is installed in the
centre seating position.

15
NOTE: the belts must pass
under the armrests and
across the child's upper
thighs.
The lap belt must not be
in contact with the child's
stomach. In the event of a
crash or sudden stop a lap
belt moving into a child's
stomach can cause serious
injury.
Correct Vehicle Belt
Placement
Place child on seat. Check
headrest height and adjust if
necesssary. See page 12.
Pass sash belt through the guide
under the headrest.
Connect the vehicle belt. Check
that it is securely engaged.
Ensure the belt is not putting
pressure on the child's neck and
can slide freely through the guide.
Ensure the sash belt has good
contact against the child's chest.
ALWAYS USE THE
SASH GUIDE
WARNING
A SASH BELT
UNDER THE
ARM OR BEHIND
THE BACK IS
DANGEROUS

16
Vehicle Belt Checklist
CORRECT VEHICLE BELT PATH
The cover has labels marking the correct vehicle belt path.
Belts must
pass under
the armrests
Sash belts must
pass through the
red guide in the
headrest
Engage vehicle
buckle securely
BOOSTER SEATBELT PATH
WARNING
DO NOT LEAVE
CHILDREN
UNATTENDED
IN THE CAR
BOOSTER SASH BELT PATH

17
Removing and Refitting Cover
Seat Pad
Remove the Cup Holder.
Release the bottom edges of the
seat pad by releasing the 6 snaps
and remove.
Seat Back
Release the 2 snaps at the lower
back, unhook the 4 elastic bands
on the back side and remove the
cover by lifting it over the head-
rest.
Headrest
Raise to highest position, unhook
4 elastic bands and remove. Start
by pulling the top edge forwards.
To ret the cover reverse the
steps above.
VERY IMPORTANT:
Only replace the cover
with a manufacturer's
supplied replacement
cover with identical
shoulder height
markers or a
replacement cover
meeting AS/NZS 8005.

18
Fitting and Removing Cupholder
To fit: insert cupholder clip
through opening in cover and into
matching slot in the base.
To remove: hold cupholder rmly
and pull upwards.
IMPORTANT: the cupholder
must be securely tted into
the slot in the base, if not it
may dislodge.
NEVER PLACE CONTAINERS
WITH HOT LIQUIDS IN THE
CUPHOLDER.

19
Shoulder Height Label
Shoulder Height Label: this booster seat is rated as suitable for
children from approximately 4 years to 8 years. The exact sizing is
determined by the shoulder height label.
When a child is sitting on the
booster seat with their back
rmly up against backrest, the
top of their shoulders must be
between the dotted lines on the
shoulder height label.
Adjust the headrest height if
necessary to reposition the lines.
If their shoulders are above the
dotted line when the headrest is
fully up, or below the dotted line
when the headrest is fully down,
do not use the booster seat.
SHOULDERS BELOW THIS LINE WHEN
HEADREST AT HIGHEST POSITION
SHOULDERS ABOVE THIS LINE WHEN
HEADREST AT LOWEST POSITION
Table of contents
Other Nuna Car Seat manuals