Oce TDS450 User manual

Education Services
Océ Education Services
Océ
FedEx Kinko’s Student Guide
Océ TDS450
Océ Customer Trainin
g

Student Guide - Hardware solutions
Océ TDS450
Version : 2006.01 USA
CEP No. : 0910319

Table of contents
1. Introduction 5
Use of the Student Guide 6
2. Océ TDS450 7
Introduction 8
The Scanner Operator Panel 9
The Printer Operator Panel 10
3. How to… 11
Switch the Océ TDS450 on/off 12
Load rolls of media 14
Set the media type and width 19
Make a basic copy 20
Make a print with the Océ WPD driver 22
Work with the System Control Panel 25
Work with the Queue Manager 27
Make a basic scan-to-file job 28
Work with Océ Scan Manager 30
Work with the Settings Editor 33
Use Remote Logic 35
Correct the errors 37
Add toner 38
4. Exercises 41
Exercises 42
5. Frequently asked questions 53
The 10 most frequently asked questions 54
6. Safety instructions 57
Instructions for safe use 58
7. About Océ 59
About Océ 60
Océ philosophy on Education Services 61
3

4

1. Introduction
5

Use of the Student Guide
Student Guide
During this training course this Student Guide will be used as an exercise
book. It contains a description of all exercises that can be executed
during this course.
After this training this Guide can be used as a reference book. It will help
you to find how to execute the most common tasks related to this
equipment in a very easy manner.
This Student Guide contains seven (7) sections:
1. Introduction
In the introduction-section we describe the outline of this guide.
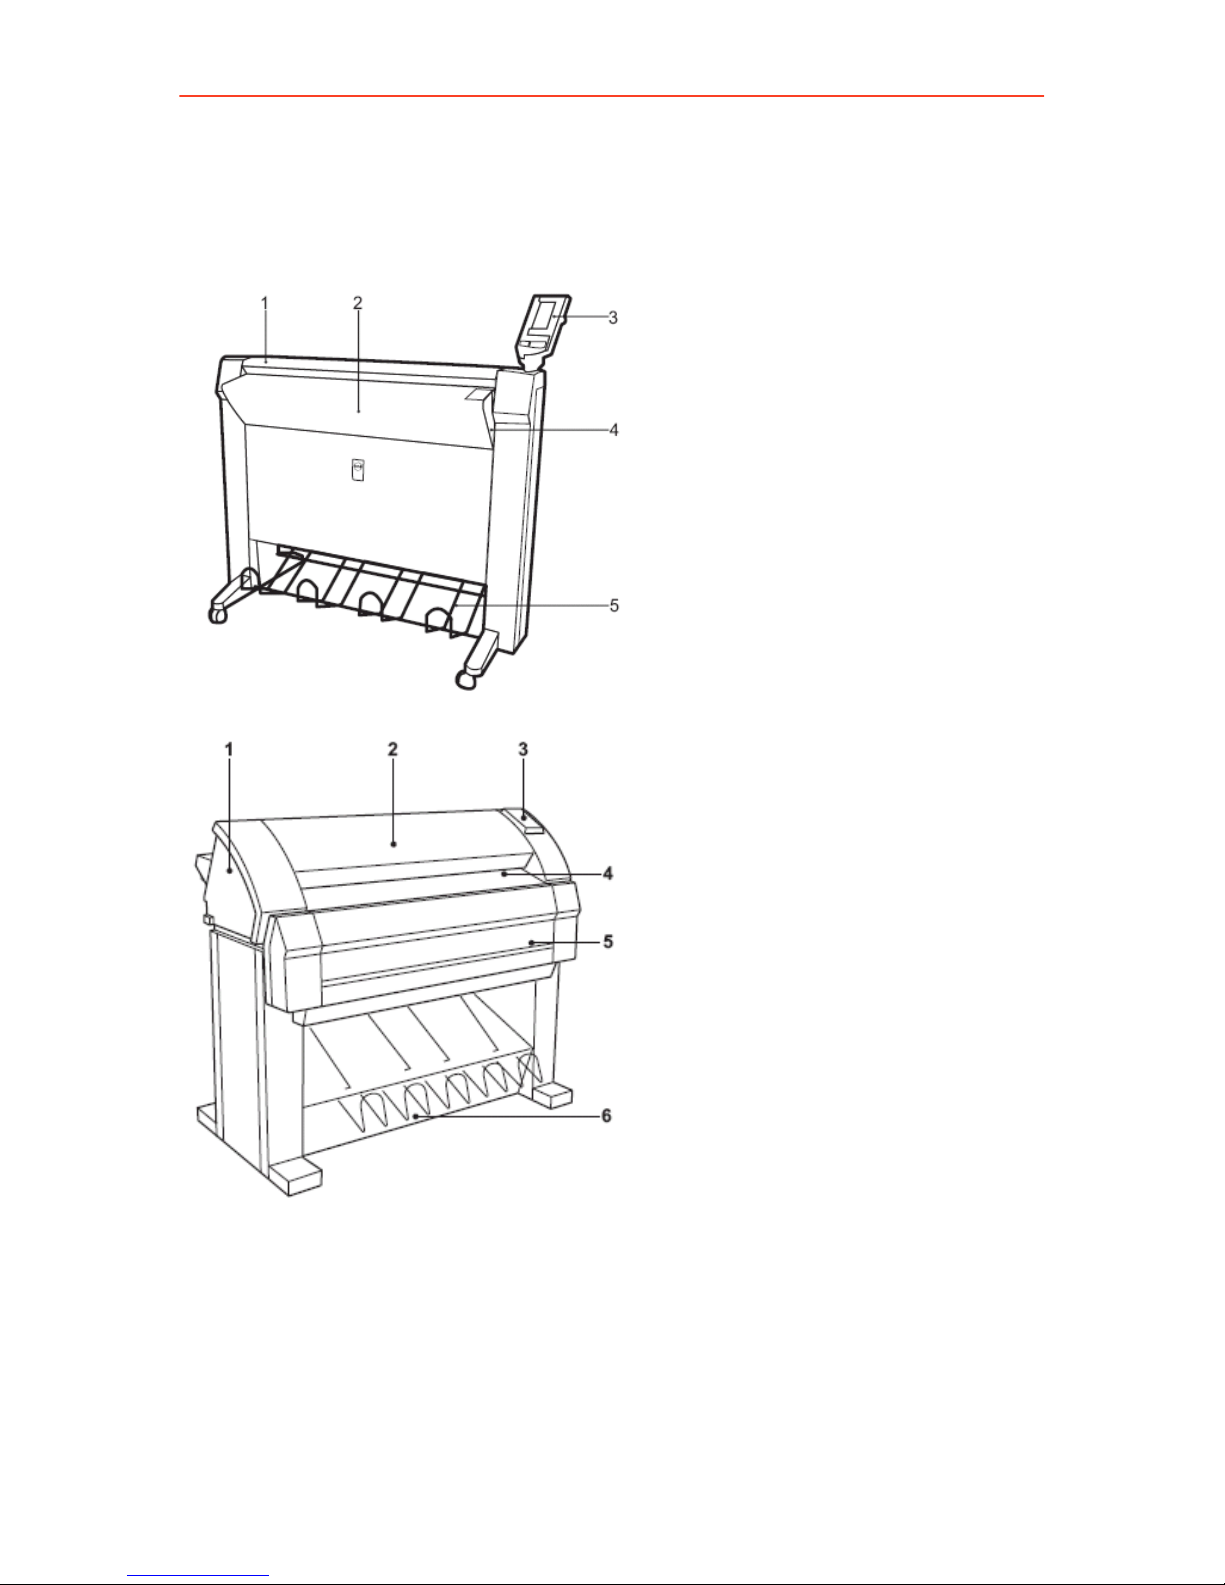
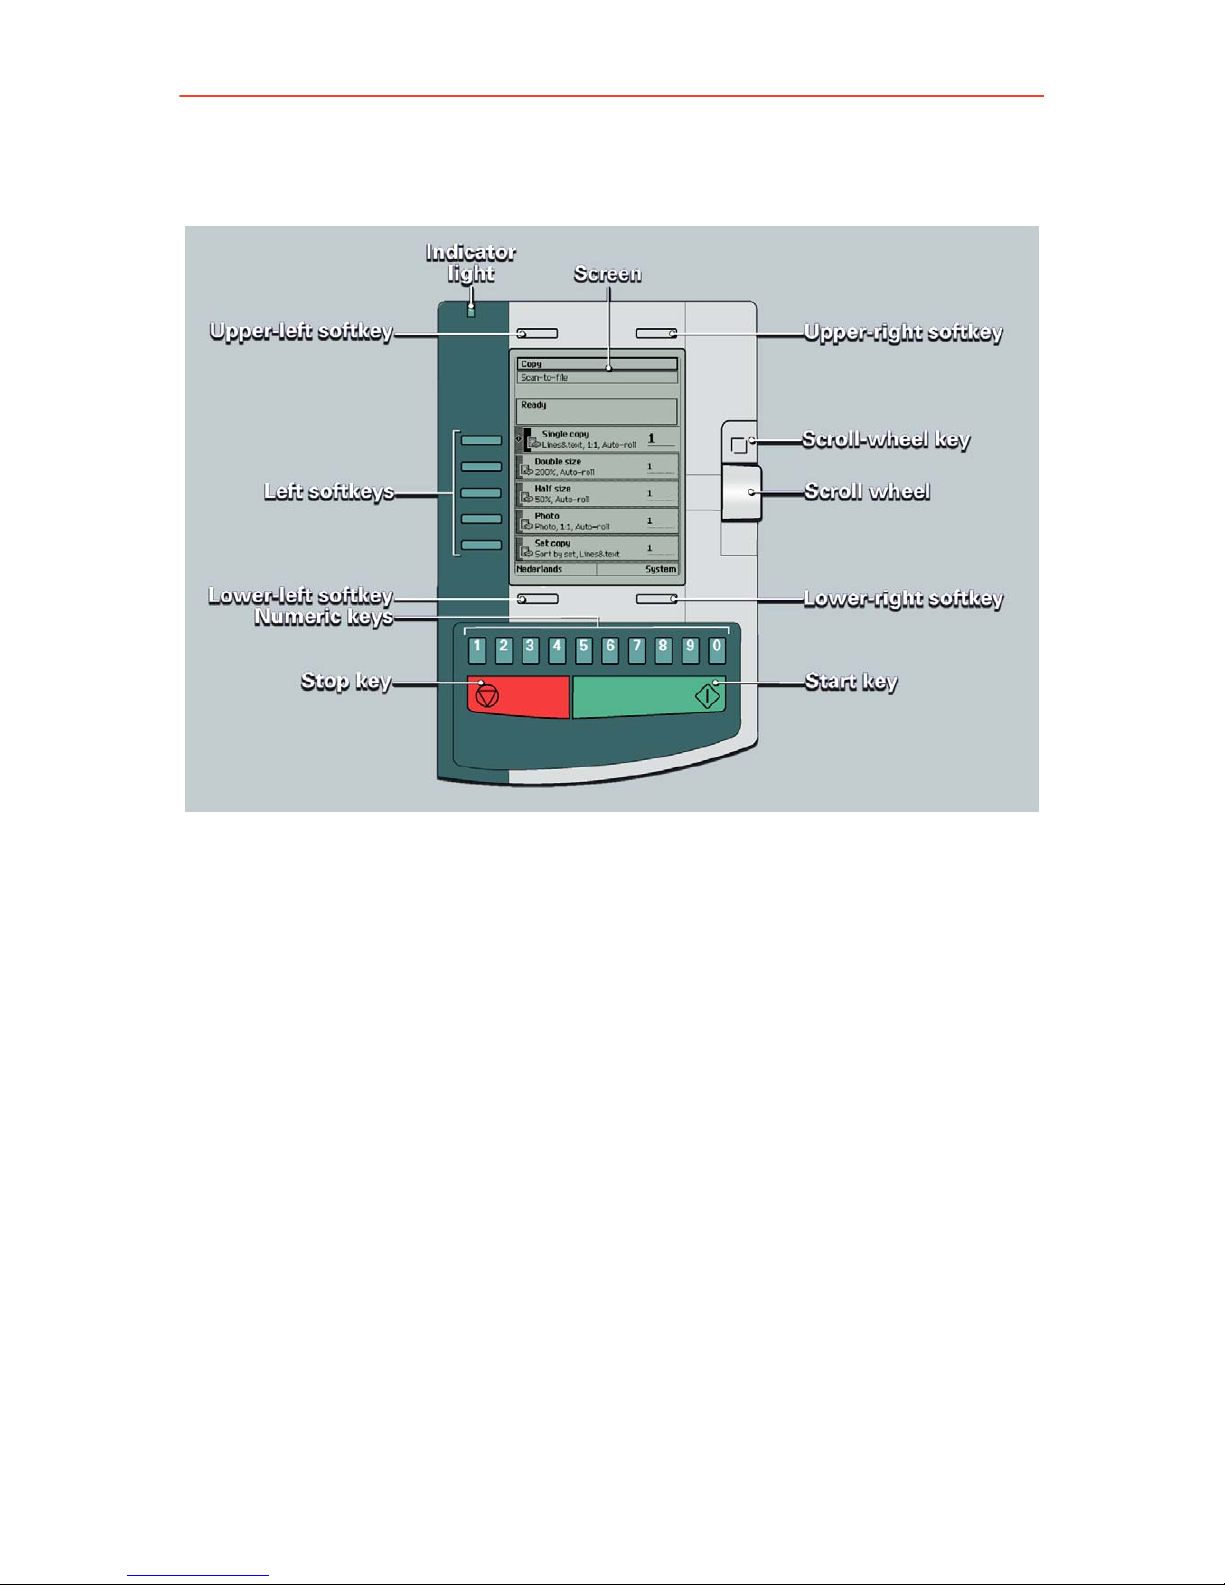
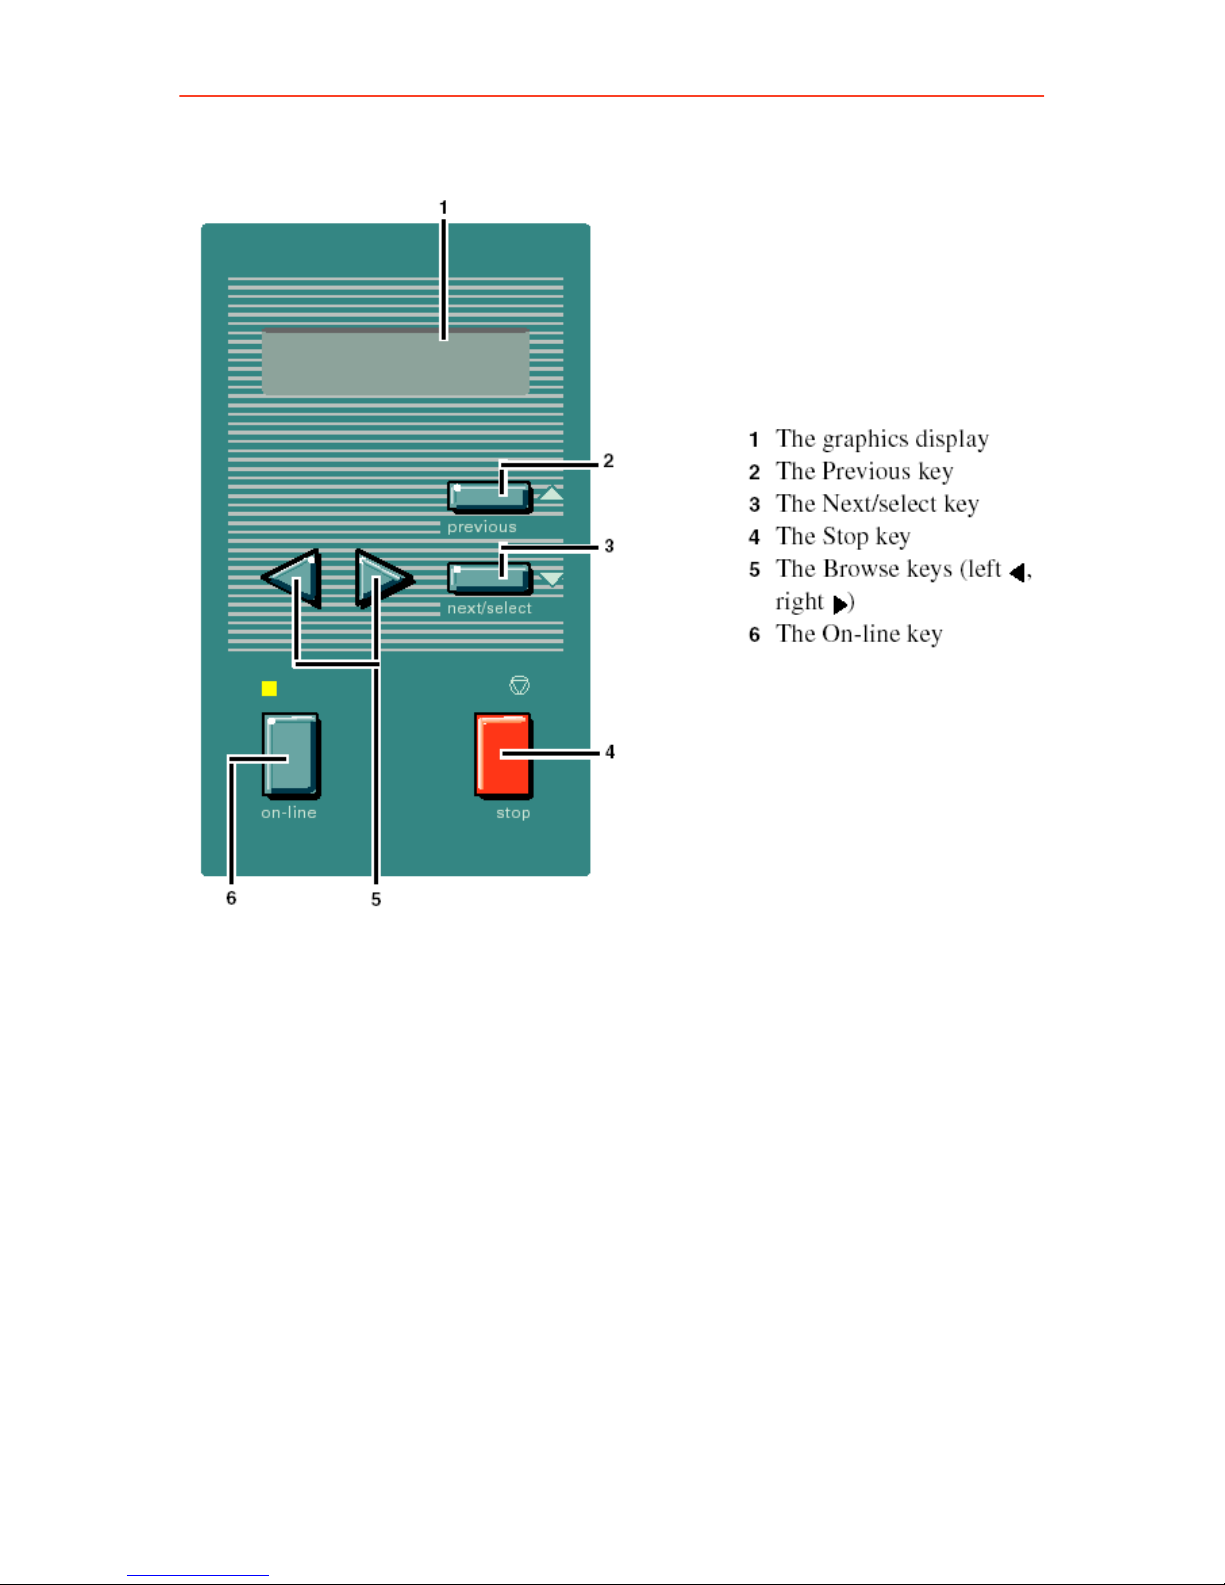
2. Océ TDS450
In this section the main components of the machine and the operator
panel are highlighted.
3. How to ..
The so-called ‘How to..’-section explains basic usage of the machine.
4. Exercises
A section that lists all exercises that can be executed in this training
course.
5. Frequently Asked Questions
This section provides an overview of where to find the answers to the
ten (10) most frequently asked questions.
6. Safety instructions
In the second section we highlight safety issues related to the Océ
TDS450 equipment.
7. About Océ
The final section provides some information on the company Océ and
the position of Education Services in our company.
Practical arrangements
• Please do not smoke, eat or drink during this course. Sufficient breaks
will be inserted for this purpose.
• Please switch off your mobile phone.
• Feel free to interrupt your trainer whenever something is not clear to
you or in case you want more details.
6

2. Océ TDS450
7

Introduction
Introduction
The Océ TDS450 is a wide format, multifunctional system.
It offers a broad range of print, copy, and (color) scan-to-file
functionality. The system includes a printer (1 or 2 rolls) a controller and
an optional scanner.
The Océ TDS450 scanner
1. Top Cover
2. Original feed table
3. Operator panel
4. On / off switch
5. Integrated Receiving Tray
The Océ TDS450 printer
1. Left cover
2. Fuser unit
3. Operator panel
4. Manual feed table
5. Drawer with media roll
6. Integrated Receiving Tray
8

The Scanner Operator Panel
9

The Printer Operator Panel
10

3. How to…
11

Switch the Océ TDS450 on/off
Introduction
You must separately switch on and off the Océ TDS450 printer, Océ
TCS4 scanner and the Océ Power Logic® Controller.
Switch the Océ TDS450 printer on
1. Set the On/Off switch at the rear of the printer to position ‘1’.
The green LED in the switch lights.
The message ‘Printer ready’ appears.
Switch the Océ TDS450 printer on/off
1. Set the On/Off switch at the rear of the printer to position ‘0’.
Note: Before you turn off the printer, make sure that the printer is not
printing a job.
12

Switch the Océ TDS450 on/off
Switch the Océ TCS4 scanner on
1. Set the On/Off switch at the right to position ‘1’.
Switch the Océ TCS4 scanner off
1. Set the On/Off switch at the right to position ‘0’.
Start up the Océ Power Logic Controller
1. Switch on the controller and the screen.
After the initial system test of the controller the applications, Océ
Queue Manager, Océ System Control Panel, Océ Settings Editor and
Océ Scan Manager are automatically started and the controller
applications are ready for operation.
Switch off the Océ Power Logic Controller
1. Open the Océ System Control Panel application.
2. Click ‘System’ to open the system menu.
3. Click ‘Shutdown’.
A dialogue box displays.
4. Click ‘Yes’ to confirm.
The system automatically performs the shutdown procedure for the
controller.
Note: Wait at least 5 seconds before you restart the Océ TDS450.
13

Load rolls of media
Load rolls of media
Introduction
The Océ TDS450 is available with a roll unit for one or two rolls.
Each of the rolls on the Océ TDS450 can be loaded with print material of
a different size or type. The size and type of the available media are
indicated on the operator panel.
Attention: When you load new print material, you must tell the system
the size of the material and the type of print material (paper, transparent,
or polyester).
The definition of the size and type of the new print material is required to:
• Enable the automatic media switch function to work correctly.
• Support auto format functions.
How to load roll 1
1. Open the drawer completely.
2. Remove the roll holder from the drawer.
14

Load rolls of media
2. Remove the empty core from the roll holder while pressing the knob.
3. Slide the roll holder in the new roll of material while pressing the knob.
The knob must be at the right hand side and paper must be
positioned as shown in the figure.
4. Align the roll with the appropriate size indicator on the roll holder and
release the locking mechanism. The size indicator line has to be
completely visible.
15

Load rolls of media
5. Place the roll holder with the material in the drawer.
6. Feed the material between the input guide plates against the rollers.
7. Turn the rollers until the material is visible. Also refer to the sticker
inside the drawer.
8. If you have inserted a roll with another material or with a different
width, you have to program the correct width and material type.
9. Close the drawer.
10.Switch the printer on-line with the On-line key.
16

Load rolls of media
How to load roll 2
1. Open the cover to get access to roll 2
2. Remove the roll holder
3. Remove the empty core from the roll holder while pressing the knob
(see page 15).
4. Slide the roll holder in the roll of print material while pressing the knob
(see page 15).
17

Load rolls of media
5. Align the roll with the appropriate lines on the roll holder while you
press the knob.
6. Place the roll holder with the material in the lower paper compartment.
7. Feed the material between the input guide plates against the rollers.
Turn the rollers until the material is visible. Also refer to the sticker
inside the drawer.
8. Close the lower paper compartment.
9. Switch the printer on-line with the On-line key.
18

Set the media type and width
Set the media width
1. Press the On-line key to put the printer off-line.
2. Select the ‘Media settings’ item with the ◄or ►key.
3. Press Next/select to enter the ‘Media settings’ menu.
4. Select ‘Roll 1’or ‘Roll 2’ with the ◄or ►key.
5. Press Next/select to enter the ‘Roll’ or ‘Manual feed’ menu.
6. Select the ‘Width’ item with the ◄or ►key.
7. Press Next/select to enter the ‘Width’ menu.
8. Select the desired width with the ◄or ►key.
9. Press Next/select to confirm the selected width.
10.Press On-line to put the printer on-line again.
Set the media type
1. Press the On-line key to put the printer off-line.
2. Select the ‘Media settings’ item with the ◄or ►key.
3. Press Next/select to enter the ‘Media settings’ menu.
4. Select ‘Roll 1’, ‘Roll 2’, ‘Manual feed’ with the ◄or ►key.
5. Press Next/select to enter the ‘Roll’ or ‘Manual feed’ menu.
6. Select the ‘Material’ item with the ◄or ►key.
7. Press Next/select to enter the ‘Material’ menu.
8. Select the desired media material with the ◄or ►key.
9. Press Next/select to confirm the selected media material.
10.Press On-line to put the printer on-line again.
19

Make a basic copy
Make a basic copy
Introduction
A basic copy job takes two steps. Feed the original and press the start
key. Every other type of copy job is called an extended copy job. An
extended copy job takes one additional step, define the copy job settings
at the scanner operator panel. When you turn the Océ TDS450 on or
when you select 'Copy', the scanner operator panel shows five copy job
templates. The copy job templates provide access to the different
settings per copy job template. When you select a copy job template, the
scanner operator panel shows the top 5 settings of the selected copy job
template. The top 5 settings are the most often used settings. You can
define the top 5 settings for each copy job template with the Océ Settings
Editor. You can use the scroll wheel to see the other settings. After you
start a copy job, you can manage your jobs from the Océ Queue
Manager.
20
Table of contents
Other Oce All In One Printer manuals