manuals.online logo
Brands
  1. Home
  2. •
  3. Brands
  4. •
  5. Olympus
  6. •
  7. Laboratory Equipment
  8. •
  9. Olympus CX-DO User manual

Olympus CX-DO User manual

oL!!MPus
- -- -~ - -
INSTRUCTIONS
cx-DO
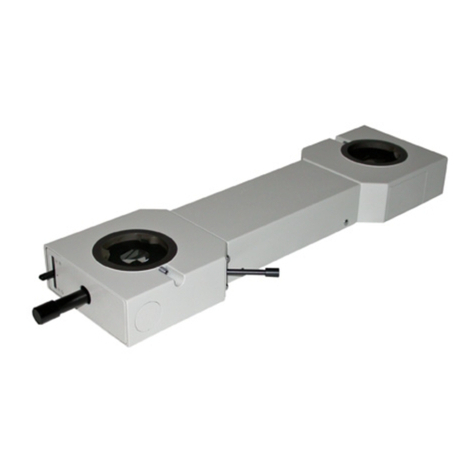
DUAL-VIEWING ATTACHMENT
This instruction manual is for the Olympus Dual-Viewing Attachment Model CX-DO. To ensure
the safety, obtain optimum performance, and to familiarize yourself fully with the use of this
attachment, we recommend that you study this manual thoroughly before installing the attachment.
Retain this instruction manual in an easily accessible place near the work desk for future reference.
AX7075
CX-DO
This unit employs a UIS (universal infinity system) optical design, and should only be
used with the CX40 microscope frame and UIS eyepieces, objectives, condensers,
etc. Less than optimum performance may result if inappropriate accessories are used.
I, This manual pertains only to the CX-DO. Before using this attachment with the microscope, also thoroughly review
the instruction manual for the CX40 microscope frame.
2. To avoid potential shock hazard, always turn the main switch on the transformer (TDO) to OFF and disconnect the
power cord before replacing the pointer illumination bulb.
3. Never connect the pointer illumination cord plug to other units than the TDO transformer.
4. When replacing the pointer illumination bulb, be sure to use only the designated tungsten bulb.
I
Designated bulb: 6V IOWGE (mfd. by Hosobuchi Denkyuu). I
2. Orientation of the
image is
the same for both observers.
3. Observation tubes and eyepieces that can be used with the CX-DO are as follows.
Eyepiece
CWHlOX
Eyepiece
helicoid
CWHlOX,
, ~.
CWHlOX
with
observation tube
U-B130
Eyepiece with
helicoid
CWHlOX-H or
1351WHlOX
Cross-WHlOX.
Transformer
TDO
Main observer Secondary
observer
Dual-viewing
body
cx-Do
Binocular
observation
tube
U-B130
Eyepiece
with helicoid
CWHIOX-H
1.
ml
Eyepiece
CWHlOX
etc. Trinocular
observation tube
U-TR30
1. Clean all glass components by wiping gently with gauze. To remove fingerprints or oil smudges, wipe with gauze
slightly moistened with xylene or a mixture of ether (70%) and alcohol (30%).
A Since both ether and alcohol are highly flammable, be careful to keep these chemicals away from open
fire and potential sources of electrical sparks, such as when the main switch is turned ON.
2. Do not attempt to use organic solvents to clean the non-optical components of this attachment. To clean these,
use a lint-free, soft cloth lightly moistened with a diluted neutral detergent.
3. Do not disassemble any part of the dual-viewing attachment as this could result in malfunctions or reduced
performance.
4. When not using the dual-viewing attachment, keep it covered with the provided dust cover.
If the dual-viewing attachment is used in a manner not specified in this manual, the safety of the user may be
imperiled. In addition, the equipment may also be damaged. Always operate the equipment as outlined
instruction manual.
The following symbols are used to set off text in this instruction manual.
A : Indicates that failure to follow the instructions in the warning could result in bodily
harm to the user and/or damage to equipment (including objects in the vicinity of the
equipment).
* : Indicates that failure to follow the instructions could result in damage to equipment.
Q : Indicates commentary (for ease of operation and maintenance).
in this
CX-DO
2-l Assembly Diagram ........................................................................ 2
2-2 Detailed Assembly Procedure ...................................................... 2
3-1 Focus Adjustment .......................................................................... 5
3-2 Using the Pointer .......................................................................... 6
3-3 Photomicrography ......................................................................... 7
a
A
1 Dual-Viewing Body CX-Do ]
Observation tube
mounting dovetail
*
For
compatibility of other transformers, contact
your
Obnpus
representative.
\
Connector for
- -‘--te.+ illatmination
7Halogen bulb/
Voltage selector knob
and main switch
Illumination can be set at
“L”(LOW) “M”(MEDIUM)
........!.^...
1 *
Observation tube
servation tube
CX-40 Microscope frame
Fig. 1
a
1. Using the Alien screwdriver @ provided with the microscope frame,
loosen the observation tube clamping screw.
2. Insert the circular dovetail mount at the bottom of the duel-viewing
body @ into the opening on the microscope frame, positioning the
duel-viewing body approximately parallel with the arm. Clamp the duel-
viewing body by tightening the clamping screw.
A
When mounting and detaching, hold the duel-viewing body
securely to prevent it from toppling or falling off.
A
Always attach the duel-viewing body as shown in Fig. 1. If the
duel-viewing body is mounted with the rear section facing
forward or to either side, it may topple.
@When mounted as shown in Fig. 1, image orientation is identical for
both the main and secondary observer.
0
2
Fig. 2
eyepiece
Fig. 3
Mount an observation tube at the position of both the main and
secondary observer.
1. Using the Allen screwdriver (TJ,loosen the observation tube clamping
screw on the dual-viewing body.
2. Insert the circular dovetail mount at the bottom of the observation
tube @ into the opening on the dual-viewing body, positioning the
observation tube to point the binocular eyepieces toward the front.
Clamp the observation tube by tightening the clamping screw.
The eyepieces are mounted in the same manner as in the case of the
microscope itself. However, since the right eyepiece of both the main
and secondary observer is used for pointer focusing, the eyepiece
mounted in the right eyepiece sleeve should either be a helicoid
eyepiece or one with diopter adjustment.
Q For details, refer to “Features” at the beginning of this instruction
manual.
Fig. 4
,
Fig. 5
1. Loosen the lamp socket clamping knob (iJ and remove the lamp socket.
(Fig. 4)
2. Screw the designated tungsten bulb (6VlOWGE) into the lamp socket.
(Fig. 5)
3. Insert the lamp socket into the socket holder and clamp by tightening
the clamping knob.
t Do not touch the bulb with bare hands. Hold the bulb with
gloves or a piece of gauze. If fingerprints or smudges are
accidentally left on the bulb, wipe the bulb with a soft cloth.
+ Use only the designated bulb type for replacement, i.e.,
GVIOWGE (mfd. by Hosobuchi Denkyuu).
A Precautions for Bulb Replacement
The bulb and the lamp socket will be hot during use and right
after use.
Turn the main switch on the transformer to OFF and disconnect
the power cord from the wall outlet. Then allow the old bulb
and lamp socket to cool before replacing the bulb with a new
of the designated type.
3
l
CX-DO
Fig. 6
A
The cords are vulnerable when bent or twisted. Never subject
them to excessive force.
AMIC
a e sure that the main switch is turned to OFF before
connecting the power cord.
1. Connect the pointer illumination cord plug @ to the connector @ on
the rear panel of the TDO transformer.
2. Connect the power cord plug @ to the wall outlet.
Fig. 7
1. Loosen the support pillar clamping knob @ and thread the upper section
@ of the support pillar into the socket @ located at the underside of
the secondary observer position on the dual-viewing body.
2. Extend the lower section of the support pillar until the base is in contact
with the table surface.
* The dual-viewing body should be parallel with the table surface.
3. Clamp the support pillar by tightening the support pillar clamping knob
0.
0
4
Fig. 8
I \
1. Turn the transformer’s voltage selector knob (main switch) to the “M”
position to turn ON the pointer light.
2. If the pointer is not visible in the field of view, bring it to the center
of the field of view by manipulating the pointer control joystick 0.
3. Turn the helicoid @ on the right eyepiece until the pointer is in focus.
4. Turn the helicoid @ on the left eyepiece until the pointer is in focus.
5. Turn the focus adjustment knobs on the microscope frame to bring
the specimen into focus.
Fig. 9
Bring the pointer and specimen into simultaneous focus by performing
steps 3 to 5 described in the above paragraph [II, Focusing at the Main
Observer’s Position.
5 0
CX-DO
Fig. 10
Fig. 11
Looking though the eyepieces, adjust the brightness of the pointer by
turning the transformer‘s voltage selector knob 0.
Symbol Application
H Used when the field of view is bright.
M Used for normal brightfield observation.
L Used when the field of view is dark (darkfield observation, etc.)
The color of the pointer can be changed to make it easily distinguishable
from the colors of the specimen. Push in the filter slider @ to select
green; pull it out to select orange.
The main observer can move the pointer to any desired location within
the field of view by manipulating ttie pointer control joystick (iJ at the
front. The secondary observer can do the same by manipulating his/
her pointer control joystick 0.
Q When use of the pointer is not required, move it outside the field of
view by manipulating either of the control joysticks.
Fig. 12
0
6
In general, the procedure for photomicrography is the same as usual. This section describes special considerations
that apply when taking photographs with the dual-viewing attachment CX-DO mounted.
1. Using the trinocular observation tube mounted on top of the microscope, you can take photographs that include the
pointer.
0 When you use Olympus trinocular observation tubes, photo eyepieces, and photomicrographic equipment, the pointer
arrow is always focused on the film plane.
2. The brightness of the pointer is set to be brighter than the specimen to ensure adequate contrast. This has the
following effects on photographs that are not apparent during visual observation.
@ Since the pointer is always overexposed when exposure is correct for the specimen, the pointer color will bleach to
white in color photographs.
@When taking photographs with photomicrographic equipment with automatic exposure control, the brightness of the
pointer will cause the specimen to be underexposed. In such cases, set the photomicrographic equipment’s
compensation to the OVER position in accordance with the specimen distribution.
@ Since the effect of the pointer is particularly noticeable when making long exposures of dark specimens, check the
exposure time with the pointer illumination turned off, then make the exposure manually after turning the pointer
illumination on again.
3. Photomicrography is performed at the main observer’s position.
Fig. 13
* During photomicrography, be sure to cap the eyepiece section @
at the secondary observer‘s position with the provided. light
excluding cap 0. (Fig. 13)
I
7
0
Item
Maximum number of observers
Image orientation
Maximum field number
Pointer color
Pointer movement
Designated bulb
Pointer illumination transformer
Specifications
Two
Identical at main and secondary observer positions.
20
Two colors selectable (orange and green)
By joystick levers (at both main and secondary observer positions)
6VlOWGE (mfd. by Hosobuchi Denkyuu)
TDO transformer 1OOV, 11O-l 2OV, 220-240V
Rating: 1OOV50/60 Hz 1OVA
11O-l 20V 50160 Hz 12VA
220-240V 50160 Hz 12VA
l
8
ol!!MPus
OLYMPUS OPTICAL CO., LTD.
43-2, Hatagaya P-chome,Shibuya-ku, Tokyo, Japan
OLYMPUS OPTICAL CO., (EUROPA) GMBH.
(Premises/Goods delivery) Wendenstrasse 14-16,20097 Hamburg, Germany
(Letters) Postfach 1049 08,20034 Hamburg, Germany
OLYMPUS AMERICA INC.
2 Corporate Center Drive, Melville, N.Y. 11747-3157, USA
OLYMPUS OPTICAL CO. (U.K.) LTD.
2-8 Honduras Street, London EClYOTX, United Kingdom

Other Olympus Laboratory Equipment manuals
Olympus HysteroFlow User manual

Olympus

Olympus HysteroFlow User manual

Olympus OER-Elite User manual

Olympus

Olympus OER-Elite User manual

Olympus U-AFA2M-VIS User manual

Olympus

Olympus U-AFA2M-VIS User manual

Olympus SZX2-EEPA User manual

Olympus

Olympus SZX2-EEPA User manual

Olympus BH-NRE User manual

Olympus

Olympus BH-NRE User manual

Olympus SZX2-ILLT User manual

Olympus

Olympus SZX2-ILLT User manual

Olympus BioLever mini User manual

Olympus

Olympus BioLever mini User manual

Olympus U-APT User manual

Olympus

Olympus U-APT User manual

Olympus SZ2-ILLC User manual

Olympus

Olympus SZ2-ILLC User manual

Olympus SZX2-ILR66 User manual

Olympus

Olympus SZX2-ILR66 User manual

Olympus SZX-SDO2 User manual

Olympus

Olympus SZX-SDO2 User manual

Olympus MX61A User manual

Olympus

Olympus MX61A User manual

Olympus VISERA CLV-S40 User manual

Olympus

Olympus VISERA CLV-S40 User manual

Olympus U-HGLGPS User manual

Olympus

Olympus U-HGLGPS User manual

Olympus SZ2-STU1 User manual

Olympus

Olympus SZ2-STU1 User manual

Olympus OMCL-AC160TS-W2 User manual

Olympus

Olympus OMCL-AC160TS-W2 User manual

Olympus 72DL PLUS User manual

Olympus

Olympus 72DL PLUS User manual

Olympus U-LH50HG User manual

Olympus

Olympus U-LH50HG User manual

Olympus DP2-SAL User manual

Olympus

Olympus DP2-SAL User manual

Olympus UHI-4 User manual

Olympus

Olympus UHI-4 User manual

Olympus SZX-DO User manual

Olympus

Olympus SZX-DO User manual

Olympus OLYMPUS OSF-3 User manual

Olympus

Olympus OLYMPUS OSF-3 User manual

Olympus AL120-6 Series User manual

Olympus

Olympus AL120-6 Series User manual

Olympus U-RFLT50 User manual

Olympus

Olympus U-RFLT50 User manual
Popular Laboratory Equipment manuals by other brands

Boekel Bambino 230301 operating instructions

Boekel

Boekel Bambino 230301 operating instructions

Microscan MINI Hawk Series quick start guide

Microscan

Microscan MINI Hawk Series quick start guide

THORLABS OTKB manual

THORLABS

THORLABS OTKB manual

Thermo Scientific AquaSensors AquaChlor user guide

Thermo Scientific

Thermo Scientific AquaSensors AquaChlor user guide

Nickel-Electro Clifton Range SM-1 manual

Nickel-Electro

Nickel-Electro Clifton Range SM-1 manual

Thermo Scientific Barnstead EASYpure RODI 1332 Series Operation manual and parts list

Thermo Scientific

Thermo Scientific Barnstead EASYpure RODI 1332 Series Operation manual and parts list

Aven Cyclops user guide

Aven

Aven Cyclops user guide

Thermo Scientific Cryofuge 8 instruction manual

Thermo Scientific

Thermo Scientific Cryofuge 8 instruction manual

Knauer Azura P 6.1L user manual

Knauer

Knauer Azura P 6.1L user manual

Socket DuraScan D745 Programming guide

Socket

Socket DuraScan D745 Programming guide

CORNING 6928 instruction manual

CORNING

CORNING 6928 instruction manual

Hanil Component R12 Operation manual

Hanil

Hanil Component R12 Operation manual

Fluidigm Polaris user guide

Fluidigm

Fluidigm Polaris user guide

ChemoMetec NucleoCounter NC-250 quick guide

ChemoMetec

ChemoMetec NucleoCounter NC-250 quick guide

Neuation iTHERM D150-1 Product user manual

Neuation

Neuation iTHERM D150-1 Product user manual

Labconco Precise CA 5220100 user manual

Labconco

Labconco Precise CA 5220100 user manual

Bibby Sterilin Stuart SMP40 Instructions for use

Bibby Sterilin

Bibby Sterilin Stuart SMP40 Instructions for use

Malvern Nano Series Basic guide

Malvern

Malvern Nano Series Basic guide

manuals.online logo
manuals.online logoBrands
  • About & Mission
  • Contact us
  • Privacy Policy
  • Terms and Conditions

Copyright 2025 Manuals.Online. All Rights Reserved.