Detectable
object
Be sure to follow the safety precautions below for added
safety.
(1) Do not use the sensor under the environment with
explo-sive or ignition gas.
(2) Never disassemble, repair nor tamper with the product.
(3) Keep the supply voltage within the specified range.
(4) Do not use the sensor over the rated values.
(5)
Do not short-circuit the load. The sensor type has a
load short-circuit protective function, but avoid
keeping it short-circuited for a long time.
(6) Do not use the sensor in the water.
(7) Be careful not to confuse the terminal polarities.
(1) Do not use the product under the following conditions.
In the place exposed to the direct sunlight.
In the place where humidity is high and condensa-
tion may occur.
In the place where corrosive gas exists.
In the place where vibration or shock is directly
transmitted to the product.
(2) Connections
Before turning on the power, make sure the supply
voltage is below the maximum voltage level.
Routing the wires of the photoelectric switch with
high potential power lines may cause malfunction or
damage to it because of the inductive effects.
Be sure to route the switch wires separated from the
power lines or though an exclusive conduit.
For extending wires, use a cable of 0.3mm2min. and
100m max. in length.
(3)Cleaning
Do not use thinner such as alcohol and benzine because it
may damage a product.
(4)Power supply
When using a commercially available switching regula-
tor, be sure to ground the FG (Frame Ground) and G
(Ground) terminals.If this is not done, failure in opera-
tion may happen by switching noise of the regulator.
(5)Function of this sensor will be stable 100ms after turning
on the power supply.
(6)Water-proof
Do not use in the water, rain or outdoor.
(7)Control cover
Tighten the cover screws at the torque of 0.2 to 0.3
N・m to keep water-proof.
(1)Position the photoelectric switch so that direct sunlight,
flourescent light, incandescent light and any other
strong rays do not come within the response angle.
(2)Sensors that are installed facing each other may cause
mutual interference. Set them up with their optical axes
not facing each other.
(3)Use 3M screws to secure the unit.
(4)Tighten the casing screws to 0.54 N-m or lower.
(5)Before connecting and disconnecting the connectors,
be sure to turn off the power.
(6)In connecting and disconnecting the connectors, be
sure to hold the connector covers.
(9)
If there is something mirror-surfaced below the
photo-electric switch, the switch performance may be
adversely affected. Tilt the switch or keep it away
enough from the mirror surface.
(8)
When detecting a glossy object, however, place the
photoelectric switch tilted 5–10°to the glossy object. See
the figure bellow or select Zone one-point teaching.
In placing the photoelectric switch, pay attention to the
moving direction of a detectable object. See the figure
below.
3 . Set the MODE selector to the RUN position.
4 . Using the RUN MODE selector, select L-ON or D-ON.
L-ON: Output is given by the background.
D-ON: Output is interrupted by the background.
2. Direct the sensor toward the background and hold
down the SET button. All the THRESHOLD indicators
(red) light up. Then release the SET button.
・When the teaching is acceptable, all the DISTANCE
indicators (green) light up.
・If the teaching is rejectable, all the THRESHOLD
in-dicators (red) start flashing. Re-arrange the sensor.
Repeat steps 2 to 3 again.
1. Set the NORMAL/ZONE selector to the ZONE posi-
tion.
Set the Mode Selector to TEACH.
Set the selector to RUN to complete the distance setting.
The following settings can also be made.
To set the sensor's distance differential to the maximum
distance, see "Maximum distance setting".
To set it to the minimum distance, see "Minimum distance
setting".
Note 1: Background distance.
In case of Normal one-point teaching and Zone
one-point teaching, the distance between the
sensor and background is more than Xmm.
Note 2: In case the setting distance is more than
150mm, the maximum detecting distance
de-pend on color of the object. Before using,
make sure if it works. (Type E3G-L3□)
Be also careful when a detectable object has quite
different colors or is made of different materials.
(7)
Be sure to place the photoelectric switch so that
its
sensing face be parallel with (not tilted against) a
detect-able object.
■Installation
●M8 connectors
●Setup direction
■RAITINGS/PERFORMANCE
Type
Item
Detectable range
Presettable distance
Connection
Light source
Supply voltage
Current consumption
Response time
Projection spot dimeter
Hysteresis
Reflectivity characteristics
(black/white error)
Control output
Control output switching
Protective circuit
Indicator
Ambient temperature
Ambient humidity
Protective design
Material
Weight
E3G-L11
Cord type Red LED (670nm)
10 to 30 V DC (including 10% ripple (P–P))
55mA max
5 to 50mm (50×50mm white paper, 50mm distance)
30 to 50mm (50×50mm white paper, black paper)
Run/reset: Shorter than 1.5ms each
1mm max (at detection distance of 38mm)
4% max of setting distance
±4% of setting distance
Load supply voltage 30V DC max
Load current 100mA max
L-ON/D-ON switching
Reverse-phase connection protection, Load short-circuit protection, Mutual interference prevention
Operation indicator (orange), Incident light level indicator (green, 8 levels),
Thereshold indicator (red, NORMAL mode in 13 levels and ZONE mode 5 levels)
Operation:−25 to +55℃, storage:−30 to+70℃(no freezing and condensation)
Operation: 35 to 85%RH, storage: 35 to 95%RH (no condensation)
IEC60529 IP67 (with protective cover)
Casing: polybuthylene, Lens: acrylic resin (PMMA), Fixture: stainless steel (SUS304)
About 64g (2m cord included)
About 21g
About 64g (2m cord included)
About 21g
E3G-L12 E3G-L15
Connector type
E3G-L16 E3G-L31
Cord type
Infrared LED (860nm)
65mA max
5 to 200mm (50×50mm white paper, 200mm distance)
5 to 150mm (50×50mm black paper, 150mm distance)
■NAMES AND FUNCTIONS OF PARTS
50 to 200mm (50×50mm white paper)
50 to 150mm (50×50mm black paper)
Run/reset: Shorter than 2.5ms each
15mm max (at detection distance of 150mm)
10% (typical) of setting distance
±10% of setting distance
(at detection distance of 50 to 150mm)
E3G-L32 E3G-L35
Connector type
E3G-L36
■OUTPUT STAGE CIRCUIT DIAGRAM
■OPERATING PROCEDURE
■DISTANCE SETTING APPLICATION
NPN type: E3G-L□1, L□5
PNP type: E3G-L□2, L□6
1. Make sure that the sensor is installed and the wires
are connected as specified. Turn on the power.
2. Set (teach) the distance level. See "Distance setting".
3. Finely adjust the threshold as required. See "Adjust-
ment procedure".
4. Make sure that the MODE selector is at the RUN
position.
select the most suitable distance setting.
Application
Teaching
Detecting
range and
setting
distance
Normal two-point
teaching
Teaching point:
under position
upper position
Setting distance:
center of to
Normal one-point
teaching
Teaching point:
background
Setting distance:
just front of
Zone one-point
teaching
Teaching point:
background
Setting distance:
(A)and (B)
It is available to adjust operation level after teaching. (refer to adjustment procedure)
■DISTANCE SETTING (TEACHING)
●Zone one-point teaching
●Normal one-point teaching
1 .
Set the NORMAL/ZONE selector to the NORMAL
position.
2. Direct the sensor toward the background and hold down
the SET button.
・All the THRESHOLD indicators (red) light up.
・If the teaching is rejectable, all the THRESH
indicators (red) start flashing.
3 . zSet the MODE selector to the RUN position.
4 . Using the RUN MODE selector, select L-ON or D-ON.
L-ON: Output is given between the background and
the sensor.
D-ON: Output is interrupted between the background
and the sensor.
●Minimum distance setting
1.
Set the NORMAL/ZONE selector to the NORMAL
position.
2. Set the UP/DOWN selector to the DOWN (▼) position.
3. Hold down the SET button for 3 seconds or longer.
・All the THRESHOLD indigators (red) light up.
To set the sensor's distance differential to the minimum
distance, take the following steps.
To set the sensor's distance to the maximum distance,
take the following steps.
4. Wait until all the DISTANCE indicators light up. Set
the MODE selector to the RUN position.
5. Using the RUN MODE selector, select L-ON or D-ON.
(Refer back to the normal one-point teaching.)
4. Wait until all the DISTANCE indicators (green) light
up. Set the MODE selector to the RUN position.
5. Using the RUN MODE selector, select L-ON or D-ON.
(Refer back to the normal one-point teaching.)
●Normal two-point teaching
1.Set the NORMAL/ZONE selector to the NORMAL
position.
2.Direct the sensor toward a work and hold down the
SET button.
・All the THRESHOLD indicators (red) light up.
3. Move the work. Direct the sensor toward the back-
ground and hold down the SET button.
・When the teaching is acceptable, all the DISTANCE
indicators (green) light up.
・If the teaching is rejectable, all the THRESHOLD
in-dicators (red) start flashing.
4. When the teaching is accepted, set the MODE selector
to the RUN position. If it is rejected, change the work
position and distance. Repeat the above steps 3 and 4.
5. Using the RUN MODE selector, select L-ON or D-ON.
After teaching, the threshold can be finely adjusted.
If detection is unstable by difference of color, adjust
threshould to make detection stable.
1. Set the MODE selector to the ADJ position.
2. In the ADJ mode, specify the adjustment direction
with the UP/DOWN selector. Each time the SET but-
ton is pressed, the threshold moves up or down. Up to
13 levels can be preset (at Normal one-point, two-point
teaching and Zone one-point teaching).
THRESHOLD indicator light-up in adjusting the sensitivity
Up to 13 levels are adjustable for the normal teaching.
(Up to 5 levels are adjustable for the zone teaching.)
3 . Finally set the MODE selector to the RUN position.
●THRESHOLD and DISTANCE indicator light-up
・Light-up in the case of distance setting in normal teaching.
The DISTANCE indicators tell the distances that are
re-lative to the thresholds.
Using the UP/DOWN selector and the SET button, the
threshold can be shifted. The distance differential is fixed,
however.
・Light-up in the case of distance setting in zone teaching.
The DISTANCE indicators tell the current distance range
that is relative to the threshold.
Using the UP/DOWN selector and the SET button, the
output ON range can be shifted. The distance differential
is fixed, however.
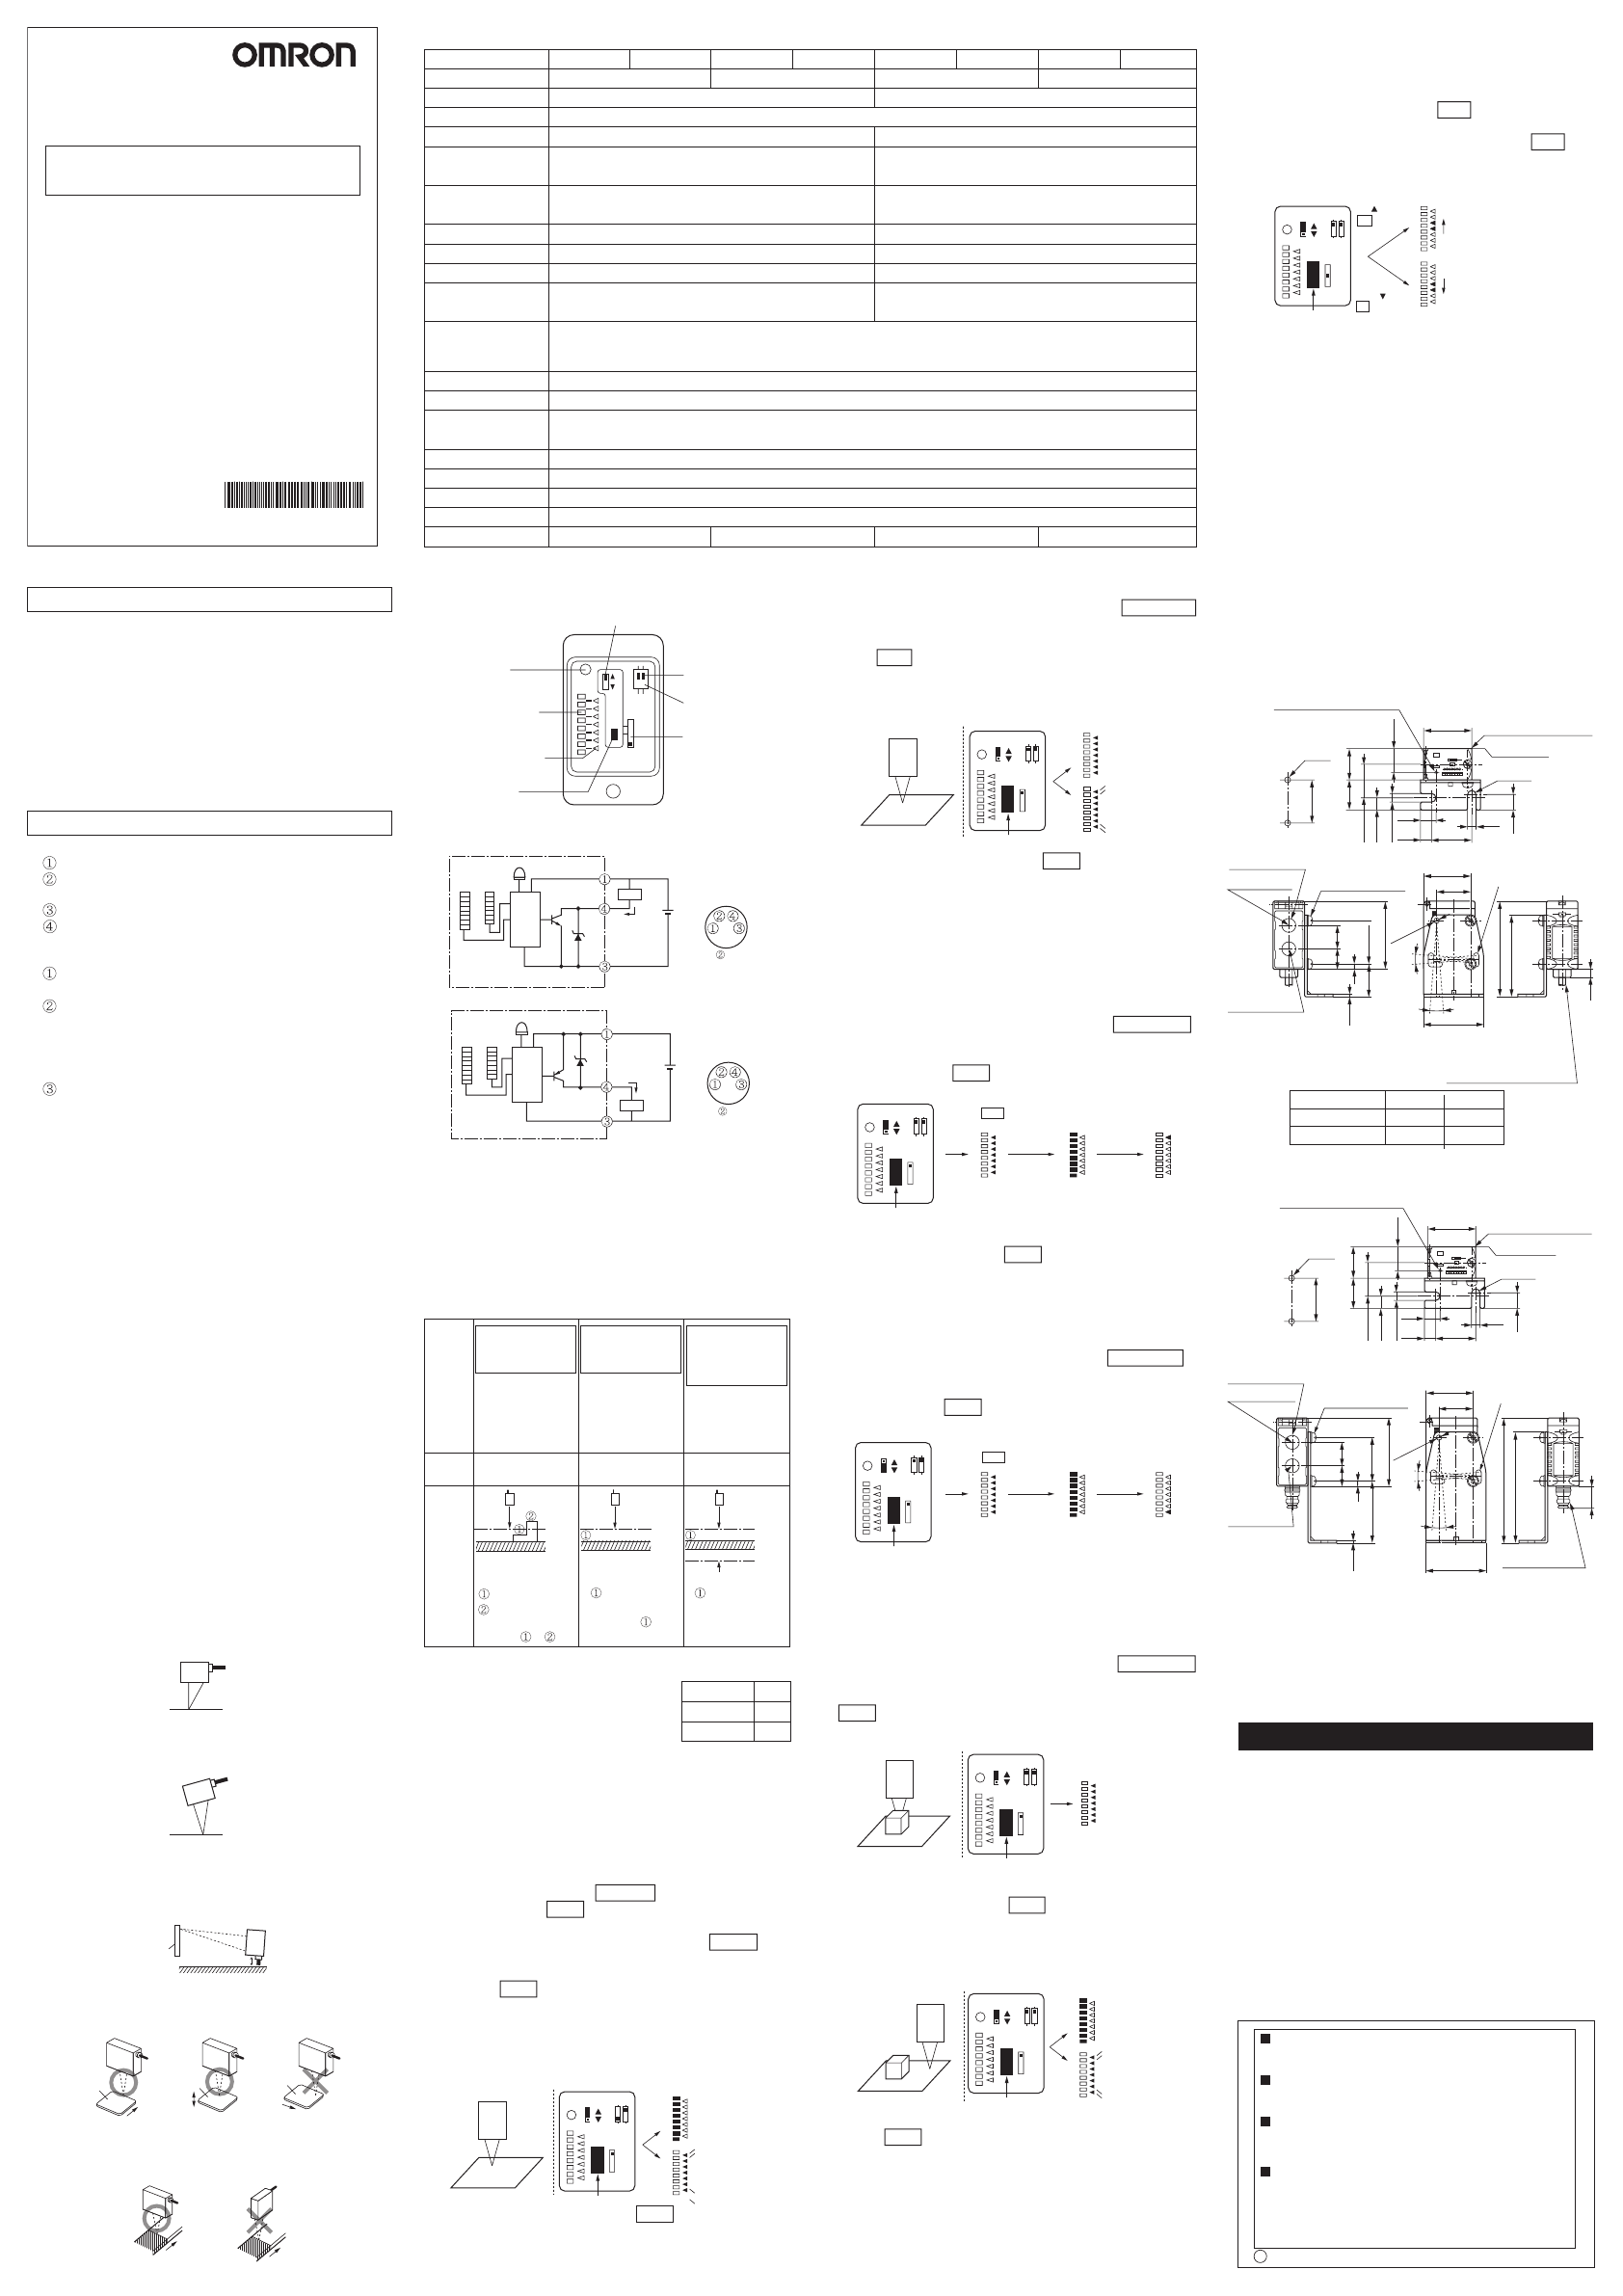
■EXTERNAL DIMENSIONS (with Fixture)
E3G-L□1, L□2 (Cord type)
NOTE1 MOUNTING BRACKET CAN BE
INSTALLED ON B SIDE ALSO
NOTE2 Type
E3G-L1□
E3G-L3□
A
14.5
16
B
11.88
10.35
E3G-L□5, L□6 (Connector type)
When distinction be-
tween objects is de-
sired
Applications
・Minute difference
detection
・Detection of height
difference
Applications
・Detection of objects
above a conveyor.
・Detection of objects a
front of background.
Applications
・
various glossy objects
Making setting with-
out work. (Back-
ground only)
Detecting a glossy
work and normal
work front of back-
ground.
Type
E3G-L1□
E3G-L3□
X
32
55
●Maximum distance setting
Note: EEPROM write error correction.
If during teaching the power is cut off or static electricity
causes noises, there may be a write error (the RUN
indica-tor stars flashing). ln such case.do the teaching
again.
1. Set the NORMAL/ZONE selector to the NORMAL
position.
2. Set the UP/DOWN selector to the UP (▲)position.
3. Hold down the SET button for 3 seconds or longer.
・All the THRESHOLD indigators (red) light up.
©OMRON Corporation 1998 All Rights Reserved.
PRECAUTIONS FOR SAFE USE
PRECAUTIONS FOR CORRECT USE
■ADJUSTMENT PROCEDURE
OMRON Corporation
Suitability for Use
EUROPE
OMRON EUROPE B.V. Sensor Business Unit
Carl-Benz Str.4, D-71154 Nufringen Germany
Phone:49-7032-811-0 Fax: 49-7032-811-199
NORTH AMERICA
OMRON ELECTRONICS LLC
One Commerce Drive Schaumburg,IL 60173-5302 U.S.A.
Phone:1-847-843-7900 Fax : 1-847-843-7787
ASIA-PACIFIC
OMRON ASIA PACIFIC PTE. LTD.
No. 438A Alexandra Road #05-05-08(Lobby 2),
Alexandra Technopark, Singapore 119967
Phone : 65-6835-3011 Fax :65-6835-2711
o
THE PRODUCTS CONTAINED IN THIS SHEET ARE NOT SAFETY RATED.
THEY ARE NOT DESIGNED OR RATED FOR ENSURING SAFETY OF
PERSONS, AND SHOULD NOT BE RELIED UPON AS A SAFETY
COMPONENT OR PROTECTIVE DEVICE FOR SUCH PURPOSES.
Please refer to separate catalogs for OMRON's safety rated products.
OMRON shall not be responsible for conformity with any standards, codes, or
regulations that apply to the combination of the products in the customer's
application or use of the product.
Take all necessary steps to determine the suitability of the product for the
systems, machines, and equipment with which it will be used.
Know and observe all prohibitions of use applicable to this product.
NEVER USE THE PRODUCTS FOR AN APPLICATION INVOLVING
SERIOUS RISK TO LIFE OR PROPERTY WITHOUT ENSURING THAT THE
SYSTEM AS A WHOLE HAS BEEN DESIGNED TO ADDRESS THE RISKS,
AND THAT THE OMRON PRODUCT IS PROPERLY RATED AND
INSTALLED FOR THE INTENDED USE WITHIN THE OVERALL
EQUIPMENT OR SYSTEM.
See also Product catalog for Warranty and Limitation of Liability.
CHINA
OMRON(CHINA) CO., LTD.
Room 2211, Bank of China Tower,
200 Yin Cheng Zhong Road,
PuDong New Area, Shanghai, 200120, China
Phone : 86-21-5037-2222 Fax :86-21-5037-2200
OCT, 2009
INSTRUCTION SHEET
Thank you for selecting OMRON product. This sheet pri-
marily describes precautions required in installing and
operating the product.
Before operating the product, read the sheet thoroughly to
acquire sufficient knowledge of the product. For your con-
venience, keep the sheet at your disposal.
Model
E3G-L1□,L3□
17.5
30
4.4
24.4
9.1
5.9
8.3
25.4
19.8
6.9
4.4
18.4
14.4
27
19
35
10
10
1.5
19.1
325.4
40
NOTE2
NOTE2
56.1
48
4.6
2-3.2dia
2-3.2dia
OPERATION INDICATOR
OPERATION INDICATOR
2-R2.2
2-M3 THROUGH HOLES
2-M3 THROUGH HOLES
2-M4 B(NOTE 1)
B(NOTE 1)
A
B
6-R1.6
2-M3×12
SCREW.+−PAN
2-M3×12
SCREW.+−PAN
MOUNTING SCREW HOLES
SOURCE LENS
SOURCE LENS
RECEIVE LENS
RECEIVE LENS
2-LENS(8dia)
MOUNTING SCREW HOLES
2-LENS(8dia)
VINYL INSULATED
ROUND CORD 4dia
(18/0.12dia)3CORES
STANDARD LENGTH 2m
17.5
30
4.4
24.4
9.1
5.9
8.3
25.4
19.8
6.9
4.4
18.4
14.4
27
19
35
10
10
1.5
36.1 325.4
40
73.1
65
13.7
2-R2.2
2-M4
A
B
6-R1.6
M8 CONNECTOR
Sensor
Work
Glossy object
Ssnsor
Detectable object millor surface
Moving
direction Moving
direction Moving
direction
Moving
direction Moving
direction
Detectable
object
CORRECT
CORRECT
CORRECT INCORRECT
INCORRECT
SET
UP/DOWN selector :
Used to select the shifting-up/down of thresholds
Operation indicator (orange) :
Lighis up when
the output is given.
RUN MODE selector :
Used to select L-ON or
D-ON.
MODE selector :
Used to select a mode.
NORMAL/ZONE selector :
Used to select a detection
mode.
DISTANCE is given indicator (green) :
Indicates a relative
distance with respect to
the threshold.
THRESHOLD indicator (red) :
Indicates a threshold revel.
SET button :
Used for teaching and
threshold abjustment.
Load
Main
circuit
Operation indicator
(Orange)
Operation indicator
(Orange)
Distance
level
indicator
8 levels
(Green)
Distance
level
indicator
8 levels
(Green)
Threshold
level
indicator
13 levels
(Red)
Threshold
level
indicator
13 levels
(Red)
NPN output
transistor
PNP output
transistor
Black
Black
Blue
Blue
Contorol
output
Contorol
output
Loadcuppent
100mA max
Loadcuppent
100mA max
Brown 10 to 30 VDC
Brown 10 to 30 VDC
0V
ZD note. no use
(Connector pin arrangement)
sensor side
0V
ZD
note. no use
(Connector pin arrangement)
sensor side
Main
circuit
Load
Detecting range
Work
Threshold
Background
Setting distance
Detecting range
Threshold
Background
Setting distance
Detecting range
Detecting range
Threshold
Background
Setting distance (A)
Setting distance (B)
Sensor
Background
Accepted
Rejected
THRESHOLD indicators
(red) start flashing.
THRESHOLD indicators
(red) light up.
DISTANCE indicators
(green) light up.
THRESHOLD indigators
(red) light up.
SET button held down
3 sec or longer MODE selector
set at RUN
DISTANCE indicators
(green) light up.
THRESHOLD indigators
(red) light up.
SET button held down
3 sec or longer MODE selector
set at RUN
Sensor
Background
THRESHOLD indicators
(red) light up.
Work
Hold down.
Sensor
Background
Accepted
Rejected
DISTANCE indicators
(green) light up.
THRESHOLD indicators
(red) start flashing.
Background
Accepted
Rejected
DISTANCE indicators
(green) light up.
THRESHOLD indicators
(red) start flashing.
Sensor
UP ( ) selected and
SET button pressed
DOWN ( ) selected and
SET button pressed
THRESHOLD moving upward
THRESHOLD moving downward
OUT NORM
ZONE
TEACH
L
D
ADJ
RUN
SET
FAR
NEAR
Hold down.
OUT NORM
ZONE
TEACH
L
D
ADJ
RUN
SET
FAR
NEAR
Hold down.
OUT NORM
ZONE
TEACH
L
D
ADJ
RUN
SET
FAR
NEAR
Hold down.
OUT NORM
ZONE
TEACH
L
D
ADJ
RUN
SET
FAR
NEAR
Hold down.
OUT NORM
ZONE
TEACH
L
D
ADJ
RUN
SET
FAR
NEAR
Hold down.
OUT NORM
ZONE
TEACH
L
D
ADJ
RUN
SET
FAR
NEAR
Hold down.
OUT NORM
ZONE
TEACH
L
D
ADJ
RUN
SET
FAR
NEAR
Detectable
object
Manufacturer:
Omron Corporation,
Shiokoji Horikawa, Shimogyo-ku,
Kyoto 600-8530 JAPAN
Ayabe Factory
3-2 Narutani, Nakayama-cho,
Ayabe-shi, Kyoto 623-0105 JAPAN
TRACEABILITY INFORMATION:
Representative in EU:
Omron Europe B.V.
Wegalaan 67-69
2132 JD Hoofddorp,
The Netherlands
The following notice applies only to products that carry the CE mark:
Notice:
This is a class A product. In residential areas it may cause radio
interference, in which case the user may be required to take adequate
measures to reduce interference.
*5977239-7C*

![Omron CP1E-N[]S1 User manual](/data/manuals/1j/0/1j0uf/sources/omron-cp1e-n-s1-power-supply-manual.jpg "Omron CP1E-N[]S1 User manual")


