manuals.online logo
Brands
  1. Home
  2. •
  3. Brands
  4. •
  5. Phonocar
  6. •
  7. Automobile Accessories
  8. •
  9. Phonocar VM390 User manual

Phonocar VM390 User manual

IT
EN
FR
DE
ES
BLIND SPOT DETECTION SYSTEM
DISPOSITIVO DI RILEVAZIONE ANGOLO BUIO CON RADAR
A MICROONDE 79GHz
BLIND SPOT DETECTION SYSTEM
79GHz MICROWAVE RADAR BLIND SPOT DETECTION
SYSTEM
BLIND SPOT DETECTION SYSTEM
DISPOSITIF DE DÉTECTION DE LA ZONE D’OMBRE AVEC
RADAR À MICROONDE 79 GHz
BLIND SPOT DETECTION SYSTEM
79GHZ-MIKROWELLENRADAR ZUR ERKENNUNG DES
TOTEN WINKELS
BLIND SPOT DETECTION SYSTEM
DETECTOR ÁNGULO MUERTO CON RADAR DE
MICROONDAS 79GHz
VM390
MANUALE ISTRUZIONI / INSTRUCTIONS MANUAL / NOTICE D’UTILISATION /
BEDIENUNGSANLEITUNG / MANUAL DE INSTRUCCIONES
phonocar.it
2
IT / EN / FR / DE / ES
VM390
IT AVVERTENZE
LEGGERE ATTENTAMENTE IL PRESENTE MANUALE ISTRUZIONI
PRIMA DI PROCEDERE ALL’INSTALLAZIONE.
Il produttore declina ogni responsabilità per danni derivanti da
un’installazione o da un utilizzo improprio del prodotto.
L’installazione deve essere eseguita da personale qualificato.
FR RECOMMANDATIONS
LIRE ATTENTIVEMENT LA NOTICE D’UTILISATION SUIVANTE
AVANT L’INSTALLATION.
Le producteur n’est en aucun cas responsable des pannes causées par
une mauvaise installation ou utilisation non conforme du produit.
L’installation doit être faite par un professionnel.
DE WARNUNGEN
LESENSIEDIESEANLEITUNGVORDERINSTALLATIONSORGFÄLTIGDURCH.
Der Hersteller lehnt jede Verantwortung für Schäden ab, die durch
unsachgemäße Installation oder Verwendung dieses Produkts
entstehen. Die Installation muss von qualifiziertem Personal
durchgeführt werden.
ES ADVERTENCIAS
LEA DETENIDAMENTE EL PRESENTE MANUAL DE
INSTRUCCIONES ANTES DE PROCEDER A LA INSTALACIÓN.
El fabricante declina toda responsabilidad por daños resultantes de una
instalación o de un uso inadecuado del producto.
La instalación debe ser realizada por personal cualificado.
EN WARNINGS
READ THESE INSTRUCTIONS CAREFULLY BEFORE INSTALLATION.
The manufacturer declines any responsibility for damage resulting from
improper installation or use of this product.
The installation must be carried out by qualified personnel.
IT Visione dello specchietto
EN Mirror vision
FR Vision miroir
DE Spiegelsicht
ES Visión del espejo
IT Radar a microonde
EN Microwave radar
FR Radar à microonde
DE Mikrowellenradar
ES Radar de microondas
*2*3
*1
*2
*2
*1
*3MICROWAVE RADAR
Blind spot zone
Blind spot zone
Mirror vision
Mirror vision
IT Zona buia
EN Blind spot zone
FR Zone d’ombre
DE Toter Winkel
ES Área oscura
*1
3
VM390
IT / EN / FR / DE / ES
IT DISPOSITIVO DI RILEVAZIONE ANGOLO BUIO
CON RADAR A MICROONDE 79GHz
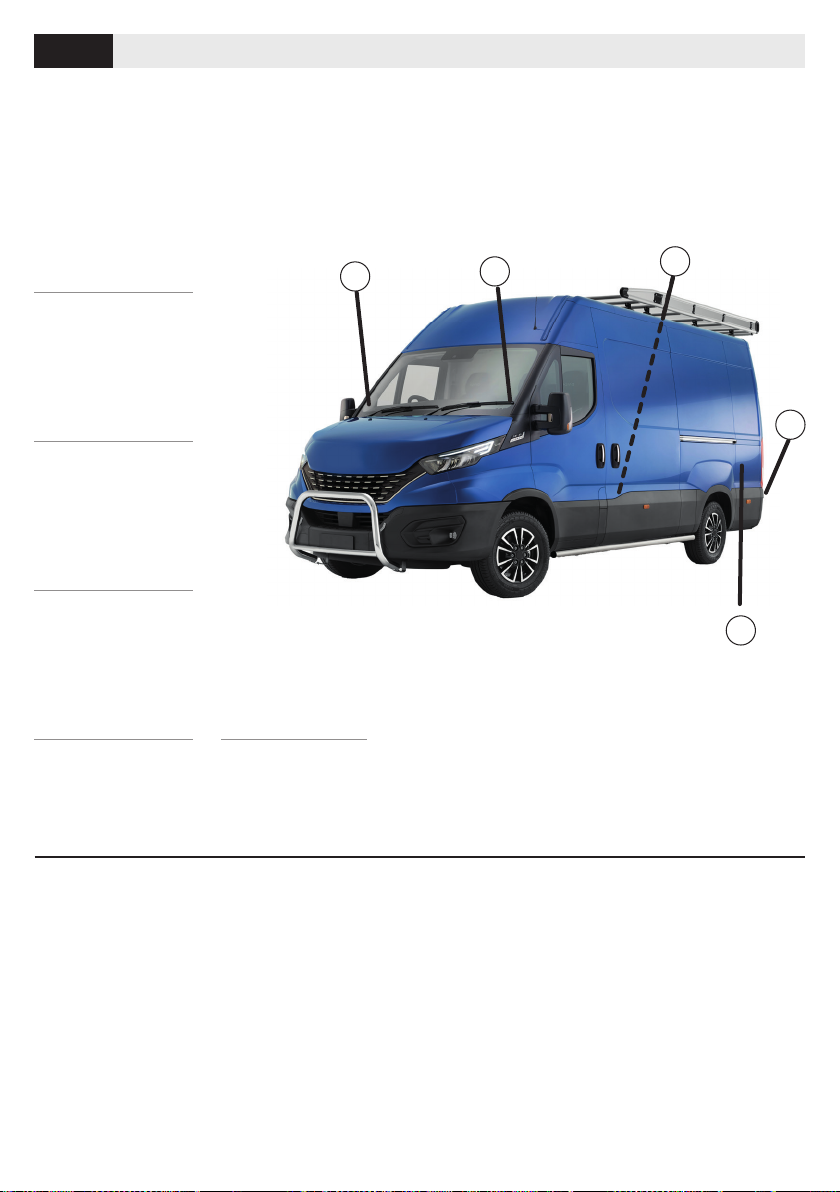
Questo dispositivo avvisa il conducente dell’avvicinarsi di un
veicolo nella zona buia, è particolarmente efficace quando
un altro veicolo è in sorpasso o il conducente deve cambiare
corsia.
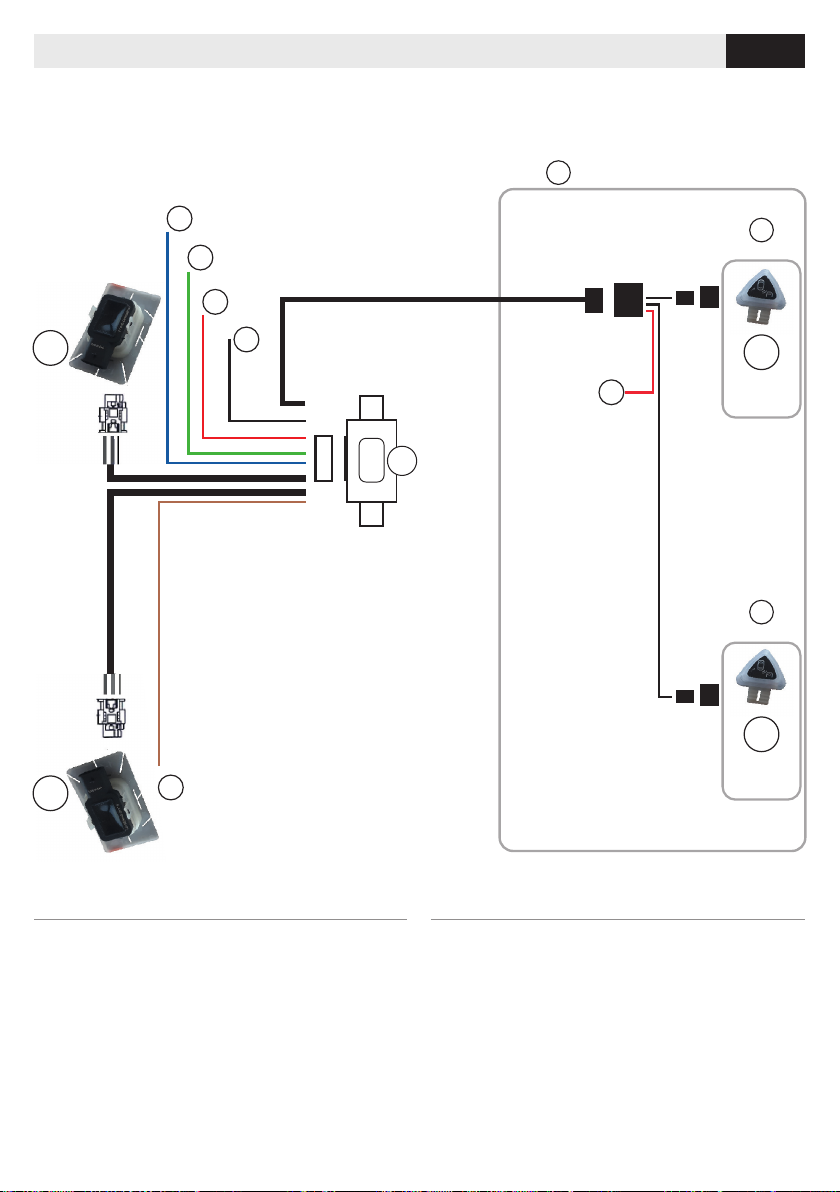
Il sistema rileva la presenza di altri veicoli utilizzando un radar
a microonde 79GHz che trasmette l’informazione ai display da
installare nell’abitacolo programmati per emettere due tipi di
avvisi:
avviso visivo quando altri veicoli sono nella zona buia,
avviso visivo ed acustico quando viene inserito l’indicatore
di direzione corrispondente.
PER FURGONI, VAN, MINIBUS di LUNGHEZZA
MINIMA 4,8 m e MASSIMA 6,5 m.
AVVERTENZE Questo sistema non si sostituisce al giudizio del conducente
che deve sempre attenersi alle normative vigenti ed al codice della strada.
Il sistema non segnala la presenza di un mezzo né se la velocità del veicolo in
avvicinamento è superiore ai 40 km/h rispetto alla velocità del veicolo su cui
è installato né se l’ostacolo è fermo.
Non è adatto a paraurti metallici.
Si raccomanda di non applicare nessun adesivo o decorazione sul paraurti
posteriore come ad esempio gomme protettive.
Il sistema si disattiva temporaneamente quando viene inserita la
retromarcia.
EN 79GHz MICROWAVE RADAR BLIND SPOT
DETECTION SYSTEM
This device warns the driver of an approaching vehicle in the
dark, and is particularly effective when another vehicle is
overtaking or the driver needs to change lanes.
The system detects the presence of other vehicles using a
79GHz microwave radar that transmits the information to
displays to be installed in the passenger compartment that
are programmed to emit two types of warnings:
visual warning when other vehicles are in the blind spot area,
visual and acoustic warning when the corresponding
direction indicator is ON.
FOR VANS, CARGO VANS and MINIBUSES WITH A
MINIMUM LENGTH OF 4.8 m AND A MAXIMUM LENGTH
OF 6.5 m.
WARNINGThis system is not a substitute for the personal judgement of the
driver who must always follow the regulations in force.
The system does not indicate the presence of a vehicle, either if the speed of
the approaching vehicle is greater than 40 km/h compared to the speed of
the vehicle on which it is installed, or if the obstacle is stationary.
Not suitable for metal bumpers.
Not recommended to apply any stickers or decorations to the rear bumper
such as protective rubbers.
The system is temporarily deactivated when reverse gear is engaged.
FR DISPOSITIF DE DÉTECTION DE LA ZONE
D’OMBRE AVEC RADAR À MICROONDE 79 GHZ
Ce dispositif avertit le chauffeur dès qu’un véhicule approche
dans la zone d’ombre; il est très utile lorsqu’il y a un véhicule
en dépassement ou bien lorsque le chauffeur doit changer
de voie. Le système détecte la présence des autres véhicules
grâce au radar à microonde de 79GHz. Celui-ci transmet
l’iinformation aux afficheurs installés dans l’habitacle et
programmés pour émettre deux types d’avertissements:
avertissement visuel lorsque d’autres véhicules sont dans
la zone d’ombre,
avertissement visuel et sonore lorsque le clignotant
correspondant est inséré.
POUR LES FOURGONS, VAN, MINIBUS DE LONGUEUR
MINIMUM 4,8 m ET MAXIMUM 6,5 m.
RECOMMANDATIONS Ce système ne remplace pas le jugement du
chauffeur ; celui-ci doit toujours faire attention aux normes en vigueur et
respecter le code de la route.
Le système ne signale pas la présence d’un autre véhicule; il ne signale pas
non plus si la vitesse du véhicule qui approche dépasse de 40 km/h celle du
véhicule sur lequel il est installé ni si l’obstacle est fixe.
Il n’est pas compatible avec les pares- chocs en métal.
Il est déconseillé de mettre des autocollants ou décoration sur le pare-chocs
arrière (par exemple caoutchouc de protection).
Le système se désactive momentanément à l’insertion de la marche arrière.
DE 79GHZMIKROWELLENRADAR ZUR
ERKENNUNG DES TOTEN WINKELS
Dieses Gerät warnt den Fahrer vor einem sich nähernden
Fahrzeug im toten Winkel und ist besonders hilfreich, wenn
ein anderes Fahrzeug überholt oder der Fahrer die Fahrspur
wechseln muss. Das System erkennt die Nähe anderer
Fahrzeuge mit Hilfe eines 79-GHz-Mikrowellenradars, das
die Informationen an Displays im Fahrzeug überträgt, die
so programmiert sind, dass zwei Arten von Warnungen
ausgegeben werden:
optischeWarnung,wenn andere Fahrzeuge imDunkelnfahren,
optische und akustische Warnung, wenn der
entsprechende Fahrtrichtungsanzeiger eingeschaltet ist.
FÜR LIEFERWAGEN, KLEINTRANSPORTER UND
KLEINBUSSE MIT EINER MINDESTLÄNGE VON 4,8 M UND
EINER HÖCHSTLÄNGE VON 6,5 M.
WARNUNGEN Dieses Gerät ersetzt nicht die Beurteilung des Fahrers der stets
die geltendenVorschriften und die Straßenverkehrsordnung beachten muss.
Das Gerät funktioniert nicht, wenn die Geschwindigkeit des sich nähernden
Fahrzeugs mehr als 40 km/h über der Geschwindigkeit des Fahrzeugs liegt,
an dem das Gerät angebracht ist, oder wenn das Hindernis stillsteht.
Er ist nicht für Metallstoßstangen geeignet.
Es wird empfohlen, keine Aufkleber oder Verzierungen an der hinteren
Stoßstange anzubringen, wie z. B. Schutzreifen.
Das System wird vorübergehend deaktiviert, wenn der Rückwärtsgang
eingelegt wird.
ES DETECTOR ÁNGULO MUERTO CON RADAR DE
MICROONDAS 79GHZ
Este dispositivo avisa al conductor de la proximidad de un
vehículo en la zona oscura, es especialmente eficaz cuando
otro vehículo se adelanta o el conductor debe cambiar de
4
IT / EN / FR / DE / ES
VM390
1
7
11
10
2
3
4
5
9
8
(1) INTERFACCIA
(2) SENSORE x2
(3) DISPLAY SINISTRA
(4) DISPLAY DESTRA
(5) CABLAGGIO PRINCIPALE
(6) CABLAGGIO DISPLAY
(7) BIADESIVO FISSAGGIO INTERFACCIA
(8) FASCETTE
(9) MAGNETI PER L’INSTALLAZIONE
(10) PANNO DI PULIZIA E PANNO ASCIUGATURA PER PARAURTI
(11) DIMA PER POSIZIONAMENTO SENSORI (da ricavare dalla
scatola)
(12) ATTREZZO PER POSIZIONAMENTO SENSORI (da ricavare
dalla scatola)
(13) LIBRETTO ISTRUZIONI
(1) INTERFACE
(2) SENSOR x2
(3) LEFT DISPLAY
(4) RIGHT DISPLAY
(5) MAIN HARNESS
(6) DISPLAY CABLE
(7) DOUBLE SIDED ADHESIVE
(8) CABLE TIES
(9) INSTALLATION MAGNETS
(10) CLEANING AND DRYING CLOTH FOR BUMPER
(11) TEMPLATE FOR SENSOR POSITIONING (to be taken from
the box)
(12) SENSOR POSITIONING TOOL (to be taken from the box)
(13) INSTRUCTIONS
IT Contenuto della confezione: EN Supplied:
12
13
6
carril. El sistema detecta la presencia de otros vehículos
utilizando un radar de microondas de 79 GHz que transmite
la información a los display que se instalarán en el habitáculo,
programados para emitir dos tipos de alerta:
aviso visual cuando haya otros vehículos en la zona oscura,
aviso visual y acústico cuando se inserta el indicador de
dirección correspondiente
PARA FURGONETAS, MINIBUSES CON LONGITUD MÍNIMA
de 4,8 m y 6,5 m de MÁXIMA.
¡ADVERTENCIA! Este sistema no sustituye el juicio del conductor, el
cual debe cumplir siempre con la normativa vigente y con el código de
circulación.
El sistema no señalará la presencia de un vehículo ni tampoco si la velocidad
del vehículo que se aproxima es superior a 40 km/h con respecto a la
velocidad del vehículo en el que está instalado el dispositivo, ni tampoco si el
obstáculo está parado.
No está indicado para parachoques metálicos.
Se recomienda no aplicar ningún adhesivo o decoración en el parachoques
trasero como por ejemplo gomas protectoras.
El sistema se desactiva temporalmente cuando se pone la marcha atrás.
5
VM390
IT / EN / FR / DE / ES
(1) INTERFACE
(2) CAPTEUR x2
(3) AFFICHEUR GAUCHE
(4) AFFICHEUR DROIT
(5) CABLAGE PRINCIPAL
(6) CABLAGE AFFICHEUR
(7) AUTOCOLLANT DE FIXATION DE L’INTERFACE
(8) ATTACHES CÂBLES
(9) AIMANTS POUR L'INSTALLATION
(10) CHIFFON DE NETTOYAGE ET DE SÉCHAGE POUR PA-
RE-CHOCS
(11) MODÈLE (GABARIT)POUR LE POSITIONNEMENT DES
CAPTEURS (à récupérer dans la boite)
(12) OUTIL POUR LE POSITIONNEMENT DES CAPTEURS
(à récupérer dans la boite)
(13) NOTICE D'UTILISATION
FR Contenu de la boite:
(1) INTERFACE
(2) SENSOR X2
(3) DISPLAY LINKS
(4) DISPLAY RECHTS
(5) HAUPT-VERKABELUNG
(6) DISPLAY-KABEL
(7) DOPPELSEITIGES KLEBEBAND ZUR INTERFACE-BEFESTIGUNG
(8) KABELBINDER
(9) INSTALLATIONSMAGNETE
(10) REINIGUNGS- UND TROCKENTUCH FÜR STOßFÄNGER
(11) SCHABLONE FÜR DIE SENSORPOSITIONIERUNG
(Verpackung)
(12) WERKZEUG ZUR POSITIONIERUNG DER SENSOREN
(Verpackung)
(13) BEDIENUNGSANLEITUNG
DE Im lieferumfang enthalten:
(1) INTERFACE
(2) SENSOR x2
(3) DISPLAY IZQUIERDO
(4) DISPLAY DERECHO
(5) CABLEADO PRINCIPAL
(6) CABLEADO DISPLAY
(7) TIRAS ADHESIVAS DOBLE CARA FIJACIÓN INTERFACE
(8) BRIDAS
(9) IMANES PARA LA INSTALACIÓN
(10) PAÑO DE LIMPIEZA Y PAÑO PARA EL SECADO DEL
PARACHOQUES
(11) PLANTILLA DE POSICIONAMIENTO DE LOS SENSORES
(debe obtenerse de la caja)
(12) PLANTILLA DE POSICIONAMIENTO SENSORES
(debe obtenerse de la caja)
(13) MANUAL DE INSTRUCCIONES
ES Contenido del envase:
6
IT / EN / FR / DE / ES
VM390
IT INSTALLAZIONE / EN INSTALLATION / FR INSTALLATION / DE INSTALLATION / ES INSTALACIÓN
IT COLLOCAZIONE COMPONENTI / EN COMPONENT PLACEMENT / FR POSITIONNEMENT
COMPOSANTS / DE ANBRINGUNG DER BAUTEILE/ ES COLOCACIÓN DE LOS COMPONENTES
3
2
4
1
2
(1) INTERFACCIA
(2) SENSORE
(3) DISPLAY SINISTRA
(4) DISPLAY DESTRA
IT
(1) INTERFACE
(2) SENSOR
(3) DISPLAY LINKS
(4) DISPLAY RECHTS
DE
(1) INTERFACE
(2) SENSOR
(3) LEFT DISPLAY
(4) RIGHT DISPLAY
EN
(1) INTERFACE
(2) SENSOR
(3) DISPLAY IZQUIERDO
(4) DISPLAY DERECHO
ES
(1) INTERFACE
(2) CAPTEUR
(3) AFFICHEUR GAUCHE
(4) AFFICHEUR DROIT
FR
7
VM390
IT / EN / FR / DE / ES
IT SCHEMA DI COLLEGAMENTO GENERALE / EN GENERAL CONNECTION DIAGRAM / FR SCHÉMA
DE BRANCHEMENT GÉNÉRAL / DE ALLGEMEINER ANSCHLUSSPLAN / ES ESQUEMA GENERAL DE
CONEXIÓN
IT
(A) BLU +12V indicatore di direzione sinistra
(B) VERDE Luce di posizione posteriore
(C) ROSSO +12V retromarcia
(D) MARRONE +12V indicatore di direzione destra
(E) ROSSO +12V batteria
(F) ABITACOLO
(G) MONTANTE
(H) MASSA
(2) SENSORI
(3) DISPLAY SINISTRA
(4) DISPLAY DESTRA
EN
(A) BLUE +12V left-direction indicator
(B) GREEN Tail lights
(C) RED +12V reverse gear
(D) BROWN +12V right-direction indicator
(E) RED +12V battery
(F) PASSENGER COMPARTEMENT
(G) PILLAR
(H) GROUND
(2) SENSORS
(3) LEFT DISPLAY
(4) RIGHT DISPLAY
RIGHT
PASSENGER COMPARTEMENT
8 POLES 4 POLES
4 POLES
E
A
B
C
H
D
LEFT
DISPLAY
RIGHT
DISPLAY
3
4
2
2
LEFT
F
PILLAR
G
PILLAR
G
1
8
IT / EN / FR / DE / ES
VM390
1
DE
(A) BLAU +12V linker Fahrtrichtungsanzeiger
(B) GRÜN Schlußleuchte
(C) ROT +12V Rückwärtsgang
(D) BRAUN +12V rechter Fahrtrichtungsanzeiger
(E) ROT +12V Batterie
ES
(A) AZUL +12V indicador de dirección izquierdo
(B) VERDE Luz de posición trasera
(C) ROJO +12V marcha atrás
(D) MARRÓN +12V indicador de dirección derecho
(E) ROJO +12V batería
(F) HABITACULO
(G) MONTANTE
(H) MASA
(2) SENSORES
(3) DISPLAY IZQUIERDO
(4) DISPLAY DERECHO
FR
(A) BLEU + 12V indicateur de direction gauche
(B) VERT Feux de position arrière
(C) ROUGE +12V marche arrière
(D) MARRON +12V indicateur de direction droit
(E) ROUGE +12V batterie
(F) HABITACLE
(G) MONTANT
(H) MASSE
(2) CAPTEURS
(3) AFFICHEUR GAUCHE
(4) AFFICHEUR DROIT
IT Ricavare la dima (11) e l'attrezzo (12) dalla scatola.
EN Cut the template (11) and the tool (12) out of the box.
FR Découper le modèle (11) et l'outil (12) dans la boite.
DE Schneiden Sie die Schablone (11) und das Werkzeug
(12) aus dem Karton aus.
ES Obtener la plantilla (11) y el plantilla (12) mediante
la caja.
(F) FAHRZEUGINNENRAUM
(G) A-SÄULE
(H) MASSE
(2) SENSOREN
(3) DISPLAY LINKS
(4) DISPLAY RECHTS
IT INSTALLAZIONE SENSORI / EN SENSOR INSTALLATION / FR INSTALLATION DES CAPTEURS /
DE SENSOR-EINBAU / ES INSTALACIÓN SENSORES
11
12
9
VM390
IT / EN / FR / DE / ES
2
IT Staccare lungo la linea per aprire la scatola.
Rimuovere le zone scure .
Stendere l'attrezzo e seguire la linea per piegarlo.
EN Peel off along the line to open the box.
Remove the dark parts .
Stretch the tool and follow the line to fold the tool.
FR Détacher le long de la ligne pour ouvrir la boite.
Enlever les zones sombres .
Aplatir l'outil et suivre la ligne pour le plier.
DE Zum Öffnen der Verpackung entlang der Linie abziehen
.
Entfernen Sie die dunklen Teile
.
Entfalten Sie das Werkzeug und knicken Sie es dann an der
Linie .
ES Cortar a lo largo de la línea para abrir la caja.
Quitar las zonas oscuras .
Extender la plantilla y seguir la línea para doblar la
misma.
10
IT / EN / FR / DE / ES
VM390
3
IT Staccare la dima (11) dal cartoncino, rimuovere la
pellicola e applicare il magnete (9).
EN Peel off the template (11) from the cardboard, remove
the foil and apply the magnet (9).
FR Détacher le modèle (11) du carton, enlever le film de
protection et mettre l'aimant (9)
DE Ziehen Sie die Schablone (11) vom Karton ab, entfernen
Sie die Folie und bringen Sie den Magneten (9) an.
ES Quitar la plantilla (11) de la cartulina, quitar la película y
aplicar el imán (9).
11
11
VM390
IT / EN / FR / DE / ES
4
IT Trovare il punto di installazione dei sensori.
Posizionare l'attrezzo (12) appoggiandolo al paraurti dal lato
interno inclinandolo fino a puntare lo specchietto retrovisore
esterno.
Con un pennarello fare un segno al centro, circa,
dell'ipotenusa.
EN Establish the sensor installation point.
Place the tool against the bumper from the inside and tilt it
until it points at the outside rear-view mirror.
Use a felt-tip pen to make a mark approx, in the centre of
the longer side of the angle.
FR Trouver le point d’installation des capteurs.
Positionner l’outil (12) en l’appuyant contre le pare-chocs du
côté interne et en l’inclinant jusqu’à pointer le rétroviseur
externe.
Avec un marqueur, faire un signe vers le centre du côté plus
long de l’angle droit.
DE Bestimmen Sie den Einbauort des Sensors.
Positionieren Sie das Werkzeug (12) von innen gegen den
Stoßfänger und neigen Sie es, bis es auf den Außenspiegel
zeigt.
Mit einem Filzstift etwa in der Mitte der langen Seite des
Winkels eine Markierung anbringen.
ES Encontrar el punto de instalación de los sensores.
Posicionar la plantilla (12) apoyándola en el parachoques
desde el lado interno inclinandola hasta apuntar el espejo
retrovisor exterior.
Con un rotulador hacer una marca en el centro,
aproximadamente, de la hipotenusa.
12
12
IT / EN / FR / DE / ES
VM390
5
IT Trovare l'altezza di installazione dei sensori.
Posizionare l'attrezzo (12) perpendicolare al terreno con la
scala graduata a lato del paraurti (vedi figura) e segnare con
un pennarello l'altezza adatta al paraurti.
L'altezza raccomandata è compresa fra i 45 e i 65 cm.
EN Establish the installation height of the sensors.
Position the tool (12) perpendicular to the ground with the
graduation scale on the side of the bumper (see figure) and
mark with a felt-tip pen the height suitable for the bumper.
The recommended height is between 45 and 65 cm.
FR Trouver la hauteur d'installation des capteurs.
Placer l'outil (12) perpendiculaire au terrain, l'échelle graduée
doit être au coté du pare-chocs (voir dessin); indiquer avec un
marqueur la hauteur correcte sur le pare-chocs.
La hauteur conseillée est incluse entre 45 et 65 cm.
DE Bestimmen Sie die Einbauhöhe der Sensoren.
Das Werkzeug (12) senkrecht zum Boden mit der Skala auf
der Seite des Stoßfängers positionieren (siehe Abbildung)
und mit einem Filzstift die passende Höhe für den
Stoßfänger markieren.
Die empfohlene Höhe liegt zwischen 45 und 65 cm.
ES Encontrar la altura de instalación de los sensores.
Posicionar la plantilla (12) perpendicular al suelo con la
escala graduada al lado del parachoques (véase la figura)
y marcar con un rotulador la altura adecuada para el
parachoques.
La altura recomendada es entre 45 y 65 cm.
12
h 45/65 cm
PERPENDICOLARE
PERPENDICULAR
PERPENDICULAIRE
SENKRECHT
PERPENDICULAR
13
VM390
IT / EN / FR / DE / ES
6
7
IT Ripetere l'operazione sull'altro lato e, prima di procedere,
verificare che il punto di installazione segnato sia su un'area
piana e perpendicolare al terreno.
Rimuovere il paraurti.
EN Repeat the operation on the other side and, before
proceeding, check that the marked installation point is on a
level area perpendicular to the ground.
Remove the bumper.
FR Répéter l'opération sur l'autre côté et, avant de
continuer, vérifiez que le point d'installation marqué se
trouve sur une surface plane et perpendiculaire au sol.
Enlevez le pare-chocs.
DE Wiederholen Sie den Vorgang auf der anderen Seite und
vergewissern Sie sich vorher, dass der markierte Einbauort
auf einer ebenen Fläche senkrecht zum Boden liegt.
Entfernen Sie den Stoßfänger.
ES Repetir la operación en el otro lado y, antes de continuar,
verificar que el punto de instalación marcado se encuentre
en un área plana y perpendicular al suelo.
Quitar el parachoques del vehículo.
IT Pulire e asciugare le 2 aree di installazione all'interno del
paraurti con i panni (10) in dotazione.
EN Clean and dry the 2 installation surfaces inside the
bumper with the cloths (10) supplied.
FR Nettoyer et sécher les 2 surfaces d'installation à
l'intérieur du pare-chocs avec les chiffons (10) fournis.
DE Reinigen und trocknen Sie die 2 Montageflächen im
Inneren des Stoßstange mit den mitgelieferten Tüchern (10).
ES Limpiar y secar las 2 áreas de instalación dentro del
parachoques con los paños (10) suministrados.
14
IT / EN / FR / DE / ES
VM390
8
9
IT Posizionare il magnete rimasto (9) sul punto segnato
all'esterno del paraurti e la dima (11) - con la freccia rivolta
verso l'alto - in corrispondenza all'interno del paraurti.
Con il pennarello tracciare accuratamente il perimetro della
dima. Ripetere dall'altro lato.
EN Position the remaining magnet (9) on the marked spot
outside the bumper and place the template (11) - with
the arrow pointing upwards - on the inside of the bumper.
Use the felt-tip pen to carefully trace the perimeter of the
template. Repeat on the other side.
FR Positionner l'aimant qui reste (9) sur la surface marquée
à l'extérieur du pare-chocs et placer le modèle (11), la flèche
retournée vers le haut sur l'intérieur du pare-chocs. Utiliser
le marqueur pour délimiter le périmètre du modèle.
Répétez l'opération de l'autre côté.
DE Positionieren Sie den verbleibenden Magneten (9) an
der markierten Stelle auf der Außenseite der Stoßstange
und die Schablone (11) - mit dem Pfeil nach oben - auf der
Innenseite der Stoßstange. Zeichnen Sie die Umrisse der
Schablone sorgfältig mit dem Filzstift nach. Wiederholen Sie
den Vorgang auf der anderen Seite.
ES Colocar el imán restante (9) en el punto marcado en el
exterior del parachoques y la plantilla (11) - con la flecha
que apunta hacia arriba - en correspondencia con el interior
del parachoques. Con el rotulador trazar con precisión el
perímetro de la plantilla. Repetir lo mismo por el otro lado.
IT Rimuovere la pellicola dal sensore (2) e fissarlo in
corrispondenza del tracciato all'interno del paraurti.
Ripetere dall'altro lato.
EN Remove the foil from the sensor (2) and fix it at the
perimeter marked on the inside of the bumper.
Repeat on the other side.
FR Enlever le film du capteur et le fixer en correspondance
du périmètre tracé à l'intérieur du pare-chocs.
Répéter la même procédure de l'autre côté.
DE Entfernen Sie die Folie vom Sensor (2) und befestigen
Sie ihn an der markierten Fläche auf der Innenseite des
Stoßfängers. Wiederholen Sie den Vorgang auf der anderen
Seite.
ES Retirar la película del sensor (2) y fijarlo en
correspondencia del trazado en el interior del parachoques.
Repetir en el otro lado.
15
VM390
IT / EN / FR / DE / ES
10
11
IT Rimontare il paraurti posteriore.
Installare l'interfaccia (1) nella zona posteriore del veicolo e
procedere ai collegamenti come da schema a pagina 7.
EN Refit the rear bumper.
Install the interface (1) at the rear of the vehicle and proceed
with the connections as shown in the diagram on page 7.
FR Remonter le pare-chocs arrière.
Installer l'interface (1) à l'arrière du véhicule et faire les
branchements comme indiqué sur le schéma à la page 7.
DE Bringen Sie den hinteren Stoßfänger wieder an.
Installieren Sie das Interface (1) am Heck des Fahrzeugs und
gehen Sie mit den Anschlüssen wie im Diagramm auf Seite
7 gezeigt vor.
ES Volver a montar el parachoques trasero.
Instalar el interface (1) en la parte trasera del vehículo y
proceder a las conexiones según el esquema de la página 7.
IT Fissare il Display di sinistra (3) alla base del montante
laterale di sinistra infilando la linguetta di plastica fra il
montante e il cruscotto.
Ripetere l’operazione per fissare il Display di destra (4).
EN Fix the left display (3) to the base of the left side pillar
by inserting the plastic tab between the pillar and the
instrument panel. Repeat the operation to secure the right
display (4).
FR Fixer l'afficheur de gauche (3) à la base du montant
latéral de gauche en enfilant la languette en plastique entre
le montant et le tableau de bord.
Répéter la procédure pour fixer l'afficheur de droite (4).
DE Befestigen Sie das linke Display (3) unten an der linken
A-Säule, indem Sie die Kunststoffzunge zwischen dem
Türholm und dem Armaturenbrett einführen.
Wiederholen Sie den Vorgang, um das rechte Display (4) zu
befestigen.
ES Fijar el Display de izquierda (3) a la base del montante
lateral de la izquierda metiendo la lengüeta de plástico
entre el montante y el salpicadero .
Repita la operación para fijar el Display de la derecha (4).
16
IT / EN / FR / DE / ES
VM390
IT DISPLAY (3) E (4) / EN DISPLAY (3) AND (4) / FR AFFICHEURS (3) ET (4) / DE DISPLAY (3) UND (4) /
ES DISPLAY (3) E (4)
IT Tasto suono
EN Sound button
FR Bouton son
DE Ton-Taste
ES Tecla sonido
IT Buzzer
EN Buzzer
FR Buzzer
DE Buzzer
ES Zumbador IT Linguetta di fissaggio
EN Plug-in plate
FR Languette de fixation
DE Kunststoffzunge
ES Lengüeta de fijación
IT Indicatore di allarme
EN Warning indicator
FR Indicateur d’alarme
DE Alarmanzeige
ES Indicador de alarma
IT IMPOSTAZIONE LUMINOSITÀ DISPLAY / EN DISPLAY BRIGHTNESS SETTING / FR PARAMÉTRAGE
LUMINOSITÉ AFFICHEUR / DE DISPLAY HELLIGKEIT EINSTELLUNG / ES AJUSTE BRILLO DISPLAY
IT La luminosità del display ha due modalità:
Giorno: Luminosità alta, impostazione di default.
Notte: Luminosità bassa, quando sono accese le luci
dell’auto.
EN There are two brightness modes:
Day:
High-brightness when you enter the system (Default
setting).
Night: Low-brightness when you turn on the clearance
lamp or headlights.
FR Il y a deux modalités de luminosité de l’afficheur:
Jour: Haute luminosité, parémétrage d’origine.
Nuit: Basse luminosité, lorsque les lumières du véhicule sont
allumées.
DE Für die Helligkeit des Displays gibt es zwei Einstellungen:
Tag: Hohe Helligkeit, Standardeinstellung.
Nacht: Geringe Helligkeit, wenn die Fahrzeugbeleuchtung
eingeschaltet ist.
ES El brillo del Display tiene dos modos:
Día: Brillo alto, ajuste por defecto.
Noche: Bajo brillo cuando las luces del coche están
encendidas.
IT IMPOSTAZIONE VOLUME AVVISO ACUSTICO / EN SETTING AUDIO WARNING VOLUME /
FR PARAMÉTRAGE VOLUME ALERTE ACOUSTIQUE / DE EINSTELLUNG DER AKUSTISCHEN
WARNLAUTSTÄRKE / ES AJUSTE VOLUMEN DEL AVISO ACÚSTICO
IT Il volume dell’avviso acustico può essere attivato o
disattivato: premere 1 volta il tasto suono per attivarlo (il
display emetterà 1 “Bi”) premere 2 volte il tasto suono per
disattivarlo (il display emetterà 2 “Bi”).
EN The volume of the audio alert can be switched on or off:
press the sound button once to activate it (the display will
emit 1 “Bi”) press the sound button twice to deactivate it
(the display will emit 2 “Bi”).
FR Le volume de l’alerte acoustique peut être activé ou
désactivé: appuyer 1 fois le bouton son pour l’activer
(l’afficheur fera 1»Bi») appuyer 2 fois le bouton son pour le
désactiver (l’afficheur fera 2»Bi»).
VOLUME ON
VOLUME OFF
17
VM390
IT / EN / FR / DE / ES
DE Die Lautstärke des akustischen Signals kann ein- oder
ausgeschaltet werden:
Drücken Sie einmal die Tontaste, um sie zu aktivieren ( das
Display gibt 1 „Bi“ aus) Drücken Sie zweimal die Tontaste,
um sie zu deaktivieren ( das Display gibt 2 „Bi“ aus).
ES El volumen del aviso acústico puede ser activado o
desactivado:
Pulse 1 vez la tecla de sonido para activarlo (el display
emitirá 1 “Bi”) Pulse dos veces la tecla de sonido para
desactivarlo (el display emitirá 2 “Bi”).
IT CALIBRAZIONE / EN CALIBRATION / FR CALIBRAGE / DE KALIBRIERUNG / ES CALIBRACIÓN
IT Il sistema viene fornito già calibrato. Nel caso sia
necessario rifare la calibrazione procedere come di seguito
indicato.
Assicurarsi che durante la fase di calibrazione non ci siano
ostacoli entro 2 m dal paraurti.
Premere 1 volta il Tasto suono su un display prima di
accendere il quadro del veicolo.
Accendere il quadro e aspettare che il display completi la
calibrazione: emetterà un suono per 3 secondi e la luce
rimarrà accesa fino al completamento della procedura.
Spegnere il quadro e accendere il veicolo per fare il test di
funzionamento.
EN The system is supplied pre-calibrated. Should it be
necessary to recalibrate it, proceed as indicated below.
Make sure that there are no obstacles within 2 m of the
bumper during the calibration phase.
Press the Sound button on a display once before turning on
the ignition of the vehicle.
Turn on the ignition and wait for the display to complete
the calibration: it will beep for 3 seconds and the light will
remain on until the procedure is completed.
Turn off the ignition and turn on the vehicle to perform the
function test.
FR Le système est fourni déjà étalonné. S’il devait s’avérer
nécessaire de répéter l’étalonnage, procéder comme indiqué
ci-après. Pendant le calibrage, vérifier qu’il n’ y ait pas
d’obstacles à 2 m des pare-chocs.
Appuyer 1 fois sur le bouton du son sur un afficheur avant
d’allumer le tableau de bord du véhicule.
Allumer le tableau de bord et attendre la fin du calibrage
de l’afficheur: il émettra un son pendant 3 secondes et la
lumière restera allumée jusqu’à la fin de la procédure.
Éteindre le tableau de bord et démarrer le véhicule pour le
test de fonctionnement.
DE Das System wird bereits kalibriert geliefert. Wenn eine
Neukalibrierung erforderlich ist, gehen Sie wie folgt vor.
Stellen Sie sicher, dass sich während der Kalibrierung keine
Hindernisse innerhalb von 2 m um den Stoßfänger befinden.
Drücken Sie die Ton-Taste auf einem Display einmal, bevor
Sie das Gerät einschalten. Schalten Sie die Zündung ein und
warten Sie, bis das Display die Kalibrierung abgeschlossen
hat. Ein Signalton ertönt 3 Sekunden lang, und das Licht
bleibt an, bis der Vorgang abgeschlossen ist.
Schalten Sie die Zündung aus und schalten Sie das Fahrzeug
ein, um den Funktionstest durchzuführen.
ES El sistema se suministra ya calibrado. En el caso de que
sea necesario calibrar de nuevo, proceder como se indica a
continuación. Asegúrese de que no haya obstáculos durante
la fase de calibración a menos de 2 m del parachoques.
Pulse 1 vez la tecla de sonido en un Display antes de encen-
der el cuadro del vehículo.
Encender el cuadro y esperar a que el display termine la
calibración: emitirá un sonido durante 3 segundos y la luz
permanecerá encendida hasta que se complete el proceso.
Apagar el cuadro de encendido y arrancar el motor para
hacer la prueba de funcionamiento.
18
IT / EN / FR / DE / ES
VM390
IT TEST DI FUNZIONAMENTO / EN FUNCTIONAL TEST / FR TEST DE FONCTIONNEMENT /
DE FUNKTIONSTEST / ES PRUEBA DE FUNCIONAMIENTO
IT Il test di funzionamento si effettua verificando che il
display si accenda quando viene inserito l’indicatore di
direzione corrispondente.
Inserire l’indicatore di direzione di destra: il display di destra
emetterà un “Bi”e lampeggerà per avvisare se un oggetto è
in avvicinamento nell’area di rilevazione (la velocità relativa
deve essere maggiore di 5km/h ed inferiore a 40 km/h).
EN The function test is carried out by checking that the
display lights up when the corresponding direction indicator
is activated insert the right indicator: the corresponding
display will “Bi” and flash to warning while moving object is
closing and enter the detection area. (The detecting relative
velocity has to be over 5 km/h and less than 40 km/h).
FR Le test de bon fonctionnement s’effectue en vérifiant
que l’écran s’allume lorsque le clignotant correspondant est
actionné.
Insérer l’indicateur de direction de droite: l’afficheur de
droite fera un «Bi» et clignotera pour avertir lorsqu’un objet
approche dans la zone de détection (la vitesse doit être
supérieure à 5km/h et inférieure à 40 km/h).
DE Der Funktionstest wird durchgeführt, indem überprüft
wird, ob das Display beim Einschalten des entsprechenden
Anzeigers aufleuchtet. Schalten Sie den rechten Fahrt-
richtungsanzeiger ein: Das rechte Display gibt ein „Bi“ aus
und blinkt, um Sie zu warnen, wenn sich ein Objekt dem
Erkennungsbereich nähert. (die relative Geschwindigkeit
muss größer als 5 km/h und kleiner als 40 km/h sein).
ES La prueba de funcionamiento se realiza verificando que
la pantalla se encienda al encender el indicador de dirección
correspondiente.
Introduzca el indicador de dirección de la derecha: el Display
de la derecha emitirá un “Bi” y parpadeará para advertir
si un objeto se está aproximando al área de detección (la
velocidad relativa debe ser superior a 5 km/h e inferior
a 40 km/h).
19
VM390
IT / EN / FR / DE / ES
IT Quando il conducente viene sorpassato da un altro veicolo
o vuole cambiare corsia, se l’indicatore di direzione è acceso,
il display corrispondente emetterà un “Bi” e lampeggerà per
avvisare che il veicolo in avvicinamento è vicino ed è entrato
nell’area di rilevazione.
Se l’indicatore di direzione è spento, il display
corrispondente rimarrà acceso per avvisare che il veicolo è in
avvicinamento e che sta per entrare nell’area di rilevazione.
Note:
1. Il sensore rileva veicoli in movimento fino ad una distanza
di 5 m.
2. Il sensore rileva veicoli in avvicinamento se la differenza di
velocità tra i due veicoli è superiore ai 40km/h.
3. Se le 4 frecce sono inserite ambedue i display rimarranno
accesi solo per avvisare se un veicolo sta entrando nell’area
di rilevazione.
4. Durante la retromarcia il dispositivo viene
momentaneamente disattivato.
EN When driver is being passed by other vehicles or
making a lane change, if the direction indicator is on, the
corresponding direction of display will “Bi” and flash for
warning while approaching vehicle is closing and enter the
detection area.
If the turn signals is off, the corresponding direction of
display will always ON only for warning while approaching
vehicle is closing and enter the detection area.
Note:
1. The sensor detects moving vehicles up to a distance of 5 m.
2. The sensor detects approaching vehicles if the speed
difference between the two vehicles is higher than 40km/h.
3. When the azard warning lights are turned on, both right &
left display will always ON only for warning when approaching
vehicle is closing and enter the detection area.
4. When vehicle is reversing, the system will be invalid
temporarily.
FR Lors du dépassement par un autre véhicule ou bien si le
conducteur veut changer de voie, l’afficheur correspondant
au clignotant allumé fera un «Bi» et clignotera pour avertir
de la proximité du véhicule qui approche et l’entrée dans la
zone de détection.
Si le clignotant est éteint, l’afficheur correspondant restera
allumé pour avertir du rapprochement du véhicule et de son
entrée dans la zone de détection.
Note:
1. Le capteur détecte les véhicules en mouvement jusqu’à 5 m
de distance.
2. Le capteur détecte les véhicules qui approchent si la
différence de vitesse entre les deux véhicules est supérieure
à 40 Km/h.
3. Si le warning est inséré, les deux afficheurs resteront
allumés uniquement pour avertir de l’entrée d’un véhicule
dans la zone de détection.
4. Pendant la marche arrière, le dispositif est provisoirement
désactivé.
Bi- Bi-B i-
IT FUNZIONAMENTO / EN HOW DOES THE SYSTEM WORK? / FR FONCTIONNEMENT /
DE FUNKTIONSWEISE / ES FUNCIONAMIENTO
20
IT / EN / FR / DE / ES
VM390
DE Wenn der Fahrer von einem anderen Fahrzeug überholt
wird oder die Spur wechseln will, gibt das entsprechende
Display bei eingeschaltetem Abbiegelicht ein „Bi“ aus und
blinkt, um zu warnen, dass sich das herannahende Fahrzeug
nähert und in den Erkennungsbereich eingetreten ist.
Wenn das Abbiegelicht ausgeschaltet ist, leuchtet das
entsprechende Display weiter, um zu warnen, dass sich ein
Fahrzeug nähert und in den Erkennungsbereich einfährt.
Anmerkungen:
1. Der Sensor erkennt fahrende Fahrzeuge bis zu einer
Entfernung von 5 m.
2. Der Sensor erkennt herannahende Fahrzeuge, wenn der
der Geschwindigkeitsunterschied zwischen den beiden
Fahrzeugen mehr als 40 km/h beträgt.
3. Wenn die Warnblinker eingeschaltet sind, bleiben beide
Displays eingeschaltet.
3. Wenn die Warnblinker eingeschaltet sind, bleiben beide
Displays nur zur Warnung eingeschaltet, wenn ein Fahrzeug in
den Erkennungsbereich einfährt.
4. Beim Rückwärtsfahren wird das Gerät kurzzeitig deaktiviert.
ES Cuando el conductor ha sido adelantado por otro vehículo
o quiere cambiar de carril, si la luz del indicador de dirección
está encendida, el Display correspondiente emitirá un “Bi”
y parpadeará para advertir que el vehículo que se aproxima
está cerca y ha entrado en el área de detección.
Si la luz del intermitente está apagada, el Display
correspondiente permanecerá encendido para advertir
que el vehículo se acerca y que va a entrar en el área de
detección.
Nota:
1. El sensor detecta vehículos en movimiento hasta una
distancia de 5 m.
2. El sensor detecta vehículos que se aproximan si la diferencia
de velocidad entre los dos vehículos es superior a 40 km/h.
3. Si se inserta el Warning los dos Display permanecerán
encendidos sólo para advertir si un vehículo está entrando en
el área de detección.
4. Durante la marcha atrás el dispositivo viene
momentáneamente desactivado.

Other Phonocar Automobile Accessories manuals

Phonocar VM334 User manual

Phonocar

Phonocar VM334 User manual

Phonocar 3/835 Installation guide

Phonocar

Phonocar 3/835 Installation guide

Phonocar 04994 User manual

Phonocar

Phonocar 04994 User manual

Phonocar VM548 User manual

Phonocar

Phonocar VM548 User manual

Phonocar 5/956 User manual

Phonocar

Phonocar 5/956 User manual

Phonocar 06855 User manual

Phonocar

Phonocar 06855 User manual

Phonocar 4/030 User manual

Phonocar

Phonocar 4/030 User manual

Phonocar 05152 User manual

Phonocar

Phonocar 05152 User manual

Phonocar 4/031 User manual

Phonocar

Phonocar 4/031 User manual

Phonocar 4/503 User manual

Phonocar

Phonocar 4/503 User manual

Phonocar 6/851 User manual

Phonocar

Phonocar 6/851 User manual

Phonocar VM 031 User manual

Phonocar

Phonocar VM 031 User manual

Phonocar VM341 User manual

Phonocar

Phonocar VM341 User manual

Phonocar 06940 User manual

Phonocar

Phonocar 06940 User manual

Phonocar VM545 User manual

Phonocar

Phonocar VM545 User manual

Phonocar VM280 User manual

Phonocar

Phonocar VM280 User manual

Phonocar VM342 User manual

Phonocar

Phonocar VM342 User manual

Phonocar 6/946 User manual

Phonocar

Phonocar 6/946 User manual

Phonocar 09004 User manual

Phonocar

Phonocar 09004 User manual

Phonocar 4/084 User manual

Phonocar

Phonocar 4/084 User manual

Phonocar 06856 User manual

Phonocar

Phonocar 06856 User manual

Phonocar 05730 User manual

Phonocar

Phonocar 05730 User manual

Phonocar 05964 User manual

Phonocar

Phonocar 05964 User manual

Phonocar VM089 User manual

Phonocar

Phonocar VM089 User manual

Popular Automobile Accessories manuals by other brands

4x4 TOUGH 17-22697 instruction manual

4x4 TOUGH

4x4 TOUGH 17-22697 instruction manual

FormFit HD9F03 quick start guide

FormFit

FormFit HD9F03 quick start guide

Air Lift loadlifter 5000 installation guide

Air Lift

Air Lift loadlifter 5000 installation guide

Caraudio-Systems c.LOGiC C2-MMI2G Series manual

Caraudio-Systems

Caraudio-Systems c.LOGiC C2-MMI2G Series manual

etrailer XHD-e98973 Operator's manual

etrailer

etrailer XHD-e98973 Operator's manual

Bigfoot T2801 manual

Bigfoot

Bigfoot T2801 manual

USASPEC BT35-Toy owner's manual

USASPEC

USASPEC BT35-Toy owner's manual

pro user SUPER-BIKE Assembly instruction and safety regulations

pro user

pro user SUPER-BIKE Assembly instruction and safety regulations

NAV TOOL NAVRGB6.0-VI installation manual

NAV TOOL

NAV TOOL NAVRGB6.0-VI installation manual

Steelcraft DS5 manual

Steelcraft

Steelcraft DS5 manual

Health Mate All-Season Car Cushion user manual

Health Mate

Health Mate All-Season Car Cushion user manual

Power Fist PTC-75A owner's manual

Power Fist

Power Fist PTC-75A owner's manual

Air Lift 57365 installation guide

Air Lift

Air Lift 57365 installation guide

Matt:e ARD-1-32-TP-M installation manual

Matt:e

Matt:e ARD-1-32-TP-M installation manual

Air Lift LoadLifter 5000 88216 installation guide

Air Lift

Air Lift LoadLifter 5000 88216 installation guide

B-Link SEMACONNECT 7 Series installation manual

B-Link

B-Link SEMACONNECT 7 Series installation manual

Tripp Lite U280-CQ01 owner's manual

Tripp Lite

Tripp Lite U280-CQ01 owner's manual

4x4 TOUGH Neoprene Style Seat Cover instructions

4x4 TOUGH

4x4 TOUGH Neoprene Style Seat Cover instructions

manuals.online logo
manuals.online logoBrands
  • About & Mission
  • Contact us
  • Privacy Policy
  • Terms and Conditions

Copyright 2025 Manuals.Online. All Rights Reserved.