Plus M-18S User manual

Copyboard
M-18S/M-18W
User’s Manual
Thank you for your purchase of the PLUS Copyboard.
Please read this User’s Manual carefully before use to take full advan-
tage of the functions of this product. After you have finished reading
the manual, please keep it for future reference.

E-2
Introduction
This manual is for both the M-18S and M-18W models.
The copyboards come in two sizes: standard size (model M-18S) and wide size (model M-18W).
The descriptions and diagrams in this manual refer to the model M-18S.
* When functions or operations are specific to a certain model of copyboard, the model name is specified.
Trademarks
• MicrosoftandWindowsareregisteredtrademarksortrademarksintheUnitedStatesandothercountriesoftheMicrosoftCor-
poration.
• VelcroisaregisteredtrademarkofVelcroIndustries.
Thetrademarksofthevariouscompaniesandtheproducttrademarks,evenwhennotwrittendown,willbegivenduerespect.
Productnamesandcompanynamesappearinginthismanualareregisteredtrademarksortrademarksoftherespectivecompa-
nies.
(1) Thecontentsofthismanualmaynotbereprintedinpartorwholewithoutpermission.
(2) Thecontentsofthismanualaresubjecttochangewithoutnotice.
(3) Greatcarehasbeentakeninthecreationofthismanual;however,shouldanyquestionablepoints,errors,oromissionsbe
apparent,pleasecontactus.
(4) NotwithstandingSection(3),thiscompanywillnotberesponsibleforanyclaimsoflossorprofitorothermattersdeemedto
betheresultofusingthisunit.
(5) TheuseofaprinterastheperipheraldeviceofthePLUSCopyboardistakentobeaprerequisite;therefore,operationwillnot
beguaranteedwhentheprinterisusedwithadirectconnectiontoapersonalcomputer.

E-3
Table of Contents
Meaning of the Terms Used in this Manual
• Mainunit(orset):Thisreferstothecopyboard.
• USBmemory: referstoUSBflashmemory.
• USBmemorystorage: meansthesavingofsheetsurfacedatausingMEMORY(i.e.,theUSBport)oftheoperationpanel.(The
Copyboardhas3USBports.)
• Internalmemory: indicatesatemporarysavinglocationoftheimagethathasbeenread.
• “copy”: Both“print”and“USBmemorysaving”meanto“copy.”
• “Sheetsurface”: refertothedrawingportion.
• “Scroll”or“move”: indicatesfeedingofthesheet.
Introduction...............................................................................................E-2
Package Contents.................................................................................... E-4
Names of the Parts................................................................................... E-5
Front.......................................................................................................E-5
Input/outputterminals............................................................................. E-6
ChangingtheHeightoftheUnit..............................................................E-7
ControlPanel.......................................................................................... E-8
Operation Steps........................................................................................ E-9
Connecting the Power........................................................................... E-10
Printing (printer sold separately)...........................................................E-11
PreparingthePrinter.............................................................................E-11
BasicPrintingOperation.......................................................................E-12
Movingthesheetsurfacemanually....................................................... E-13
Using USB Memory................................................................................ E-14
USBMemoryStorageProcedure.......................................................... E-14
Using the copyboard connected to a computer..................................E-17
CB Setup Procedure............................................................................... E-18
CBSetup(operatingthecopyboard’sbuttons)......................................E-18
Basicsettingoperation.....................................................................E-18
TableofFunctionNumbersandSettings..........................................E-19
CB Setup Procedure (Setting the Time)............................................... E-20
DescriptionofOperations......................................................................E-20
Making the Device Settings...................................................................E-22
Meaning of Error Messages.................................................................. E-24
Troubleshooting...................................................................................... E-25
Scanning Adjustment (White Calibration)............................................ E-27
Specifications.........................................................................................E-28
Appendix................................................................................................. E-29
ConnectionsandWiringDiagram.......................................................... E-29

E-4
Main unit [1]
Stand [1]
Amobilestand(withcasters)forsupportingthemainunit.A
printertableandACadapterboxareincluded.Forthecon-
tents of the stand’s package and instructions on assembly,
see the stand’s instructions or the separate Assembly and
SetupManual.
* Dependingonthetypeofsetyouhavepurchased,some
partsmaybesoldseparately.
Assembly and installation parts
Pen tray [1]
Pen tray fixing screws (M4 × 20) (temporarily fastened on
mainunit)
M-18S:3screws,M-18W:4screws
(SeetheAssemblyandSetup Manual for assembly instruc-
tions.)
Wall mount printer table [1 set]
Bracketfixingscrews(M4×8):4
ACpoweradapterbox:1
Velcro:2sets
* Soldseparately.
Wall brackets [1 set]
These are brackets for mounting the main unit on a wall.
(SeetheAssemblyandSetupManual.)
Upperwallbrackets:2
Lowerwallbrackets:2
Mainunitfixingscrews(M4×12:2)
* Soldseparatelyforsomeproducts.
Dedicated eraser [1]
Usethistoerasethedrawing.
Copyboard Accessories
Dedicated markers
(Oneeachofblack,red,blue,andgreen)
Usethesemarkerstodrawonthesheet
surface.
AC power adapter (with power cord) [1]
Thisisthepoweradapterfor supplying power to the copy-
board(SeePageE-10).
USB cable (type B ↔type A) [1]
[PLUScode715258900]
Important Safety Information [1]
Includesinstructionstobeheededinordertousetheset
safely.
Assembly and Setup Manual
Includesinstructionsoninstallingthesetandconnectingit
withtheprinter(soldseparately).
Cableforconnectingthemainunittoa
computer.
Usedformakingthedevicesettings.
Notice
• Do not use this cable for connection to the printer
(soldseparately).
Notice
• The included AC power adapter and AC power cord
areexclusivelyfor use with thisunit.Never use them
withotherproducts.
The package contents are as described below. Please check before use.
Package Contents

E-5
Names of the Parts
Frame cover
Sheet
Dedicated markers are used on the sheet to
drawdiagramsandtowrite.
Control panel (See Page E-8)
Input/output terminals (see next
page)
* Locatedonthebottomsurface.
Printer table
The printer* is placed here. (See the Assembly
andSetupManual.)
* Theprinterissoldseparately.
AC adapter box
Store the AC power adapters of the copyboard
and printer here. (See the Assembly and Setup
Manual.)
Stand
This stand supports the copyboard. (See the
AssemblyandSetupManual.)
Main unit
Pen tray
* Dependingontheproductyouhavepurchased,theprintermay be
soldseparately.
* Thisillustrationdoesnotshowtheconnectioncords.
Effective Reading Size
Theareathatcanbecopiedisthegrayareaofthediagram.
Note
• Itmightnotbepossibletoprintorsavetheportions
thataredrawnoutsideoftheeffectivescanningarea.
approx.5mm
approx.10mm
approx.10mm
approx.5mm
Effective reading size
Front

E-6
DC input connector
ConnectthiswiththeDCplugend oftheACpower
adapter.(SeePageE-10.)(Onlyconnectthesupplied
ACpoweradapter;nothingelse.)
Printer connector (USB port Type A)
Connect this with the USB connector of the printer
(SeePageE-29).
(The printer connector is dedicated for use with a
printer;useitonlywithaprinter.)
* This illustration does not show the printer or
connectioncords.
Personal computer (PC) dedicated USB
port (Type B)
ConnectthiswiththeUSBport(typeA)ofthePC.
Used to connect the copyboard to a computer to
make the copyboard’s device settings. Can also be
used to copy scanned images onto the computer.
(SeepageE-17,E-22)
Theconnectorislocatedonthebottomsur-
faceofthemainunit.
Thediagramviewisseenfromthebottom.
Names of the Parts
Unlock
Lock
Caster
Locking/unlocking the stand’s casters
After installation, lock the casters with the stoppers. When
movingthestand,unlockthecaster’sstoppers.
Thestoppersarelockedwhenthebottomispressed.Press
thetoptounlockthem.
Input/output terminals

E-7
Names of the Parts
(1) Unplug the power cord from the wall power outlet, then disconnect all the connection cords from
the main unit.
(2) Remove the locking knobs (one on each side).
(3) Change the position of the main unit support pieces.
Lift the main unit about 1 cm to unhook it.
Insert the stand’s hooks securely into in the mounting holes in the main unit’s support pieces (one on
each side).
(4) Fasten the two locking knobs (left and right) to the mount support pieces.
(5) Connect all the connection cables.
Changing the Height of the Unit
This is the height adjustment when setting up the copyboard on the optional stand. The stand height can
be adjusted to 3 levels by 100 mm.
* Thisillustrationdoesnotshowtheconnectioncords.
Mountinghole
Hook
lock-screw
Rearframes
lock-screws
Stand
CAUTION
• Atleasttwopersonsshouldholdthemainunit.Ifnot,themainunitcoulddroportip,resultinginaccidentalinjury.
• Lockthestand’scastersbypressingthebottomofthecasterlockbutton.Ifnot,thestandcouldmovewhilethemain
unitisbeingmountedorremoved,resultinginaccidentalinjury.
• Afterunpluggingthepowercordfromthewallpoweroutlet,disconnectalltheconnectioncordsfromtheset’sinput/
outputterminals.Ifthesetisremovedwithoutdisconnectingthecords,itcouldtip,resultinginaccidentalinjury.
• Ifaprinterismountedontheset,removetheprinterbeforestarting.Ifnot,thestandcouldtipwhilethemainunitis
beingmountedorremoved,resultinginaccidentalinjuryduetotheprinterdroppingortippingover.

E-8
Display
window Meaning Copyboard
indicator
Device indi-
cator
Printer problem
Off On
USB Memory not recognized
USB Memory storage problem
USB memory not connected
USB memory is full
An unsupported printer is connected
*Warning that disconnection of USB
memory has been forgotten
Reading problem
On Off
System error
Color printed prohibited
Time setting error
*Theletters“USB”scrollonthedisplay.
5
1 ON/Standby ( ) button
Turnsthecopyboard’spoweronandoff(standbymode).
2 Display window
The number of copies, operating status and error mes-
sagesaredisplayedonthe7-segmentLEDs.
3 Number of Copies/Test ( ) print button
Press this button to set the number of copies to be
printed(max.10).Thenumberofcopiesisdisplayedon
thedisplaywindow.
* “ ”isdisplayedduringtestprinting.
4 Color Print ( ) button
Thesheetismovedby1screenandread,andtheimage
is printed in color in the number of copies indicated on
thedisplaywindow.
5 B/W Print ( ) button
Thesheetismovedby1screenandread,andtheimage
isprintedinblackandwhiteinthenumberofcopiesindi-
catedonthedisplaywindow.
6 Save ( ) button (USB memory storage)
Thesheetismovedby1screenandread,andtheimage
isstoredontheUSBmemorydevice.
WhenconnectedtoacomputerbyUSBcable,theimage
isstoredinthecopyboard’sinternalmemory.
7 Scroll/Stop ( ) button
Scrollsthesheetonescreenportionleft,thenstopsauto-
matically. A press of this button while scrolling will stop
thescrolling.
8 USB A Memory port (USB Type A)
Saves in commercially-available USB memory images
thathavebeenreadbythecopyboard.
9 Status
Theseindicatorslightorturnofftoindicateerrorswiththe
copyboard,USBmemorydeviceorprinter.
(Seetableatleft)
Alsochecktheerrormessageonthedisplaywindow.
Forerrorinformationandremedies,seepageE-24.
Control Panel
When pressing a button, please press the center area (the square bulge). The button may not work if it is
pressed on a corner.
Names of the Parts
2
3
4
7
8
8
1
9

E-9
Draw on the Sheet Surface
Pleasedrawwiththededicatedmarkersthathavebeensupplied.
Ifanythingotherthanthededicatedmarkersoreraserareused,itmaybeimpossibletoerasethe
sheetorthesheetcouldgetdirty.
Tomovethesheetmanually,see“MovingtheSheetSurfaceManually”onpageE-13.
Printing
(1) SetA4orlettersizepaper.
Do not set anything other
thanA4orlettersizepaper.
(2) Press the ON/Standby
button of the copyboard
andswitchonthepower.
(3) Switchontheprinterpower.
For instructions on operating the printer, see the
printer’soperatinginstructions.
(4) Press the Color Print or the B/W Print button.
The copyboard will move a one-screen portion of
sheet,readtheimage,andstartthecopyoperation*.
See“Printing”onPageE-11.
Saving to USB Memory
(1) Press the ON/Standby button
of the copyboard to switch on the
power.
(2) Insert USB memory into the Memory port (USB A
port)ofthecopyboard.
(3) PresstheSave button.
See“UsingUSBMemory”onPageE-14.
Saving on a computer
(1) Pressthecopyboard’sON/Standby( )buttontoturn
thepoweron.
(2) ConnectthecopyboardtothecomputerusingthePC
dedicatedUSBport.
(3) PresstheSave( )button.
(4) Theimageissavedonthecomputer.
Operation Steps
The copyboard uses a CIS (Contact Image Sensor) image sensor to read the diagrams and text that have
been written down with special (4-color) markers, and accumulates the image data in internal memory. The
sheet surface’s image data is printed out from the printer when the Color Print ( ) or B/W Print ( ) button is
pressed, or stored as image data on the USB memory device or in the main unit’s internal memory when the
Save ( ) button is pressed.
Preparation
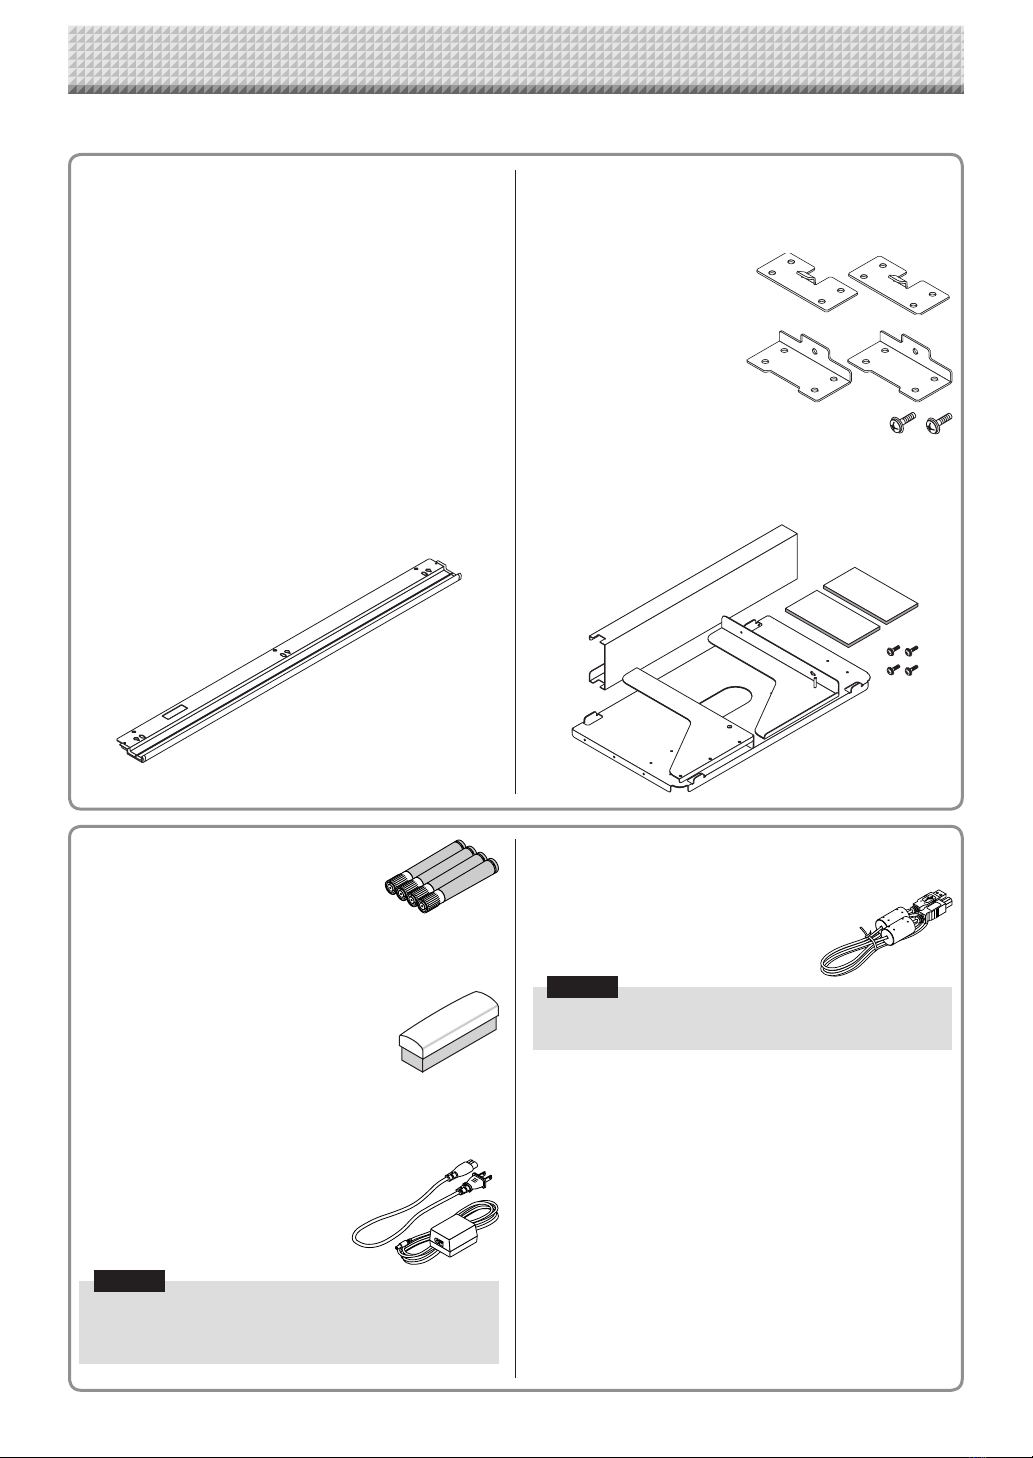
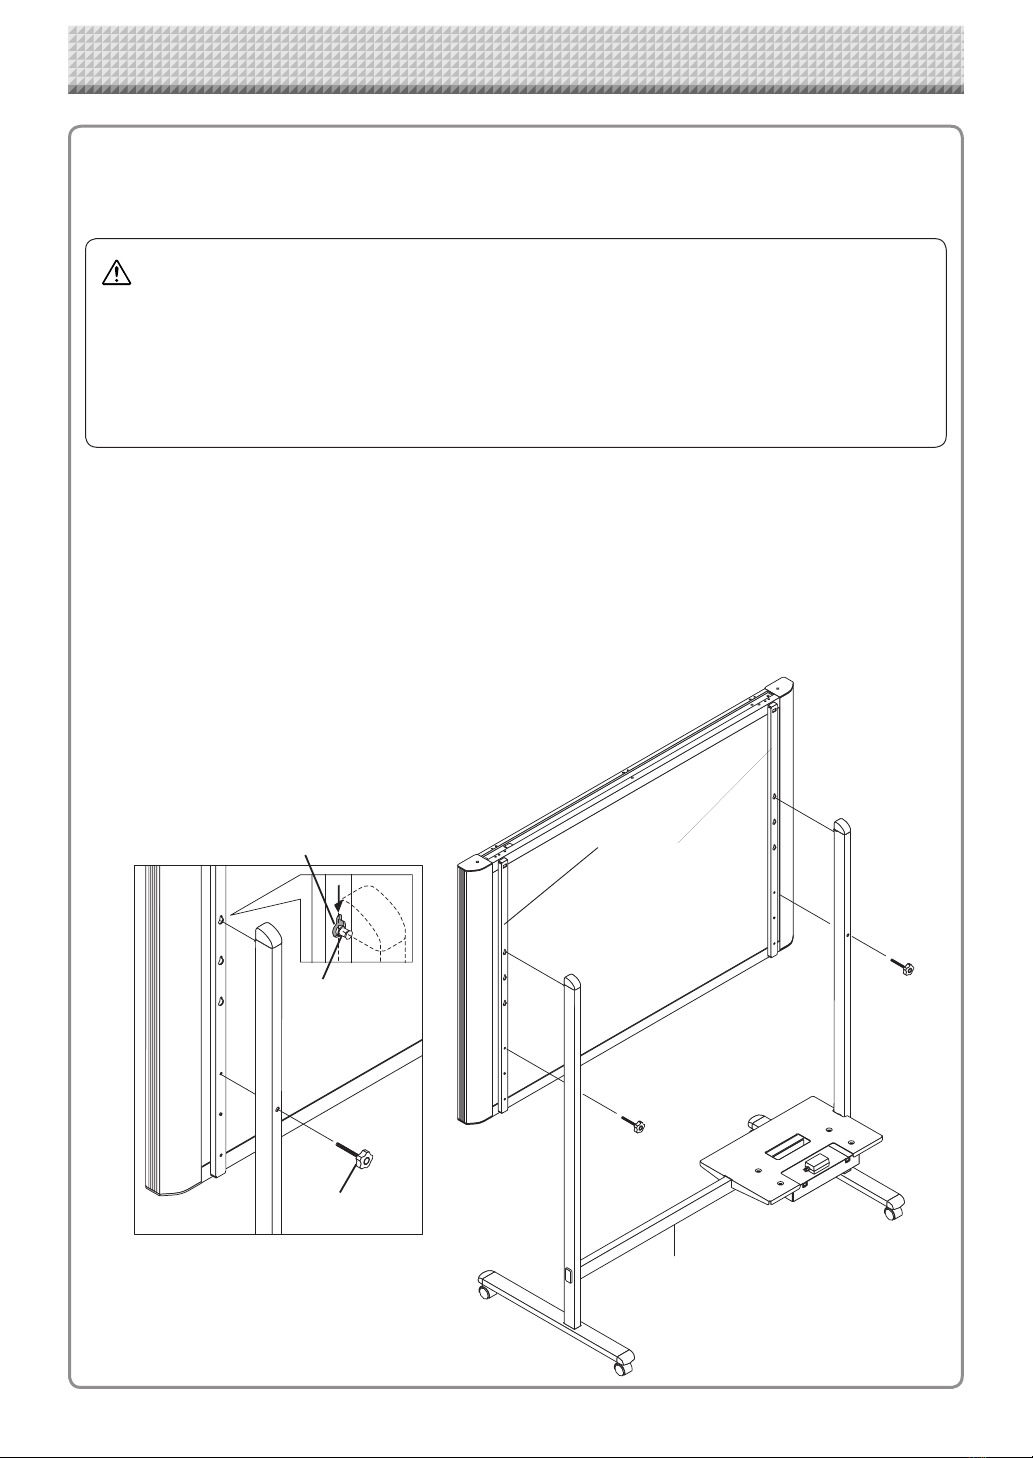
• Setupthenewlypurchasedcopyboardandconnectaprinter.
Seeaseparatemanualtitled“AssemblyandSetupManual.”
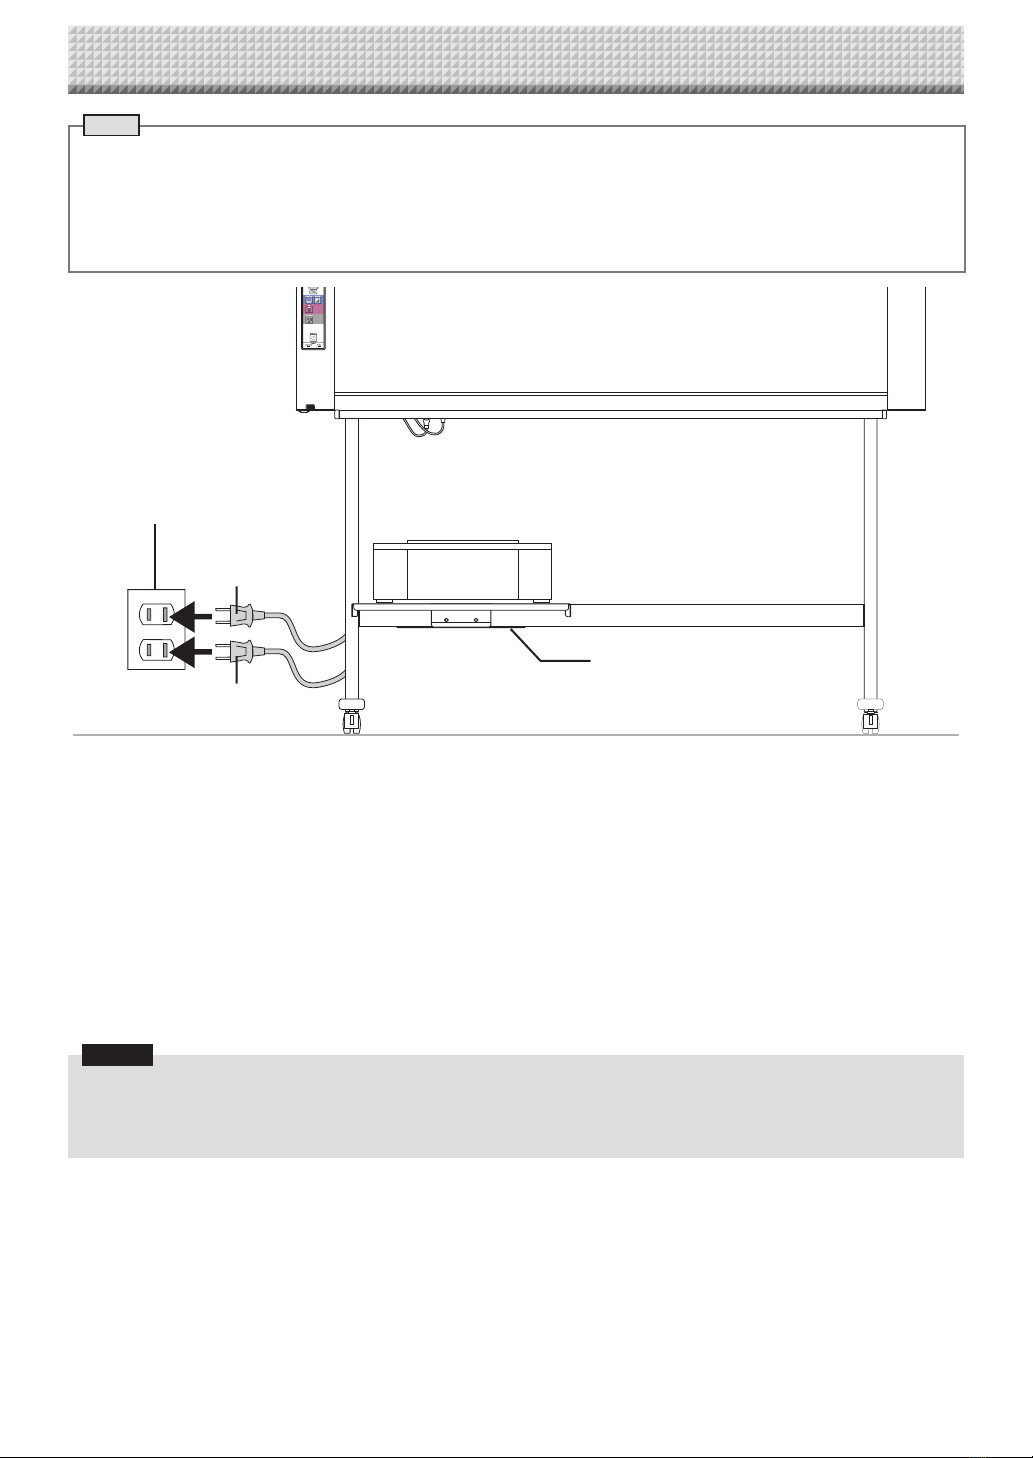
• PlugtheACpowerplugsofthecopyboardandprinterintowallpoweroutlets.SeepageE-10.
• Afterpurchase,besuretosetthecopyboard’sclock.Ifnot,theproperdateandtimewillnotbedisplayedonprints
orinimagefiles.SeepageE-20.
When Not Using the Copyboard
(1) Byallmeans,cleanlyerasethedrawingfromthesheetsurfacewiththededicatederaser.(Leavingthedrawingforalong
periodwillmakeithardertoerase.)
(2) PresstheON/Standby buttonofthecopyboardandswitchoffthepower(standbymode).
ThepowercannotbeswitchedoffwhiletheUSBmemoryremainsinstalled.(Thisisapreventionfunctionagainstforget-
tingtounplugtheUSBmemory.)
(3) Switchofftheprinterpower.
Note
• Whenconnecting the power plug,theflashingLED indicator in thedisplaywindowstarts to rotate for about5 seconds.
MakesuretopresstheOn/Standby buttontopoweronthecopyboardwhentheflashingLEDindicatorgoesoff.
• ThecoloroftheimageswhenprintedincolororwhensavedinUSBmemorywilldiffersomewhatfromthemarkercolors.
• Blurredcharacters, thinlines, overlapping of markers andother factors can causecolors to differin places and can also
resultinportionsthatcannotbescannedsuccessfully.
Also,blackmaybemixedin(forcolorprints)andruledlinesmaybescanned.
• Dataintheinternalmemoryisclearedwhenthepoweristurnedoff(settostandby)withthepower buttonorwhenthe
computerisdisconnected.

E-10
Connecting the Power
Note
About the connection and the AC adapter box
PlacetheACpoweradaptersofthemainunitandprinterintheACadapterbox.
Ifyouonlyhaveonepoweroutlet,connecttheACpoweradaptersofthe main unit and printer to a commerciallyavailable
cabletap,placethemintheACadapterbox,andconnectthecabletap’spowerplugtothewallpoweroutlet.
Also,ifnotconnectedorplacedintheACadapterbox,seetheseparate“AssemblyandSetupManual”andconnectaccord-
ingtothepurpose.
Printer’sACpower
adapter
Copyboard’sACpoweradapter
Walloutlet
ACadaptorbox
* Be sure to insert all the plugs securely.
Tousethecopyboard,connectthecopyboard’sACpowerplugtoawallpoweroutlet.
Themainpowerturnson.Inthismanual,thisisreferredtoasthe“standbymode”.
ThedescriptionsinthismanualassumethattheACpowerplugisconnected(thattheunitisinthestandbymode).
About the printer’s power supply
• Whenusingaprinter,connectitspowerplugtoawallpoweroutlet.
Also, turn on the printer’s power before printing.
When not using the copyboard for long periods of time
DisconnecttheACpoweradapter’spowerplugfromtheACpoweroutletinthewall.
Notice
• WhentheACpoweradapter’spowerplugisunpluggedfromthepoweroutlet,placethecopyboardnearthepoweroutlet
sothatitcanbereachedeasily.
• ThesuppliedACpoweradapterandACpowercordareintendedforexclusiveusewiththisproduct.Neverusethemwith
anotherproduct.

E-11
Use a printer to print out the image that has been drawn on the sheet surface. Use a PLUS-designated printer.
Operations and names of parts differ from printer to printer. For details of operations, see your printer’s operat-
ing instructions.
Preparing the Printer
Pleasecheckthatthecopyboardandtheprinterhavebeenconnected.SeePageE-29.
Setthepaper.
PleaseuseA4orlettersizeprinterpaper.
• Whenusinglettersizepaper,setlettersizepaperinthe
devicesettings.(SeepageE-19.)
1) Arrangethepaperedgessothattheyareeven.
2) Insertpaperatthespecifiedpositionofthepapertray.
3) Pressthepaperguidegentlyuntilittouchesthepaper.
Note
See your printer’s operating instructions for a
descriptionofthepaperthatcanbeused.
Dischargetray
Paperguide
Paper
Powerswitch
Appearanceofprinterisforillustrationpurposes.
Papertray
Switchonthepower.
Pressthepowerswitch.Thepowerindicatorlights.
Thiscompletesthepreparationoftheprinter.
PresstheColorPrint ortheB/WPrint buttononthecopyboard’scontrolpanel.Onepageworthofdataisread
andtheprintingoperationstarts.
Notice
• Dependingontheprinter,indicators,etc.,mayflashafterthepoweristurneduntiltheprinterispreparedtoprint.
Inthiscase,seetheprinter’soperatinginstructionsandcheckthattheprinterisreadybeforestartingtheprinting
operationonthecopyboard.
Whenfinishedprinting...
Switchofftheprinterpowerandremovethepaper.
Closethepapertray.
Notice
• Caution:DonotturnoffthepowerordisconnecttheUSBcableduringprinting.
Printing (printer sold separately)

E-12
Basic Printing Operation
Preparation:
Preparation:CheckthattheACpowerplugsofthecopyboardandprinterareconnected
towallpoweroutlets.SeePageE-10.
Press the ON/Standby buttonandswitchonthepower.
Preparetheprinter.(Seethepreviouspage.)
Note
• When turning on the power, wait about 5 seconds after connecting the
copyboard’sACpowerplugtothewallpoweroutletorafterturningoffthe
power(standbymode)beforepressingtheON/Standby button.
• PresstheON/Standby buttontoswitchonthepower.TheLEDofthe
displaywindowwilllight.
• Turnonthecopyboard’spowerbeforeturningontheprinter’spower.
Press the Scroll/Stop button and display the sheet sur-
faceyouwanttoprint.
ApressoftheScroll/Stop buttonscrollsthesheetsurfaceonescreenportion
leftandautomaticallystopsit.
Tostoptheoperationpartwaythrough,presstheScrol/Stop buttonagain.
Note
• Theone-screenthatisvisibleisprintableposition.
• To fine-adjust the sheet surface position, with the sheet stopped, move
thesheetslowlybyhand.Thesheetcanbemovedeithertotheleftorto
theright.
• Printingoftheportionlocatedaroundthesheetsurfacemightnotbepos-
sible.Pleasesee“Effectivereadingsize”onPageE-5.
Press the Number of Copies button and select the num-
berofcopies.
Note
• “01”isselectedwhenthepoweristurnedon.
• Upto10copiescanbespecifiedanddisplayedonthedisplaywindow.
• The number of copies increases by 1 each time the Number of Copies
buttonis pressed,and “ ” is displayedafter “10”(thisisusedfor test
printing).Whenthebuttonispressedagain,thedisplayswitchesto“01”.
Thenumberswitchescontinuouslyifthebuttonisheldin.
• After setting the number of copies, proceed to step 4 within 1 minute.
Thenumberofcopiesisresetto“01”ifnooperationisperformedwithin1
minute.
Printing

E-13
Printing
Press the Color Print or the B/W Print buttontoprint.
or
• Thereadingoperationisperformedforaone-sheetportion(whilethesheetisscrolled)andtheprintingoperationis
performed.
Cancellation of the print operation in progress
WhentheON/Standby buttonispressed,thereadingofthesheetstops,andthepartiallyreadimagedataisprinted.
Waituntilthesheetisexpelledfromtheprinter.
Note
• IftheON/Standby buttonispressedwhilethesheetsurfaceisbeingread,printingisinterruptedandonlypart
oftheimagewillbeprinted.
Tomovethesheetsurface,waituntilscrollingstops,thenpresstheScroll/Stop button.
• Theone-screenportionisreducedtoA4papersizeandprinted.
Forwide type copyboards (modelM-18W), theimageiscompressedabout 75% in thehorizontaldirection.To
printwiththesameproportionsastheimageonthesheetsurface,see“MakingtheDeviceSettings”(pageE-22).
• Aflashing“ ”inthedisplaywindowindicatesaprinterror.See“MeaningofErrorMessages”onPageE-24.
• Whenprinting,atimestamp(dateandtime)isprintedatthetoprightofthesheet.See“MakingtheDeviceSet-
tings”onpageE-22.
Whenthecopyboardisnotgoingtobeused,presstheON/Standby button and switch
offthepower(standbymode).
• Switchofftheprinterpower.
Note
• Ifnobuttonisoperatedwithin30seconds,thepowerturnsoffautomatically(autopoweroff).
Whenthepoweristurnedoff,scannedimagesstoredintheunit’sinternalmemoryarecleared.
• TheautopowerofffunctioniscanceledwhenthecopyboardandcomputerareconnectedbyUSBcable.
Moving the sheet surface manually
Thesheetcanbemovedevenwhenthepowerofthecopyboardisswitchedoff.
Thesheetcanbemovedwith your hand either inleftorright.Pleaseplaceyour
handattheverticalcenterandmovethesheetslowly.
Notice
• Quickmovement cancausedamagetothedrivemechanismofthecopy-
board.

E-14
Using USB Memory
The content of what has been drawn on the sheet surface of the copyboard can be saved in USB memory.
Later, the saved image can be read into a personal computer and made into a document of the proceedings of
the meeting, or affixed to a document.
The name of the folder on the USB memory device is “CB_Image”. Image files are stored in this folder.
By factory setting upon purchase, image files are named “PV-xxx.pdf” (PDF files), where “xxx” refers to a
3-digit number starting from 001 (ex.: PV-001.pdf).
Notice
• NoUSBflashmemorydeviceisincluded.WhenpurchasingaUSBflashmemorydevice,payattentiontothefollowing:
1.USBflashmemorydevicesformattedinFAT16/FAT32aresupported.USBflashmemorydevicesinNTFS/exFATformat
cannotbeused.
2.USBflashmemorydevicesprotectedbyasecurityfunctioncannotbeused.
3.USBflashmemorydeviceswithacapacityofover32GBcannotbeused.
4.IftheUSBflashmemorydeviceisdividedintomultiplepartitions,onlyonepartitioncanberecognizedwiththisunit.
• SeethePLUSwebsiteformoreinformationonUSBmemorydevicesusablewiththisunit.
USB Memory Storage Procedure
Preparation:
Checkthatthecopyboard’sACpowerplugisconnectedtoawallpoweroutlet.SeepageE-10.
Press the ON/Standby buttonandswitchonthepower.
Note
• When turning on the power, wait about 5 seconds after connecting the
copyboard’sACpowerplugtothewallpoweroutletorafterturningoffthe
power(standbymode)beforepressingtheON/Standby button.
• PresstheON/Standby buttontoswitchonthepower.TheLEDofthe
displaywindowwilllight.
Insert the USB memory device into
the USB A Memory port of the
copyboard.
Notice
• Checktheside(polarity)oftheUSBmem-
ory device before inserting it. Forcing it
in the reverse orientation will damage the
USB A Memory port or USB memory
device.
• Be careful not to bump into the USB
memory device with hand or body while
itismounted.Doingsocoulddamagethe
USB memory device or USB A Memory
port.

E-15
Using USB Memory
Press the Scroll/Stop buttonanddisplaythesheetsurfaceyouwanttostore.
Theprocedurefordisplayingthesheetsurfaceyouwanttostoreisthesameasforprinting.
See“BasicPrintingOperation”onpageE-12.
Note
• TheonescreenportionthatisviewablewillbesavedinUSBmemory.
• Savingoftheportionlocatedaroundthesheetsurfacemightnotbepossible.Pleasesee“Effectivereadingsize”
onPageE-5.
Press the Save buttontostore.
Flashingindicator“rotates”sequentiallyduringUSBmemory
storageoperation.
Displaywindow
• The reading operation is performed for a one-sheet portion (while the sheet is scrolled) and USB memory storage
startsafterthescrollingcompletes.
The (5 second) flashing “US” display indicates that the USB memory has not been inserted. Please
inserttheUSBmemoryandthenpresstheSave button.
A(5 second) flashing“FL”displayindicates that there isinsufficientfree capacity topermit storagein
USBmemory.TheflashingdisplaywillstopwhentheUSBmemorydeviceisremoved.Replacewitha
USBmemorydevicehavingsufficientcapacity.
See“MeaningofErrorMessages”onPageE-24forothererrordisplays.
Note
• DependingontheUSBmemory,itmaytaketimeforrecognitionoritmaytaketimeforsaving.
• WhentheON/Standby buttonispressedduringthereadingoperation,thereadingoperationwillbediscontin-
uedandthepartiallyreadimagedatawillbestoredintheUSBmemory.
Tomovethesheetsurface,waituntilscrollingstops,thenpresstheScroll/Stop button.
• Thedateandtimeofthesavedfilewillreflectthecopyboardtimesetting.See“MakingtheDeviceSettings”on
PageE-22.
• WhenacertainamountoffreecapacityisnotavailableintheUSBmemory,“FL”willbedisplayedwhentheSave
button is pressed. Also, when insufficient free capacity arises during saving, “FL” is displayed at that point.
Deletedata,setthesheetsurfacebacktotheoriginalstatus,thenpresstheSave buttonagain.
• WhenthecopyboardandacomputerareconnectedbyUSBcable,thedataisstoredinthemainunit’sinternal
memory.
Removing the USB memory
Checkthattheflashingrotationofthedisplaywindowhaschangedtosteady
lightingandthattheUSBmemoryaccessindicatorisnotflashing,thenpullthe
USBmemorystraightout.(PleaseseeyourUSBmemorymanualfordetails.)
Notice
• DonotunplugtheUSBmemorydeviceduringtheUSBmemorystorage
operation (i.e., during the rotating, flashing display in the display win-
dow),orwhiletheaccessindicatoroftheUSBmemorydeviceisflash-
ingbecausedatawillbedestroyed.
continued on next page

E-16
Using USB Memory
Whenthecopyboardisnotgoingtobeused,presstheON/Standby button and switch
offthepower(standbymode).
Note
• “ ”lettersappearingatone-secondintervalsinamovingdisplayinthedisplaywindowindicatethataUSB
memorydeviceismounted.UnpluggingtheUSBmemorydevicewillswitchoffthepower.(Afunctionthatserves
asaremindertounplugtheUSBmemorydevice)
• WhenthecopyboardandacomputerareconnectedbyUSBcable,theautopowerofffunction(whichturnsthe
poweroffautomatically)iscanceled.
• Scannedimagesfilesstoredinthecopyboard’sinternalmemoryareclearedwhenthepoweristurnedoff(setto
standby)withtheON/Standby buttonorwhenthecomputerisdisconnected.

E-17
When the copyboard and a computer are connected by USB cable, the copyboard is recognized as an exter-
nal memory device (removable device). Below is the procedure for copying the “CBImage” file from this device
onto the computer.
Images can be stored in JPEG (.jpg), PNG (.png) or PDF (.pdf) format, selectable in the main unit settings . (See
pages E-19.)
Notice
• Onlyonesheet’sworthofdatacanbestoredinthecopyboard’sinternalmemory.
Whenthestorageprocedureisperformedsuccessivelyonthecopyboard,thedataisoverwritten.
• Theimagedatainthecopyboard’sinternalmemoryisclearedwhentheUSBconnectionbetweenthecopyboardandcom-
puteriscutoff.
• Donotsavedatafromacomputerintothecopyboard’sinternalmemory.
• Thecopyboard’sinternalmemorycannotbeformattedfromacomputer.
• Donotdisconnectthe USBcableoraccessthecopyboardwhilethedataisbeing saved afterpressingthecopyboard’s
Save( )button/.Doingsomaycauseoperationofthecomputertobecomeunstable.
• Donot pressany operation buttons onthe mainunitwhilethecopyboard’sinternal memoryis beingaccessedfromthe
computer.Theresponsetimecouldbelongandtheoperationmaynotbepossible.
Turn on the copyboard’s power and connect the PC dedicated USB port (type B) and com-
puterusingtheUSBcable.
• Thestandarddriverisinstalledautomaticallyandthecopyboardisidentifiedbythecomputerasaremovabledevice.
Tocomputer’sUSBport
(typeA)
USBcableincludedwith
copyboard
ToPCdedicatedUSBport
(typeB)
Press the Save buttontostore.
Displaywindow
Flashing indicator “rotates” sequentially during USB memory stor-
ageoperation.
• Onesheet’s worthof thescreenisscanned (scrolled) and storingin thememoryfor computer storagestartsonce
scrollingstops.
TheLEDsonthedisplaywindowflashinacircularmotionduringsavinginthememoryforcomputerstorage.
LaunchExplorerandopenthisunit’sremovabledevice.
(1) Whenthedeviceiconforthemainunit(displayedasaremovabledisk)isdouble-clicked,themainunit’sinternal
memoryopens.
The“CBImage”fileisthescannedimagefile(“.jpg”,“.png”or“.pdf”,accordingtosetting).
(2) Copythe“CBImage”fileto[MyDocuments],etc.,onthecomputer(“.jpg”,“.png”or“.pdf”,accordingtosetting).
PerformtheUSBdisconnectionoperationonthecomputerbeforedisconnectingtheUSBcable.
Notethattheimagedatainthemainunit’scomputerstoragememoryisdeletediftheoperationfordisconnectingthe
USBconnectionbetweenthemainunitandcomputerisperformedatthistime.
Using the copyboard connected to a computer

E-18
There are two ways to make the device settings: using the copyboard’s operation buttons to make the settings
(“CB Setup”), making the settings using a USB connection.
CB Setup (operating the copyboard’s buttons)
Basic setting operation
• Checkthatthepowerison(thatthedisplaywindowislit).
• Wheninthe“CBSetup”mode, the copyboardwillreturntothenormalmode if no buttons areoperatedfor10seconds,so
operatethebuttonswithin10seconds.
CB Setup Procedure
SwitchtotheCBSetupmode.
WhilepressingtheON/Standby button,press
the Number of Copies button, then release
the ON/Standby button. The copyboard
switchestotheCBSetupmode.
“F1”appearsonthedisplaywindow.
“F1”isthetimesetting.
CBSetupmode
Select“thefunctionnumber”,then
press the Save button.
PresstheNumberofCopies button(thefunc-
tion switches each time the button is pressed,
returning to F1 after FA) to select the desired
functionnumber,thenpresstheSave button
tosetthatfunctionnumber.
Fortheitemnamesofthefunctionnumbers,see
the“TableofFunctionNumbersandSettings”on
thefollowingpage.
• WhentheSave buttonispressed,thefunc-
tion number to be changed is set and a dot
lights(ex.:“F4.”).
Select“thesetting”,thenpressthe
Save button.
PresstheColor PrintorB/WPrint button,
checkthesetting,thenpresstheSave button
toset.
CheckthesettingaccordingtowhethertheUSB
andPrinterStatusindicatorsarelitoroff.Seethe
“TableofFunctionNumbersandSettings”onthe
followingpage.
Dotlit
ExittheCBSetupmode.
PresstheON/Standby button.Thecopyboard
returnstothenormalmode.
The display window returns to the number of
copiesdisplay.
Normalmode
Device
Copyboard

E-19
Table of Function Numbers and Settings
Function
Number SettingItem Description Setting StatusIndicators
TimeSetting
Thedateandtimearestampedontheprintingpaper
and recorded in the file information when files are
stored.(SeePageE-20)
Year,month,
day,hours,
minutes
Notlit
PaperSize
SelectionofwhethertoprintinA4papersizeorletter
size.
• Thisoperateswhenthecopyboardisconnectedto
aprinter.
A4
(Lit) (Off)
Letter
(Off) (Lit)
AspectRatioSet-
ting
Selection of the image’s vertical-to-horizontal ratio
(aspectratio)whenprinting.
EqualRatio:Theimageisprintedwiththesameratio
asthecopyboard’ssheetsurface.
Compressed:The image is compressed in the hori-
zontal direction to the ratio of A4 or
lettersizepaperforprinting(ex:circles
becomeellipses).
Compressed
(Lit) (Off)
EqualRatio
(Off) (Lit)
ColorPrinting
Ifthisissetto[Invalid],colorprintingisnotpossible.
Valid:Whenthisisset,colorprintingispossible.
Invalid:Whenthisisset,colorprintingisnotpossible.
Valid
(Lit) (Off)
Invalid
(Off) (Lit)
GraphicsFile
Format
Selectionoftheformatinwhichimagefilesaresaved.
ScannedimagesareconvertedintoJPEG(extension
“.jpg”), PNG (extension “.png”) or PDF (extension
“.pdf”)format.
JPEG
(Lit) (Off)
PNG
(Off) (Lit)
PDF
(Lit) (Lit)
ResetDeviceSet-
tings
ThisrestoresthecopyboarddevicesettingsatF2to
F5totheirdefaults(settingsuponfactoryshipment).
Thesettingsmarked“*”arethedefaults.
(1) SelectFA,thenpresstheSave button.“FA.”
isdisplayed(withthedotlit).
(2) PresstheSave buttonagain.Thesettingsare
reset.
— — —
CB Setup Procedure
Device
Copyboard
Device
Copyboard
Device
Copyboard
Device
Copyboard
Device
Copyboard
Device
Copyboard
Device
Copyboard
Device
Copyboard
Device
Copyboard

E-20
CB Setup Procedure (Setting the Time)
The date and time are stamped on the printing paper and recorded in the file information when files are stored
on the copyboard, so set the copyboard’s time correctly.
Description of Operations
1 Switchto“CBSetup”.
Withthepowerturnedon,presstheNumberofCopies but-
tonwhilepressingtheON/Standby button,thenreleasethe
ON/Standby button.
2Press the Save buttonandswitchto“TimeSetting”.
ThemodeswitcheseachtimetheSavebuttonispressed.
Contentsofsettingmodedisplayedondisplaywindow
(First2digits) (Last2digits)
Christianyear Month Day Hours Minutes
3 Setthesettingmode’sdateandtime.
WhentheColorPrint orB/WPrint buttonispressedonce,thesettingcanbe
made.
UsetheColorPrint (Increase)andB/WPrint (Decrease)buttonstoset.
4Press the Save buttontoenterthesetting.
Thecopyboardswitchestothenextsettingposition.
Repeatsteps4and5tosetthecurrentdateandtime.
• IftheON/Standby buttonispressedduringsteps 3 to 5,the partiallymade
settingiscanceledandthedateandtimereturntothevaluessetbeforetheset-
tingwasstarted.
5 Completethesetting.
WhentheSave buttonispressedaftertheminute’ssettingposition(c.6display)
hasbeenset,the“TimeSetting”iscompletedandthe[F1]display(CBSetup)reap-
pears.PresstheON/Standby buttontoreturntothenormalmode.
[Example]:Settingthedateandtimeto2:16pmOctober8,2020
Press the ON/Standby button to turn on the
power.
Thedisplaywindow’sLEDslightandthepowerturnson.
Normalmode
Press the Number of Copies button while
pressing the ON/Standby button,thenrelease
the ON/Standby button.
Themodeswitchesto“CBSetup”,and“F1”isdisplayedonthe
displaywindow’sLEDs.
The mode returns to the normal mode if no buttons are oper-
atedfor10seconds.
“CBSetup”mode
While“F1”isdisplayed,presstheSave button
toenter.
Thedisplayswitchesto“c1”(first2digitsofyear).
Ifnobuttonsareoperatedfor10secondswhileinthetimeset-
tingmode,themodereturnstothe“CBSetup”mode.
Other manuals for M-18S
2
This manual suits for next models
1
Table of contents
Other Plus Office Equipment manuals
Popular Office Equipment manuals by other brands

Plustek
Plustek SmartOffice PS186 quick start guide

LDI
LDI SAFCO 3045 Assembly instructions

OCEE DESIGN
OCEE DESIGN SASS-0090 Assembly instructions

Steelcase
Steelcase Elective Elements Powerway SPB89 installation instructions

Mayline
Mayline realoffice Aberdeen Series Assembly instructions

kube
kube Kubebooth Kwe Assembly guide