PNI SafeHome PT840S User manual

PNI SafeHome PT840S
Smart outdoor socket/Интелигентен външен
контакт/Smarte Außensteckdose/Toma exterior
inteligente/Prise extérieure intelligente/Intelligens
kültéri aljzat/Presa esterna intelligente/Slim
buitenstopcontact/Inteligentne gniazdo zewnętrzne/
Priza inteligenta dubla de exterior

EN User manual ....................................................... 3
BG Ръководство за употреба ............................. 8
DE Benutzerhandbuch .............................................. 13
ES Manual de usuario ............................................... 18
FR Manuel utilisateur ............................................... 23
HU Használati utasítás .............................................. 28
IT Manuale utente .................................................. 33
NL Handleiding ........................................................ 38
PL Instrukcja obsługi ............................................... 43
RO Manual de utilizare ............................................. 48

User manual - 3
Technical specifications
»Nominal voltage: 230V AC
»Output voltage: 230V
»Nominal current: max. 16
»Standby consumption: ≤ 3mA
»Dimensions: 100 x 125 x 42 mm
»WiFi frequency: 2.4GHz
»WiFi emission power: 100mW
»Water protection class: IP40
Product presentation
Pairing button
Manual switch
The blue LEDs indicate the operating status of the sockets, and the
green LED indicates the status of the WiFi connection.

User manual - 4
Tuya Smart app
Warning: due to updates to the Tuya Smart application, there could be
dierences from the images and information presented in this manual.
1. Download the Tuya Smart app from Google Play or the App Store
or scan the QR code below:
Open the application, create an account and log in.
In your phone, activate the Bluetooth function and Location.
Add the smart socket to the mobile app
1. Power the socket. Make sure that the green LED on the socket
blinks often, a sign that the device is in the configuration mode.
Note: If the LED does not blink often or does not blink at all, long press
the button on the upper side of the socket. After about 6 seconds, the
green LED will start to blink infrequently. Do not take your finger o
the button, keep pressing it until the LED blinks often.
2. Open the Tuya Smart application. Select “Electrical” - “Socket
(Wi-Fi)”.
3. Select the WiFi network you want to connect to and add the
network password.

User manual - 5
4. Press “Next” on the next 3 steps. Press “Blink quickly”.
5. The application will scan nearby devices.
6. After your device has been identified, press “Done” to complete the
procedure of adding the outlet to the application.
7. Now you have complete control over the outlet from the remote.
You can turn the outlet on/o, set an operating schedule, share the
outlet with other family members and create smart scenarios with
other compatible Tuya products.

User manual - 6
Simplified EU declaration of conformity
SC ONLINESHOP SRL declares that the PNI SafeHome PT840S
double outdoor intelligent socket is in accordance with the RED
Directive 2014/53/EU. The full text of the EU declaration of
conformity is available at the following internet address:
https://www.mypni.eu/products/7239/download/certifications

User manual - 7
QUALITY CERTIFICATE AND COMMERCIAL WARRANTY
The warranty period for individuals is 24 months from the date of
delivery for manufacturing and material defects.
The warranty period for legal entities is 12 months from the date of
delivery for manufacturing and material defects.
The commercial guarantee does not aect the rights of the consumer
provided by the applicable legislation in force, namely Emergency
Ordinance 140/28.12.2021 regarding certain aspects related to
contracts for the sale of goods, OG 21/1992 regarding consumer
protection with subsequent amendments and additions and Law
296/2004 regarding the consumption code with subsequent changes
and additions.
Please download the full version
of the warranty certificate:

Ръководство за употреба - 8
Технически спецификации
»Номинално напрежение: 230V AC
»Изходно напрежение: 230V
»Номинален ток: макс. 16
»Консумация в режим на готовност: ≤ 3mA
»Размери: 100 х 125 х 42 мм
»WiFi честота: 2.4GHz
»Мощност на WiFi излъчване: 100mW
»Клас на водозащита: IP40
Представяне на продукта
Pairing button
Manual switch
Сините светодиоди показват състоянието на работа на
контактите, а зеленият светодиод показва състоянието на
WiFi връзката.

Ръководство за употреба - 9
Приложение Tuya Smart
Предупреждение: поради актуализации на приложението
Tuya Smart може да има разлики с изображенията и
информацията, представени в това ръководство.
1. Изтеглете приложението Tuya Smart от Google Play или
App Store или сканирайте QR кода по-долу:
Отворете приложението, създайте акаунт и влезте.
Във вашия телефон активирайте функцията Bluetooth и
Местоположение.
Добавете интелигентния контакт към мобилното
приложение
1. Захранване на контакта. Уверете се, че зеленият светодиод
на гнездото мига често, знак, че устройството е в режим на
конфигуриране..
Забележка: Ако светодиодът не мига често или изобщо не
мига, натиснете продължително бутона от горната страна на
гнездото. След около 6 секунди зеленият светодиод ще започне

Ръководство за употреба - 10
да мига рядко. Не махайте пръста си от бутона, продължете да
го натискате, докато светодиодът мига често.
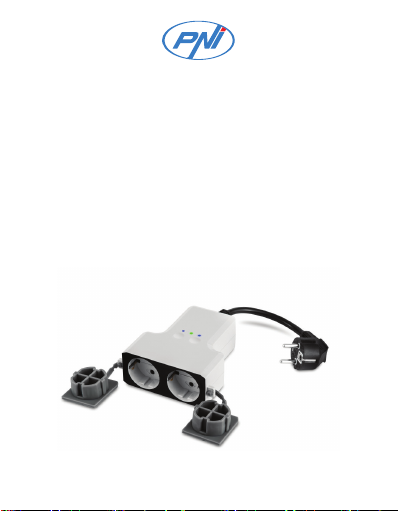
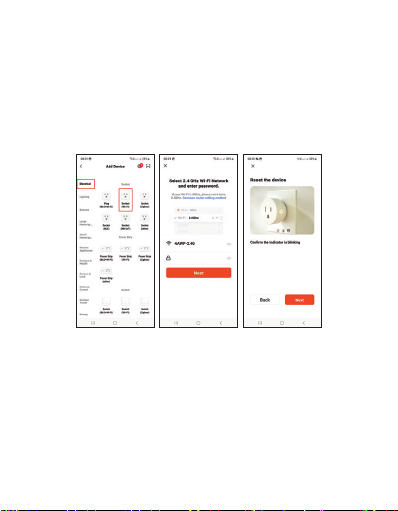
2. Отворете приложението Tuya Smart. Изберете „Electrical“ -
„Socket (Wi-Fi)“.
3. Изберете WiFi мрежата, към която искате да се свържете, и
добавете паролата за мрежата.
4. Натиснете “Next” на следващите 3 стъпки. Натиснете „Blink
quickly“.
5. Приложението ще сканира близки устройства.
6. След като вашето устройство бъде идентифицирано,
натиснете „Done“, за да завършите процедурата по
добавяне на контакта към приложението.
7. Сега имате пълен контрол над контакта от дистанционното.
Можете да включвате/изключвате контакта, да задавате
работен график, да споделяте контакта с други членове на
семейството и да създавате интелигентни сценарии с други
съвместими продукти на Tuya.

Ръководство за употреба - 11
Опростена ЕС декларация за
съответствие
SC ONLINESHOP SRL декларира, че двойният външен
интелигентен контакт PNI SafeHome PT840S е в съответствие с
RED Direcve 2014/53/EU. Пълният текст на ЕС декларацията за
съответствие е достъпен на следния интернет адрес:
hps://www.mypni.eu/products/7239/download/cercaons

Ръководство за употреба - 12
СЕРТИФИКАТ ЗА КАЧЕСТВО И ТЪРГОВСКА ГАРАНЦИЯ
Гаранционният срок за физически лица е 24 месеца от датата на
доставка за производствени и материални дефекти.
Гаранционният срок за юридически лица е 12 месеца от датата
на доставка за производствени и материални дефекти.
Търговската гаранция не засяга правата на потребителя,
предоставени от приложимото действащо законодателство, а
именно Извънредна наредба 140/28.12.2021 г. относно някои
аспекти, свързани с договорите за продажба на стоки, ДВ
21/1992 г. относно защитата на потребителите с последващи
изменения и допълнения и Закон 296/2004 относно кода на
потреблението с последващи промени и допълнения.
Моля, изтеглете пълната версия на гаранционния
сертификат:

Benutzerhandbuch - 13
Technische Spezifikationen
»Nennspannung: 230 V AC
»Ausgangsspannung: 230V
»Nennstrom: max. 16
»Standby-Verbrauch: ≤ 3mA
»Abmessungen: 100 x 125 x 42 mm
»WLAN-Frequenz: 2,4 GHz
»WLAN-Emissionsleistung: 100 mW
»Wasserschutzklasse: IP40
Produktpräsentation
Pairing button
Manual switch
Die blauen LEDs zeigen den Betriebszustand der Steckdosen und die
grüne LED den Status der WLAN-Verbindung an.

Benutzerhandbuch - 14
Tuya Smart app
Warnung: Aufgrund von Aktualisierungen der Tuya Smart-Anwendung
kann es zu Abweichungen von den Abbildungen und Informationen in
diesem Handbuch kommen.
1. Laden Sie die Tuya Smart-App von Google Play oder dem App
Store herunter oder scannen Sie den folgenden QR-Code:
Önen Sie die Anwendung, erstellen Sie ein Konto und melden Sie
sich an.
Aktivieren Sie in Ihrem Telefon die Bluetooth-Funktion und Standort.
Fügen Sie die Smart-Steckdose zur mobilen App hinzu
1. Schalten Sie die Steckdose ein. Achten Sie darauf, dass die grüne
LED an der Buchse häufig blinkt, ein Zeichen dafür, dass sich das
Gerät im Konfigurationsmodus befindet.
Hinweis: Wenn die LED nicht oft oder gar nicht blinkt, drücken
Sie lange auf die Taste auf der Oberseite der Buchse. Nach etwa 6
Sekunden beginnt die grüne LED unregelmäßig zu blinken. Nehmen
Sie den Finger nicht von der Taste, sondern halten Sie sie gedrückt, bis
die LED häufig blinkt.
2. Önen Sie die Tuya Smart-Anwendung. Wählen Sie

Benutzerhandbuch - 15
„Electrical“ - „Stec Socket kdose (WLAN)“.
3. Wählen Sie das WLAN-Netzwerk aus, mit dem Sie sich
verbinden möchten, und fügen Sie das Netzwerkkennwort
hinzu.
4. Drücken Sie in den nächsten 3 Schritten auf „Next“. Drücken
Sie „Blink quickly“.
5. Die Anwendung scannt Geräte in der Nähe.
6. Nachdem Ihr Gerät identifiziert wurde, drücken Sie „Done“, um
den Vorgang zum Hinzufügen der Steckdose zur Anwendung
abzuschließen.
7. Jetzt haben Sie die vollständige Kontrolle über die Steckdose
von der Fernbedienung aus. Sie können die Steckdose ein- und
ausschalten, einen Betriebsplan festlegen, die Steckdose mit
anderen Familienmitgliedern teilen und intelligente Szenarien
mit anderen kompatiblen Tuya-Produkten erstellen.

Benutzerhandbuch - 16
Vereinfachte EU-Konformitätserklärung
SC ONLINESHOP SRL erklärt, dass die intelligente Doppelsteckdose
PNI SafeHome PT840S für den Außenbereich der RED-
Richtlinie 2014/53/EU entspricht. Der vollständige Text der EU-
Konformitätserklärung ist unter folgender Internetadresse abruar:
https://www.mypni.eu/products/7239/download/certifications

Benutzerhandbuch - 17
QUALITÄTSZERTIFIKAT UND KOMMERZIELLE GARANTIE
Für Fabrikations- und Materialfehler beträgt die Gewährleistungsfrist
für Privatpersonen 24 Monate ab Lieferdatum.
Die Gewährleistungsfrist für juristische Personen beträgt 12 Monate
ab Lieferdatum für Fabrikations- und Materialfehler.
Die gewerbliche Garantie berührt nicht die Rechte des Verbrauchers,
die durch die geltenden Rechtsvorschriften vorgesehen sind, nämlich
die Notverordnung 140/28.12.2021 zu bestimmten Aspekten im
Zusammenhang mit Verträgen über den Warenkauf, OG 21/1992 zum
Verbraucherschutz mit nachfolgenden Änderungen und Ergänzungen
und Gesetz 296/2004 über das Verbrauchsgesetz mit nachfolgenden
Änderungen und Ergänzungen.
Bitte laden Sie die Vollversion des
Garantiezertifikats herunter:

Manual de usuarioe - 18
Especificaciones técnicas
»Voltaje nominal: 230V CA
»Voltaje de salida: 230V
»Corriente nominal: máx. dieciséis
»Consumo en espera: ≤ 3mA
»Dimensiones: 100 x 125 x 42 mm
»Frecuencia Wi-Fi: 2,4 GHz
»Potencia de emisión WiFi: 100mW
»Clase de protección contra el agua: IP40
Presentacion de producto
Pairing button
Manual switch
Los LED azules indican el estado de funcionamiento de las tomas, y el
LED verde indica el estado de la conexión WiFi.

Manual de usuarioe - 19
Aplicación Tuya Smart
Advertencia: debido a las actualizaciones de la aplicación Tuya Smart,
podrían existir diferencias con las imágenes y la información presentada
en este manual.
1. Descargue la aplicación Tuya Smart de Google Play o App Store o
escanee el código QR a continuación:
Abra la aplicación, cree una cuenta e inicie sesión.
En su teléfono, active la función Bluetooth y Ubicación.
Agregue el enchufe inteligente a la aplicación móvil
1. Encienda el enchufe. Asegúrese de que el LED verde en el zócalo
parpadee con frecuencia, una señal de que el dispositivo está en el
modo de configuración.
Nota: Si el LED no parpadea con frecuencia o no parpadea en absoluto,
mantenga presionado el botón en el lado superior del enchufe. Después
de unos 6 segundos, el LED verde comenzará a parpadear con poca
frecuencia. No quite el dedo del botón, siga presionándolo hasta que el
LED parpadee con frecuencia.
2. Abra la aplicación Tuya Smart. Seleccione “Electrical” - “Socket
(Wi-Fi)”.

Manual de usuarioe - 20
3. Seleccione la red WiFi a la que desea conectarse y agregue la
contraseña de la red.
4. Presione “Next” en los siguientes 3 pasos. Presiona “Blink quickly”.
5. La aplicación escaneará los dispositivos cercanos.
6. Una vez que se haya identificado su dispositivo, presione “Done”
para completar el procedimiento de agregar el enchufe a la
aplicación.
7. Ahora tiene control completo sobre la toma de corriente desde
el control remoto. Puede encender/apagar el enchufe, establecer
un horario de funcionamiento, compartir el enchufe con otros
miembros de la familia y crear escenarios inteligentes con otros
productos Tuya compatibles.
Table of contents
Languages:
Other PNI Accessories manuals

PNI
PNI SAFE HOUSE PG230 User manual

PNI
PNI RM3100 User manual

PNI
PNI PlacePod User manual

PNI
PNI SafeHome PT225G User manual

PNI
PNI Safe House IDB10 User manual

PNI
PNI SmartHome WP800 User manual

PNI
PNI SafeHouse HS003 User manual

PNI
PNI GD-01 User manual

PNI
PNI SafeHouse HS130 User manual

PNI
PNI HU180 User manual

PNI
PNI PlacePod User manual

PNI
PNI SAFE HOUSE PG07 User manual

PNI
PNI SAFE HOUSE PG07 User manual

PNI
PNI HS004 User manual

PNI
PNI SmartHome WP202 User manual

PNI
PNI JS10A User manual

PNI
PNI SafeHouse HS002 User manual

PNI
PNI SmartHome SM440 User manual

PNI
PNI SmartHome WP850 User manual

PNI
PNI RM3000-f User manual